Enable SSO for API-based message extensions
Single sign-on (SSO) authentication method for API based message extension uses an app user's Teams identity to provide them with access to your app. A user who has signed into Teams doesn't need to sign in again to your app within the Teams environment. Microsoft Entra SSO enables the app to silently obtain a user token that is issued for its resource by Microsoft Entra. The app can then authenticate this token and retrieve the user profile information without the user's consent.
Prerequisites
Before you start, ensure you have the following:
- An Azure account with an active subscription.
- Basic familiarity with Microsoft Entra ID and Teams app development.
The following image shows how SSO works when a Teams app user attempts to access API-based message extension app:
- The user invokes the API-based message extension app within Teams and invokes a command that requires authentication.
- The app sends a request to the Teams backend service with the app ID and the required scope (
access_as_user). - The Teams backend service checks if the user consented to the app and the scope. If not, it shows a consent screen to the user.
- If the user consents, Microsoft Entra generates an access token for the user and the app, and sends it to the app in the authorization header of the request.
- The app validates the token and extracts the user information from the token, such as the name, email, and object ID.
- After successful authentication, user is granted access to the API-based message extension.
To enable SSO authentication for API-based message extension, follow these steps:
- Register a new app in Microsoft Entra ID.
- Configure scope for access token.
- Authenticate token.
- Update app manifest.
Register a new app in Microsoft Entra ID
Open the Azure portal on your web browser.
Select the App registrations icon.
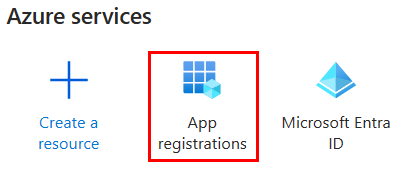
The App registrations page appears.
Select + New registration icon.
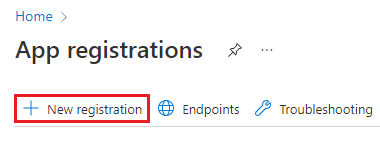
The Register an application page appears.
Enter the name of your app that you want to be displayed to the app user. You can change the name at a later stage if you want to.
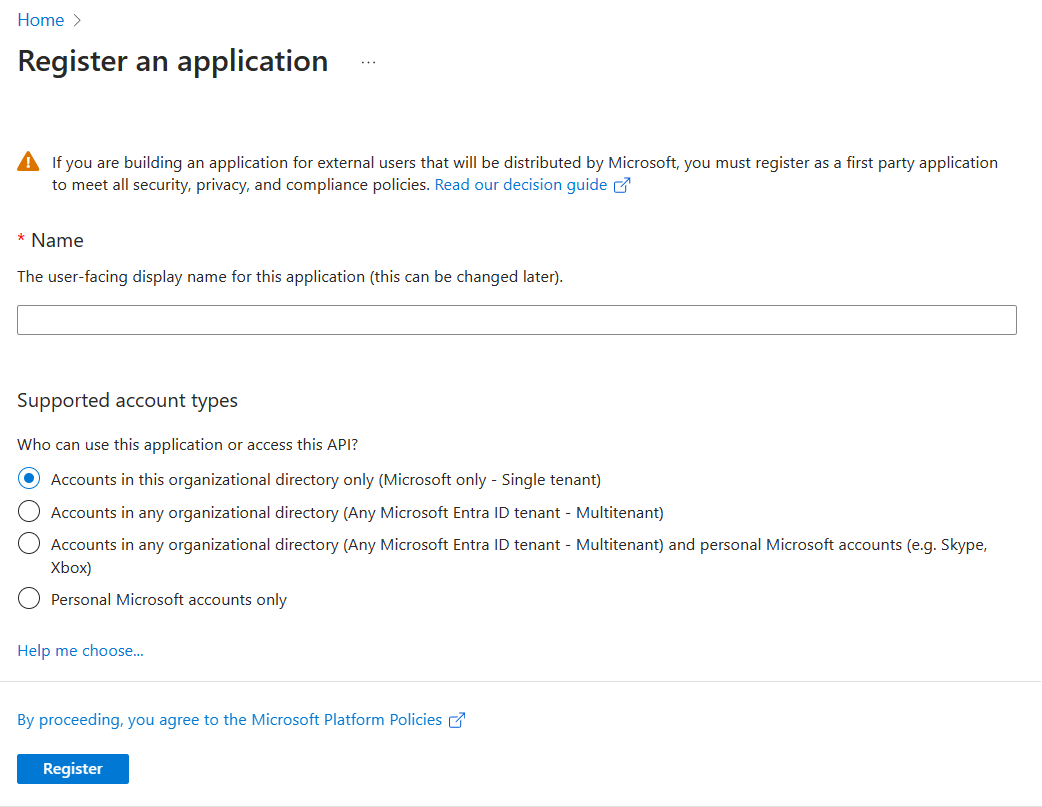
Select the type of user account that can access your app. You can select from single or multitenant options in organizational directories or restrict the access to personal Microsoft accounts only.
Options for supported account types
Option Select this to... Accounts in this organizational directory only (Microsoft only - Single tenant) Build an application for use only by users (or guests) in your tenant.
Often called custom app built for your org (LOB app), this app is a single-tenant application in the Microsoft identity platform.Accounts in any organizational directory (Any Microsoft Entra ID tenant - Multitenant) Let users in any Microsoft Entra tenant use your application. This option is appropriate if, for example, you're building a SaaS application, and you intend to make it available to multiple organizations.
This type of app is known as a multitenant application in the Microsoft identity platform.Accounts in any organizational directory (Any Microsoft Entra ID tenant - Multitenant) and personal Microsoft accounts (for example, Skype, Xbox) Target the widest set of customers.
By selecting this option, you're registering a multitenant application that can support app users who have personal Microsoft accounts also.Personal Microsoft accounts only Build an application only for users who have personal Microsoft accounts. Note
You don't need to enter Redirect URI for enabling SSO for an API-based message extension app.
Select Register. A message pops up on the browser stating that the app was created.

The page with app ID and other app details is displayed.
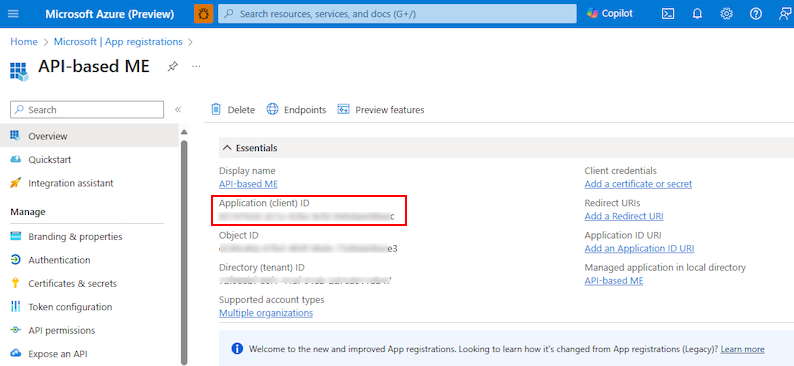
Note and save the app ID from Application (client) ID to update the app manifest later.
Your app is registered in Microsoft Entra ID. You now have the app ID for your API-based message extension app.
Configure scope for access token
After you've created a new app registration, configure scope (permission) options for sending access token to Teams client, and authorizing trusted client applications to enable SSO.
To configure scope and authorize trusted client applications, you must:
- Add App ID URI: Configure scope (permission) options for your app. Expose a web API and configure the app ID URI.
- Configure API scope: Define scope for the API, and the users who can consent for a scope. You can let only admins provide consent for higher-privileged permissions.
- Configure authorized client application: Create authorized client IDs for applications that you want to preauthorize. It allows the app user to access the app scopes (permissions) you've configured, without requiring any further consent. Preauthorize only those client applications you trust as your app users don't have the opportunity to decline consent.
App ID URI
Select Manage > Expose an API from the left pane.
The Expose an API page appears.
Select Add to generate app ID URI in the form of
api://{AppID}.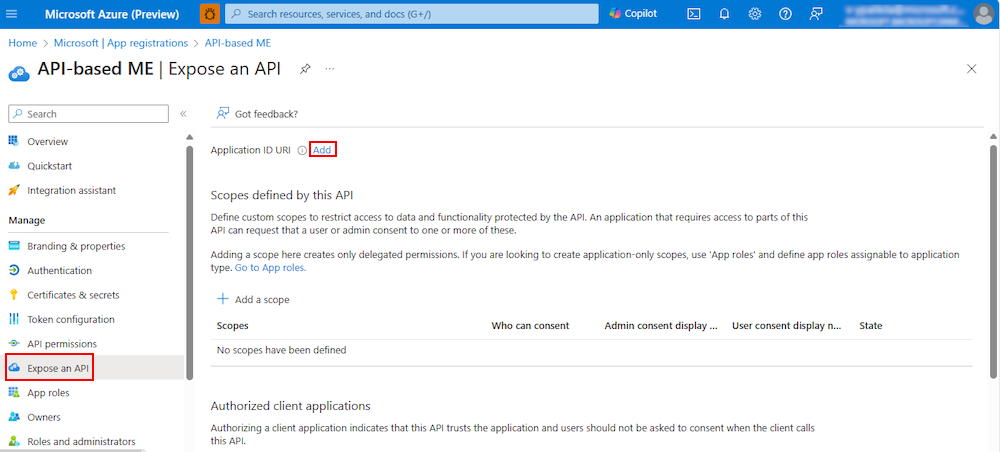
The section for setting app ID URI appears.
Enter the Application ID URI in the format explained here.
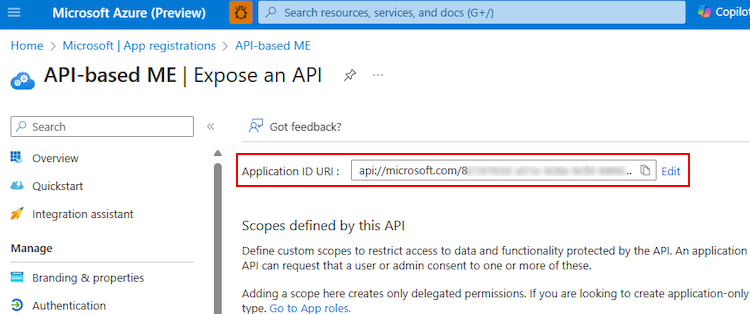
- The Application ID URI is prefilled with app ID (GUID) in the format
api://{AppID}. - The app ID URI format must be:
api://fully-qualified-domain-name.com/{AppID}. - Insert the
fully-qualified-domain-name.combetweenapi://and{AppID}(which is, GUID). For example, api://example.com/{AppID}.
Important
- If you're building a standalone bot, enter the app ID URI as api://botid-{YourBotId}. Here, {YourBotId} is your Microsoft Entra app ID.
- If you're building an app with a bot, a message extension, and a tab, enter the app ID URI as api://fully-qualified-domain-name.com/botid-{YourClientId}, where {YourClientId} is your bot app ID.
- If you're building an app with a message extension or tab capabilities without the bot, enter the app ID URI as api://fully-qualified-domain-name.com/{YourClientId}, where {YourClientId} is your Microsoft Entra app ID.
- Application ID URI for app with multiple capabilities: If you're building an API-based message extension, enter the app ID URI as
api://fully-qualified-domain-name.com/{YourClientId}, where {YourClientId} is your Microsoft Entra app ID. - Format for domain name: Use only lower-case letters for domain name.
- The Application ID URI is prefilled with app ID (GUID) in the format
Select Save.
A message pops up on the browser stating that the app ID URI was updated.

The app ID URI displays on the page.
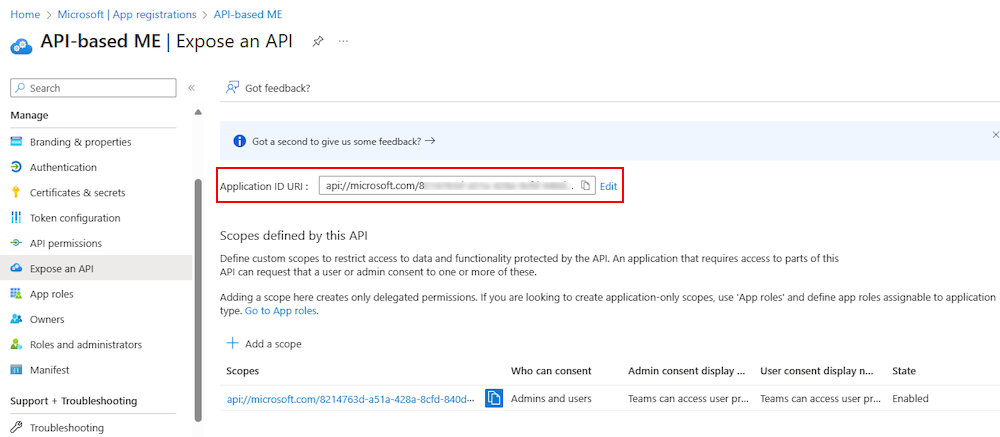
Note and save the app ID URI to update the app manifest later.
Configure API scope
Note
- API-based message extension supports only the access_as_user scope.
- The API receives a Microsoft Entra access token with the scope set to
access_as_useras registered in the Azure portal. However, the token isn't authorized to call any other downstream APIs, such as Microsoft Graph.
Select + Add a scope in the Scopes defined by this API section.
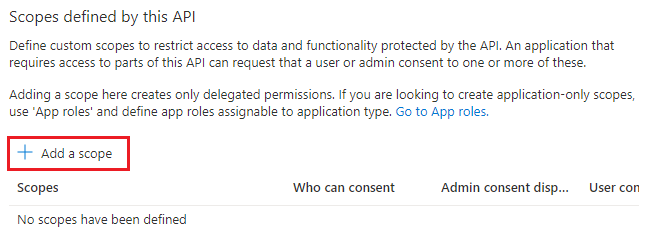
The Add a scope page appears.
Enter the details for configuring scope.
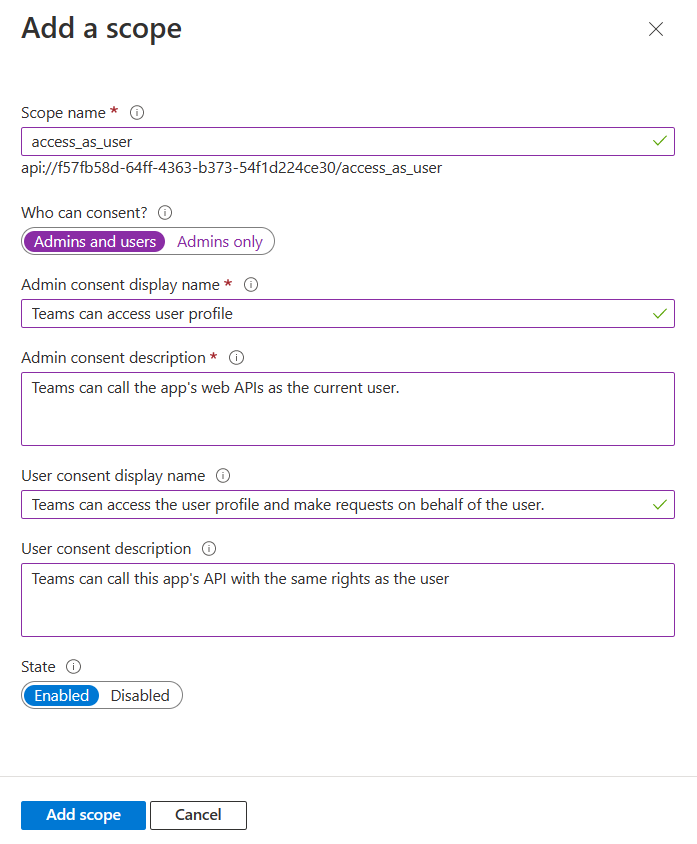
- Enter the scope name. This field is mandatory.
- Select the user who can give consent for this scope. The default option is Admins only.
- Enter the Admin consent display name. This field is mandatory.
- Enter the description for admin consent. This field is mandatory.
- Enter the User consent display name.
- Enter the description for user consent description.
- Select the Enabled option for state.
- Select Add scope.
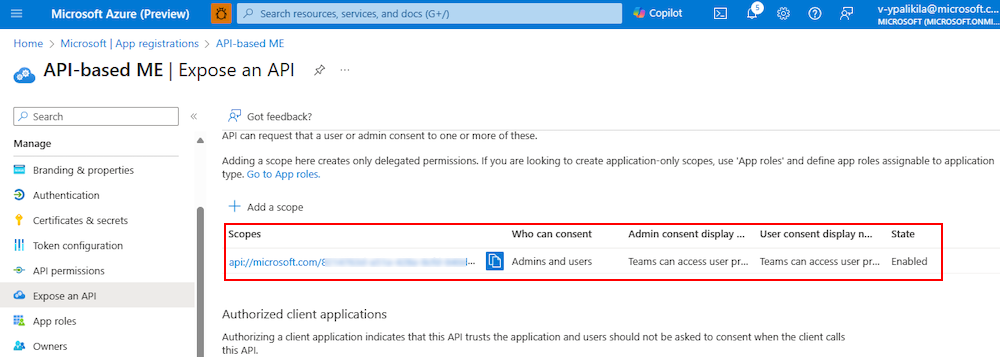
A message pops up on the browser stating that the scope was added.

The new scope you defined displays on the page.
Configure authorized client application
Move through the Expose an API page to the Authorized client application section and select + Add a client application.

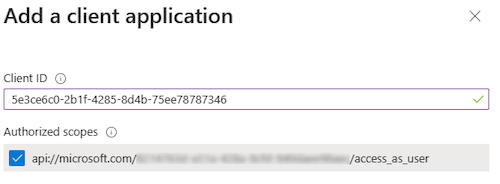
The Add a client application page appears.
Enter the appropriate Microsoft 365 client ID for the applications that you want to authorize for your app’s web application.
Note
The Microsoft 365 client IDs for mobile, desktop, and web apps for Teams are the actual IDs that you must add.
Select one of the following client IDs:
Use client ID For authorizing... 1fec8e78-bce4-4aaf-ab1b-5451cc387264 Teams mobile or desktop app 5e3ce6c0-2b1f-4285-8d4b-75ee78787346 Teams web app Select the app ID URI you created for your app in Authorized scopes to add the scope to the web API you exposed.
Select Add application.
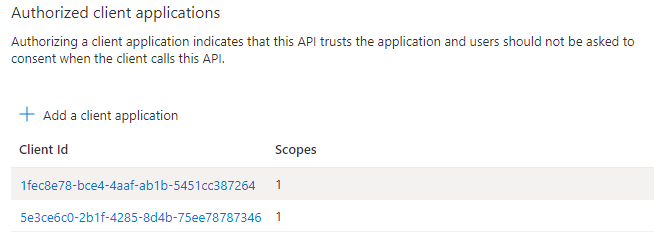
A message pops up on the browser stating that the authorized client app was added.

The authorized app's client ID displays on the page.
Note
You can authorize more than one client application. Repeat the steps of this procedure for configuring another authorized client application.
You've successfully configured app scope, permissions, and client applications. Ensure that you note and save the app ID URI. Next, you configure the access token version.
Authenticate token
When the message extension calls the API during authentication, it receives a request with the user’s access token. The message extension then adds the token in the authorization header of the outgoing HTTP request. The header format is Authorization: Bearer <token_value>. For example, when a message extension makes an API call to a service that requires authentication. The extension constructs an HTTP request as follows:
GET /api/resource HTTP/1.1
Host: api.example.com
Authorization: Bearer eyJhbGciOiJIUzI1NiIsInR5cCI6IkpXVCJ9.eyJzdWIiOiIxMjM0NTY3ODkwIiwibmFtZSI6IkpvaG4gRG9lIiwiaWF0IjoxNTE2MjM5MDIyfQ.SflKxwRJSMeKKF2QT4fwpMeJf36POk6yJV_adQssw5c
After the API-based message extension gets a request header with token, perform the following steps:
Authenticate: Verify the token for the audience, scope, issuer, and signature claims to check if the token is for your app. For more claims, see ID token claims.
The following example shows the JSON Web Token (JWT) with a header and response:
{ "typ": "JWT", "rh": "0.AhoAv4j5cvGGr0GRqy180BHbR6Rnn7s7iddIqxdA7UZsDxYaABY.", "alg": "RS256", "kid": "q-23falevZhhD3hm9CQbkP5MQyU" }.{ "aud": "00000002-0000-0000-c000-000000000000", "iss": "https://login.microsoftonline.com/72f988bf-86f1-41af-91ab-2d7cd011db47/v2.0", "iat": 1712509315, "nbf": 1712509315, "exp": 1712513961, "aio": "Y2NgYEjJqF0stqv73u41a6ZmxPEvBgA=", "azp": "1fec8e78-bce4-4aaf-ab1b-5451cc387264", "azpacr": "0", "name": "John Doe", "oid": "00000000-0000-0000-0000-000000000000", "preferred_username": "john.doe@contoso.com", "rh": "I", "scp": "access_as_user", "sub": "e4uM7JgAEm08GBuasSltQjvPuMX1fR5TqxopJpqZJB8", "tid": "12345678-aaaa-bbbb-cccc-9876543210ab", "uti": "h7DMQwSPAEeiEe62JJUGAA", "ver": "2.0" }Use the token: Extract the user information from the token, such as name, email, and object ID and use the token to call the message extension app's own API. For more information on claims reference with details on the claims included in access tokens, see access token claims.
Update app manifest
Update the following properties in the app manifest file:
webApplicationInfo: ThewebApplicationInfoproperty is used to enable SSO for your app to help app users access your API-based message extension app seamlessly. The app ID URI that you registered in Microsoft Entra ID is configured with the scope of the API you exposed. For more information, see webApplicationInfo.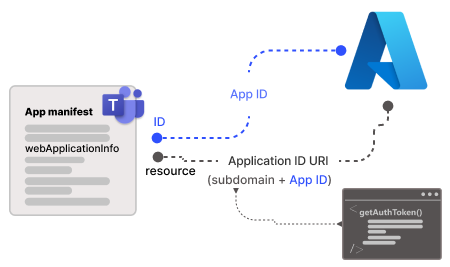
microsoftEntraConfiguration: Enables SSO authentication for your app. Configure thesupportsSingleSignOnproperty totrueto support SSO and reduce the need for multiple authentications. If the property is set tofalseor is left empty, the user can't upload the app to Teams and the app fails validation.
To configure app manifest:
Open the API-based message extension app.
Open the app manifest folder.
Note
- The app manifest folder should be at the root of your app folder. For more information, see create a Microsoft Teams app package.
- For more information on learning how to create a manifest.json, see the app manifest schema.
Open the
manifest.jsonfile.Add the following code snippet into the
webApplicationInfosection of your app manifest file:"webApplicationInfo": { "id": "{Microsoft Entra AppId}", "resource": "api://subdomain.example.com/{Microsoft Entra AppId}" }where,
{Microsoft Entra AppId}is the app ID you created when you registered your app in Microsoft Entra ID. It's the GUID.api://subdomain.example.com/{Microsoft Entra AppId}is the app ID URI that you registered when creating scope in Microsoft Entra ID.
Add the following code snippet into the
composeExtensionssection of your app manifest file:"authorization": { "authType": "microsoftEntra", “microsoftEntraConfiguration”: { “supportsSingleSignOn”: true } },Save the app manifest file.
Congratulations! You've enabled SSO for your API-based message extensions.
See also
Platform Docs
