Step 4: Lay Out Your Form with a TableLayoutPanel Control
Note
This article applies to Visual Studio 2015. If you're looking for the latest Visual Studio documentation, see Visual Studio documentation. We recommend upgrading to the latest version of Visual Studio. Download it here
In this step, you add a TableLayoutPanel control to your form. The TableLayoutPanel helps properly align controls in the form that you will add later.
 For a video version of this topic, see Tutorial 1: Create a Picture Viewer in Visual Basic - Video 2 or Tutorial 1: Create a Picture Viewer in C# - Video 2. These videos use an earlier version of Visual Studio, so there are slight differences in some menu commands and other user interface elements. However, the concepts and procedures work similarly in the current version of Visual Studio.
To lay out your form with a TableLayoutPanel control
On the left side of the Visual Studio IDE, locate the Toolbox tab. Choose the Toolbox tab, and the Toolbox appears. (Or, on the menu bar, choose View, Toolbox.)
Choose the small triangle symbol next to the Containers group to open it, as shown in the following picture.
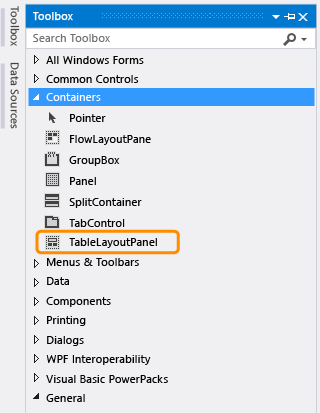 Containers group
You can add controls like buttons, check boxes, and labels to your form. Double-click the
TableLayoutPanelcontrol in the Toolbox. (Or, you can drag the control from the toolbox onto the form.) When you do this, the IDE adds aTableLayoutPanelcontrol to your form, as shown in the following picture.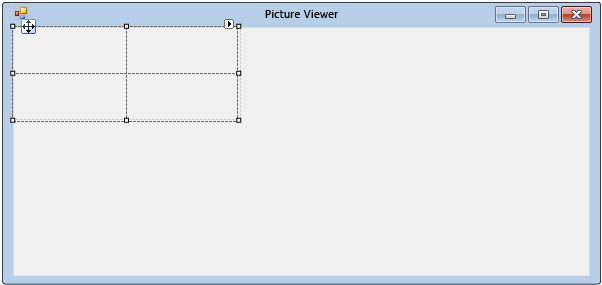 TableLayoutPanel control
Note
After you add your TableLayoutPanel, if a window appears inside your form with the title TableLayoutPanel Tasks, choose anywhere inside the form to close it. You will learn more about this window later in the tutorial.
Notice how the Toolbox expands to cover your form when you choose its tab, and closes after you choose anywhere outside of it. That's the IDE auto-hide feature. You can turn it on or off for any of the windows by choosing the pushpin icon in the upper-right corner of the window to toggle auto-hide and lock it in place. The pushpin icon appears as follows.
 Pushpin icon
Be sure TableLayoutPanel is selected by choosing it. You can verify what control is selected by looking at the drop-down list at the top of the Properties window, as shown in the following picture.
 Properties window showing TableLayoutPanel control
Choose the Alphabetical button on the toolbar in the Properties window. This causes the list of properties in the Properties window to display in alphabetical order, which will make it easier to locate properties in this tutorial.
The control selector is a drop-down list at the top of the Properties window. In this example, it shows that a control called
tableLayoutPanel1is selected. You can select controls either by choosing an area in Windows Forms Designer or by choosing from the control selector. Now thatTableLayoutPanelis selected, find the Dock property and choose Dock, which should be set to None. Notice that a drop-down arrow appears next to the value. Choose the arrow, and then select the Fill button (the large button in the middle), as shown in the following picture.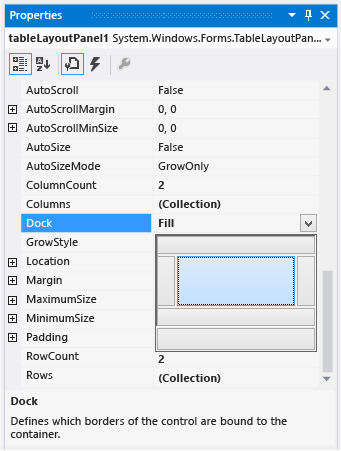 Properties window with Fill selected
Docking in Visual Studio refers to when a window is attached to another window or area in the IDE. For example, the Properties window can be undocked – that is, unattached and free-floating within Visual Studio – or it can be docked against Solution Explorer.
After you set the TableLayoutPanel Dock property to Fill, the panel fills the entire form. If you resize the form again, the TableLayoutPanel stays docked, and resizes itself to fit.
Note
A TableLayoutPanel works like a table in Microsoft Office Word: It has rows and columns, and an individual cell can span multiple rows and columns. Each cell can hold one control (like a button, a check box, or a label). Your TableLayoutPanel will have a
PictureBoxcontrol spanning its entire top row, aCheckBoxcontrol in its lower-left cell, and fourButtoncontrols in its lower-right cell.Currently, the TableLayoutPanel has two equal-size rows and two equal-size columns. You need to resize them so the top row and right column are both much bigger. In Windows Forms Designer, select the TableLayoutPanel. In the upper-right corner, there is a small black triangle button, which appears as follows.
 Triangle button
This button indicates that the control has tasks that help you set its properties automatically.
Choose the triangle to display the control's task list, as shown in the following picture.
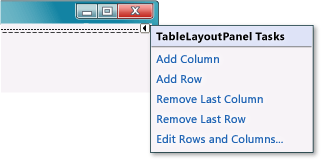 TableLayoutPanel tasks
Choose the Edit Rows and Columns task to display the Column and Row Styles window. Choose Column1, and set its size to 15 percent by being sure the Percent button is selected and entering
15in the Percent box. (That's aNumericUpDowncontrol, which you will use in a later tutorial.) Choose Column2 and set it to 85 percent. Don't choose the OK button yet, because the window will close. (But if you do, you can reopen it using the task list.)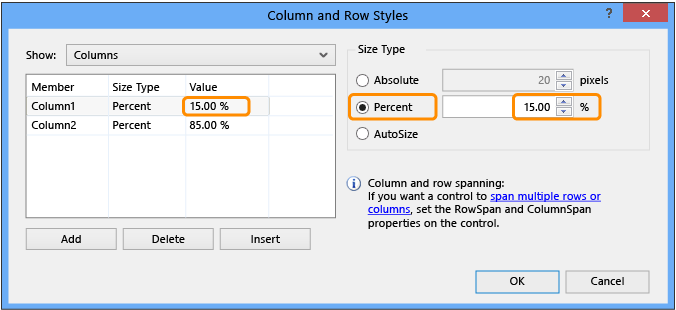 TableLayoutPanel column and row styles
From the Show drop-down list at the top of the window, choose Rows. Set Row1 to 90 percent and Row2 to 10 percent.
Choose the OK button. Your TableLayoutPanel should now have a large top row, a small bottom row, a small left column, and a large right column. You can resize the rows and columns in the TableLayoutPanel by choosing tableLayoutPanel1 in the form and then dragging its row and column borders.
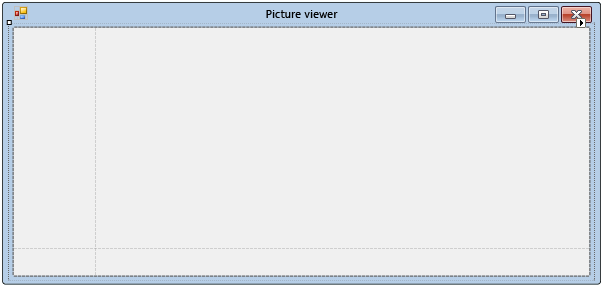 Form1 with resized TableLayoutPanel
To continue or review
To go to the next tutorial step, see Step 5: Add Controls to Your Form.
To return to the previous tutorial step, see Step 3: Set Your Form Properties.