Develop JavaScript and TypeScript code in Visual Studio without solutions or projects
Applies to: ![]() Visual Studio
Visual Studio ![]() Visual Studio for Mac
Visual Studio for Mac
Note
This article applies to Visual Studio 2017. If you're looking for the latest Visual Studio documentation, see Visual Studio documentation. We recommend upgrading to the latest version of Visual Studio. Download it here
Starting in Visual Studio 2017, you can develop code without projects or solutions, which enables you to open a folder of code and immediately start working with rich editor support such as IntelliSense, search, refactoring, debugging, and more. In addition to these features, the Node.js Tools for Visual Studio adds support for building TypeScript files, managing npm packages, and running npm scripts.
To get started, select File > Open > Folder from the toolbar. Solution Explorer displays all the files in the folder, and you can open any of the files to begin editing. In the background, Visual Studio indexes the files to enable npm, build, and debug features.
Important
Many of the features described in this article, including npm integration, require Visual Studio 2017 version 15.8 or later versions. The Visual Studio Node.js development workload must be installed.
npm integration
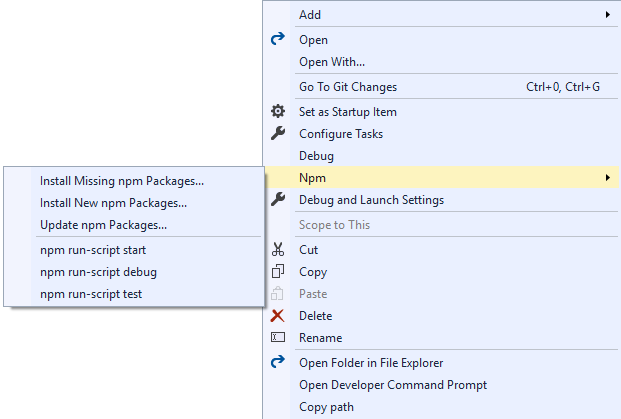
If the folder you open contains a package.json file, you can right-click package.json to show a context menu (shortcut menu) specific to npm.

In the shortcut menu, you can manage the packages installed by npm in the same way that you manage npm packages when using a project file.
In addition, the menu also allows you to run scripts defined in the scripts element in package.json. These scripts will use the version of Node.js available on the PATH environment variable. The scripts run in a new window. This is a great way to execute build or run scripts.
Build and debug
package.json
If the package.json in the folder specifies a main element, the Debug command will be available in the right-click shortcut menu for package.json.
Clicking this will start node.exe with the specified script as its argument.
JavaScript files
You can debug JavaScript files by right-clicking a file and selecting Debug from the shortcut menu. This starts node.exe with that JavaScript file as its argument.
TypeScript files and tsconfig.json
If there is no tsconfig.json present in the folder, you can right-click a TypeScript file to see shortcut menu commands to build and debug that file. When you use these commands, you build or debug using tsc.exe with default options. (You need to build the file before you can debug.)
Note
When building TypeScript code, we use the newest version installed in C:\Program Files (x86)\Microsoft SDKs\TypeScript.
If there is a tsconfig.json file present in the folder, you can right-click a TypeScript file to see a menu command to debug that TypeScript file. The option appears only if there is no outFile specified in tsconfig.json. If an outFile is specified, you can debug that file by right-clicking tsconfig.json and selecting the correct option. The tsconfig.json file also gives you a build option to allow you to specify compiler options.
Note
You can find more information about tsconfig.json in the tsconfig.json TypeScript Handbook page.
Unit Tests
You can enable the unit test integration in Visual Studio by specifying a test root in your package.json:
{
    // ...
    "vsTest":{
        "testRoot": "./tests"
    }
    // ...
}
The test runner enumerates the locally installed packages to determine which test framework to use. If none of the supported frameworks are recognized, the test runner defaults to ExportRunner. The other supported frameworks are:
- Mocha (mochajs.org)
- Jasmine (Jasmine.github.io)
- Tape (github.com/substack/tape)
- Jest (jestjs.io)
After opening Test Explorer (choose Test > Windows > Test Explorer), Visual Studio discovers and displays tests.
Note
The test runner will only enumerate the JavaScript files in the test root, if your application is written in TypeScript you need to build those first.