Getting DNS Set Up on a Self-Contained MOSS Server
Since I don’t do it very often, I can never remember everything I need to do to get DNS set up correctly when I create a new MOSS VM for testing or development. It’s easier to set the entire thing up to run on a single server to keep it insulated from everything else I might be working on, and it doesn’t suck up as many resources on my VM host as a multi-server farm might (i.e. DC/DNS, Web Server, SQL Server.)
So here are some notes for next time:
Install at least two NICs (physical or virtual adapters) on the box. One can be for external access (i.e. so you can get to the Internet), and the other for local routing (on-box, in this case) only.
Set the External NIC up so that it retrieves an IP address from your network DHCP server. For a home network, this would probably be the gateway router that acts as a DHCP server. Generally, you can just select, “Obtain an IP address automatically” and “Obtain DNS server address automatically”, as shown below.
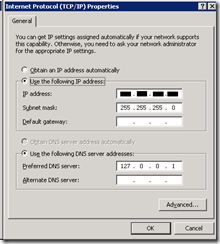
Set the Internal NIC up with a static IP address. Then specify the DNS server address as either 127.0.0.1 (the loopback address) or as the static IP address you’re giving to this NIC.
DNS – must be installed on the server (as well as Active Directory).
- Forward Lookup Zone: this server will provide name resolution for computers listed in this zone.
- Zone can be authoritative: means that this server is the primary place to get name resolution for the machines listed.
For this (assuming the zone doesn’t exist already), create a new zone with the name of the domain for which this box will be authoritative. E.g. “mydomain.com”. - Or, the zone can be non-authoritative: by creating a “stub zone”, this server will get its lists of servers from another DNS resource.
- Name-to-IP or IP-to-Name: both types of resolution can be handled with a single entry.
First, right-click your new zone listing under “Forward Lookup Zones” and select “New Host (A)”.
This displays the “New Host” dialogue window.
The Host Name—the name of your site (e.g. “moss” for “https://moss/” or “https://moss.mydomain.com”) goes in the first box. You don’t need to add the “.mydomain.com” part; that will get added automatically and entering it here will cause it to double-up (e.g. “https://moss.mydomain.com.mydomain.com”.)
The IP address goes in the second box. This can be 127.0.0.1, but it’s better if you have an address that isn’t the loopback address, as that can cause other issues. Use the address you assigned to the Internal NIC.
Checking the first checkbox (“Create associated pointer record”) causes a record to be created that allows reverse-lookup as well. So, typing “https://192.168.x.x”—or whatever the actual IP address of the box is—will cause the site to still be found as “https://moss.mydomain.com”.
- Once you get this far, you should be able to ping the hostname and get a response from the IP address you chose. You should also be able to ping the IP address and get a response.
- Zone can be authoritative: means that this server is the primary place to get name resolution for the machines listed.
- Reverse Lookup Zone: don’t bother with this for now.
- Forward Lookup Zone: this server will provide name resolution for computers listed in this zone.
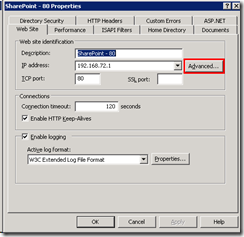
IIS Settings: you may need to create a host-header entry for your web application using the properties window in IIS.
Find the node in the tree for your web application, right-click on it, and select “Properties”.
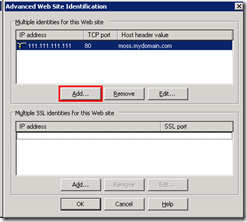
In the Properties dialogue window, select the “Advanced…” button on the “Web Site” tab.
Click the “Add” button…
And add an entry by specifying:
The IP address (or leaving as “All Unassigned”);
The port (“80” is the default for HTTP traffic; “443” is the default for SSL traffic);
And the Host Header value. For the Host Header, enter the name you want to use when going to the website. In the existing entry above, I’ll be able to type “https://moss.mydomain.com” to get to my SharePoint site.
Multiple Host Header values can be added for a single web application. In addition, each Host Header can be bound to its own static IP address. In order to do this, however, you’ll need to add additional IP addresses to one of the box’s NICs. That can be done using the following dialogue window:
This can be opened by clicking the “Advanced” button on the Internet Protocol (TCP/IP) Properties dialogue window.
- Right-click on the Internal NIC';
- Select “Internet Protocol (TCP/IP)”;
- Click the “Properties” button to view Internet Protocol (TCP/IP) Properties;
- Click the “Advanced” button.
- Select the “DNS” tab.
hosts file: If all else fails, or you’re still having some odd routing issues, or for some reason one of the host names you’re trying to use won’t resolve to the right IP address, you can try adding a host-name-to-IP-address matching directly in the host file (c:\windows\system32\drivers\etc\hosts; the file has no extension.) It’s a simple text file; open it in a text editor like Notepad.exe and add a line like this:
111.111.111.1 myhostname.com
(Note: that’s a tab between the IP address and the host name.)
Ok, hope that helps next time you’re trying to get a new machine set up—physical, virtual, or otherwise.


