How to Run a LightSwitch App in Azure without HTTPS (V3 Apps Only)
IMPORTANT: We recommend that you use HTTPS for applications deployed in production and that the approach outlined below only be used for testing purposes. I will work on getting something posted about SSL Certificates and LightSwitch apps, as I am not finding anything straight-forward with a quick search.
Currently when you go down the “Azure >> Cloud Service” path in the LightSwitch Publish Wizard, you will run into this tab on the “Security Settings” page:
Unlike the IIS or Azure Web Site paths, you don’t get to choose whether or not you want to use HTTPS, it’s required and you have to pick a certificate (I won’t go into why, as this was implemented before I started on the team so I wasn’t there for the discussions). One significant problem that this requirement leads to is that attempting to launch an out-of-browser app that is configured to use HTTPS will fail if you are using a self-signed certificate:
“An error occurred while checking for updates. Make sure you are running the latest version of the application by uninstalling it from Add/Remove Programs in the Control Panel, and then re-installing the application.
Details:
Catastrophic failure (Exception from HRESULT: 0x8000FFFF (E_UNEXPECTED)”
In VS Update 2 CTP 4, we have introduced a runtime setting that will allow you to run without HTTPS. No changes were made to the Publish Wizard at this time so it will still require that you specify a certificate, but if you follow the steps below HTTPS will not be used. Note that the changes are for “V3” projects only, so you will need to right-click on the LightSwitch project in Solution Explorer and choose “Upgrade Project” in order for this setting to work.
You will need to edit 3 files to make this happen. Start by switching to “File View” in Solution Explorer.
First open the web.config file located in the Server sub-project and update this setting:
<add key="Microsoft.LightSwitch.RequireEncryption" value="false" />
Next, open the ServiceDefinition.csdef file located under the root LightSwitch project and add this setting to the ConfigurationSettings node:
 <ConfigurationSettings>
    <Setting name="Microsoft.LightSwitch.Trace.Enabled" />
    <Setting name="Microsoft.LightSwitch.Trace.LocalOnly" />
    <Setting name="Microsoft.LightSwitch.Trace.Level" />
    <Setting name="Microsoft.LightSwitch.Trace.Sensitive" />
    <Setting name="Microsoft.LightSwitch.Trace.Categories" />
<Setting name
 ="Microsoft.LightSwitch.RequireEncryption" />
</ConfigurationSettings>
Finally, open the ServiceConfiguration.cscfg file located under the root LightSwitch project and add this setting to the ConfigurationSettings node:
 <ConfigurationSettings>
    <Setting name="Microsoft.LightSwitch.Trace.Enabled" value="false" />
    <Setting name="Microsoft.LightSwitch.Trace.LocalOnly" value="true" />
    <Setting name="Microsoft.LightSwitch.Trace.Level" value="Information" />
    <Setting name="Microsoft.LightSwitch.Trace.Sensitive" value="false" />
    <Setting name="Microsoft.LightSwitch.Trace.Categories" value="Microsoft.LightSwitch" />
<Setting name="Microsoft.LightSwitch.RequireEncryption" value="false" />
</ConfigurationSettings>
Save all these files, then re-publish. To reiterate, you still need to specify a certificate although it won’t actually be used. Create a new self-signed certificate through the publish wizard if you haven’t done this already.
Once the app is done publishing, browse to the site and you will notice that you’re hitting an HTTP URL instead of HTTPS. You should now be able to install your out-of-browser app successfully.
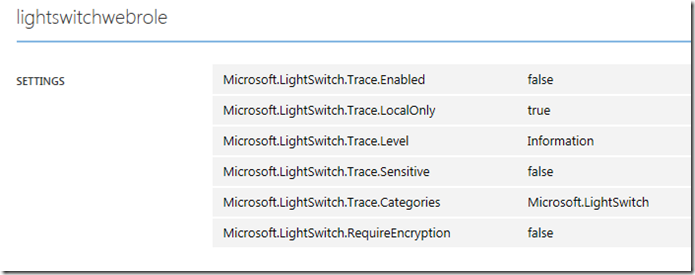
If you navigate to your Cloud Service in the Azure Management Portal and click on the “Configure” tab, you will see this new setting (and all the ones that were previously defined in the csdef/cscfg files) are here and available to update via the portal:
In the future we hope to get around to adding support in the Publish Wizard to let you choose whether or not to use HTTPS in the Cloud Service path, but for now, this should get you around the out-of-browser issue.
Comments
Anonymous
November 09, 2013
Hi Dave, thanks for this write-up. I held back from upgrading to LS 2012 partially due to this requirement for Azure requiring HTTPS. I am a small time developer and very cost conscious. Now that I am looking to change to LS 2013, is it still possible to use LS without HTTPS?Anonymous
November 11, 2013
Yes, in VS 2013, there is an option directly in the Publish Wizard where you can choose whether or not you want to use HTTPS (just like in the IIS and Azure Web Site Path). I will get a blog posted soon with some new publish wizard functionality soon

