Office 2010 – Deploying custom fonts across all applications
In an enterprise environment, you may want to customize your fonts across all Office applications. Here is a list of all Office 2010 applications and the possibility to set the custom font.
For WORD, the custom font is customized via the Normal.dotm template, located at %APPDATA%\Microsoft\Templates. Navigate to this location, right click on the template and choose Open. On the Home tab, in the Font group select the font of your choice (we will take Arial 12 as example for this article) and save the file.

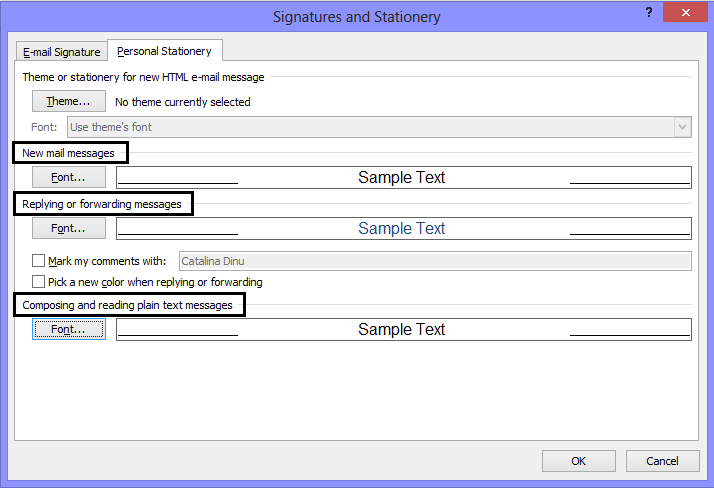
For OUTLOOK, the font is customizable in File menu - Outlook Options – Mail – Stationery and Fonts… For each of the options you want to customize select Arial 12 as custom font: New mail messages, Replying or forwarding messages, Composing and reading plain text messages.
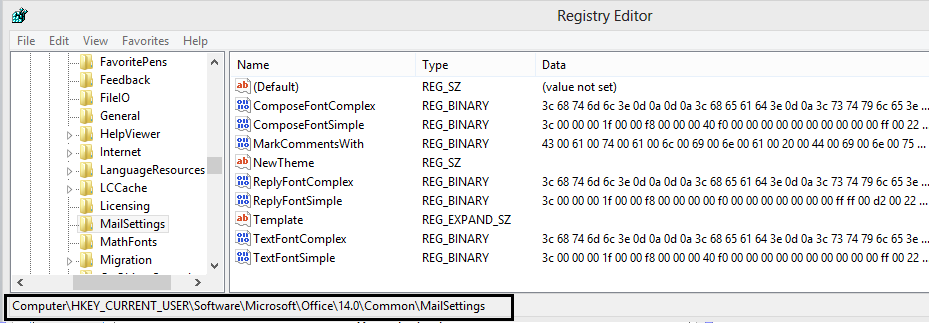
This will write the settings in the following registry key:
HKEY_CURRENT_USER\Software\Microsoft\Office\14.0\Common\MailSettings
The information written in the registry is in binary format and it’s written for both complex and simple settings.
For EXCEL, the font is customized via a registry key: HKEY_CURRENT_USER\Software\Microsoft\Office\14.0\Excel\Options
Name: Font
Type: REG_SZ
Value: Arial,12

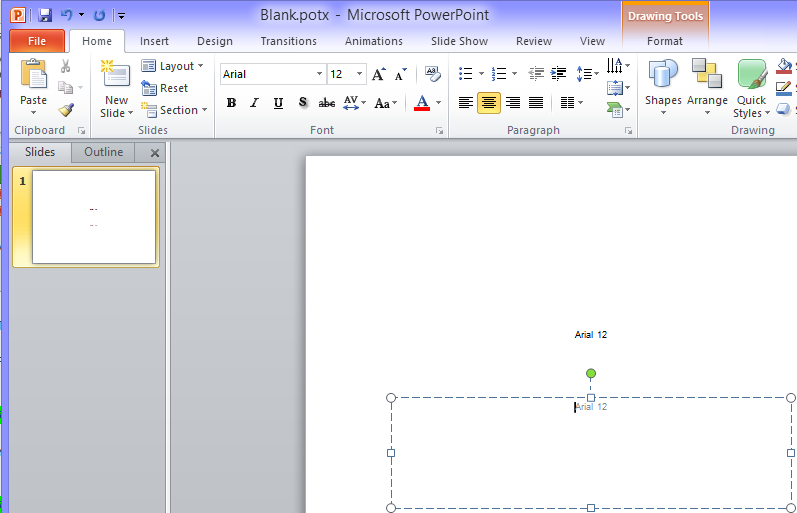
For POWERPOINT the font is customized using a custom template called Blank.potx. To create such a template, start PowerPoint, set the font to Arial 12 on the Home tab, Font group and save the file as Blank.potx in the %APPDATA%\Microsoft\Templates folder. You will need to customize the font for every text box on the slide:
In ACCESS 2010 the setting for the default font size is overridden by the setting in the theme. The behavior is different than the one in Access 2007 where the default font size cannot be set by the registry keys: [HKEY_CURRENT_USER\Software\Microsoft\Office\14.0\Access\Settings]"DefaultFontName"="Arial""Default Font Size"=dword:0000000a
The solution would be to create a custom theme with the desired font and setting it as the default theme. In Access 2010 create a custom theme with the font settings you would like to have by default.
- add the .thmx file in the .msp and point to a destination such as [ProgramFilesFolder]\Themes\CustomTheme.thmx
- add the registry key
[HKEY_CURRENT_USER\Software\Microsoft\Office\14.0\Access\Settings]REG_SZ
"New Database Theme". The value should be the path to the .thmx file on the user's computer (e.g.: C:\Program Files\Themes\CustomTheme.thmx).
For 64 bit machines this would not be the same, but C:\Program Files (x86)\Themes\CustomTheme.thmx
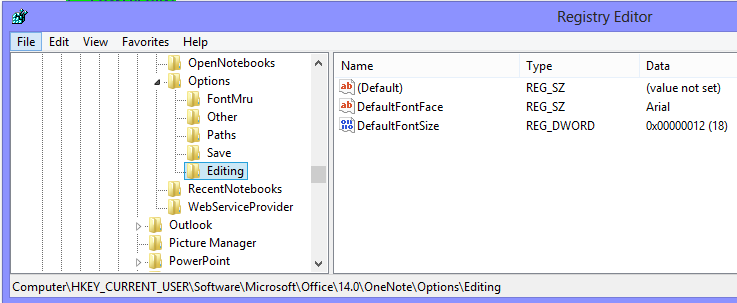
For ONENOTE, the font is customizable via a registry key:
HKEY_CURRENT_USER\Software\Microsoft\Office\14.0\OneNote\Options\Editing
Name: DefaultFontFace
Type: REG_SZ
Value: Arial
Name: DefaultFontSize
Type: DWORD
Value: 12
In VISIO, the font is also customizable via the Visio Options:
1. Start Visio (open blank drawing)
2. Change the font to Arial, 12 in the Home tab, Font group
3. Click on File menu, click Options. Click the Advanced tab.
4. Scroll down to under General, click to select the “Put all settings in Windows registry” check box, and then click OK.
4. Quit Visio.
You will notice that the information was written in the following registry key:
HKEY_CURRENT_USER\Software\Microsoft\Office\14.0\Visio\Application

NOTE: While Visio 2010 will use this registry key to set the default font, this setting will only apply when no template (blank drawing) is used.
For PROJECT client and INFOPATH, changing the default font is not possible.
Now that we have customized the font for all possible applications, we are ready to include the changes in an MSP file to deploy it across the organization.
Here is how to create the customization .msp:
1. Create a customization .msp file using the Office Customization Tool: drag and drop the setup.exe of the Office installation source in the Run box, and pass it the switch /admin:

2. This will open OCT (Office Customization Tool):

3. Select the first option: Create a new Setup customization file for the following product and click OK
4. We are now ready to add all our files into then MSP
Under Additional Content – click Add Files to add here the template for Word (Normal.dotm) and for PowerPoint (Blank.potx)
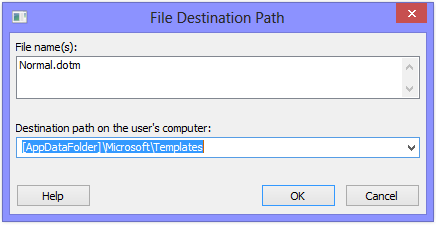

You should now see both templates listed with their corresponding location:

NOTE: in a migration scenario, for Word, to make sure that your template is migrated, make sure to add the following registry key in the OCT:
[HKEY_CURRENT_USER\Software\Microsoft\Office\14.0\Word\Options]"MigrateNormalOnFirstBoot"=dword:00000001
The registry key is described in the following KB article:
https://support.microsoft.com/kb/2408845
Customization to the Normal template is lost in upgrade to Word 2010
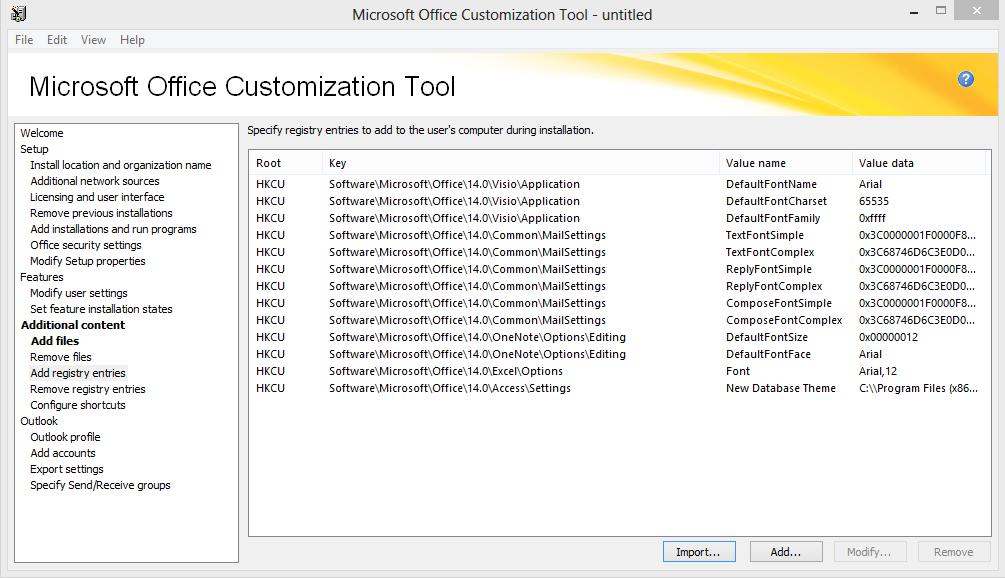
Now, you can add the registry keys. You can choose to Import the registry entries (considering you have created them before and exported in .reg format) or Add (and you will have to create them one by one). Below is an example of imported registry key:
Under Additional content – click on Add registry entries and click on Import and browse to the location of the exported registry keys to import them in the OCT. You should now see them all listed as below:
We have now finished creating the customization file. You can save it from File – Save as – Name.msp
We are now ready to create the start-up script and add it to the GPO that will deploy these settings to the whole organization.
To create the .bat file that will be used in the start-up script, please open Notepad and use the following text:
setlocal
reg query HKEY_CLASSES_ROOT\Installer\Patches\9EA4D5478DD17EE45B1A1E670AC471BC
if %errorlevel%==1 (goto Patches) else (goto End)
REM If 1
returned, the patch is not installed. Install the patch here.
:Patches
"%windir%\system32\msiexec.exe" /p \\server\shared_folder\Name.msp /qn
REM If 0 or other was returned, the patch is already installed. Do nothing.
:End
Endlocal
** Please NOTE that you need to change the \\server\shared_folder to point to the correct path and MSP file in your environment.
Save the Notepad file as Name.bat in the same shared location (\\server\shared_folder)
On the Domain Controller create a new Policy and assign it to the desired Organizational Unit. Edit the policy and go under:
User Configuration – Windows Settings – Scripts (Logon/Logoff)
Double click Logon – click Add
Under Script name please type the location and the name of the .bat file we created earlier (please use UNC path and not a drive letter)

The script that I create above is also sampled in the following blog:
The logic behind the startup script is as follows:
Check to see if the reg key HKEY_CLASSES_ROOT\Installer\Patches\ 9EA4D5478DD17EE45B1A1E670AC471BC
exists. If it does, than the patch is already installed and it goes to End performing no action. If the reg key does not exist than this patch needs to be installed therefore it will run the command to install it.
To know the ID that we need to look for, we right click on the MSP, go to Properties, go to the Details tab. Here we will find a Revision #. This first number is the uncompressed GUID for this patch. In our case it was {9EA4D5478DD17EE45B1A1E670AC471BC}. We need to convert it to determine what the compressed GUID is. The following blog entry discusses converting a GUID to a compressed GUID. https://blogs.technet.com/odsupport/archive/2009/12/17/how-to-convert-an-office-guid-or-office-patch-guid-to-a-compressed-guid.aspx
Related online resources:
Comments
Anonymous
January 01, 2003
Hi Steve, Can you be more specific in what should be wrong with the PowerPoint portion? This has been tested and confirmed as working. Thanks, CatalinaAnonymous
January 30, 2013
Hi. As long as you don't print out these instructions, the portion for PowerPoint is worth the paper it's printed on. Clearly, the author never tested this or ran it past anyone with more than a casual knowledge of PowerPoint. In short: it's totally wrong. The PowerPoint product managers can put you in touch with people who would gladly help correct the misinformation here if you'd like.Anonymous
November 07, 2013
You have a simple typo in your PowerPoint section. Blank.potx should be Blank.pptxAnonymous
November 07, 2013
Sorry, no you were correct. It is .potx (reference link below) office.microsoft.com/.../create-and-save-a-presentation-as-a-template-HA010338384.aspxAnonymous
January 19, 2016
Hi,
My environment already had Office 2010 and 2013 installed. Now, I'm working on the default font (Time New Roman size 13) for everybody in our domain. I created a customize .MSP file using Office Customization Tool from Office 2013 with just "Add file and Remove file" (Normal.dotm which have set with Time New Roman size 13) and "Add Registry" As follow:
Add files
File name Location
Normal.dotm %AppData%MicrosoftTemplates
Remove files
File name Location
Normal.dotm %AppData%MicrosoftTemplatesNormal.dotm
Add registry Entries
Root Key Value name Value data
HKCU SoftwareMicrosoftOffice14.0WordOptions MigrateNormalOnFirstBoot DWORD: 1
HKLM SoftwareMicrosoftOffice14.0WordOptions MigrateNormalOnFirstBoot DWORD: 1
HKCU SoftwareMicrosoftOffice15.0WordOptions MigrateNormalOnFirstBoot DWORD: 1
HKLM SoftwareMicrosoftOffice15.0WordOptions MigrateNormalOnFirstBoot DWORD: 1
Folder 14.0 is for Office 2010, folder 15.0 is for Office 2013
I have created and deploy a package in SCCM console using this commandline: msiexec.exe /p Font.MSP /qn
Everything is seemed working fine in SCCM (no error). In the client side, I saw the patch (Font.msp) and file Normal.dotm are in %appdata%MicrosoftTemplate folder. However, the font is still not changed to Time New Roman (TNR) size 13. In some clients, the default font got changed to my desired font (TNR 13). What SCCM logs (in both server and client) should I look for? What do I need to do to make it work?