Adding WebApi & OAuth Authentication to an Existing Project
Editor's note: The following post was written by Visual Studio and Development Technologies MVP Mitchel Sellers as part of our Technical Tuesday series. Danae Aguilar of the MVP Award Blog Technical Committee served as the technical reviewer for this piece.
There are many tutorials out there that discuss the ease of setting up a new project, and checking all of the magic boxes to add Identity, WebApi controllers etc. However while these may be helpful, in the real world situations are often not as simple. We might have existing projects that at the start didn’t need WebAPI - or maybe we used WebApi controllers in our code. All in all, we didn’t get the proper security architecture in place.
In this post, we will walk through how to enhance an existing project to be able to create WebApi controllers and properly secure them using OAuth.
Prerequisites
This article assumes that you have an existing ASP.NET MVC project with ASP.NET Identity configured as part of the solution. If you do not yet have Identity configured, you will need to add this portion to your project before we get started.
If your project has already been configured for WebAPI, and is just missing Authentication, I will try to call attention to the areas you can skip.
Getting Started
Before we get into the specific changes, I encourage you to commit any unsaved changes and be setup to roll back should any of these steps not work as expected. We will try to approach the needed configuration items in a logical manner that will minimize errors, but anything can happen!
Validate NuGet Packages
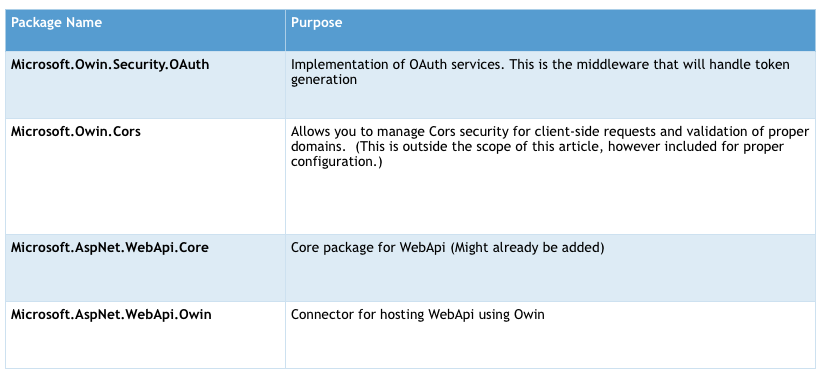
First, validate that you have all of the proper NuGet packages added to your solution. This will ensure that you can complete the remaining steps of the article without issue. The table below outlines the specific packages that are needed.

If any of these packages are missing from your installation you can use “Install-Package {packageName}” from the Package Manager Console. It is possible that additional packages will be added as dependencies. This would be a good time as well to make sure that you have all of the proper versions inside your project.
Configuration of WebAPI & CORS
The next step of the process is to ensure that we have proper configuration for WebAPI and Cors. These are high level configuration items. If you already have a WebApi controller in your project, it is possible that you might have many of these items defined.
Add Web API Configuration
Now that we have the proper NuGet packages, we want to create our configuration class. This should go inside of your App_Start folder, just like the other configuration items - such as BundleConfig or RouteConfig. The following snippet is an example of a basic configuration for WebAPI
 using System.Web.Http;
using Microsoft.Owin.Security.OAuth;

public static class WebApiConfig
{
    public static void Register(HttpConfiguration config)
    {
        // Web API configuration and services
        // Configure Web API to use only bearer token authentication.
        config.SuppressDefaultHostAuthentication();
        config.Filters.Add(new HostAuthenticationFilter(OAuthDefaults.AuthenticationType));

        // Web API routes
        config.MapHttpAttributeRoutes();
    }
}
There are a few key things we can take from this default configuration. The first line of code removes any default authentication that may be defined at the host level. This will ensure that when the second line of code adds an authentication filter for OAuth that it will be the only one applied.
After this, we add needed configuration for the routing. First, we enable HttpAttributeRoutes, as well as define the default routes. The style of routing used will depend on your desired architecture.
Update Startup.cs
The next steps in configuring the application, is to update Startup.cs to add the configuration of CORS. We also need to register the WebApi Middleware within the Owin context. In our case, the final contents of Startup.cs, with the existing ConfigureAuth call was similar to the code below:
  var config = new HttpConfiguration();
ConfigureAuth(app);
app.UseCors(CorsOptions.AllowAll);
app.UseWebApi(config);
In this example, we have the configuration defined for CORS - however, it is set to allow all callers. If you want, feel free to send detailed policy information rather than a blanket accept. We then let the App know that we want to use WebAPI.
Update Global.asax.cs
The final piece of the operation is to configure WebApi, which is part of the regular ASP.NET Pipeline. Although this will function if placed in other locations, it is important to register this here for future enhancement, such as the use of Swagger for Api documentation. Do this by simply adding one line of code inside of the Application_Start method:
GlobalConfiguration.Configure(WebApiConfig.Register);
If the above line of code does not work in your project, ensure that you have included the Microsoft.AspNet.WebApi.WebHost NuGet package.
I also find that when looking for configuration items later, it is easier to remember that routing configuration hooks are completed in the Global.asax file, rather than Startup.cs.
Configure OAuth Authentication
The final steps are to setup the application to authenticate, and issue credentials for user accounts.
Update User Object
A small change needs to be made to your ASP.NET Identity User object, to add an overload allowing you to pass through the authentication type to the CreateIdentityAsync method. This code sample assumes that your user object is named ApplicationUser.
  public async Task GenerateUserIdentityAsync(UserManager manager)
{
    return await GenerateUserIdentityAsync(manager, DefaultAuthenticationTypes.ApplicationCookie);
}

public async Task GenerateUserIdentityAsync(UserManager manager,
    string authenticationType)
{
    // Note the authenticationType must match the one defined in CookieAuthenticationOptions.AuthenticationType
    var userIdentity = await manager.CreateIdentityAsync(this, authenticationType);
    // Add custom user claims here
    return userIdentity;
}
In this example, we take the existing GenerateUserIdentityAsync method and have it call a new overload with an additional parameter. You could also use an optional parameter; the key consideration is that we must be able to generate an identity while passing the authentication type as a parameter.
Add an ApplicationOauthProvider
The final step for implementation requires us to create an Application OAuth Provider. This is a default implementation that outlines how to authenticate and login a user through the process. There are two classes needed to create this object.
ChallengeResult.cs
This result is used to communicate authentication challenge responses within the actual provider.
  public class ChallengeResult : IHttpActionResult
{
    public ChallengeResult(string loginProvider, ApiController controller)
    {
        LoginProvider = loginProvider;
        Request = controller.Request;
    }

    public string LoginProvider { get; set; }
    public HttpRequestMessage Request { get; set; }

    public Task ExecuteAsync(CancellationToken cancellationToken)
    {
        Request.GetOwinContext().Authentication.Challenge(LoginProvider);

        var response = new HttpResponseMessage(HttpStatusCode.Unauthorized);
        response.RequestMessage = Request;
        return Task.FromResult(response);
    }
}
Application OAuth Provider
This is the actual implementation of your provider. The key concepts here are that we need to properly configure the application to validate passed username & password information to authenticate as a user within our system. Add:
 public class ApplicationOAuthProvider : OAuthAuthorizationServerProvider
{
    private readonly string _publicClientId;

    public ApplicationOAuthProvider(string publicClientId)
    {
        //TODO: Pull from configuration
        if (publicClientId == null)
        {
            throw new ArgumentNullException(nameof(publicClientId));
        }

        _publicClientId = publicClientId;
    }

    public override async Task GrantResourceOwnerCredentials(OAuthGrantResourceOwnerCredentialsContext context)
    {
        var userManager = context.OwinContext.GetUserManager();

        var user = await userManager.FindAsync(context.UserName, context.Password);

        if (user == null)
        {
            context.SetError("invalid_grant", "The user name or password is incorrect.");
            return;
        }

        ClaimsIdentity oAuthIdentity = await user.GenerateUserIdentityAsync(userManager,
            OAuthDefaults.AuthenticationType);
        ClaimsIdentity cookiesIdentity = await user.GenerateUserIdentityAsync(userManager,
            CookieAuthenticationDefaults.AuthenticationType);

        AuthenticationProperties properties = CreateProperties(user.UserName);
        AuthenticationTicket ticket = new AuthenticationTicket(oAuthIdentity, properties);
        context.Validated(ticket);
        context.Request.Context.Authentication.SignIn(cookiesIdentity);
    }

    public override Task TokenEndpoint(OAuthTokenEndpointContext context)
    {
        foreach (KeyValuePair<string, string> property in context.Properties.Dictionary)
        {
            context.AdditionalResponseParameters.Add(property.Key, property.Value);
        }

        return Task.FromResult(null);
    }

    public override Task ValidateClientAuthentication(OAuthValidateClientAuthenticationContext context)
    {
        // Resource owner password credentials does not provide a client ID.
        if (context.ClientId == null)
        {
            context.Validated();
        }

        return Task.FromResult(null);
    }

    public override Task ValidateClientRedirectUri(OAuthValidateClientRedirectUriContext context)
    {
        if (context.ClientId == _publicClientId)
        {
            Uri expectedRootUri = new Uri(context.Request.Uri, "/");

            if (expectedRootUri.AbsoluteUri == context.RedirectUri)
            {
                context.Validated();
            }
        }

        return Task.FromResult(null);
    }

    public static AuthenticationProperties CreateProperties(string userName)
    {
        IDictionary<string, string> data = new Dictionary<string, string>
        {
            { "userName", userName }
        };
        return new AuthenticationProperties(data);
    }
}
In this example we have added the minimum implementation using basic considerations with the out-of-the-box authentication configuration.
Enable OAuth in Startup.Auth
The final step to enable OAuth is to update your Startup.Auth to include the oAuth items. Two properties need to be added first, one to store the options and the other to store a public client id.
 public static OAuthAuthorizationServerOptions OAuthOptions { get; private set; }
public static string PublicClientId { get; private set; }
After this has been added we add the configuration to actually enable OAuth for the project. It is important to note that the “AuthorizeEndpointPath” property isn’t used within the actual configuration at this point as we are using tokens, rather than external authentication grants. This block of code should be added to the constructor, along with the rest of the initialization code.
  // Configure the application for OAuth based flow
PublicClientId = "self";
OAuthOptions = new OAuthAuthorizationServerOptions
{
    TokenEndpointPath = new PathString("/Token"),
    Provider = new ApplicationOAuthProvider(PublicClientId),
    AuthorizeEndpointPath = new PathString("/Account/ExternalLogin"),
    AccessTokenExpireTimeSpan = TimeSpan.FromDays(14),
    AllowInsecureHttp = true //Don't do this in production
};

// Enable the application to use bearer tokens to authenticate users
app.UseOAuthBearerTokens(OAuthOptions);
When configuring in your environment, pay special attention to the expiration timespan, as well as the enabling of insecure Http. For demo purposes we allow non-HTTPS traffic, but you shouldn’t within your application.
Validate Operations
Now that we have everything properly configured, we just need to make a simple API to validate that all operations were successful.
Sample ApiController
This is a simple controller, which includes only a simple route, and the Authorize Attribute to ensure that security is validated.
 [RoutePrefix("Test")]
public class TestController : ApiController
{
    [Route("HelloWorld")]
    [Authorize]
    [HttpGet]
    public HttpResponseMessage HelloWorld()
    {
        return Request.CreateResponse(HttpStatusCode.OK, “Hello”);
    }
}
Test Requests
If you attempt to make a get request to {siteUrl}/Test/HelloWorld you should get a 401: Not Authorized response.
Obtain Bearer Token
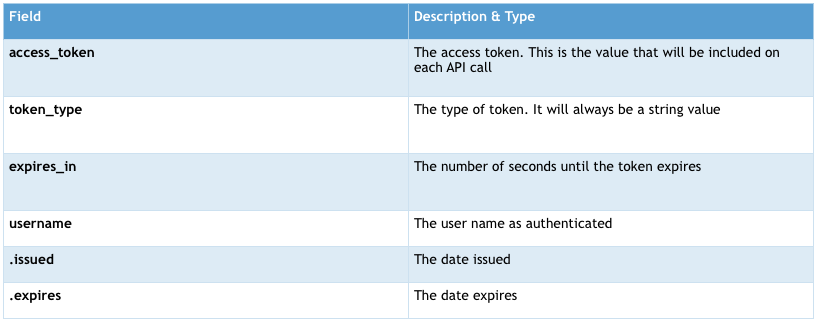
You should then be able to make a post request to {siteUrl}/Token, with x-www-form-urlencoding parameters including:

This will provide a JSON object with the following fields.

Test another request
If you reattempt the request for the HelloWorld action, and this time provide an Authorization header with a value of “Bearer {access_token}” you should get a successful result.
Summary
With just a few short steps, you can easily add OAuth security to your existing - or new - WebApi controllers. This allows your API’s to be consumed in a common manner, without requiring substantial effort on your part. After this initial setup you can easily customize the process for any application specific requirements.
Mitchel Sellers is a Microsoft MVP, an ASPInsider and the CEO of IowaComputerGurus. He enjoys sharing his software architecture experience with others, and works with his organization to deliver high-quality solutions to customers across the globe. You will find him at many conferences and events each year. For more information you can visit MitchelSellers.com or follow him on Twitter @mitchelsellers.
Comments
- Anonymous
October 14, 2017
The comment has been removed
