Image Effects Sample in C++ AMP
We have walked you through the C++ AMP texture feature with this series on concurrency::graphics, including how to interop with DirectX11 textures in C++ AMP. In this blog post, I will use a sample that implements some image effects to show you how to use the Interop APIs in real code.
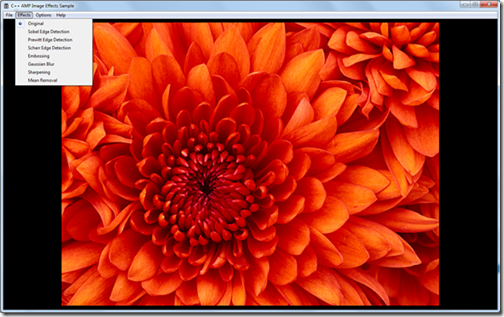
The sample is a Win32 application. The main window is shown below.
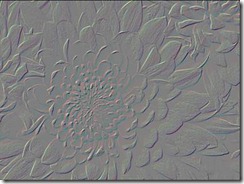
It loads an image file and renders the image to the window. There is an “Effects” menu that allows you to choose different effects that you want to apply to the image. In the sample, there are a few effects implemented, such as sobel edge detection (left) and embossing (right) as shown below:
Load image to texture
To load image files to texture, this sample uses the WICTextureLoader from the DirectX Tool Kit. WICTextureLoader is a WIC-based image file texture loader. In this sample, I only try to load simple 2D image files, so WICTextureLoader is a good fit. For loading more complex resource, you may want to use the DDSTextureLoader also from DirectX Tool Kit. For a full-featured DDS file reader, writer, and texture processing pipeline, please check out the DirectXTex Library. Back to this sample, I use the WICTextureLoader to load the image file, and create an ID3D11Texture2D object and its corresponding ID3D11ShaderResrouceView object. The code I use is very simple, in LoadImage() function:
 ID3D11Texture2D*          g_pInputTexture = nullptr;
 ID3D11ShaderResourceView* g_pInputTextureSRV = nullptr;

 //...

 // Create an ID3D11Texture2D object and an ID3D11ShaderResourceView object
 // from the image file
 CreateWICTextureFromFile(g_pd3dDevice, g_pImmediateContext, g_file.c_str(),
     reinterpret_cast<ID3D11Resource **>(&g_pInputTexture), &g_pInputTextureSRV);
The above code snippet allows me to get an ID3D11Texture2D object directly from an image file. The texture object created from the image file normally has a format as DXGI_FORMAT_R8G8B8A8_UNORM, which is assumed by this sample. Now, I have a texture on GPU, and it contains the pixels of the source image. I also have a corresponding ID3D11ShaderResourceView object, which could be bound to the graphics pipeline when I need to render the original image to the window. The code for rendering can be found in function ShowImage().
Interop between C++ AMP and DirectX
Since we have explained how to create an accelerator_view from an ID3D11Device object, this post will focus on the Interop APIs related to textures. In this sample, C++ AMP code deals with two textures:
- The texture that contains the original image. This is the one created via the WICTextureLoader as shown in the previous section.
- The texture that contains the image after an effect being applied. Note that the modified image is of the same size as the original image.
We created the second texture using C++ AMP API directly, also in LoadImage() function:
 texture<unorm4, 2>*  g_pAmpProcessedTexture = nullptr;

 //...

 // Create a texture the same size as g_pInputTexture
 g_pAmpProcessedTexture = new texture<unorm4, 2>(
     static_cast<int>(img_height), static_cast<int>(img_width), 8U, g_av);
I used C++ AMP to author the computation code that applies the effect. In this case, I want to use C++ AMP textures as input and output, so I use InterOp API to derive one from “g_pInputTexture”. For example, in function ApplyEffects(), I have:
 const texture<unorm4, 2> input_tex = make_texture<unorm4, 2>(g_av,
     reinterpret_cast<IUnknown *>(g_pInputTexture));
Then I can use “input_tex” for the computation using C++ AMP.
On the other hand, sometimes I need to render the C++ AMP texture “g_pAmpProcessedTexture” to the window using DirectX graphics pipeline. I need to read it from the pixel shader. In order to do so, I use Interop API to get an ID3D11Texture2D object, and then create an ID3D11ShaderResourceView, which can be bound to the graphics pipeline. Again, see the code in LoadImage() function:
 ID3D11ShaderResourceView*  g_pProcessedTextureSRV = nullptr;

 //...

 // Get the D3D texture from interop, and create
 // the corresponding SRV that could be later bound to
 // graphics pipeline
 ID3D11Texture2D * processedTexture =
     reinterpret_cast<ID3D11Texture2D *>(get_texture<unorm4, 2>(*g_pAmpProcessedTexture));
 g_pd3dDevice->CreateShaderResourceView(processedTexture, nullptr, &g_pProcessedTextureSRV);
 processedTexture->Release();
After this, whenever I need to render the modified image, I just bind “g_pProcessedTextureSRV” to the graphics pipeline. The code for rendering can be found in function ShowImage().
Apply effects to the image
In this sample, I implemented a few convolution based effects using C++ AMP. Please take a look on functions ApplyEdgeDetection() and ApplyOneConvolutionFilter(). The code is almost a direct translation from the algorithms in any image processing textbook to C++ AMP. There should still be room for performance optimization on the convolution. You are welcome to try it out.
Download the sample
Please download the attached package, which is released under Apache 2.0 (other than the portions coming from the DirectX Tool Kit, which is licensed under MS-PL). Look at the code, run it, play with it. Of course, you will need, Visual Studio 2012.
Comments
Anonymous
July 20, 2012
The comment has been removedAnonymous
July 20, 2012
Hi David, this is over 1000 lines of code, and it is not on codeplex and hence hasn't gone through a laborious legal review. Hence MS-RSL makes it easier to share that size on our blog without a legal process for every sample. You'll see many more like this.Anonymous
July 20, 2012
I see, thanks for the info. Here's hoping that legal can review the samples and release under a more permissive license. Not that I'm advocating copy-paste programming...Anonymous
July 20, 2012
Hi David, I don't want you to hope something that we are not pursuing so please help us understand it better: what is the problem with MS-RSL other that not allowing someone to copy paste? Remember the goal of our samples is to teach people, not to provide them ready-baked code. Do you have a different goal in mind that we should be aiming for?Anonymous
July 25, 2012
This sample won't compile for me under windows 8 build 8400. I get: Error 102 error MSB3073: The command "copy C:Usersjulie_000DocumentsVisual Studio 2012ProjectsImageEffects\Data* C:Usersjulie_000DocumentsVisual Studio 2012ProjectsImageEffectsDebug :VCEnd" exited with code 1. C:Program Files (x86)MSBuildMicrosoft.Cppv4.0V110Microsoft.CppCommon.targets 139 6 ImageEffectsAnonymous
July 25, 2012
I think we know what's wrong with the post-build event command, we fixed the sample. Please download and try again. Thanks for reporting it.Anonymous
July 25, 2012
Hi Weirong, The new version of the app fixes the post-build event. However, when I launch the app it immediately throws an error saying "Failed to create D3D11 Device and Swap Chain". Any thoughts?Anonymous
July 25, 2012
Please ignore my last comment about failed to create d3d11 device. Looking at the code I see it is because my video card is not dx11 compatible. I will try again with a dx11 card.Anonymous
September 20, 2012
Great project, thank you much! I have re-written the app to make it easier (I think so) to understand. Can I upload it? I could not do GPU debugging, the breakpoints are removed (I am setting VS to GPU debugging). Am I doing something wrong? Project settings are set for GPU debugging. I have NVidia Quadro 5000M card.Anonymous
September 21, 2012
Hi Alan, Thank you for working on improving the readability of this sample. It is great to know that you are willing to share your contribution with the broader C++ AMP community. Since this is a Microsoft team blog, due to policy constraints, you cannot directly upload your code into our site. Another caveat is that this sample was released under MS-RSL, which doesn’t grant you the right for modification and redistribution. We are currently working on the process to release it under Apache 2.0 so that you can freely modify and redistribute. We will let you know once we get a green light on that. Then you can upload the modified sample to http://code.msdn.microsoft.com, and post a link here in the comment section to share. About your debugging issue, two things to check out first are: • Are you on Win7 or Win8? AMP debugging is only supported on Win8; • In your code, do you select accelerator by yourself or use the default one? If the former, you need to set it to REF for debugging; You can find more details regarding debugging in blogs.msdn.com/.../start-gpu-debugging-in-visual-studio-11.aspx Please continue to contact us with your questions and comments. Thanks! LingliAnonymous
September 21, 2012
Lingli, Thanks a lot! I was able to debug the sample project that you linked. I'll figure it out from here why I can't set GPU breakpoints in the Image Effects app. AlanAnonymous
September 25, 2012
Alan, We have changed this sample's license to Apache 2.0. The code zip file has been updated with new license headers. Feel free to modify the new code with your improvement and if you want, share your version on http:://code.msdn.microsoft.com. Thanks! LingliAnonymous
October 02, 2012
I've uploaded it here: code.msdn.microsoft.com/Image-Effects-sample-in-C-77db1745Anonymous
October 08, 2012
Thanks for sharing, Alan.Anonymous
November 25, 2012
Execuse me, I don't understand why edge detection with 1 pixel offset filter convolution? float value = func(i, j); sumX += value * filterX(i+1, j+1); sumY += value * filterY(i+1, j+1);Anonymous
November 26, 2012
Hi Stan, By "1 pixel offset", I assume you mean the "+1" in "filterX(i+1, j+1)". Please note that it's used in a loop, for (int i = low; i <= up; ++i) { for (int j = low; j <= up; ++j) { float value = func(i, j); sumX += value * filterX(i+1, j+1); sumY += value * filterY(i+1, j+1); } } When the filter size is 3, low = -1, and up = 1, so the value range for i or j is (-1, 0, 1). However, the indexing for filter is 0 based (just like any other C/C++ indexing). So the purpose of "+1" is merely to adjust the index into the values of (0, 1, 2). In this way, the impl of "func" is simpler, (i, j) is the offset from the current pixel. You could change the indexing (for func and for filterX/filterY) into a way that you prefer, then change the way that how the loop is written. Thanks, WeirongAnonymous
November 27, 2012
Hi, Zhu, I see, the location of the code is exactly what I mean. but the code is not identical to "release" defined scope. Supposedly, it should be sumX += value * filterX(i+w, j+w); sumY += value * filterY(i+w, j+w); is it? Thanks StanAnonymous
November 28, 2012
Hi Stan, Yes. Good catch. It should be written as "i+W, j+W" in both cases. W happens to be 1 when N = 3. It should be corrected. Thanks, WeirongAnonymous
November 29, 2012
Hi Stan, Thanks for catching the typo in the code! I have fixed it and updated the code zip file. Thanks, LingliAnonymous
July 06, 2013
Anybody figured out how to get this to run on the Windows 8.1 Preview + VS 2013 Preview? Besides the deprecated API warnings, the DX device creation fails with the following output in the debug window: "D3D11 ERROR: ID3D11Device::CreateBuffer: CheckFeatureSupport() API with D3D11_FEATURE_D3D11_OPTIONS1 must report support for MapOnDefaultBuffers for a D3D11_USAGE_DEFAULT Buffer Resource to have CPUAccessFlags set (note that for MapOnDefaultBuffers support, the Device or DeviceContextState must be created with feature level greater or equal to D3D_FEATURE_LEVEL_11_0, and the driver must support it). CPUAccessFlags are currently set to: D3D11_CPU_ACCESS_READ (1), D3D11_CPU_ACCESS_WRITE (1). Feature Level is (D3D_FEATURE_LEVEL_11_1), and MapOnDefaultBuffers is (false). [ STATE_CREATION ERROR #63: CREATEBUFFER_INVALIDCPUACCESSFLAGS]"Anonymous
July 17, 2013
@FredFourie: This sample has been updated for Visual Studio 2013 Preview and fixes both the error at runtime and the compile-time deprecation warnings. There are now two solution/project files that reference/use the same source files.ImageEffects_vs2012.sln is for use with Visual Studio 2012.
ImageEffects_vs2013.sln is for use with Visual Studio 2013 Preview.


