Setting up TPM protected certificates using a Microsoft Certificate Authority - Part 3: Key Attestation
Hey Everyone, I am back with the last part of this 3 of this series on TPM protected certificates. The last topic for this series is on Key Attestation. Recently I have had a few people ask me about the Key Attestation tab in Windows Server 2012 R2. Another person informed me they tried to set it up, and it didn’t work. That’s not cool. I hadn’t used the feature before so I decided to take a dive into it and maybe I could help y’all out. Here is what I found. First, what is this for? Key Attestation is an assurance mechanism. It validates the private key in a certificate key pair are protected via a TPM. If you don’t know what the big deal is about protecting keys via TPM please see part 1 and part 2 of this series. Depending on how the key is being protected, the CA can also insert Issuance Policy OID’s into a certificate based on what attestation method was used.
The 3 methods used for Key Attestation are:
User Credentials: (Low Assurance) Issuance Policy/Certificate Policy OID: 1.3.6.1.4.1.311.21.32 – The user provides an EKPub to the enterprise CA. The enterprise CA performs no further validation.
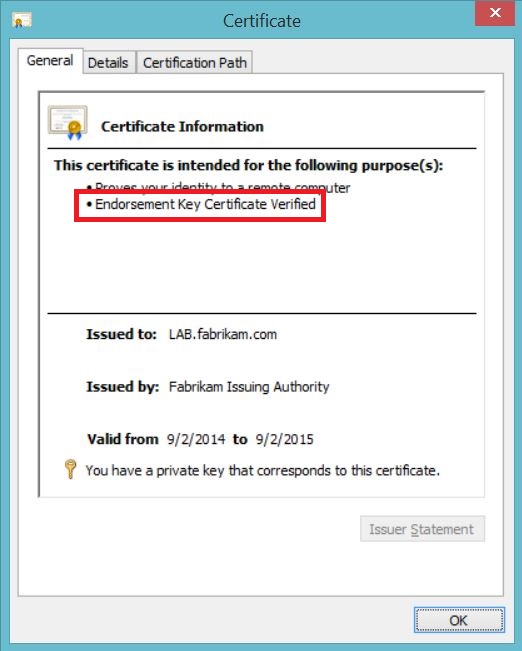
Endorsement Certificate: (Medium Assurance) Issuance Policy/Certificate Policy OID 1.3.6.1.4.1.311.21.31 – The TPM has a manufacturer supplied certificate embedded. The Enterprise CA validates the EKCert chain. All CA’s in the chain must be trusted. This method also means that ALL TPM’s from the manufacturer’s chain are trusted.
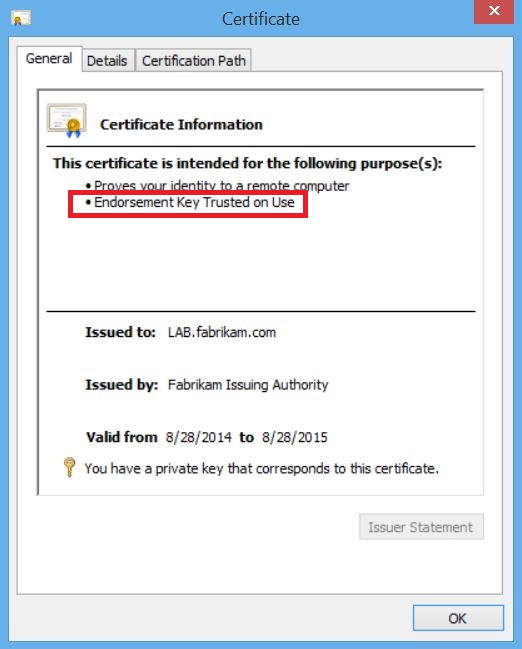
Endorsement Key: (High Assurance) Issuance Policy/Certificate Policy OID: 1.3.6.1.4.1.311.21.30 – The Enterprise CA validates each EKPub provided against an administrator defined list of allowed EKPub. The list is contained in a directory that includes files named for each EKPub SHA-256 hash.
Assumptions
This article assumes the individual has a basic understanding of Microsoft PKI and its components.
Microsoft Lab Configuration
Requirements:
- A domain controller running Windows Server 2003 or later
- An enterprise certificate authority running Windows Server 2012 R2
- A desktop or laptop with a enabled and configured TPM, running Windows 8.1
- You have completed the labs from part 1 of this series. (We will be leveraging certificate templates you created from part 1)
Configuring and Testing User Credential Attestation:
This option only requests the client send an EKPub to the Enterprise CA. There is no further validation other than the user’s domain credentials (low assurance).
Step 1: Certificate Template Configuration
In this section we will modify the template we configured in Part 1 of this 3 part series to perform key attestation and insert issuance policies.
Open the Certificate Template Console (certtmpl.msc)
Modify the Workstation Authentication Template you created in Part 1 of this series
Verify the following:
Compatibility Tab
Certificate Authority: Windows Server 2012 R2
Certificate Recipient: Windows 8.1/Windows Server 2012 R2
Cryptography Tab
Provider Category: Key Storage Provider
Requests must be from one of the following providers: Check only Microsoft Platform Crypto Provider
New Settings:
Request Handling
- Renew with the same key: cleared/unchecked
Key Attestation Tab
- Key Attestation: Required
Attestation Type
- User Credentials
Issuance Policies for key attested certificates
- Include issuance polices for enforced attestation types
Result: Certificates requested from the template should resemble the following
Configuring and Testing Endorsement Certificate Attestation:
This option makes use of the certificate some manufacturers burn into their TPM’s. Notice I said some, not all manufacturers are doing this. The next fun thing about this one is, depending on the manufacturer you have to go chase them down to get copies of the public keys for all the CA’s in their chain and import those certificates into special containers on your CA. The good thing about this is, after you do it all of the TPM enabled devices that chain to those certificates are trusted for attestation.
Let’s get started on setting this up.
Step 1: Who made my TPM and do I have an EKCert?
From the Windows 8.1 device that has a TPM.
Open PowerShell as an Admin.
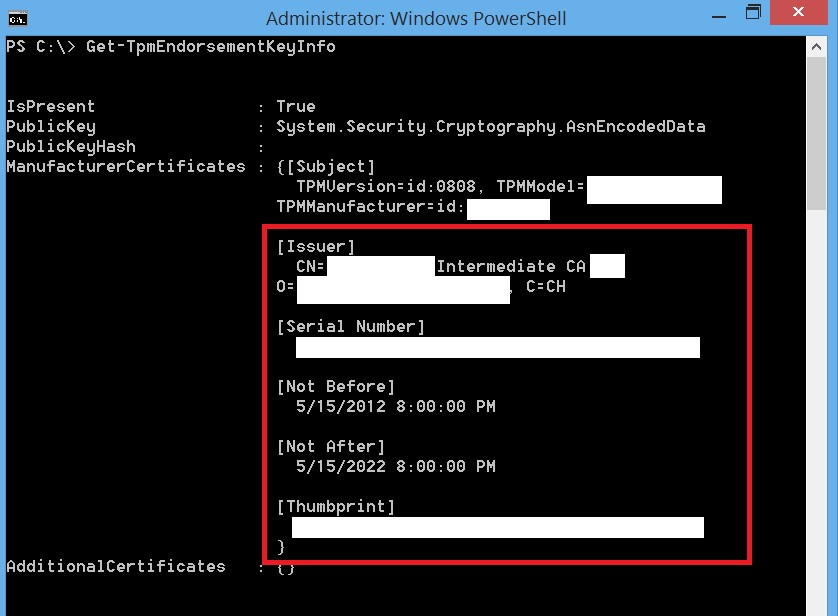
Run the following cmdlet: Get-TPMEndorsementKeyInfoyou should get an output similar to that seen below. Sorry I had to block out a bunch of stuff but you should get the point. From here we can see the certificate information for the EKCert (if you have one)
Now the fun part. Visit the manufacturer’s site and pray they publish these certificates there and you can find them. If not, you will have contact them and ask nicely. Mine was the latter.
Step 2: Importing the Manufacturer Certificates to be used with Attestation
Now that the manufacturer has given us the public keys we can go ahead and import them into special containers in the local machine store so they can be used for attestation purposes.
Some of this is from the TechNet Article: TPM Key Attestation. So a big thanks to the folks that wrote this.
The following commands will create the EKCert containers for the manufacturer’s certificates.
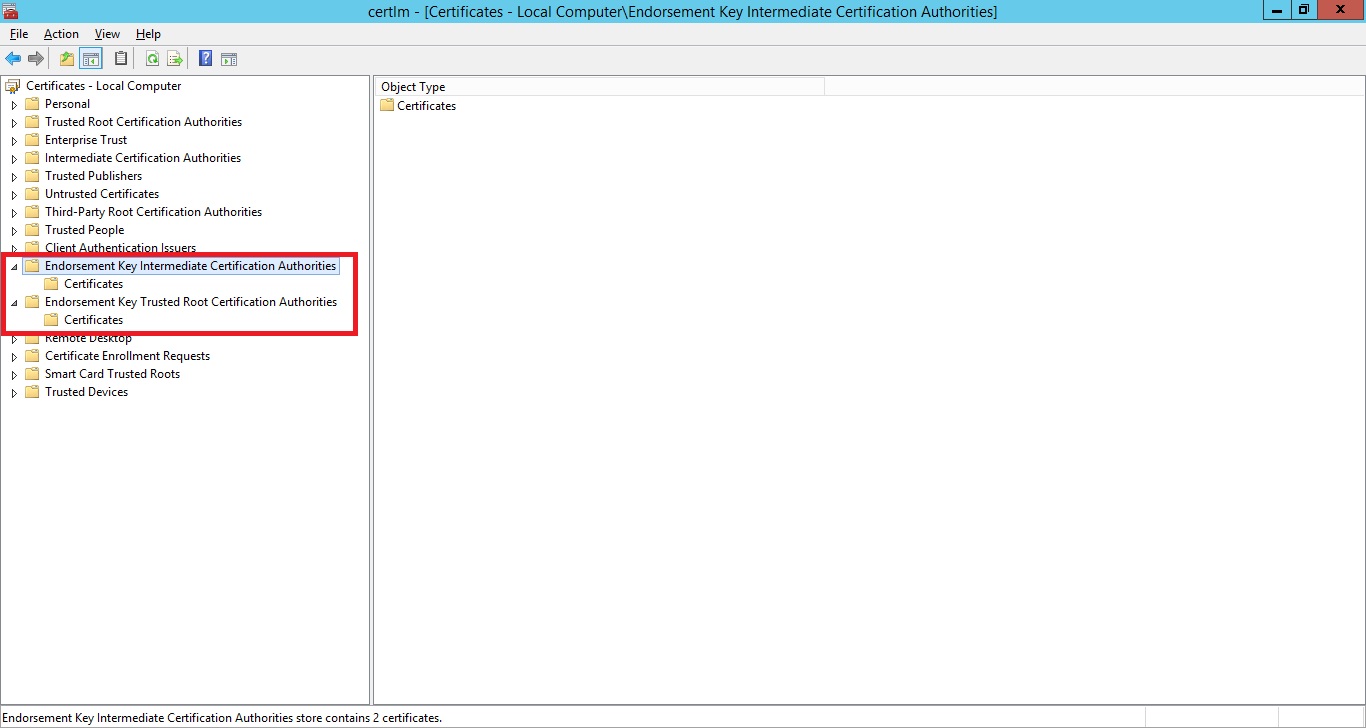
# Create EKCert containers and import TPM manufacturer certificates cd cert: cd .\\LocalMachine new-item EKROOT new-item EKCA |
These commands will create the following certificate containers in the local machine store:
After you create the containers you will need to import the manufacturer’s certificates to the proper containers.
Now we can configure your certificate template for Endorsement Certificate attestation.
Step 3: Certificate Template Configuration
Open the Certificate Template Console (certtmpl.msc)
Modify the Workstation Authentication Template you created in Part 1 of this series
Verify the following:
Compatibility Tab
Certificate Authority: Windows Server 2012 R2
Certificate Recipient: Windows 8.1/Windows Server 2012 R2
Request Handling
- Renew with the same key: cleared/unchecked
Cryptography Tab
Provider Category: Key Storage Provider
Requests must be from one of the following providers: Check only Microsoft Platform Crypto Provider
New Settings:
Key Attestation Tab
- Key Attestation: Required
Attestation Type
- Endorsement Certificate
Issuance Policies for key attested certificates
- Include issuance polices for enforced attestation types
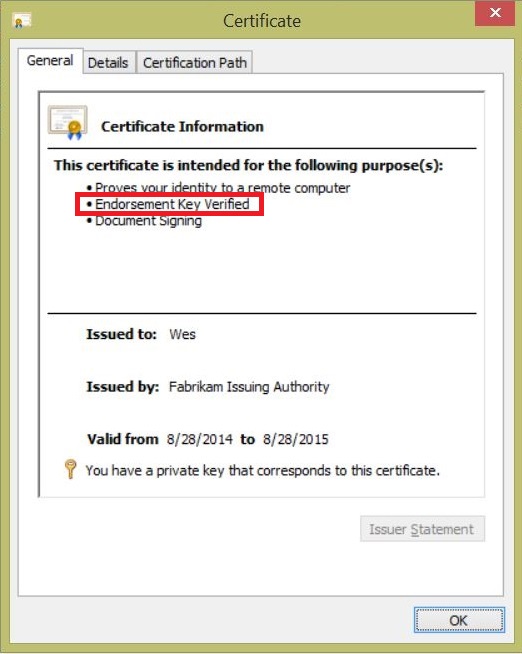
Result: Certificates requested from the template should resemble the following
Configuring and Testing Endorsement Key Attestation:
This process takes the most administrative effort and thus provides the highest level of assurance. With this method our goal is to populate a folder, either locally or network, with empty files. The names of the files are the sha256 hash of the TPM endorsement keys for the devices in your organization you want to perform attestation.
Step 1: Identifying the TPM Hash
For this we are going to use a sample PowerShell script that I made using the one in the Technet article for a reference (with a few tweaks of courseJ).
#This line provides us with the TPM Public Endorsement Key info and also provides the hash in sha-256 form $tpmhash=Get-TpmEndorsementKeyInfo -HashAlgorithm sha256 # We only want the hash value so here we pull just that value $tpmhashfile=$tpmhash.PublicKeyHash #Lastly we create an empty file with no extension whose name is the hash of the TPM EK public key. Mine writes to a file share where multiple CA’s can read it. Notice I said READ. So the NTFS and file share permissions will need to be configured to allow the machine accounts of the CA’s to READ. New-Item -path \\Fab-LAB-DC01\TPMHash\$tpmhashfile -ItemType file |
Step 2: Adding the EKPub Hash Folder to the Issuing CA
Now that we have an EKPub hash file in the folder we need to have the CA recognize this folder as a repository. Remember, the CA machine account needs to have read permissions on this folder so if it’s local that’s no big deal. But since mine is on a network share I needed to configure this on the NTFS and share permissions.
We are going to run this command to add the folder as an Endorsement Key List Directory, there is currently no method to do this through the GUI
certutil.exe -setreg CA\EndorsementKeyListDirectories +\\con-lab-dc01\EKPub$
Alternatively you can run certutil.exe -setreg CA\EndorsementKeyListDirectories -\\con-lab-dc01\EKPub$ to remove a directory
Now we need to restart the CA services for the change to take effect. You can choose your favorite method I am going to use the command line.
net stop certsvc & net start certsvc
Step 3: Certificate Template Configuration
Open the Certificate Template Console (certtmpl.msc)
Modify the Workstation Authentication Template you created in Part 1 of this series
Verify the following:
Compatibility Tab
Certificate Authority: Windows Server 2012 R2
Certificate Recipient: Windows 8.1/Windows Server 2012 R2
Cryptography Tab
Provider Category: Key Storage Provider
Requests must be from one of the following providers: Check only Microsoft Platform Crypto Provider
New Settings:
Request Handling
- Renew with the same key: cleared/unchecked
Key Attestation Tab
- Key Attestation: Required
Attestation Type
- Endorsement Key
Issuance Policies for key attested certificates
- Include issuance polices for enforced attestation types
Result: Certificates requested from the template should resemble the following
Technical Resources:
Processing Rules for Key Attestation Based on a Trusted Endorsement Key
https://msdn.microsoft.com/en-us/library/dn410471.aspx
Get-TPMEndorsementKeyInfo
https://technet.microsoft.com/en-us/library/dn449037.aspx
TPM Key Attestation
https://technet.microsoft.com/en-us/library/dn581921.aspx
TPM System Fundamentals Testing Prerequisites
https://msdn.microsoft.com/en-us/library/windows/hardware/dn247549.aspx
TPM Attestation Test
https://msdn.microsoft.com/en-us/library/windows/hardware/hh998296.aspx
Links to part 1 and 2 of this 3 part series are below:
Part 1: Microsoft Platform Crypto Provider
Part 2: Virtual Smart Cards
Comments
- Anonymous
January 01, 2003
Microsoft does not support HSM's. HSM support is provided by the HSM manufacturer. - Anonymous
September 16, 2014
215 Microsoft Team blogs searched, 58 blogs have new articles. 142 new articles found searching from - Anonymous
January 24, 2015
Is it possible to use the YubiKey HSM with a Microsoft CA? - Anonymous
April 30, 2015
Von der Sicherheit privater Schlüssel – oder verstecken Sie den Haustürschlüssel immer noch unter der - Anonymous
May 22, 2015
Hi, many thanks for this series.
Q1: The last picture (Key Attestation) looks like that the certificate is for user/logon/signing. It is also issued for Wes. Shouldn't be that certicicate for Workstation Authentication (i.e. LAB.fabrikam.com)?
Q2: Does it make sense to issue certificates with Key Attestation for users? Any use case for such User cert?
Sorry if those questions are silly ;) - Anonymous
February 28, 2017
The comment has been removed- Anonymous
February 28, 2017
Are you using a 2 tier PKI? If so does your issuing CA certificate include either the allissuance policy (2.5.29.32.0 ), or the OID's for the attestation issuance policies?- Anonymous
April 24, 2017
The comment has been removed- Anonymous
April 24, 2017
Here is a copy of the CAPolicy.inf I used on my subordinate CA. If the certificate policy does not make it into the request you may have to modify the CSR generated by your subordinate before submitting it to the Root.[Version]Signature= "$Windows NT$"[PolicyStatementExtension]Policies = AllIssuancePolicyCritical = FALSE [AllIssuancePolicy] OID = 2.5.29.32.0 [Certsrv_Server]CRLPeriod=DaysCRLPeriodUnits=7CRLDeltaPeriod=DaysCRLDeltaPeriodUnits=1LoadDefaultTemplates=0[BasicConstraintsExtension] PathLength=0Critical=Yes- Anonymous
April 24, 2017
do a dump of your root ca cert and check for issuance (certificate) policies there... - Anonymous
July 31, 2017
I am having a similar problem. The error I am getting when I request a certificate with key attestation (user credentials) is, "The certification authority cannot interpret or verify the endorsement key information supplied in the request or the information is inconsistent." I did the steps to update the CAPolicy.inf and renewed the CA cert. Using Windows server 2016 and Windows 10 client. Any help is greatly appreciated. - Anonymous
August 29, 2017
Hi David,the error you posted indicates that an error occurs when using the TPM / its Endorsement Key. To find the cause of this error log files need to be collected and analyzed. Therefore I recommend opening a support case
- Anonymous
- Anonymous
- Anonymous
- Anonymous
- Anonymous
July 25, 2017
Hi WesH,Great post and well laid out. I too was having the same issue as joshua and Radim.I followed your note to say the Sub CA needs the allissuance policy which makes sense but I've read every post going and having real problems getting this working. No matter what I do the RootCA will not issue a certificate to the SubCA with a allissuance policy. The RootCA does have it.I've amended the CAPolicy file in many ways and no luck. I did come across a post that someone else had exactly the same issue as me on 2012R2 but same settings on a 2016 hierarchy it all worked.Have you ever had a problem getting the allissuance policy on the SubCA certificate in a 2012R2 structure? Any pointers to getting it working?Many thanks- Anonymous
July 25, 2017
Hi Mark,I am not aware of any issues regarding this process. You might want to check the request that your SubCA generates during the renewal process by dumping the request's details via certutil -dump -v Request.req. You should see the AllIssuancePolicy's OID 2.5.29.32.0 there under "Certificate Policies", if the CAPolicy.inf has been applied correctly during the renewal. If it is in the request, but the issued certificate based on the request does not include it you might want to double check your RootCA's configuration. If it is not in the request you might want to check your SubCA againBest regards,Steven
- Anonymous