An Introduction to Conditional Formatting
 Hi everyone, Jon here again. Today I wanted to show you how to use Conditional Formatting to really spice up your data views.
Preparation
The customizations that I am going to demonstrate revolve around the creation of a product ordering page. To start, I created a SharePoint list called Products to store my data, though you could just as easily hook up into a database or other data source. I created the following fields:

I then filled in the table to have some sample values. If you are using your own datasource, be aware that the field names will be different, but the concepts will remain true. When doing conditional formatting, the biggest pre-requisite is that you need to be using a data view to display your data. There are a couple ways to create a data view, so if you haven’t done it before I suggest checking out the documentation on Microsoft Office Online.
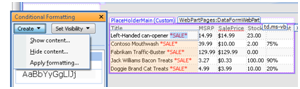 Show/Hide
One of the easiest ways you can use conditional formatting is to show or hide something in your data view based on some condition. In the case of the above table, we might want to show *SALE* next to any item that has a discount associated with it. The first thing you will want to do is insert whatever it is you want to show or hide. Next, right click in your data view and select Conditional Formatting… to bring up the Conditional Formatting task pane. Highlight the text you want to hide (*SALE* in our case), then click the Create button in the conditional formatting task pane. Select the Hide Content… option, which will bring up a dialog for setting your criteria. Since the Discount field can be zero or empty, make the condition be “Discount Is Null OR Discount Equals ‘0’ ”. You can now save the page and view the results in your browser.
Advanced Show/Hide
Now that we have the basics of creating a condition down, we can add something a little more interesting. On many ecommerce sites you will see text on certain items indicating “Only 5 Left!” or “Last One!” in the listing. Creating the text for “Last One!” is the same as what we did for sale – insert your text, highlight it, then click the Create button. Instead of selecting Hide, select Show since most of the time there will be more than one item. For the condition choose “Stock Equals 1”. To create the “Only 5 Left!” insert the text, then drag the Stock field from the Data Source Details task pane and drop it next to the number 5. Once you delete the 5, you now can select the text and repeat the same steps for the Show option, but choose “Stock Less Than 10 AND Stock Greater Than 1”. The reason we have the second clause is that we don’t want to show the text when we are already showing the “Last One!” text, nor do we want to show it for items that are out of stock.
KPIs and Icon Sets using "Apply Formatting"
SharePoint Designer 2007 doesn’t have the same icon sets features that you get with Excel 2007, but you can achieve the same results using conditional formatting. To make space for our KPI, right click in the right most column of the table, select Insert -> Column to the Right. Using the quick tag selector, choose the <td> tag. In the Conditional Formatting task pane, select Create ->Apply Formatting…. For the condition, select “Stock Greater Than 20” and click ok. You will then be presented with the modify style dialog. Here you can change just about any style aspect you choose, but for now select Background for the category and then set the Background Color to be green.
 Repeat the same steps three more times: first with the condition “Stock Less than or Equal to 20 and Stock Greater than 10” with the background color yellow, then with the condition “Stock Less than or Equal to 10 and Stock Greater Than 0” with the background color red, and finally with the condition “Stock Equals 0” and the background color black.
The reason we had to use both the “less than or equal to” condition and the “Greater than” condition is that each rule is interpreted independently. Because of that, if we didn’t select “less than or equal to” for the second condition then an item that had 50 items in stock would match both the first and second conditions (since it is greater than 20 and greater than 10). Be careful of this when selecting your condition criteria.

You can use the same technique with images (such as a set of up, down, and sideways arrow icons) by using the Show and Hide options as appropriate.
Conditional Formatting - Under the Covers
I won’t get into the intricate details of XSLT here, but it is useful to know that the way that SharePoint Designer 2007 implements conditional formatting is by wrapping your element with an <xsl:if> clause. The Show option is essentially a clause that says <xsl:if test=”your condition”>your markup</xsl:if>. When the condition is true, your markup shows up in the page. The Hide option is basically the same, but with your condition surrounded by “not()”. You can use the same concepts to create very advanced formatting options by hand if you choose, or use the Advanced… button in the Condition Criteria dialog to use SharePoint Designer’s XPath Expression builder to build your condition.
I hope you find some of this useful – conditional formatting is extremely powerful.
Enjoy!
Comments
Anonymous
November 11, 2007
PingBack from http://stevepietrekweblog.wordpress.com/2007/11/11/links-11112007/Anonymous
November 11, 2007
Ein kurze Einführung in die bedingte Formatierung eines DataViewWebparts mit Sharepoint Designer gibtAnonymous
November 13, 2007
De nuevo os presentamos la tradicional entrega de enlaces interesantes que sobre WSS 3.0 & MOSS hanAnonymous
November 19, 2007
The comment has been removedAnonymous
November 19, 2007
Can conditional formatting be applied to other types of views, or only data views? Our users are looking for the ability to color code their calendars based on where team members will be. I have set up the calendar list to include a case limiting field, but can't apply the conditional formatting to an OOB calendar view. Suggestions?Anonymous
November 20, 2007
kraabe - The conditional formatting features discussed in this post are tied to dataviews, since they are implemented using XSL. You could construct a calendar view by hand using xslt and then use conditional formatting, but as far as I know you cannot use conditional formatting with the ListViewWebPart (which is what the OOB calendar view uses).Anonymous
December 04, 2007
Hi john I'm having a problem on my datalist view web part. I have a date time column and I’ve already format the cells to appear dd-mm-yyyy, the problem is on my filter...it appear like date + time ( ex: 1/1/1990 12:AM). How can I retrieve only the date excluding time from here? Can you help me? thks!!Anonymous
January 03, 2008
Thank you for the helpful post. Do you know how to conditionally "Apply a Class" instead of specifying the individual style elements (i.e. "Apply a Style")? The default data view applies a CSS class (.ms-alternating) for alternating rows, but I don't see any way to create a new formatting rule that is class-based (without modifying the XLST of course). Thanks in advanceAnonymous
January 07, 2008
Hi JLT-DSI, Right click your main toolbar and choose to show the Style Applcation toolbar. This will allow you to make selections as necessary and you can change the settings in the toolbar so you have complete control over whether a new class is created, you use preexisting class, or use inline styling. If you simply want to modify 'ms-alternating' then you can CONTROL + CLICK the class in code view and modify it by hand. It's not completely clear what you want to do here, but hopefully that toolbar (as well as the CSS Properties Task Pane) will help you on your way. -JohnAnonymous
March 18, 2008
I have very simple query bringing in a few skillsets with multiple competencies per skillset and a rating assigned to each competency. I am grouping on the skillset and displaying KPIs for each competency based on the rating using conditional formatting. That all works great. What I am struggling with is using that same formatting to display an average rating (and KPI) for each skillset, but when I insert my images and set the conditional formatting, it is applied to each group "header". I want to be able to apply different conditional formatting to each skillset in the group. Greatly appreciate any insight.Anonymous
May 26, 2008
Hi Jon, I have a custom list in which one group title is there and the url for that report is stored. I want to format the report according to the group title when ever a gruop title presents in the list then a system pick the URL from the custom list and put it in the side of the group. The list is another webpart. Can it be possible using conditional formatting? -KULDEEPAnonymous
May 28, 2008
I'm trying to use things with conditional formating with Approval Status to determine if I should put a big DRAFT on the Custsom List form. I've used the set it up, but for some reason it never properly evaluates the items status appropriately. I've got several other conditional formats setup of the form successfully, but this one doesn't work. Any thougths? Thanks.Anonymous
June 12, 2008
Dan - One trick that I use a lot when doing conditional formatting is to change one of the values in my view to be one that you are interested in. One way is to put <xsl:value-of select="@_ModerationStatus"/> inside the <xsl:template name="dvt_1.rowview"> in a place that would render properly, such as beside the <xsl:value-of select="@Title" />. Another easy way is to select a value from your list (like the title), then do Edit -> Quick tag editor. Replace the @Title with @_ModerationStatus. When you view the page you should see the values that the value you care about is getting. I tried it on a blog and ended up with "Approved" as the value for posts which were approved and "Pending" for draft posts. you could do a @_ModerationStatus = 'Pending' and it should do the job.Anonymous
September 12, 2008
Hi, thanks for your post. I'm having issues with conditional formatting. Conditions that aren't in the range I have specified are showing up highlighted, It is a student results database - here is an example: <xsl:if test="normalize-space(@AssessmentType) = 'On Demand - Reading' or normalize-space(@AssessmentType) = 'On Demand - Maths' and normalize-space(@YearLevel) = 'Year 4' and normalize-space(@Semester) = '2' and @Result > '3.0'">background-color: #CCFFFF;</xsl:if> But even though the result is not greater than 3, I am getting the specified highlighting. I have checked all my conditions and the code, and the only thing I can associate is that the columns that are giving misleading formatting are those that have been EDITED. Does Sharepoint remember the conditional formatting of the initially created item and never change? I have even tried deleting the entry altogether and re-entering it, but it seems to have a very good memory! It still associates the original conditional formatting of the item in that position in the list... very strange indeed!! Hope you can help!Anonymous
September 13, 2008
Please disregard my silly question earlier - I've worked out it's my error in using the OR statement in the condition. I will fix it up and do the two assessment types as two separate conditions. Sorry to waste your time...Anonymous
March 26, 2009
The comment has been removedAnonymous
July 22, 2009
thanks good introduction to new usersAnonymous
November 13, 2011
I want to hide the perticular column if "AssignedTo" field is not equal to logged-in user user. How here conditional formatting will help me.