Creating Re-usable Email Templates for SharePoint Designer 2007 Workflows
Hi there, I’m Jordan Hull, a Software Development Engineer in Test on the SharePoint Designer Workflow team. I’d like to walk you through an example of how you can create re-usable e-mail templates for use in your SharePoint Designer 2007 workflows.
The goal of creating these templates is to enable site administrators to (a) define rich e-mail content that can be re-used across multiple workflows, and (b) enable site administrators to push out changes to e-mail formats, and branding, without having to modify the workflows that send them.
To make it happen, we’re going to: create a new SharePoint list and populate it with a collection of e-mail templates, design a custom workflow action to substitute placeholders in the e-mail content with dynamic values, and publish a workflow that sends the e-mail to a distribution list.
Let’s start with the coding of our custom workflow action. I won’t go into too much detail on the deployment of custom workflow actions, as there are already some great posts on this topic: Phil Allen's - Custom Action to Retrieve Workflow Information and Eilene Hao/Gabe Hall’s - How to Deploy Custom Conditions.
As a quick recap, the steps that you’ll need to take are:
- Install the Visual Studio Extensions for Workflow and create a new Workflow Activity Library project in Visual Studio
- Code your action, sign the project, and build
- Install the resulting assembly into the Global Assembly Cache (GAC) on each web front end in your server farm
- Create an actions file to surface your action in SharePoint Designer
- Add a web.config Authorized Types entry for your new workflow activity
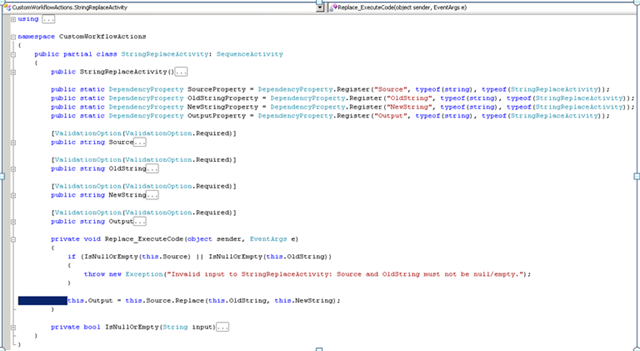
To code the action, we’ll need to add a new activity (StringReplaceActivity) to our Activity Library project and insert a single code activity (Replace) into its activity collection. In code view, we’re then going to add four dependency properties, and their corresponding class properties, to represent each of the variables used in our string replace operation: the source string, the (old) string to replace, the (new) string to replace it with, and the resulting updated (output) string. Once you have all of the properties set up, the underlying method for the code activity in your StringReplace action (Replace_ExecuteCode) will simply wrap the .Net framework’s string replace method. The end result should look something like the following:
Once the project has been signed and compiled, the next step is to follow the instructions in the articles mentioned above to deploy your custom action and surface it in SharePoint Designer.
For quick reference, here is the .actions file markup needed for the above String Replace action:
<Action Name="String Replace"
ClassName="CustomWorkflowActions.StringReplaceActivity"
Assembly="CustomWorkflowActions, Version=1.0.0.0, Culture=neutral, PublicKeyToken=..."
AppliesTo="all"
Category="Custom Actions">
<RuleDesigner Sentence="Replace occurrences of %1 in %2 with %3 (Output to %4)">
<FieldBind Field="OldString" Text="old string" Id="1"/>
<FieldBind Field="Source" Text="source string" Id="2"/>
<FieldBind Field="NewString" Text="new string" Id="3"/>
<FieldBind Field="Output" Text="variable" Id="4" DesignerType="ParameterNames"/>
</RuleDesigner>
<Parameters>
<Parameter Name="OldString" Type="System.String, mscorlib" Direction="In" />
<Parameter Name="Source" Type="System.String, mscorlib" Direction="In" />
<Parameter Name="NewString" Type="System.String, mscorlib" Direction="In" />
<Parameter Name="Output" Type="System.String, mscorlib" Direction="Out" />
</Parameters>
</Action>
Make sure to also add a corresponding entry to the Authorized Types section of your web application’s web.config file:
<authorizedType Assembly="CustomWorkflowActions, Version=1.0.0.0, Culture=neutral, PublicKeyToken=..." Namespace="CustomWorkflowActions" TypeName="*" Authorized="True" />
In order to build the complete scenario, we’re going to need a few supporting SharePoint lists to hold our e-mail templates and the content of the weekly newsletters. I’d recommend using the custom list template to create the following lists, and then add new columns as needed:
- EmailTemplates: Has a text field for title, and a multiline text field (enhanced rich text) for the e-mail body. The permissions on the list are locked down to allow site owners to make changes and all other users to have read-only access.
- Newsletters: Has a text field for title, a multiline text field (enhanced rich text) for the newsletter body, and a users/groups field for the recipient distribution list.
Next, let’s create our first e-mail template. To accomplish this we can create a new ASPX page in SharePoint Designer, and then paste the form content into the body field of a new Newsletters list item. The simplest way to do this is to paste the content from SharePoint Designer’s design view into the text area for the new item’s body field; however, if you find that you’re having issues with style preservation, click the ‘Edit HTML Source’ button at the top of the text area to bring up an editor that will let you input the markup directly.
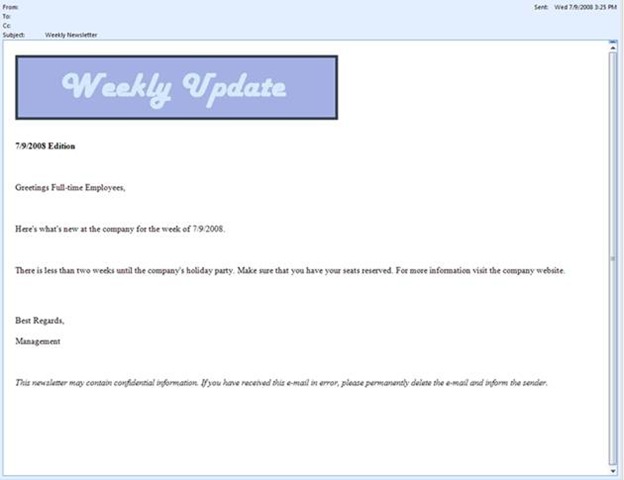
When authoring the e-mail, use placeholders to denote dynamic values that the workflow will need to plug-in at runtime. As an example, your template may look something like the following.

When you’re ready to create your item in the EmailTemplates list, make sure to set the title to something descriptive (e.g. WeeklyNewsletterTemplate).
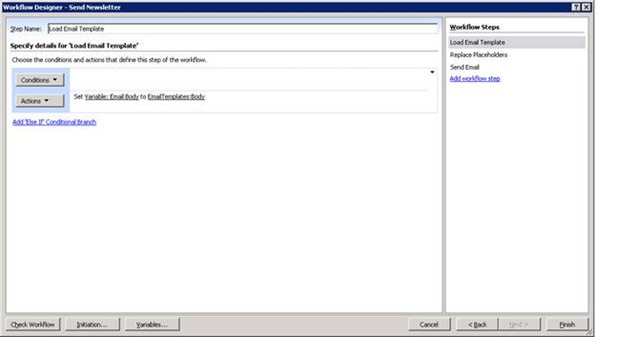
With everything else in place, it’s time to build the workflow that will send our newsletter. For my workflow, I chose to associate it with the Newsletter list, such that it will trigger each time a new newsletter is created. The workflow definition is small enough to design on a single step, but if you prefer, you can separate it out over a couple of steps, for clarity.
The first step is to retrieve the content for the body of the newsletter, by using the Set Variable action to create a new string variable (EmailBody) and setting it to the body of the EmailTemplate list item whose title matches “WeeklyNewsletterTemplate”.
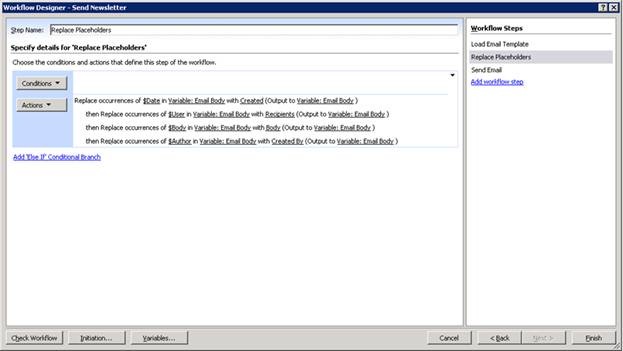
On the second step, we use our custom action to replace placeholders with the appropriate values and re-write the results back to the Email Body workflow variable:
- $Date gets replaced with the creation time of the newsletters list item
- $User gets replaced with the recipients field of the newsletters list item
- $Body gets replaced with the body field of the newsletters list item
- $Author gets replaced with the created by field of the newsletter list item
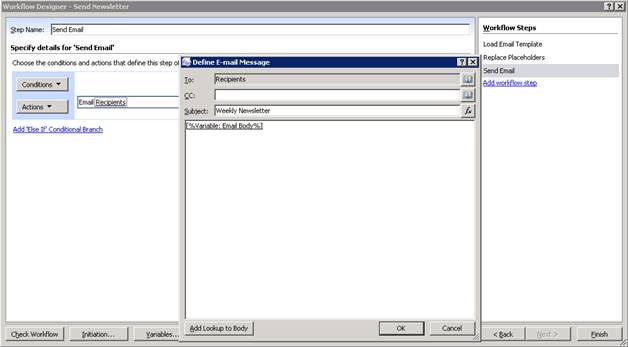
On the final step of the workflow, we simply configure a Send E-mail action to send the contents of our Email Body workflow variable to the recipients of the current newsletter.
With everything setup, we can now create a new item in the Newsletters list and our newsletter will be delivered to everyone on the distribution list defined in the recipients field.
And that’s all there is to it! In the future we can re-use the template for e-mails in other workflows, and also make changes to the format or look and feel of all such e-mails without having to update our workflow definitions.
Hope you found this helpful,
Jordan
Reusable Email Templates Files.zip
Comments
Anonymous
July 11, 2008
PingBack from http://blog.a-foton.ru/2008/07/creating-re-usable-email-templates-for-sharepoint-designer-2007-workflows/Anonymous
July 14, 2008
Form Based Authentification Configuring Forms Authentication in SharePoint 2007 Customizing the LoginAnonymous
July 16, 2008
I will be accumulating SharePoint Designer Workflow related resources here. In the future, this postAnonymous
July 16, 2008
I know it's a widely discussed problem, but still... The actions described above to create a custom activity resulted for me in the following:
- the activity appeared in the list of the workflow designer
- when I select it from the list, nothing happens, the sentence from the .actions files doesn't appear (nothing appeas in xoml code either) I've checked the web.confi many times :) What could it be?
Anonymous
July 27, 2008
Make sure that all class names in your .actions file are fully qualified and that the names have the correct casing. Once all names in the actions file match, try deleting the SPD proxy assembly cache on your client and re-starting SPD.Anonymous
March 15, 2009
The comment has been removedAnonymous
August 31, 2009
The comment has been removedAnonymous
May 03, 2011
Thanks! Below you find another solution to SharePoint 2010 templates. How To Implement A Generic Template Engine For SharePoint 2010 Using DotLiquid jbaurle.wordpress.com/.../how-to-implement-a-generic-template-engine-for-sharepoint-2010-using-dotliquid