Training Site Template: Part 3 - Custom Views and Forms
 Hi everyone,
This is Sean (I know, finally!), blogging to you with the next part of the Employee Training Scheduling and Materials site template walkthrough. I realize it's taken much too long to get the rest of this information out here - my hope is that you'll find these missing pieces useful in completing your picture of the template. Since it's been a while, you may want to refresh yourself on the lists and workflows that are in play on the site already, and perhaps review the full list of Application Templates for Windows SharePoint Services 3.0.
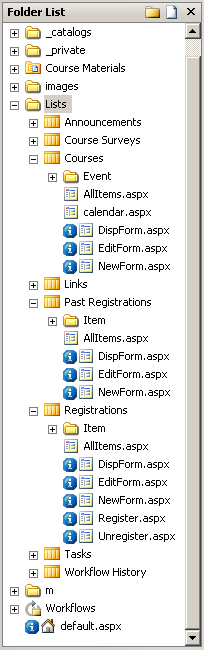 You may have noticed in your exploration of the Lists folder that a large number of the forms in this template are unghosted (the little
  next to the file indicates it's different from the version in the site definition). In particular, the so called 'big 3' forms - new, edit, and display - for Courses, Registrations, and Past Registrations have all been customized.
What we did with these pages was to add a Data Form Web Part (DFWP) that essentially replaces the default SharePoint List View Web Part (LVWP) and List Form Web Part (LFWP) with custom logic, built up using SPD's design surface.
This has some implications on how future customizations to the site will work: for one, the DFWP is not schema agnostic, and so if you alter the underlying list schema, these views and forms won't pick up on those changes (whereas standard LVWP/LFWP pages would). On the other hand, out of box SharePoint views don't run on XSLT, so it's hard to go super custom on them beyond just sorting, grouping, and filtering. An important one for this app is that there isn't an easy way to show and hide certain fields, precisely because these CAML views are schema agnostic.
Admittedly there are other ways to accomplish this - content types being a good example - but given the scenarios and the wealth of customizations we can apply to a DFWP, it seemed like a reasonable way to go.
Let me show you what I mean.
Help! I can't look into the Registrations list!
Registrations is a shared list across all Courses, managed largely by workflow. But since using these workflows requires that the users on the site are Contributors, you don't want them manually mucking about in the Registration list. Using item-level permissions (List Settings > Advanced Settings) to restrict edits to only your own items is good, but not sufficient, because I could change the course ID that my registration looks up to and basically hack my way into an already-full class.
Site administrators can work around what I'm about to show you, but for the typical Contributor coming to the site, we removed it from the quick launch bar and took out the edit links in the All Items view. Moreover, if you try to add a new item manually or edit an existing one by crafting the appropriate URL, you'll be stopped in your tracks:
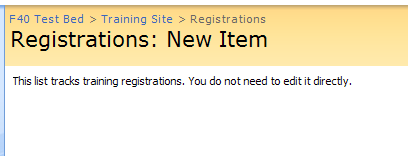
What's going on here? Crack open Registrations/NewForm.aspx in SharePoint Designer and take a look:
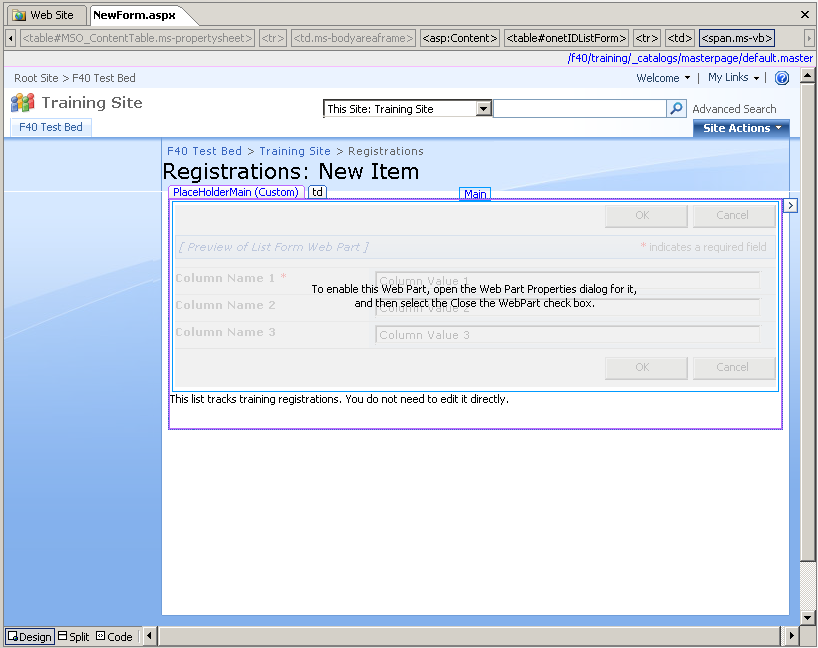
SharePoint gets a little temperamental when you delete the LFWP here or on any of the other big 3 form pages, so instead you'll want to hide it by doing the following:
- Right-click on the web part > Web Part Properties...
- Scroll down and expand the Layout section
- Make sure both Close the Web Part and Hidden are checked
- Click OK to close the dialog
Then you can simply type a message explaining where the missing view is. Do similarly on DispForm.aspx and EditForm.aspx, and you've effectively quarantined the list from manual edits. By the way - the admin workaround is to just create a new view against the list, but at least this way we've stopped Contributors from getting an unfair advantage in the registration process.
Beyond just locking down the out of box view, in the Courses list, we'll add a DFWP below the closed web part to house our custom functionality. Here's where the ability to show and hide certain fields in the form becomes useful.
Remaking the Courses list forms
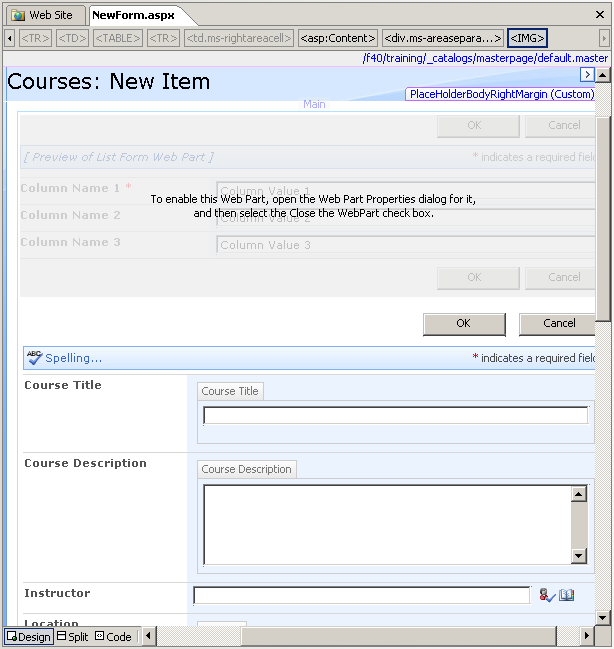 Take a quick look in Courses/NewForm.aspx and you'll see a similar sight to the new form in the Registrations list, the difference being there's another lookalike form below the closed LFWP. This is a DFWP acting as a new form - to recreate it, follow the steps above to close the LFWP, then:
- Place your insertion pointer right below the closed web part
- Click Insert > SharePoint Controls > Custom List Form...
- List or document library to use for form: Courses
- Content type to use for form: Event
- Type of form to create: New item form
- Click OK to see the new form
Yet this isn't quite what you see in the browser - where did these extras fields come from? Well, All Day Event, Recurrence, and Workspace are coming from the Event content type that Courses is based on. Filled Seats we added in part 1. However, we don't need the instructors to fill in these fields in the base scenario (though certainly you can extend the template to make sure of them) - so we just hide them from the view. A little CSS does the job:
- Pop open split view by clicking the Split button in the bottom of the design surface
- Click on the header for All Day Event - this should move your caret in code view
- Locate the <tr> tag above the controls (the tag selector can help here)
- Add a style to the <tr> tag so it now reads: <tr style="display: none">
- Repeat for Recurrence, Workspace, and Filled Seats
- Save the page and press F12 to view it in your browser
The fields are now out of sight, but because they're still embedded in the form the default values get plumbed back into the list - works out great for fields like Filled Seats where 0 is the only value that really makes sense from the start. You also can follow the same set of steps to redo the edit and display forms, hiding any fields that aren't relevant for your implementation. Just make sure to change the type of form you're creating in substep 3 above.
The Courses mega-view
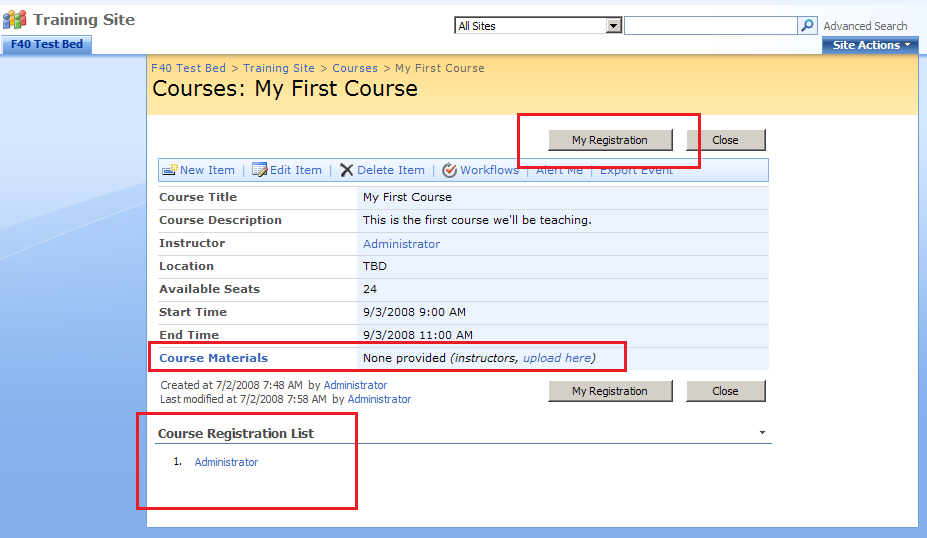 Okay, after hiding form fields the first few times, it's not all that exciting. How about some more information at my fingertips? If I'm looking at the details of a particular course, there's probably a few other things I'm wondering.
- Can I peek at the course materials?
- Who else am I taking the class with?
- Is there room for me? How do I sign up?
Fortunately all this can be done by progressively customizing Data Form Web Parts using the SPD design surface. I'll walk you through how to do each of these as it's presented in the template.
Window shopping
Remember the Course Materials document library we created? The idea is to have instructors upload their slides, etc. here, and set a lookup field that points back to the particular course. That makes sifting through the document library easier, but why not just show this in context with the course details? We can modify the DFWP we just created in Courses/DispForm.aspx to house a subview of the Course Materials library with this filter already applied.
 Here's how to do it:
With DispForm.aspx open, click into the DFWP, then switch to the Data Source Details task pane
Scroll down and click Related Data Sources > Link to another data source... , dismiss the warning
Expand SharePoint Libraries and add Course Materials, then hit Next >
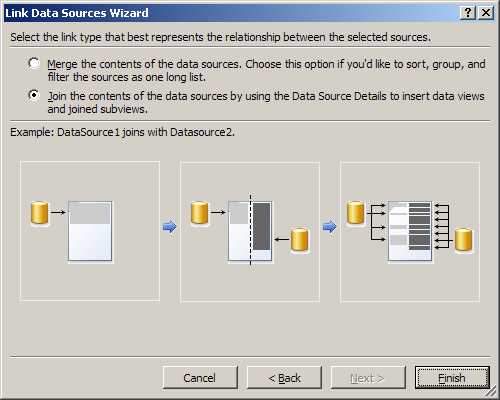
Select the second option (join), then hit Finish
Click into the last row in design view (if you've followed along, it should be Workspace)
Go to Table > Insert > Row Below, and you can perform the following optional steps:
- In the new row, type Course Materials in the first column, then highlight it and go to Insert > Hyperlink...
- Use ../../Course Materials/Forms/AllItems.aspx as the URL of your link, click OK
Move your cursor over to the second column, then flip over to code view
Insert the following snippet into the currently selected <td>:
<xsl:call-template name="GetCourseMaterials">
<xsl:with-param name="Rows" select="/dsQueryResponse/Course_Materials/Rows/Row[@Course = ddwrt:AutoNewLine(/dsQueryResponse/Courses/Rows/Row/@Title)]" />
</xsl:call-template>Move down to the nearest </xsl:template> tag within the main <xsl:stylesheet>
Insert the following snippet directly below that </xsl:template>:
<xsl:template name="GetCourseMaterials">
<xsl:param name="Rows" />
<xsl:choose>
<xsl:when test="count($Rows) <= 0">
None provided <em>(instructors, <a href="../../Course Materials/Forms/Upload.aspx">upload here</a>)</em>
</xsl:when>
<xsl:otherwise>
<ol>
<xsl:for-each select="$Rows">
<li>
<a href="{@FileRef}" mce_href="{@FileRef}">
<xsl:value-of select="@Title" />
</a>
</li>
</xsl:for-each>
</ol>
</xsl:otherwise>
</xsl:choose>
</xsl:template>Save and hit F12 to view it in your browser
The custom XSLT isn't anything too fancy, just helps to isolate the subview logic into a separate template. You can accomplish the same thing by inserting a subview from the Data Source Details task pane, applying a filter based on the course title, and doing a little conditional formatting to handle the no matching materials case. Note - some users have reported design time errors due to the use of ddwrt functions - these should render fine in the browser though; a simple workaround would be to remove it until you're ready to save, then replace it. Also, be sure that your data source matches the one provided in this template, e.g. in /dsQueryResponse/Courses/Rows/Row/@Title, if you've added additional data sources to the page you'll have to change Courses here to match.
Finding your classmates
 To get a list of registrants for a particular course, you'll actually need to look in two lists - Registrations for pending classes, and Past Registrations for finished classes. We need to do this since the same view page is going to serve both types of courses. An aggregate data source can help us do exactly this:
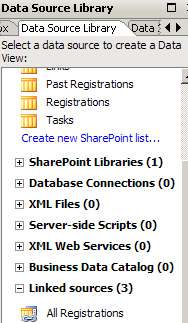
- In SPD, open the Data Source Library by going to Data View > Manage Data Sources...
- Expand the Linked sources category and click Create a new Linked Source... , then Configured Linked Source... in the dialog
- In the next screen, pick Registrations, then Past Registrations, then hit Next >
- Select the first option (merge), then hit Finish
- In the General tab, name it All Registrations, then click OK to dismiss the dialog
You should now see All Registrations listed in the data source library. Click it and choose Show Data from the menu to inspect the schema of your merged data source. If you scroll down and find Created By, you can then click and drag it onto the page to insert a DFWP against Created By for items in both lists. (Recall that Created By is used to identify a particular registrant, based on the workflow that performs attendee registration.)
 This'll get us the basic view, but not filtered down to just the course being shown on this page. We'll add a filter to key off the ID parameter passed in via the query string (another benefit of reusing the existing DispForm.aspx), by doing the following:
- Select the DFWP in design view, then click the OOUI
 chevron to drop down a menu
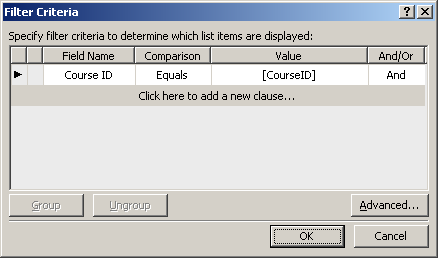
 - Click Filter: at the top, then in the section that reads Click here to add a new clause...
- Choose the following options: Field Name = Course ID, Comparison = equals, Value = Create a New Parameter...
- Name the new parameter CourseID
- Set the Parameter Source = Query String, Query String Variable = ID
From there, a few little improvements will get this view to mirror the one in the template:
- If you prefer the numbered list style, with the DFWP selected hit the OOUI and choose to Change Layout... . Scroll down until you see the preview with the numbered list in it (5th from the bottom?)and click OK. Your view should update to the new style.
- Also, if you want the "Courses Registration List" header to show up, right click the DFWP and select Web Part Properties... , then under the Appearance section change the Title and set the Chrome Type to Title Only.
- To customize the text shown when nobody has registered, select the DFWP and drop down the OOUI, choose Data View Properties... and check off/type "Nobody has registered for this course." under Display text if no matching items are found.
- You also probably noticed that the person field markup was escaped on the way back, so you can see a bunch of HTML goo in the view. To get it to render properly, select that xsl:value-of element, then hit the OOUI and choose to Format as: Rich Text. You'll get a warning to beware potential cross-site scripting attacks, but since the HTML coming back is SharePoint markup around a user field, you should feel comfortable dismissing the warning. The field should now be formatted properly.
Save the page, then browse to the site and drill into the details of one of the courses. You'll now see a view below the course details that shows who's registered for the class. Of course, this'll probably be empty until you implement the register and unregister pages. Let's go ahead and hammer out this last piece - we're almost there!
Sign me up
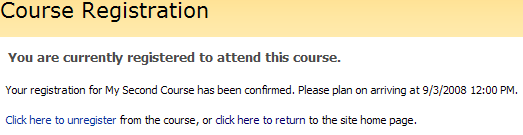
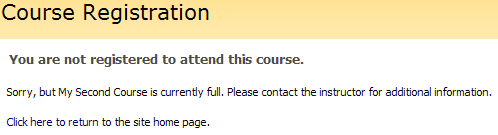
So you found the course you want, and you want in. Pushing the 'My Registration' button is your one-stop shop to getting on and off the seating list. That one-button registration leads us to another place where the DFWP is a rock star - enabling page flow scenarios using SharePoint workflow. By passing some interesting parameters to the next page, we can direct the flow of data traffic within the site, and ultimately set up cues for workflow to take care of the seating logic behind the scenes.
What's left for us to do is create Register.aspx and Unregister.aspx, which given the right parameters will look like one of these:
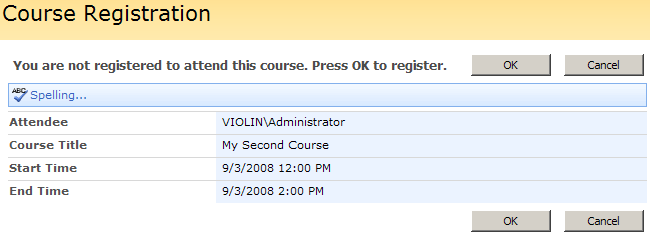

To get here, you'll need to wire up a link in Courses/DispForm.aspx to Registrations/Register.aspx. All we need to do is pass enough context to the new page via the query string, and we'll let it take care of the rest.
Locate <xsl:template name="dvt_1.body"> in the main DFWP
Below the following <xsl:param>, add this code snippet:
<xsl:variable name="IsUnlimitedSeating" select="$Rows[1]/@Total_x0020_Seats = 0" />
<xsl:variable name="AvailableSeating" select="$Rows[1]/@Total_x0020_Seats - $Rows[1]/@Filled_x0020_Seats" />
<xsl:variable name="IsAvailableSeating" select="$IsUnlimitedSeating or $AvailableSeating > 0" />
<xsl:variable name="RegisterURL" select="concat('../../Lists/Registrations/Register.aspx?CourseID=',$Rows[1]/@ID,'&CourseTitle=',$Rows[1]/@Title,'&CourseStartTime=',$Rows[1]/@EventDate,'&CourseEndTime=',$Rows[1]/@EndDate,'&IsAvailableSeating=',$IsAvailableSeating)" />Locate the two <td class="ms-toolbar" nowrap=""> tags - this is where the toolbar buttons for the fom reside
In each, below the <td> with 99% width, add the following:
<td class="ms-toolbar" nowrap="">
<a onclick="GoToLink(this); return false;" target="_self">
<xsl:attribute name="href"><xsl:value-of select="$RegisterURL" /></xsl:attribute>
<input type="button" class="ms-ButtonHeightWidth2" value="My Registration" name="btnFormAction1" />
</a></td>Save the page
From here, create two new ASPX pages (File > New > ASPX) called Register.aspx and Unregister.aspx. In each of these I'll leave it to you to copy the appropriate XSLT from the site template, but here's the gist of what's going on:
- Start with a custom new form against the Registrations list
- Set up internal parameters (OOUI > Parameters... ) for the DFWP based on the data available in the query string
- Use these parameters to construct variables in the XSLT
- Branch into different <xsl:template>s by testing the variables
The useful trick employed by these pages is to write different defaults into the form data, based on query string parameters. You can do this pretty generically with DFWPs bound to SharePoint lists by following these steps:
- Click on the control you're interested in setting a default for, it should be of type <SharePoint:FormField>
- Drop down its OOUI > Format as: Text Box to replace it with a standard <asp:Textbox>
- Switch over to code view and add a value="" attribute to the TextBox tag - you can evaluate XSLT by wrap your expression in curly braces, e.g. value="{$var}"
- Use our earlier trick to hide it from being viewed by the end user browsing the page
- Save the page and hit F12 to preview the results in your browser
It's not foolproof and certainly prone to tampering, but for the average user it's pretty effective at guiding them down the golden path for your application.
That about covers it for the custom views and forms in this app - thanks for sticking it out! While I didn't cover the non-DFWP views used in the training site template, you can easily reconstruct these yourself on the web by going to List Settings > View Name and using the fields, filters, grouping, etc. that you see as a reference guide. Start creating your new view by going to Actions > Create View - if you're working directly off the template, it's often easier start from an existing view that's close to what you want.
In the next installment we'll make sense of the customizations to default.aspx and how to build out the dashboard of the site. I'll also talk about some of the roundouts you might want to build off of the base template, and how to package up and re-deploy your changes into a new site template of your own.
Thanks,
Sean
Comments
Anonymous
July 07, 2008
Good to see you blogging Sean. Hope to see more awesome content on the blog from you! It was great to meet you at TechEd. I'll catch you again later I'm sure...Anonymous
July 16, 2008
I've read through the previous sections of this tutorial and found them very helpful. VERY glad to see this third part! Here's the question we're running into: we often have users who need to be registered for a training class by someone other than themselves. For example, our HR rep needs to sign new hires up for the next orientation class as soon as their offer is finalized. Of course, as things stand now, if they register, they don't have the option to enter an attendee name other than their own so they get the notification for the class and the roster shows their name rather than the new hire's name. Understanding that, in this case, the notification would fail as the enrolled person is not in the email system, what would you suggest to give us an option to do this? As an aside, we also have this issue with existing employees -- a manager decides to enroll one of his or her employees for a class, and it's the same scenario...the manager gets the notificaitons and reminders, and the class is in the manager's list of upcoming registrations and the manager's name is on the roster. Any help would be appreciated - I'm a total novice at this stuff, so it could be there is a rather obvious (to others) solution that I'm completely unaware of. Thanks, and glad to see this post on the blog!Anonymous
July 16, 2008
Back to basics question...While I have followed much of this tutorial by hand and gotten quite a bit of it to work (a newbie learning alot along the way), when I download and install the completed template I can build a new course but can't register myself (or anyone else) for it. Permissions issue? What gives? I want to see th finished product working as many others have apparently accomplished. Thanks - great tool which will help many I would say!Anonymous
July 21, 2008
The comment has been removedAnonymous
July 24, 2008
I guess I am missing something about how this template writes to the registrations list. I want to customize the Registrations and Past Registrations lists to include the Course Title and some other custom fields from the Courses list when a person signs up for a course. I have added the column for CourseTitle in the Registrations and Past Registrations lists as a lookup field. I have added the CourseTitle to the Parameters of the Register.aspx DFWP. I am obviously missing something, but I am still rather new to Sharepoint development and I have no clue where to go from here. If someone can help me out I would REALLY appreciate it! I need to get this site implemented in production, but this customization is one that is required before it can be moved into production. I also hope you or someone else can write a blog entry about creating a way for a manager (or someone else) to sign up another user for a course. My boss has already asked me if this would be something we can do in the future and it looks like quite a few other people are struggling with the same problem.Anonymous
July 24, 2008
Took me long enough to get this post up, but it's finally done (hopefully - please let me know ifAnonymous
August 06, 2008
Hi, Thank you for your tips. I was wondering is this possible? On the Display form/or edit form you find the course info. Is it possible to change the text of Export Event to something else? Where can i change this. And also above the course description the text editor gets enabled. Is there a way to disable this text editor for users. How can i do this? I have been playing around with sharepoint desinger and xsl editor but no luck yet.. Please help. Thanks!Anonymous
August 13, 2008
Hi, I was looking at these tutorials and I think they are amazing, and I tried to do a little customization to the forms and ended up getting lost in sharepoint designer. I'm a visual basic and java guy, and couldn't realy make sense of how to add a sharepoint formfield that would actually be recognized by sharepoint when I went into the workflow. I'm trying to find a way to add a section in the form that specifies what departments the class is open to because you wouldn't want, say an IT person taking a course designed for Accountants. I think I know how to implement it but I haven't had any luck with editing the form and having the form field recognized when I go into a workflow.Anonymous
August 20, 2008
Hello - I am testing the Application Template as provided from the downloads - no customization at this point. The "unregister" process is not restoring the seats as available. Has anyone else run into this issue with the provided template and how do we fix that?Anonymous
August 27, 2008
I also have the same problem as Robert. I am trying to add a 'Yex/No' type of field to the NewItem.aspx in the course list but I get 'Object cannot be rendered' type of problem. Please anyone who can help? Wanda: please visit the following website to fix the problem: http://www.sharepointblogs.com/dez/archive/2008/08/07/6048.aspx#19636Anonymous
October 02, 2008
Robert and Diana, Maybe this will help. I think Sean is addressing the reason behind your issue in the 4th paragraph of this posting - basically becasue the new/edit/display forms for the Courses list have been customized they won't automatically pick up changes that you might make to the list columns, but you can work around that fairly easily. First, add the column(s) that you want to the Courses list through the browser (go to the Courses list and choose Settings > List Settings). Once you have the column added open the newform.aspx page for the Courses list in SharePoint Designer. Delete the custom list form that is under the original (closed) LFWP, then add it back (Sean explains this part also in this post under the Remaking the Courses List Forms section). By doing this the custom list form will pick up the new column(s) you added. Hide any fields you don't want displayed and save your changes, then repeat for the edit and display forms - your forms should display without any error. You would want to do the same if you choose to remove any fields from the Courses list that don't apply to your specific scenario (i.e. we don't use the instructor field here).Anonymous
October 04, 2008
Hi Sean , The $AlreadyRegistered logic is not working somehow for me can you plese post some details of the logic. Thanks in advance.Anonymous
October 14, 2008
The comment has been removedAnonymous
October 21, 2008
I would like to understand how this site can be bundled up and deployed without having to redo the data view web parts. The issue we are experiencing is when the site is deployed to another environment, i.e from dev to test via a backup/restore or export/import, the list guids change and all the data views are broken. Any suggestions would be greatly appreciated. ThanksAnonymous
December 02, 2008
When I try to join the courses list with the Course Materials document library, I get a big bad SPD error that says "SPD can not render the XSLT in this Data View." Another part of the error says "Failed Setting processor systle sheet.". Do you know what is causing these errors?Anonymous
December 02, 2008
I am getting the same error "SPD can not render the XSLT in this Data View" when I try to complete Step 2 of the "Sign Me Up" section. Are there any work-arounds to this error?Anonymous
January 15, 2009
Not sure if anyone has pointed this out but the Query for the "Remove" link on "Courses I am attending" on the default main page is always coming up with the earliest ID and not the correlating ID for the course shown, this means that one could invaribly, with the default permissions, delete someone else's course registration. This makes the link essentially useless. Besides that there does not seem to be a way to prevent people from deleting Courses that have been defined in the calendar, there is of course a warning window that pops up before the deletion to recycle bin but most people click yes on prompts. This also kills the usefulness of the application. otherwise, awesome stuff!Anonymous
February 04, 2009
Sean, I followed the examples on my own site and it worked. however I now find the edit and display forms in the View: Drop down list. When I click on them they take me to the edit/display forms. Any idea why they showed up there and how do I remove them since they are not Views?Anonymous
April 08, 2009
I am using this template for training registration . in dispform.aspx page the My Registration button appears in top as well as buttom. i want to change that text to register if the user in not registered for training and want a text unregister if the user has already registered for training. the default template always display the same text My Registration which is so confusing and the users do not know how to unregister from the course. i always have to send them instruction for unregistration. which is so frustrating. does any one know how to reslove this issue ?? i am new to sharepoint so can someone help me? Thanks HariAnonymous
May 15, 2009
Hi, I am also testing this template. Question regarding the "Course" list. I want to create a view that shows only courses that are equal or greater than today. However, the "Start Time" does not exist in the filter dropdown list for me to choose. Any idea on how I can accomplish this? thanksAnonymous
November 10, 2009
Sean, Did anyone ever write Part 4? If so, please post the URL. Excellent series of aricles so far.Anonymous
November 10, 2009
I'm having trouble with the following step: "From here, create two new ASPX pages (File > New > ASPX) called Register.aspx and Unregister.aspx. In each of these I'll leave it to you to copy the appropriate XSLT from the site template, but here's the gist of what's going on:" Where do I find the site template to copy the XSLT from?Anonymous
December 29, 2009
Has part 4 been written? How do I package and re-deploy the site template with the changes I've made? The "save as site template" function doesn't save the workflows.Anonymous
March 06, 2010
I guess I am missing something about how this template writes to the registrations list. I want to customize the Registrations and Past Registrations lists to include the Course Title and some other custom fields from the Courses list when a person signs up for a course. I am obviously missing something, but I am still rather new to Sharepoint development and I have no clue where to go from here. If someone can help me out I would REALLY appreciate it! I need to get this site implemented in production, but this customization is one that is required before it can be moved into production.Anonymous
July 14, 2010
Our site admin has deployed this template to our SharePoint environment. However, our training division would like to see a report listing courses and attendees. Do you recommend solving the problem using a view or custom web part? I want to preserve the security measures Sean added to the Registrations and Past Registrations lists, but I want to present details in a read-only, filterable format. I'm a .NET developer new to SharePoint development.Anonymous
July 23, 2010
I am new to SharePoint development. My training department has asked me for a "report" that will display courses, course titles, instructors, and enrollees. Is a list or web part the best way to approach this. And will it need to be a custom?Anonymous
July 26, 2010
No part 4 ?- would be nice to have :)Anonymous
December 15, 2010
Sure would be nice to have; a.) method for the instructor to add a student (such as they arrive the day of) b.) method for the instructor to unenroll a student as they are a no-show c.) a way for the student to enroll as the event is occuring or just after. (Currently won't permit)Anonymous
December 15, 2010
oops... mean c.) a way for the student to UNenroll as the event is occuring or just after. (currently won't permit)Anonymous
July 05, 2011
It doesn't seem to be liking XSL anymore since of the IE updates. There an easy workaround?Anonymous
November 16, 2012
I would like to have instructor being able to add course across multiple weeks by entering data just one time.Anonymous
January 07, 2013
How can a manager request for a training by specifying training title, no. of participants? The trainer then creates a session and assigns it to the participants.Anonymous
January 28, 2013
I am able to see Courses I am attending, Courses I have taught, Courses I am teaching etc... but no data. What should be done in the backend to display the information?