The IoT Journey: Connecting to the Cloud
In the previous posts in this series (see posts one, two, three, four and five) we’ve walked through designing and building an application that reads a temperature and humidity sensor connected to a Raspberry Pi. In this post, we’ll create the cloud-based components necessary to receive the information from the Pi, and we’ll modify our application to transmit the data to the Azure IoT Suite.
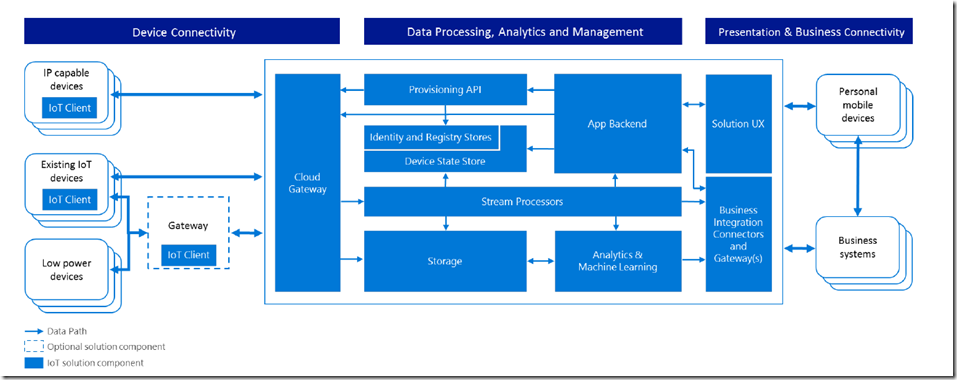
The Azure IoT Suite is a comprehensive set of cloud services and Application Programming Interfaces that enable you to construct a highly-scalable Internet of YOUR Things.
The use-cases for the Azure IoT Suite are basically limited only by your imagination. Many organizations are turning to IoT technologies to gain more and better insight on how their products and services are being used, along with creating tools and applications to make the lives of their customers better. (While there is a huge debate about the privacy concerns, one great example of this in my mind is how the OnStar service works; I have OnStar activated in my vehicle, and once per month I receive an email that gives me diagnostic information, such as tire pressure, oil life, upcoming maintenance, mileage, etc.. I also have the ability to use the service to locate my vehicle in a parking lot, or remote start.. This is all made possible by the fact that my vehicle is “connected” to the cloud).
The first step in connecting the Raspberry Pi to Azure IoT Suite is to provision an instance of the IoT suite in an Azure account. If you do not already have an Azure account, you can sign up for a free account here: https://azure.microsoft.com/en-us/free/
The free account will give you a $200 credit for one month that allows you to use any of the resources available in Microsoft Azure, and after the month if you choose not to pay for a subscription, you can still use free services including the IoT Suite. (Details are available at the link above)
Once you have an Azure account setup, you are ready to provision an instance of the IoT Suite.
Step One – Provision the IoT Suite
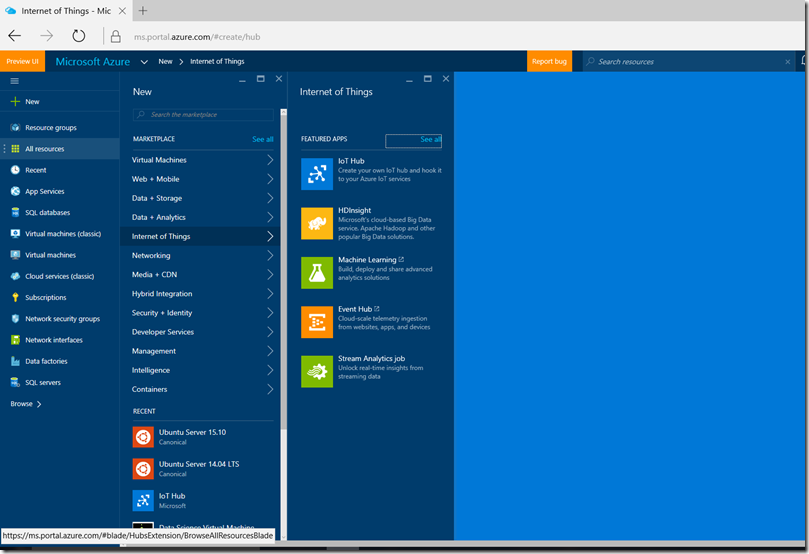
This is strangely the easiest part of the whole journey, even though the technology behind the scene is fairly complex. Browse to the Azure Management Portal (https://portal.azure.com ) and select the New item in the upper-left, then select Internet of Things, and then select IoT Hub:
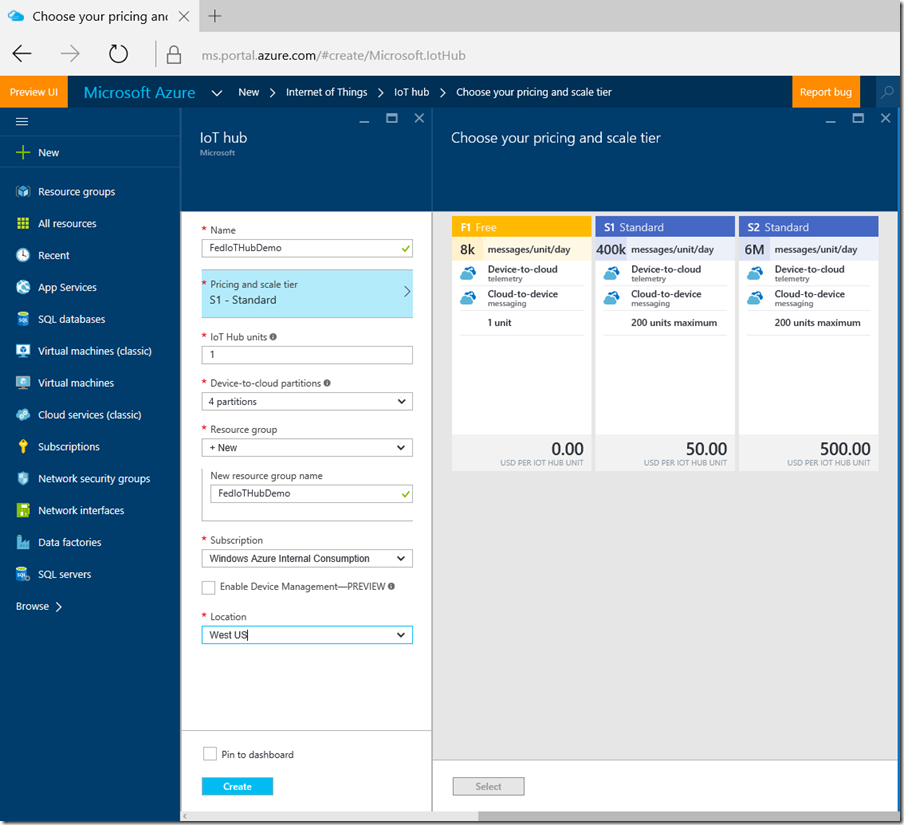
This will open the IoT Hub Configuration blade. You will need to give the hub a name, select a pricing level (the Free tier will work just fine for our purposes here) and then provide a name for a resource group that will be a container to hold all of the services that comprise the IoT Hub. Then select a location close to you:
Once you’ve selected the required elements, click the Create button to create the IoT Hub. This will take a few minutes to complete. During the process you can click the bell icon on the management portal to receive status updates of the provisioning process:
Once the deployment completes, you will see the following status message and you should also see a new icon in your management dashboard that represents the IoT Hub that you created.
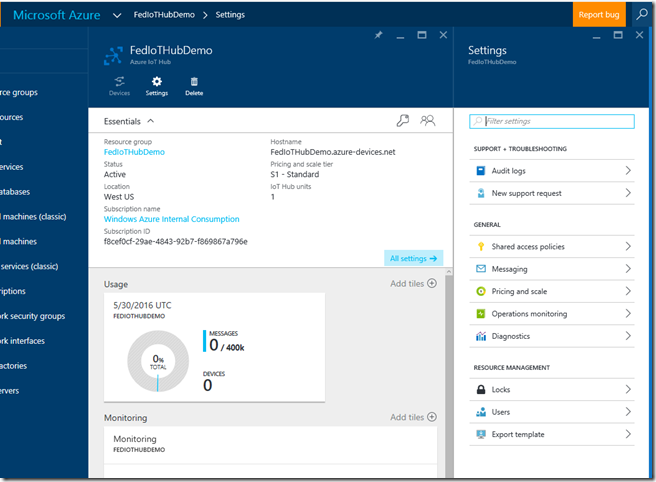
Click on the new icon on the management portal (if the icon does not appear, use the browse option on the left and then choose all/IoT Hubs and you will see it listed) to open the management blade for the new IoT Hub that you created:
Once the site is provisioned, you will need to obtain the connection string and authorization key in order to allow client applications to send data to the hub.
Step Two – Provision Your Device
The Azure IoT Suite is designed from the ground up with security in mind. Nothing can be sent to, or received from, the IoT environment that you’ve provisioned without proper credentials. In our case, we simply want to connect a single device (our Raspberry Pi sensor platform) and send data to the hub. This will involve provisioning a device and obtaining the appropriate connection string / shared access key for the device.
For the purposes of this tutorial, we’re going to take a simple path and not configure access roles or develop a full-featured application to manage the provisioning of devices on the hub (there is currently no mechanism to manually provision devices in the Azure IoT Hub, you must provision the device from the device itself).
In order to provision a device, we will need to create a simple application to provision a device. In order to build this application, we need the following information from the hub we just created:
- Host Name
- Connection String
- Shared Access Signature that allows provisioning of devices
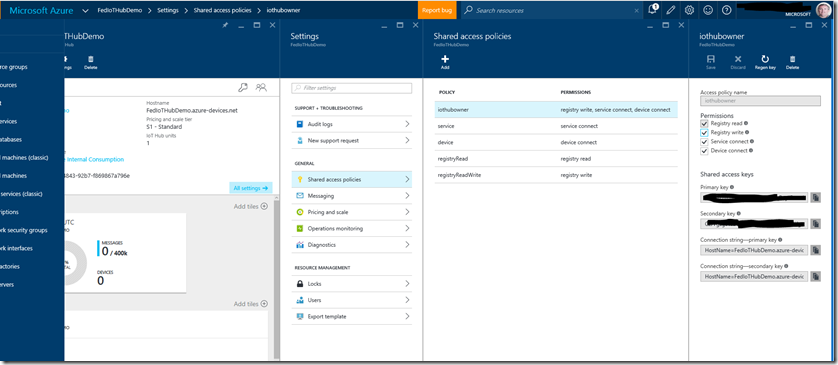
These values can be found in the Azure Management Portal. From the management blade that you opened above, click the Hostname value that is listed in the upper-center of the management blade (in the example above, the value is FedIoTHubDemo.azure-devices.net ) and then copy the value to the clipboard. Save this value to a text file (open Notepad and paste the value) as you will need to retrieve it later. Next click on Shared access policies in the settings blade to open the policies, and then select the iothubowner policy:
Copy the Primary Key and Connection string – primary key to the text file you created above. You will need these as well. Note that we are using the owner key, which gives us full access to the IoT Hub environment. In a production application we would not use the owner key here, but would rather create appropriate policies for the device and then use those keys. Since this is a simple “getting started” tutorial, we are using the simple path to test the application. I highly recommend that you read the IoT Hub Developer Guide to understand the ramifications of using the owner key before attempting to build a production application using the Azure IoT Hub.
The process to provision a new device in the Azure IoT Hub is:
- Connect to the hub using an appropriate Shared Access Signature
- Read the device registry to ensure that the device isn’t already provisioned
- Add a new device entry to the registry
- Obtain the new device Shared Access Signature
Typically the code to accomplish the above would be built into a client application that executes on the device. To simplify matters, we will build a separate application to register the device and will copy the Shared Access Signature into the application that we’ve previously developed on the Raspberry Pi.
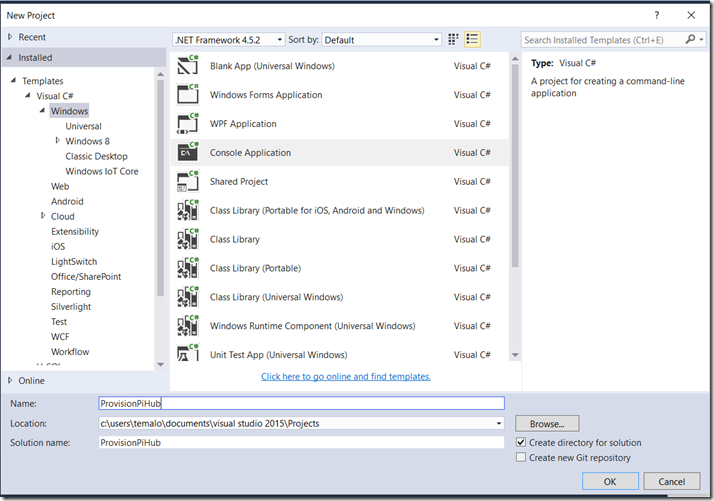
To provision the device, start Visual Studio and create a new Windows Console application named ProvisionPiHub:
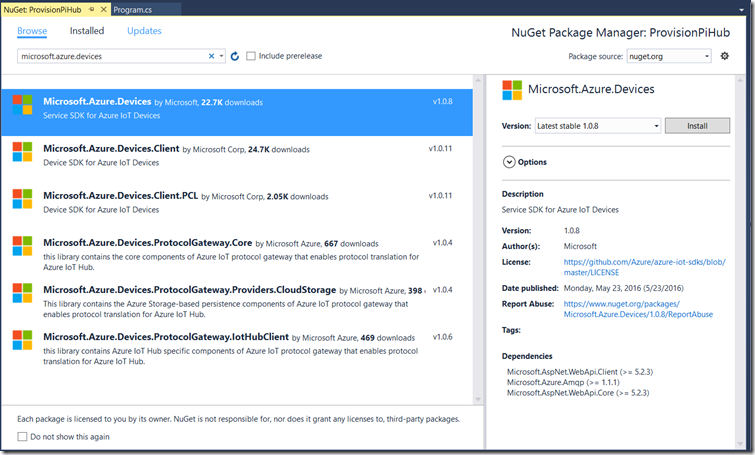
Once the solution is created, open the NuGet Package Manager (Project/Manage NuGet Packages) and then select the Browse tab. Type Microsoft.Azure.Devices into the search box, and then select the Microsoft.Azure.Devices package. Click Install, and then accept the license agreement when asked. This will add the necessary components to the project to connect to Azure IoT Hub..
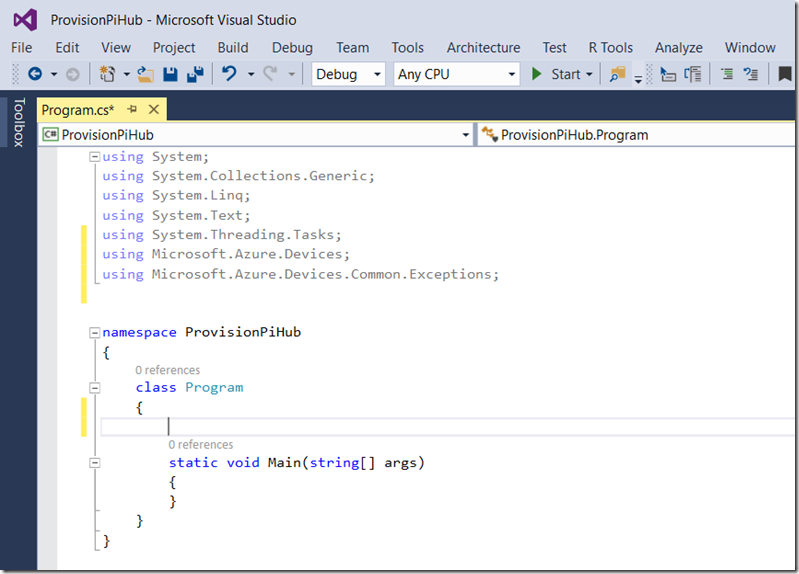
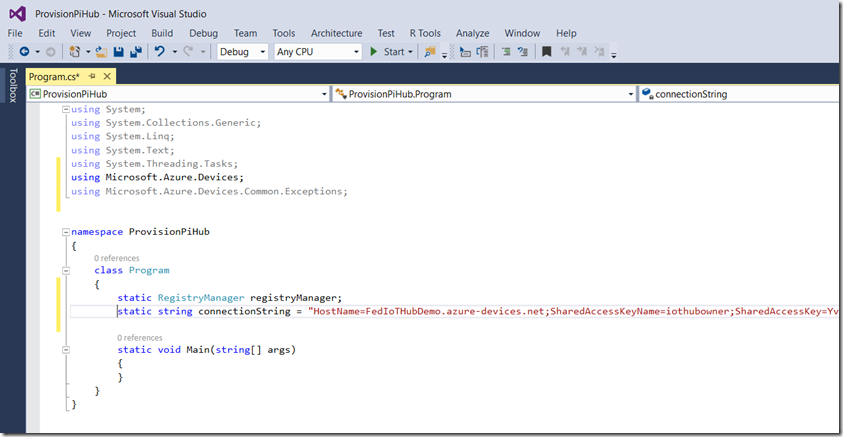
Once the package is installed, open the Program.cs file and add using statements for Microsoft.Azure.Devices and Microsoft.Azure.Devices.Common.Exceptions to the top of the file.
This will add references to the Azure IoT SDK. Next you will add static fields to the Program class that represent the RegistryManager as well as the connection string that you copied earlier as follows:
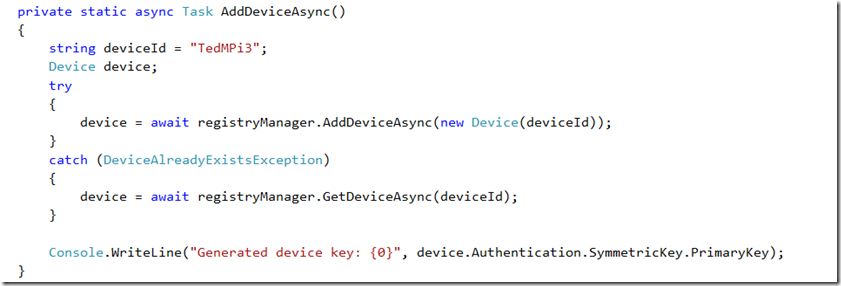
Next you will want to add an async method to register your device as follows (make sure you choose an appropriate name for your device):
Now in the Main method, add code to invoke the Registry Manager as well as the method above:
Run the program and note the generated Shared Access Signature that is displayed. Press Enter, and then Mark/Copy the generated signature. Paste it into the text file you created earlier so that you have it saved. (to Mark click the mouse pointer in the upper left corner and then select Mark. use the mouse to highlight the device key, and then press Enter to copy it to the clipboard). Once the device key is copied, you can press Enter to exit the application.
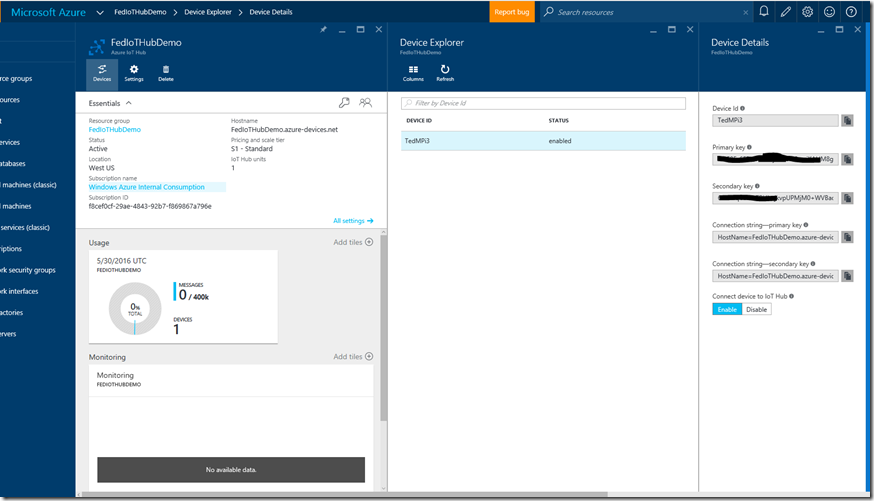
If for some reason you aren’t able to copy the key from the console application, you can refresh the Management Portal, and then select the devices blade and select the new device, and copy the Primary key from the details pane.
Now that you have created the device and copied the Shared Access Signature, you are ready to extend the application that was created in the last post to send the sensor data to the Azure IoT Hub.
Step Three – Extend the Sensor Application
Now that the device has been registered, we can extend the application that we developed in the previous post in this series to send sensor data to the cloud.
Since the application has already been created to collect the sensor data that we want to use, we will simply extend the application to transmit the data to Azure as well as writing it to the console. The process to communicate with Azure is relatively simple:
- Create an instance of the Azure Device Client class
- Use the appropriate Shared Access Signature to connect to the Azure IoT Hub
- Create a telemetry data point, using data from the sensors
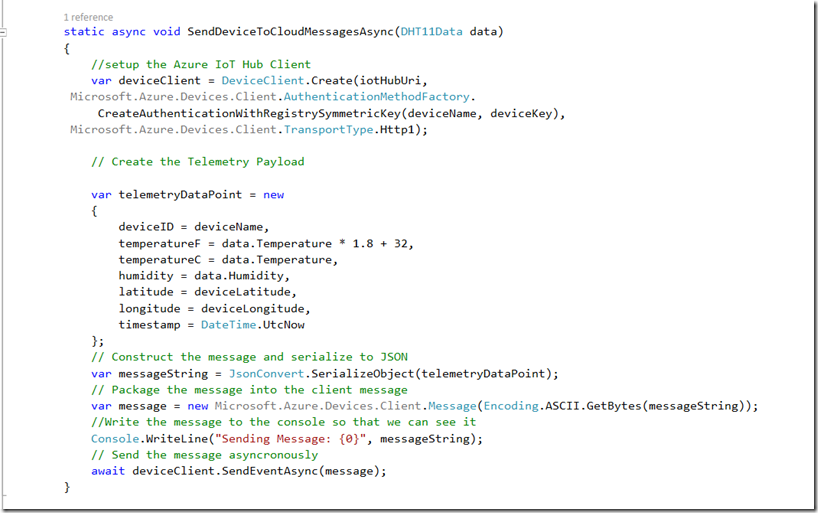
- Add the telemetry to a message, and serialize it to JSON message
- Add the message to the Client class, and transmit to Azure
Remember that this is a simple tutorial, so there is no real exception or retry logic involved. For production applications, be sure you understand the Transient Fault Handling as you will encounter transient faults.
To extend the DHT11Test application, open the solution in Visual Studio, and go to the NuGet package manager (Project / Manage NuGet Packages) and install the Microsoft.Azure.Devices and Microsoft.Azure.Devices.Client packages. Since we will be executing this application on the Raspberry Pi with Mono, we will also want to add the Mono.Security package. Once these packages are added, open the Program.cs file and add using statements for Microsoft.Azure.Devices.Client and Newtonsoft.Json.
Then, add static fields to the program class to represent your device and client. Note that part of the telemetry payload will include a location for the device. Since we do not have GPS enabled on our device, we manually lookup our geolocation and add it. For the ConnectionString and HubURI, make sure you use the values that you saved earlier, not the values that are present in the device information.
Then, in the main method, add a line to instantiate the device client. Add the code after you have started the DHT11 sensor.
Then, create an async method to send Device to Cloud messages. This will be called every time the DHT11 sensor returns data. We will also write the message to the console so that we can see what is being transmitted.
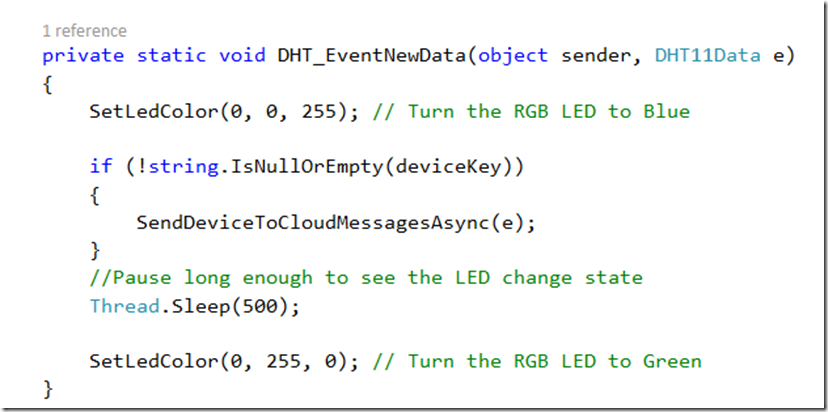
Then, in the DHT11NewData event handler, call the SendDeviceToCloudMessagesAsync method and pass the DHT11 sensor data:
This will ensure that messages are sent when the DHT11 sensor reports new data (which happens every 3 seconds in our example). Build the application and repair any errors that might have cropped up. Pay attention to the NuGet packages and make sure that you have all of the appropriate packages added.
Now that the application has been extended, you will need to deploy the application to the Raspberry Pi.
Step Four – Deploy the New Application
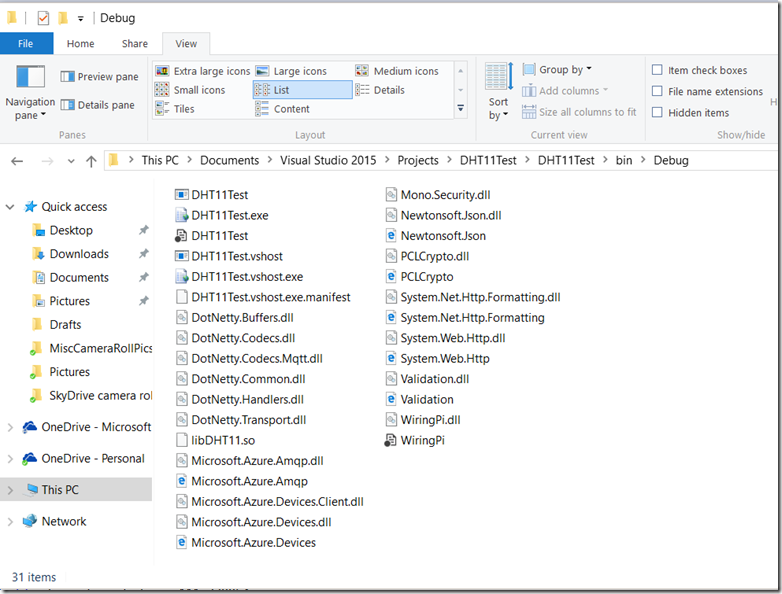
In earlier examples, deployment has been relatively easy because the libraries that we have used have been for the most part already present on the Raspberry Pi. In this case, however, there are several .dlls that we will have to deploy as part of our application. If you examine the output folder for the build, you’ll notice that there are many files that have been generated.
We will need to copy the .exe, along with all .dll files and the .xml files as well to the Raspberry Pi.
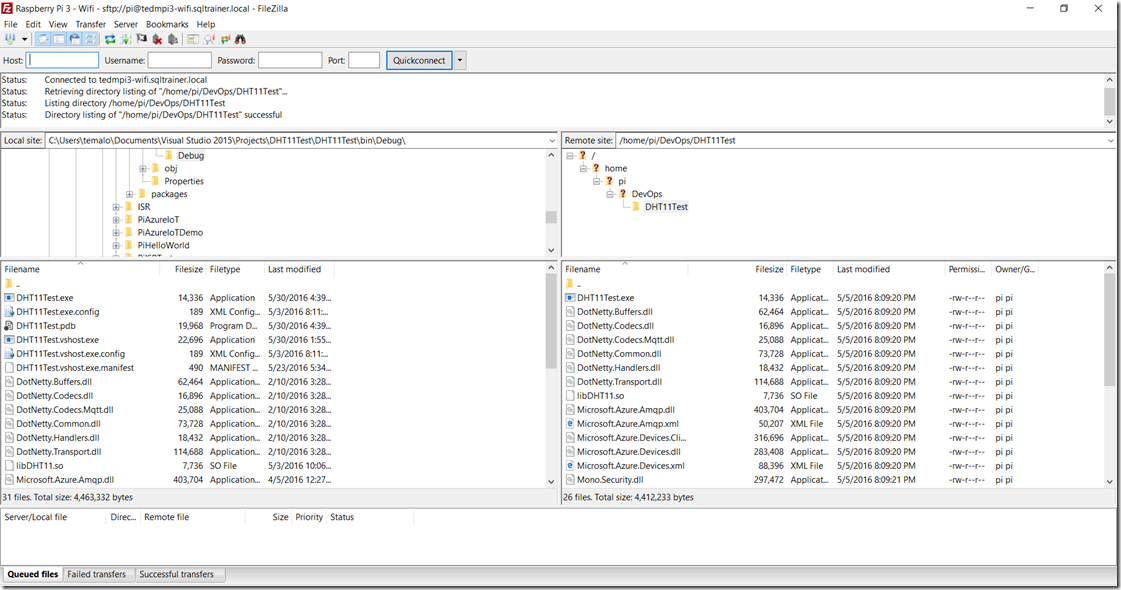
Use whatever copy program that you’ve used in previous examples (I use FileZilla) to copy the files to a folder on the Raspberry Pi. I made a new folder to hold the new version of the application, but it is entirely up to you how you want to store the program files on the Pi.
Once the application is deployed, you will need to ensure that the Pi is properly configured for https communication. Some versions of the OS have incomplete certificates configured for https communication, so it’s important to ensure that the Pi is ready.
Use an SSH client to connect to the Pi, and then execute the following command:
This will download and install the latest root certificates into the local client store. You will need to do this twice, once as a normal user, and once using sudo to ensure both certificate stores are updated.
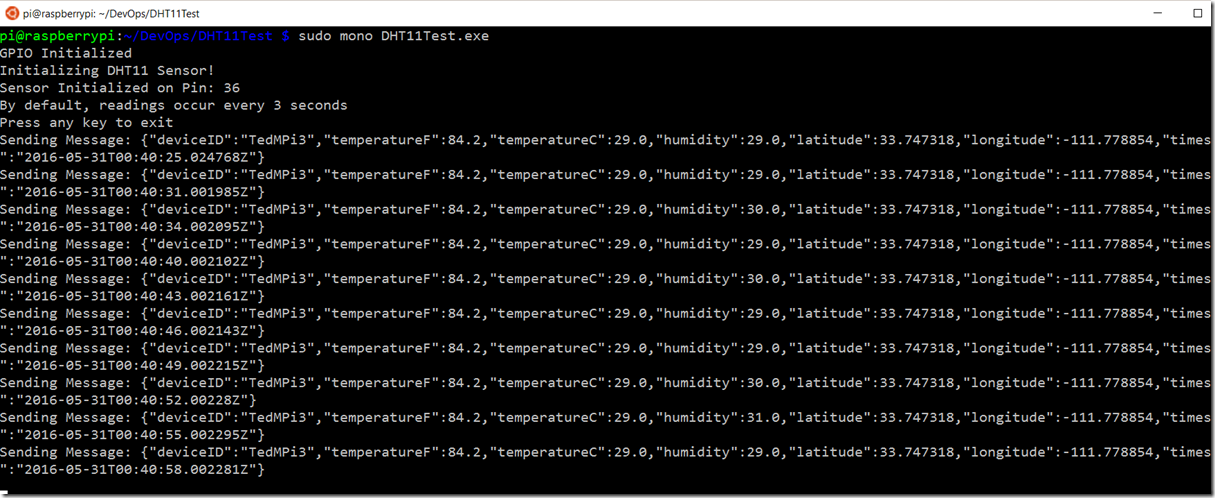
Now that the application is deployed and the certificate store updated, execute the application (don’t forget to execute with sudo) and watch the messages transmitted to Azure.
This will send a telemetry payload message containing the temperature in Fahrenheit and Celsius, as well as humidity and lat/long every 3 seconds. Leave the app running, and switch back to the Azure Portal and notice the Usage counter in the diagnostics now shows data being received by your device.
Conclusion
Congrats! You’ve now built a sensor platform that collects data from a sensor and transmits it to the cloud every 3 seconds (if you let the app run long enough, you will eventually run into an unhandled exception due to the nature of cloud communications. As mentioned above, we did not build in any retry logic or exception handling, so this will happen at some point)
In the next post of this series, we will take the final step on this journey and connect Microsoft Power BI to the IoT hub so that we can visualize the results of our sensor platform.
