Create subscriptions to offers in Azure Stack Hub
After you create an offer, users need a subscription to that offer before they can use it. There are two ways that users can subscribe to an offer:
- As a cloud operator, you can create a subscription for a user from within the administrator portal. Subscriptions you create can be for both public and private offers.
- As a tenant user, you can subscribe to a public offer when you use the user portal.
Create a subscription as a cloud operator
Cloud operators use the administrator portal to create a subscription to an offer for a user. Subscriptions can be created for members of your own directory tenant. When multi-tenancy is enabled, you can also create subscriptions for users in additional directory tenants.
If you don't want your tenants to create their own subscriptions, make your offers private, and then create subscriptions for your tenants. This approach is common when integrating Azure Stack Hub with external billing or service catalog systems.
After you create a subscription for a user, they can sign in to the user portal and see that they're subscribed to the offer.
To create a subscription for a user
In the administrator portal, go to User subscriptions.
Select Add. Under New user subscription, enter the following information:
Display name - A friendly name for identifying the subscription that appears as the User subscription name.
User - Specify a user from an available directory tenant for this subscription. The user name appears as Owner. The format of the user name depends on your identity solution. For example:
Microsoft Entra ID:
<user1>@<contoso.onmicrosoft.com>AD FS:
<user1>@<azurestack.local>
Directory tenant - Select the directory tenant where the user account belongs. If you haven't enabled multi-tenancy, only your local directory tenant is available.
Select Offer. Under Offers, choose an Offer for this subscription. Because you're creating the subscription for a user, select Private as the accessibility state.
Select Create to create the subscription. The new subscription appears under User subscription. When the user signs in to the user portal, they can see the subscription details.
To make an add-on plan available
A cloud operator can add a plan to a previously created subscription at any time:
- In the administrator portal, select All Services and then under the ADMINISTRATIVE RESOURCES category, select User subscriptions. Select the subscription you want to change.
- Select Add-ons and then select +Add.
- Under Add plan, select the plan you want as an add-on.
Create a subscription as a user
As a user, you can sign in to the user portal to locate and subscribe to public offers and add-on plans for your directory tenant (organization).
Note
If your Azure Stack Hub environment supports multi-tenancy, you can also subscribe to offers from a remote directory tenant.
To subscribe to an offer
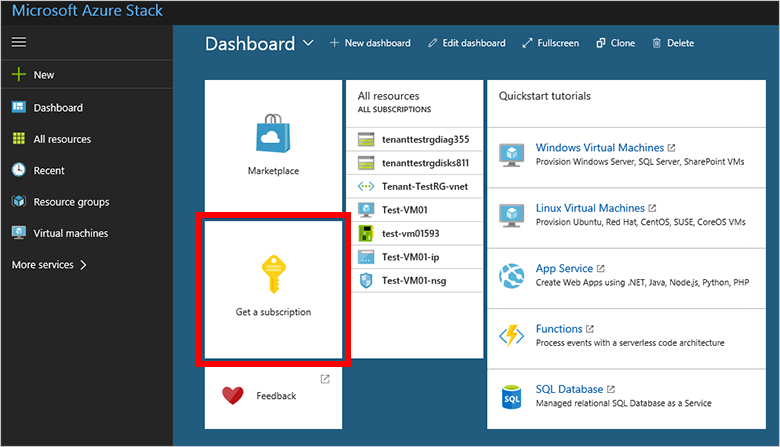
Sign in to the Azure Stack Hub user portal and select Get a Subscription.

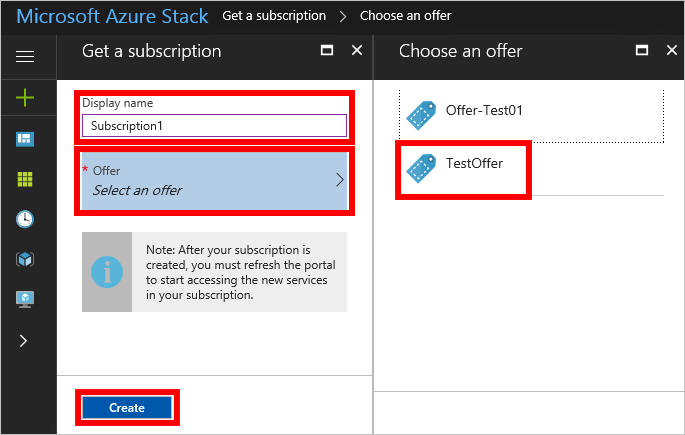
Under Get a subscription, enter the friendly name of the subscription in Display Name. Select Offer and under Choose an offer, pick an offer. Select Create to create the subscription.

After you subscribe to an offer, refresh the portal to see which services are part of the new subscription.
To see the subscription you created, select All services and then under the GENERAL category select Subscriptions. Select the subscription to see the subscription details.
To enable an add-on plan in your subscription
If the offer you subscribe to has an add-on plan, you can add that plan to your subscription at any time.
In the user portal, select All services. Next, under the GENERAL category, select Subscriptions, and then select the subscription that you want change. If there are add-on plans available, + Add plan is active and shows a tile for Add-on plans.
If + Add plan isn't active, then there are no add-on plans for the offer associated with that subscription.
Select + Add plan or the Add-on plans tile. Under Add-on plans, select the plan you want to add.
Next steps
Learn more about how a user can now deploy resources into their subscription:
- Several user quickstarts show how to provision Windows and Linux virtual machines using PowerShell, Azure CLI, and the user portal.
- A tutorial that uses an Azure Resource Manager template shows how to deploy an Ubuntu 16.04 virtual machine running Minikube to manage Kubernetes cluster.