Tutorial for configuring TypingDNA with Azure Active Directory B2C
In this walkthrough, learn how to integrate a sample online payment app in Azure Active Directory B2C with the TypingDNA APP. By using TypingDNA App, Azure AD B2C customers can comply with Payment Services Directive 2 (PSD2) transaction requirements through keystroke dynamics and strong customer authentication. Find more about TypingDNA here.
Azure AD B2C uses TypingDNA's technologies to capture the users typing characteristics and have them recorded and analyzed for familiarity on each authentication. This adds a layer of protection related to the riskiness of an authentication and evaluates the risk levels. Azure AD B2C can invoke other mechanisms to provide further confidence the user is who they claim to be by invoking Microsoft Entra multifactor authentication, forcing email verification, or any other custom logic for your scenario.
Note
This sample policy is based on SocialAndLocalAccountsWithMfa starter pack.
Scenario description

Sign-up
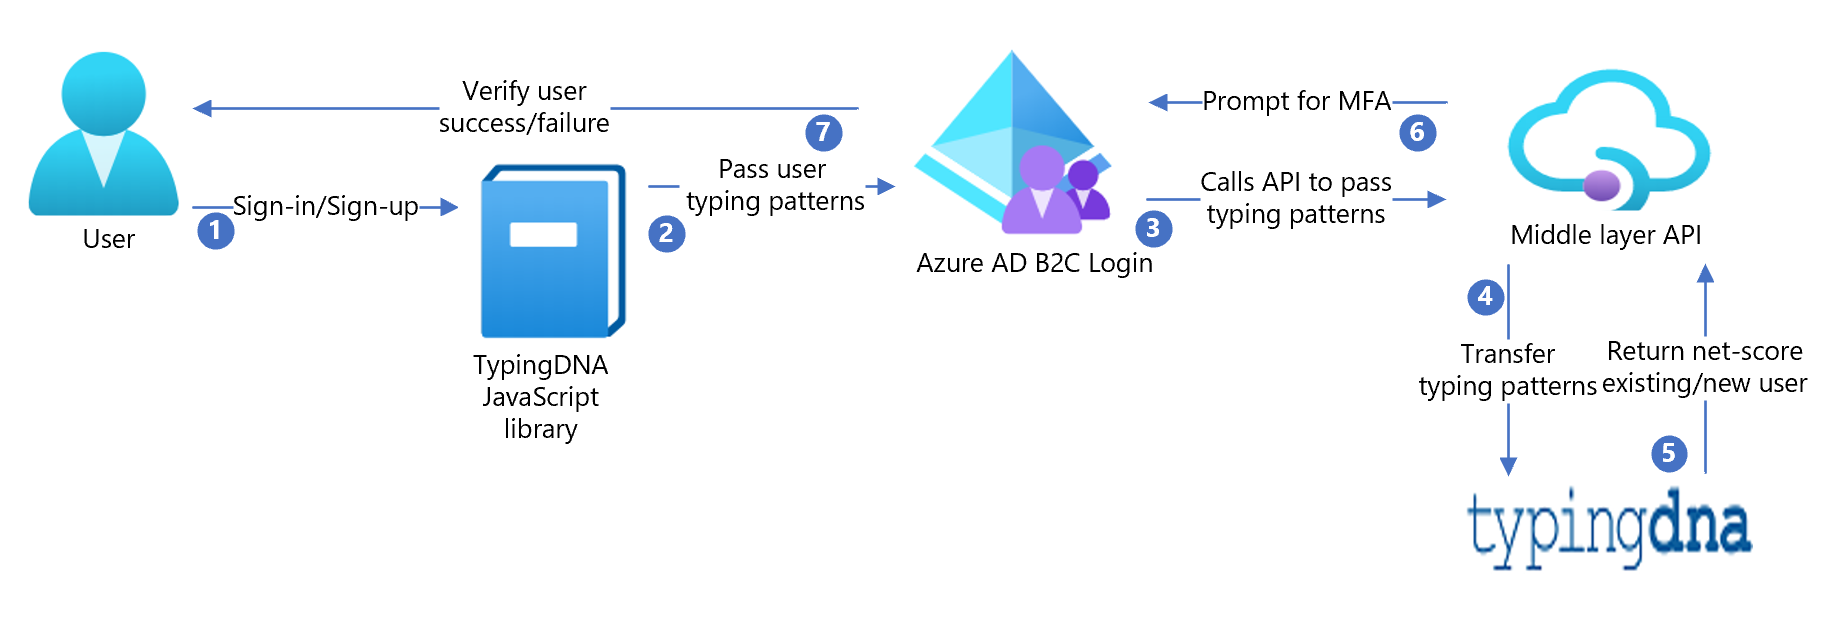
Azure AD B2C pages use TypingDNA's JavaScript library to record the user's typing pattern. For example, the username and password are recorded at sign-up for the initial enrollment, and then on every sign-in for verification.
When the user submits the page, the TypingDNA library will compute the typing characteristic of the user. After that, insert the information into a hidden text field which Azure AD B2C has rendered. This field is hidden with CSS.
The sample contains HTML files with the JavaScript and CSS modifications, and is referenced by the
api.selfasserted.tdnasigninandapi.selfasserted.tdnasignupcontent definitions. Refer to hosting the page content to host your HTML files.Azure AD B2C now has the typing pattern within the claim bag when the user submits their credentials. It must call an API (yours) to pass this data to the TypingDNA REST API endpoint. This API is included in the sample (typingDNA-API-Interface).
The middle layer API then passes the typing pattern data to TypingDNA REST API. At sign-up, the check user endpoint is called to confirm the user didn't exist and then the save pattern endpoint is called to save the user's first typing pattern.
Note
All calls to the TypingDNA REST API endpoint send a UserId. This must be a hashed value. Azure AD B2C uses the HashObjectIdWithEmail claims transformation to hash the email with a random salt and secret.
The REST API calls are modeled with validationTechnicalProfiles within LocalAccountSignUpWithLogonEmail-TDNA:
<ValidationTechnicalProfiles>

    <ValidationTechnicalProfile ReferenceId="AAD-UserWriteUsingLogonEmail-TDNA" />
    <ValidationTechnicalProfile ReferenceId="REST-TDNA-CheckUser" ContinueOnError="true"/>

    <ValidationTechnicalProfile ReferenceId="REST-TDNA-SaveUser"/>

</ValidationTechnicalProfiles>
Sign-in
At subsequent sign-in's, the user's typing pattern is computed in the same manner as at sign up using the custom HTML. Once the typing profile is within the Azure AD B2C claim bag, Azure AD B2C will call your API to call the TypingDNA REST API endpoint. The check user endpoint is called to confirm the user exists. Next, verify pattern endpoint is called to return the net_score. This net_score is an indication of how close the typing pattern was to the original at sign up.
This typing pattern is modeled with validationTechnicalProfiles within SelfAsserted-LocalAccountSignin-Email-TDNA:
<ValidationTechnicalProfiles>

    <ValidationTechnicalProfile ReferenceId="login-NonInteractive"/>

    <ValidationTechnicalProfile ReferenceId="REST-TDNA-CheckUser" ContinueOnError="false"/>

    <ValidationTechnicalProfile ReferenceId="REST-TDNA-VerifyUser"/>

    <ValidationTechnicalProfile ReferenceId="REST-TDNA-SaveUser">

        <Preconditions>

            <Precondition Type="ClaimEquals" ExecuteActionsIf="true">

            <Value>saveTypingPattern</Value>

            <Value>False</Value>

            <Action>SkipThisValidationTechnicalProfile</Action>

            </Precondition>

        </Preconditions>

    </ValidationTechnicalProfile>

</ValidationTechnicalProfiles>
If the user obtains a typing pattern that has a high net_score, you can save this using the TypingDNA save typing pattern endpoint.
Your API must return a claim saveTypingPattern if you would like the TypingDNA save typing pattern endpoint to be called by Azure AD B2C (via your API).
The example in the repo contains an API (TypingDNA-API-Interface) which is configured with the following properties.
Training mode - If the user has fewer than two patterns saved, always prompt for MFA.
If the user has 2-5 patterns saved, and the
net_scoreis lower than 50, prompt for MFA.If the user has 5+ patterns saved, and the
net_scoreis lower than 65, prompt for MFA.
These thresholds should be adjusted on your use case.
After your API has evaluated the
net_score, it should return a boolean claim to B2C -promptMFA.The
promptMFAclaim is used within a pre-condition to conditionally execute Microsoft Entra multifactor authentication.
<OrchestrationStep Order="3" Type="ClaimsExchange">

    <Preconditions>

        <Precondition Type="ClaimsExist" ExecuteActionsIf="true">

            <Value>isActiveMFASession</Value>

            <Action>SkipThisOrchestrationStep</Action>

        </Precondition>

        <Precondition Type="ClaimEquals" ExecuteActionsIf="true">

            <Value>promptMFA</Value>

            <Value>False</Value>

            <Action>SkipThisOrchestrationStep</Action>

        </Precondition>

    </Preconditions>

    <ClaimsExchanges>

        <ClaimsExchange Id="PhoneFactor-Verify" TechnicalProfileReferenceId="PhoneFactor-InputOrVerify" />

    </ClaimsExchanges>

</OrchestrationStep>
Onboard with TypingDNA
- Sign up for TypingDNA here
- Log in into TypingDNA dashboard and obtain API key and API secret. This will be needed in the API interface setup later
Integrate TypingDNA with Azure AD B2C
Host the TypingDNA-API-Interface at your hosting provider of choice
Replace all instances of
apiKeyandapiSecretin TypingDNA-API-Interface solution with the credentials from your TypingDNA dashboardHost the HTML files at your provider of choice following the CORS requirements here
Replace the LoadURI elements for the
api.selfasserted.tdnasignupandapi.selfasserted.tdnasignincontent definitions in theTrustFrameworkExtensions.xmlfile to the URI of your hosted HTML files respectively.Create a B2C policy key under identity experience framework in the Microsoft Entra blade in the Azure portal. Use the
Generateoption and name this keytdnaHashedId.Replace the TenantId's in the policy files
Replace the ServiceURLs in all TypingDNA REST API technical profiles (REST-TDNA-VerifyUser, REST-TDNA-SaveUser, REST-TDNA-CheckUser) with the endpoint for your TypingDNA-API-Interface API.
Upload policy files to your tenant.
Test the user flow
Open the B2C tenant and choose identity experience framework.
Select your previously created User Flow.
Select Run user flow
a. Application - select the registered app (sample is JWT)
b. Reply URL - select the redirect URL
c. Select Run user flow.
Go through sign-up flow and create an account
Sign out
Go through sign-in flow
Resulting JWT result will show the TypingDNA results
Live version
• MFA has been disabled in this test version, but you can see the result on whether MFA would have been prompted by the claim promptMFA after authentication.
• Sign up here and Sign in here
Next steps
For additional information, review the following articles: