Use your data securely with the Azure AI Foundry portal playground
Use this article to learn how to securely use Azure AI Foundry's playground chat on your data. The following sections provide our recommended configuration to protect your data and resources by using Microsoft Entra ID role-based access control, a managed network, and private endpoints. We recommend disabling public network access for Azure OpenAI resources, Azure AI Search resources, and storage accounts. Using selected networks with IP rules isn't supported because the services' IP addresses are dynamic.
Note
Azure AI Foundry's managed virtual network settings apply only to Azure AI Foundry's managed compute resources, not platform as a service (PaaS) services like Azure OpenAI or Azure AI Search. When using PaaS services, there is no data exfiltration risk because the services are managed by Microsoft.
The following table summarizes the changes made in this article:
| Configurations | Default | Secure | Notes |
|---|---|---|---|
| Data sent between services | Sent over the public network | Sent through a private network | Data is sent encrypted using HTTPS even over the public network. |
| Service authentication | API keys | Microsoft Entra ID | Anyone with the API key can authenticate to the service. Microsoft Entra ID provides more granular and robust authentication. |
| Service permissions | API Keys | Role-based access control | API keys provide full access to the service. Role-based access control provides granular access to the service. |
| Network access | Public | Private | Using a private network prevents entities outside the private network from accessing resources secured by it. |
Prerequisites
Ensure that the Azure AI Foundry hub is deployed with the Identity-based access setting for the Storage account. This configuration is required for the correct access control and security of your Azure AI Foundry Hub. You can verify this configuration using one of the following methods:
- In the Azure portal, select the hub and then select Settings, Properties, and Options. At the bottom of the page, verify that Storage account access type is set to Identity-based access.
- If deploying using Azure Resource Manager or Bicep templates, include the
systemDatastoresAuthMode: 'identity'property in your deployment template. - You must be familiar with using Microsoft Entra ID role-based access control to assign roles to resources and users. For more information, visit the Role-based access control article.
Configure Network Isolated Azure AI Foundry Hub
If you're creating a new Azure AI Foundry hub, use one of the following documents to create a hub with network isolation:
- Create a secure Azure AI Foundry hub in Azure portal
- Create a secure Azure AI Foundry hub using the Python SDK or Azure CLI
If you have an existing Azure AI Foundry hub that isn't configured to use a managed network, use the following steps to configure it to use one:
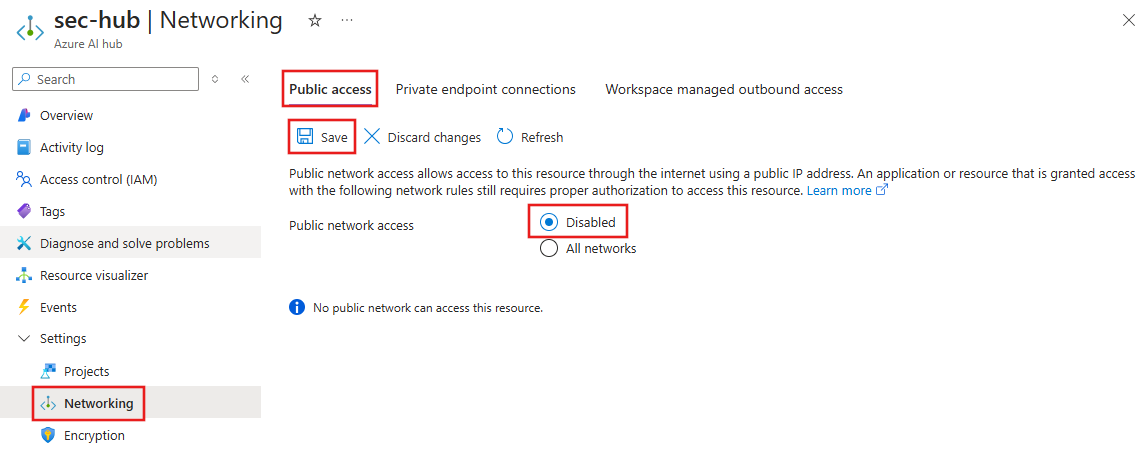
From the Azure portal, select the hub, then select Settings, Networking, Public access.
To disable public network access for the hub, set Public network access to Disabled. Select Save to apply the changes.
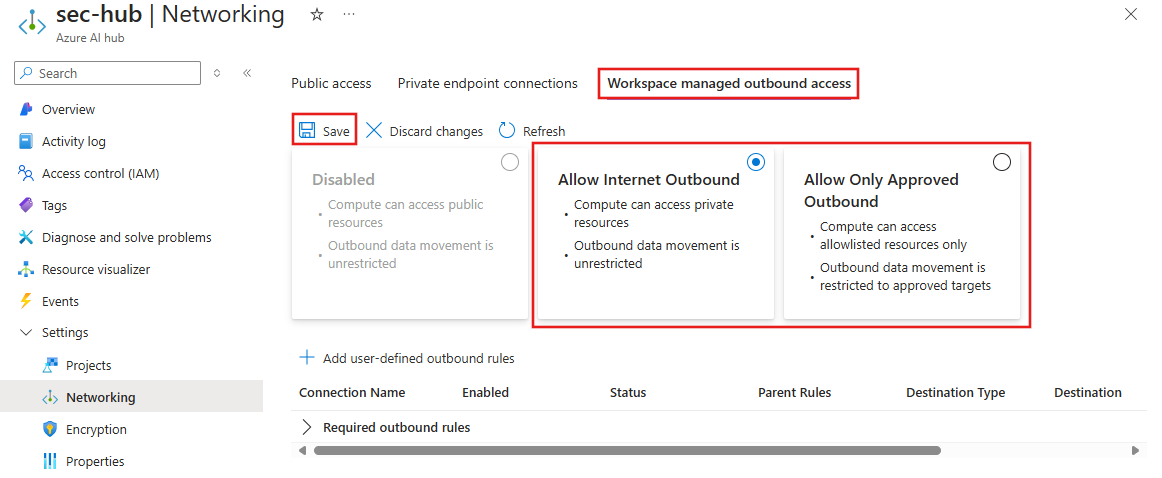
Select select Workspace managed outbound access and then select either the Allow Internet Outbound or Allow Only Approved Outbound network isolation mode. Select Save to apply the changes.
Configure Azure AI services Resource
Depending on your configuration, you might use an Azure AI services resource that also includes Azure OpenAI or a standalone Azure OpenAI resource. The steps in this section configure an AI services resource. The same steps apply to an Azure OpenAI resource.
If you don't have an existing Azure AI services resource for your Azure AI Foundry hub, create one.
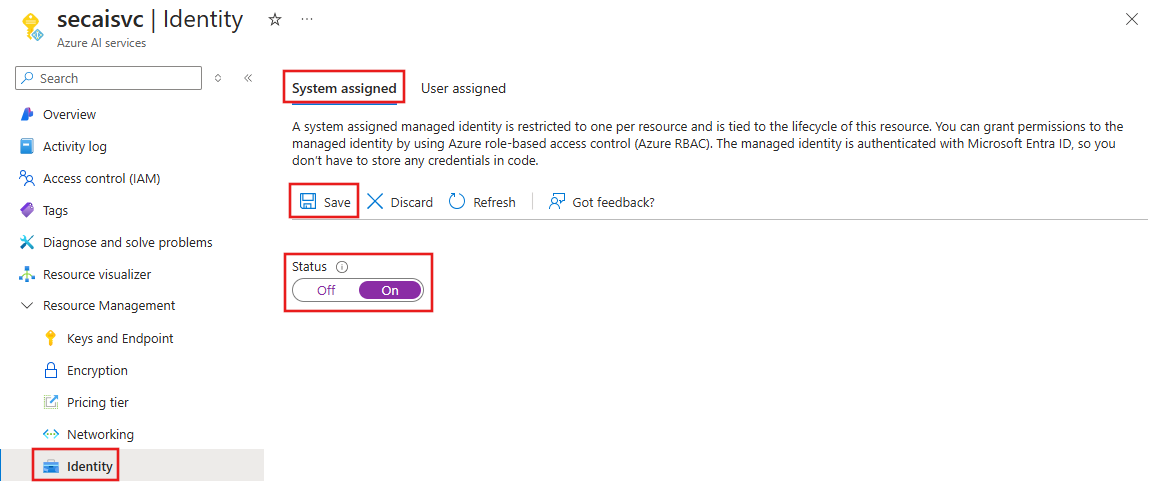
From the Azure portal, select the AI services resource, then select __Resource Management, Identity, and System assigned.
To create a managed identity for the AI services resource, set the Status to On. Select Save to apply the changes.
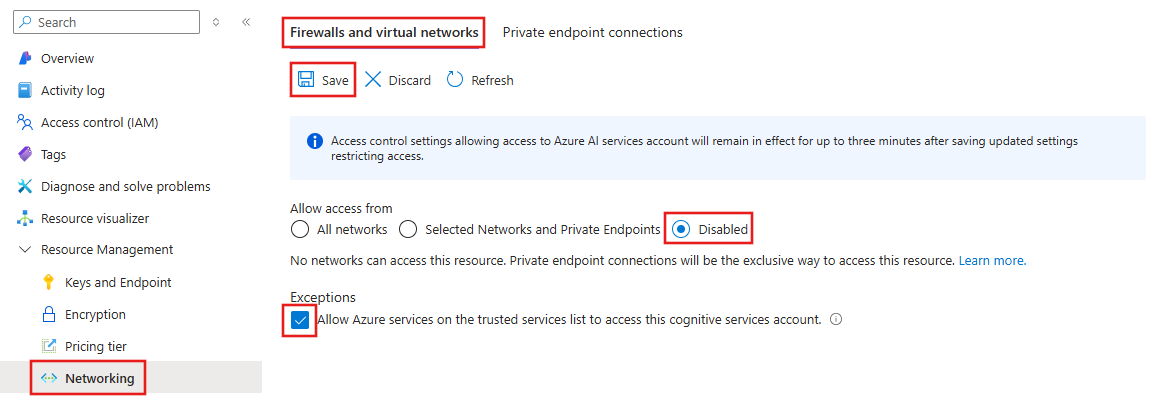
To disable public network access, select Networking, Firewalls and virtual networks, and then set Allow access from to Disabled. Under Exceptions, make sure that Allow Azure services on the trusted services list is enabled. Select Save to apply the changes.
To create a private endpoint for the AI services resource, select Networking, Private endpoint connections, and then select + Private endpoint. This private endpoint is used to allow clients in your Azure Virtual Network to securely communicate with the AI services resource. For more information on using private endpoints with Azure AI services, visit the Use private endpoints article.

- From the Basics tab, enter a unique name for the private endpoint, network interface, and select the region to create the private endpoint in.
- From the Resource tab, accept the target subresource of account.
- From the Virtual Network tab, select the Azure Virtual Network that the private endpoint connects to. This network should be the same one that your clients connect to, and that the Azure AI Foundry hub has a private endpoint connection to.
- From the DNS tab, select the defaults for the DNS settings.
- Continue to the Review + create tab, then select Create to create the private endpoint.
Currently you can't disable local (shared key) authentication to Azure AI services through the Azure portal. Instead, you can use the following Azure PowerShell cmdlet:
Set-AzCognitiveServicesAccount -resourceGroupName "resourceGroupName" -name "AIServicesAccountName" -disableLocalAuth $trueFor more information, visit the Disable local authentication in Azure AI services article.
Configure Azure AI Search
You might want to consider using an Azure AI Search index when you either want to:
- Customize the index creation process.
- Reuse an index created before by ingesting data from other data sources.
To use an existing index, it must have at least one searchable field. Ensure at least one valid vector column is mapped when using vector search.
Important
The information in this section is only applicable for securing the Azure AI Search resource for use with Azure AI Foundry. If you're using Azure AI Search for other purposes, you might need to configure additional settings. For related information on configuring Azure AI Search, visit the following articles:
If you don't have an existing Azure AI Search resource for your Azure AI Foundry hub, create one.
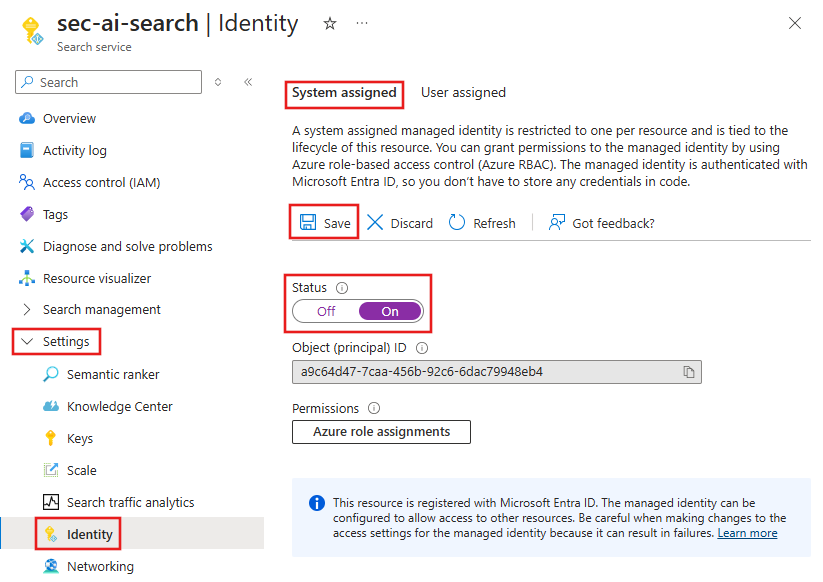
From the Azure portal, select the AI Search resource, then select Settings, Identity, and System assigned.
To create a managed identity for the AI Search resource, set the Status to On. Select Save to apply the changes.
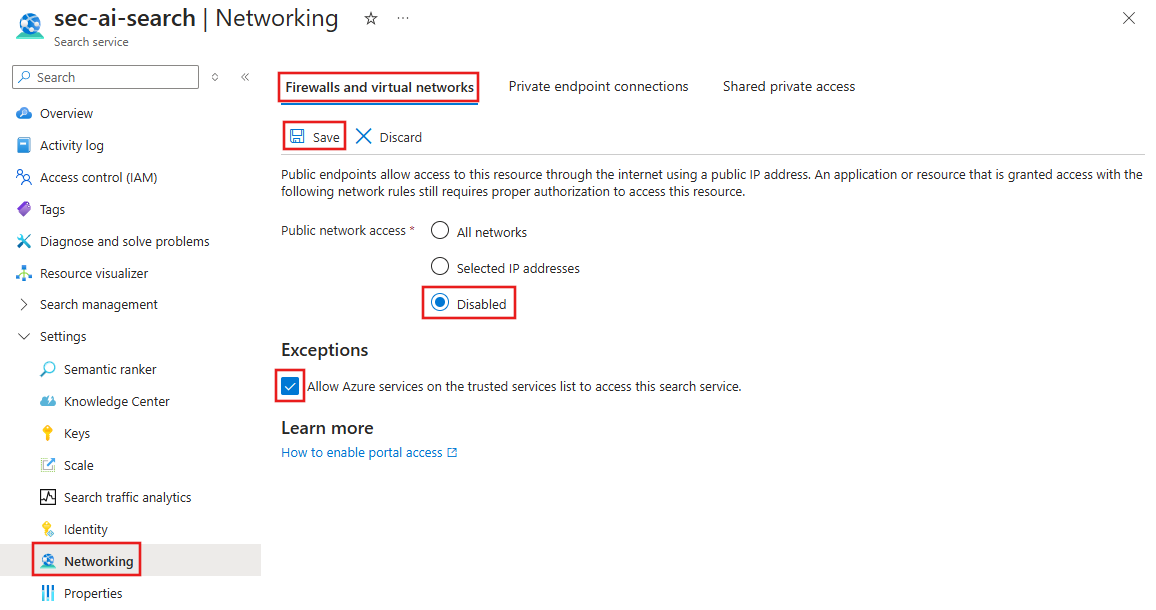
To disable public network access, select Settings, Networking, and Firewalls and virtual networks. Set Public network access to Disabled. Under Exceptions, make sure that Allow Azure services on the trusted services list is enabled. Select Save to apply the changes.
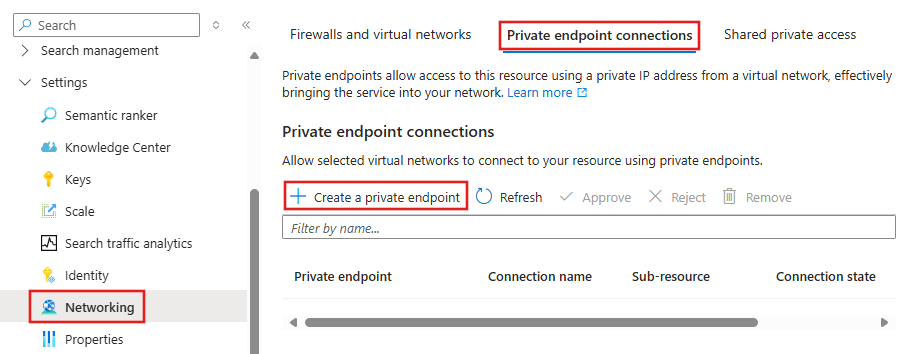
To create a private endpoint for the AI Search resource, select Networking, Private endpoint connections, and then select + Create a private endpoint.
- From the Basics tab, enter a unique name for the private endpoint, network interface, and select the region to create the private endpoint in.
- From the Resource tab, select the Subscription that contains the resource, set the Resource type to Microsoft.Search/searchServices, and select the Azure AI Search resource. The only available subresource is searchService.
- From the Virtual Network tab, select the Azure Virtual Network that the private endpoint connects to. This network should be the same one that your clients connect to, and that the Azure AI Foundry hub has a private endpoint connection to.
- From the DNS tab, select the defaults for the DNS settings.
- Continue to the Review + create tab, then select Create to create the private endpoint.
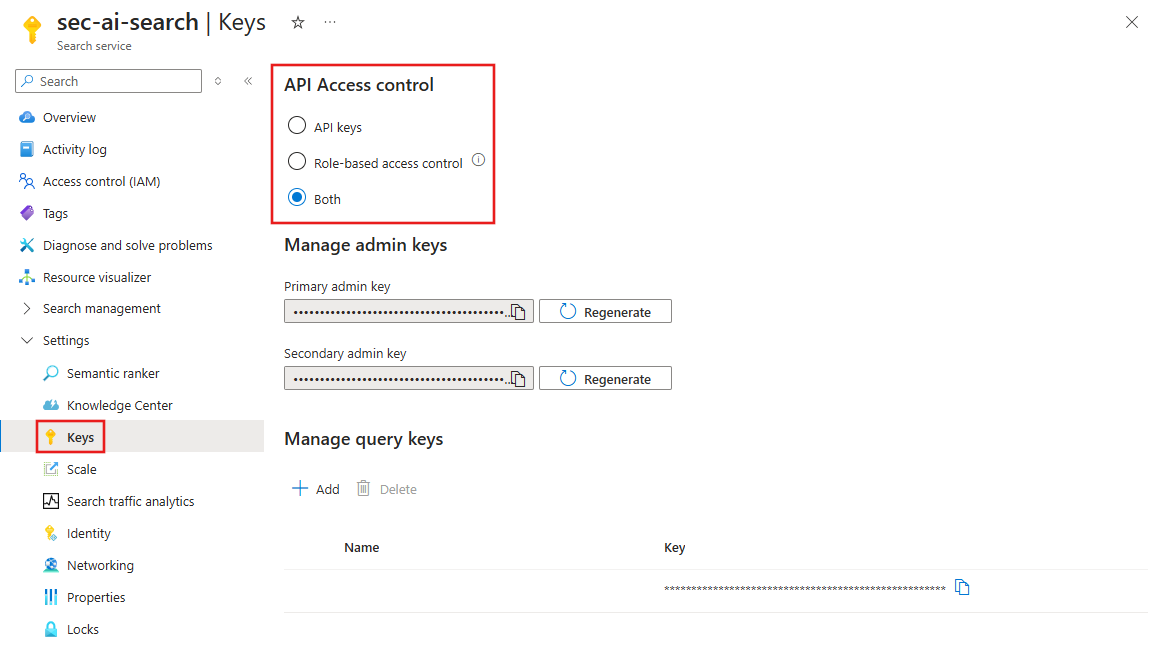
To enable API access based on role-based access controls, select Settings, Keys, and then set API Access control to Role-based access control or Both. Select _Yes to apply the changes.
Note
Select Both if you have other services that use a key to access the Azure AI Search. Select Role-based access control to disable key-based access.
Configure Azure Storage (ingestion-only)
If you're using Azure Storage for the ingestion scenario with the Azure AI Foundry portal playground, you need to configure your Azure Storage Account.
Create a Storage Account resource
From the Azure portal, select the Storage Account resource, then select Security + networking, Networking, and Firewalls and virtual networks.
To disable public network access and allow access from trusted services, set Public network access to Enabled from selected virtual networks and IP addresses. Under Exceptions, make sure that Allow Azure services on the trusted services list is enabled.
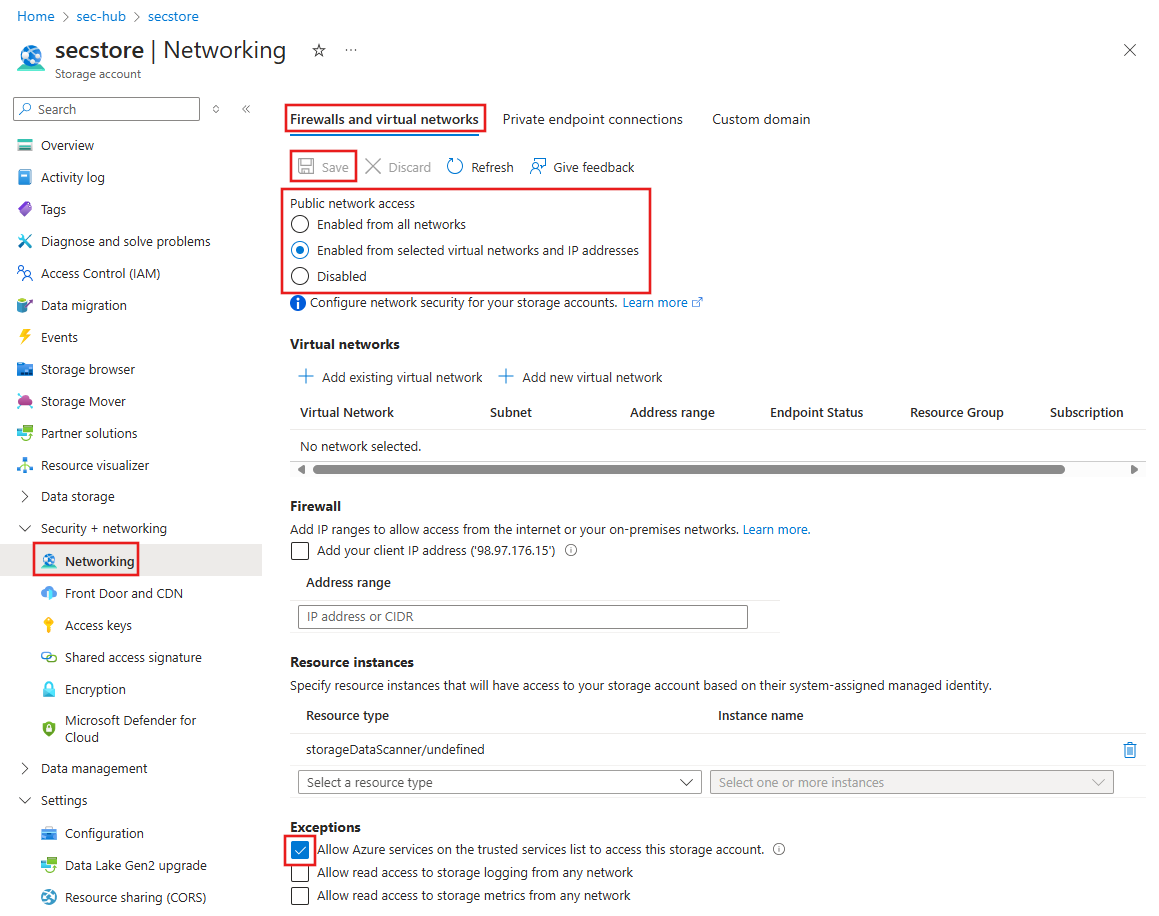
Set Public network access to Disabled and then select Save to apply the changes. The configuration to allow access from trusted services is still enabled.
To create a private endpoint for Azure Storage, select Networking, Private endpoint connections, and then select + Private endpoint.

- From the Basics tab, enter a unique name for the private endpoint, network interface, and select the region to create the private endpoint in.
- From the Resource tab, set the Target sub-resource to blob.
- From the Virtual Network tab, select the Azure Virtual Network that the private endpoint connects to. This network should be the same one that your clients connect to, and that the Azure AI Foundry hub has a private endpoint connection to.
- From the DNS tab, select the defaults for the DNS settings.
- Continue to the Review + create tab, then select Create to create the private endpoint.
Repeat the previous step to create a private endpoint, however this time set the Target sub-resource to file. The previous private endpoint allows secure communication to blob storage, and this private endpoint allows secure communication to file storage.
To disable local (shared key) authentication to storage, select Configuration, under Settings. Set Allow storage account key access to Disabled, and then select Save to apply the changes. For more information, visit the Prevent authorization with shared key article.
Configure Azure Key Vault
Azure AI Foundry uses Azure Key Vault to securely store and manage secrets. To allow access to the key vault from trusted services, use the following steps.
Note
These steps assume that the key vault has already been configured for network isolation when you created your Azure AI Foundry Hub.
- From the Azure portal, select the Key Vault resource, then select Settings, Networking, and Firewalls and virtual networks.
- From the Exception section of the page, make sure that Allow trusted Microsoft services to bypass firewall is enabled.
Configure connections to use Microsoft Entra ID
Connections from Azure AI Foundry to Azure AI services and Azure AI Search should use Microsoft Entra ID for secure access. Connections are created from Azure AI Foundry instead of the Azure portal.
Important
Using Microsoft Entra ID with Azure AI Search is currently a preview feature. For more information on connections, visit the Add connections article.
- from Azure AI Foundry, select Connections. If you have existing connections to the resources, you can select the connection and then select the pencil icon in the Access details section to update the connection. Set the Authentication field to Microsoft Entra ID, then select Update.
- To create a new connection, select + New connection, then select the resource type. Browse for the resource or enter the required information, then set Authentication to Microsoft Entra ID. Select Add connection to create the connection.
Repeat these steps for each resource that you want to connect to using Microsoft Entra ID.
Assign roles to resources and users
The services need to authorize each other to access the connected resources. The admin performing the configuration needs to have the Owner role on these resources to add role assignments. The following table lists the required role assignments for each resource. The Assignee column refers to the system-assigned managed identity of the listed resource. The Resource column refers to the resource that the assignee needs to access. For example, the Azure AI Search has a system-assigned managed identity that needs to be assigned the Storage Blob Data Contributor role for the Azure Storage Account.
For more information on assigning roles, see Tutorial: Grant a user access to resources.
| Resource | Role | Assignee | Description |
|---|---|---|---|
| Azure AI Search | Search Index Data Contributor | Azure AI services/OpenAI | Read-write access to content in indexes. Import, refresh, or query the documents collection of an index. Only used for ingestion and inference scenarios. |
| Azure AI Search | Search Index Data Reader | Azure AI services/OpenAI | Inference service queries the data from the index. Only used for inference scenarios. |
| Azure AI Search | Search Service Contributor | Azure AI services/OpenAI | Read-write access to object definitions (indexes, aliases, synonym maps, indexers, data sources, and skillsets). Inference service queries the index schema for auto fields mapping. Data ingestion service creates index, data sources, skill set, indexer, and queries the indexer status. |
| Azure AI services/OpenAI | Cognitive Services Contributor | Azure AI Search | Allow Search to create, read, and update AI Services resource. |
| Azure AI services/OpenAI | Cognitive Services OpenAI Contributor | Azure AI Search | Allow Search the ability to fine-tune, deploy and generate text |
| Azure Storage Account | Storage Blob Data Contributor | Azure AI Search | Reads blob and writes knowledge store. |
| Azure Storage Account | Storage Blob Data Contributor | Azure AI services/OpenAI | Reads from the input container, and writes the preprocess result to the output container. |
| Azure Blob Storage private endpoint | Reader | Azure AI Foundry project | For your Azure AI Foundry project with managed network enabled to access Blob storage in a network restricted environment |
| Azure OpenAI Resource for chat model | Cognitive Services OpenAI User | Azure OpenAI resource for embedding model | [Optional] Required only if using two Azure OpenAI resources to communicate. |
Note
The Cognitive Services OpenAI User role is only required if you are using two Azure OpenAI resources: one for your chat model and one for your embedding model. If this applies, enable Trusted Services AND ensure the Connection for your embedding model Azure OpenAI resource has EntraID enabled.
Assign roles to developers
To enable your developers to use these resources to build applications, assign the following roles to your developer's identity in Microsoft Entra ID. For example, assign the Search Services Contributor role to the developer's Microsoft Entra ID for the Azure AI Search resource.
For more information on assigning roles, see Tutorial: Grant a user access to resources.
| Resource | Role | Assignee | Description |
|---|---|---|---|
| Azure AI Search | Search Services Contributor | Developer's Microsoft Entra ID | List API-Keys to list indexes from Azure OpenAI Studio. |
| Azure AI Search | Search Index Data Contributor | Developer's Microsoft Entra ID | Required for the indexing scenario. |
| Azure AI services/OpenAI | Cognitive Services OpenAI Contributor | Developer's Microsoft Entra ID | Call public ingestion API from Azure OpenAI Studio. |
| Azure AI services/OpenAI | Cognitive Services Contributor | Developer's Microsoft Entra ID | List API-Keys from Azure OpenAI Studio. |
| Azure AI services/OpenAI | Contributor | Developer's Microsoft Entra ID | Allows for calls to the control plane. |
| Azure Storage Account | Contributor | Developer's Microsoft Entra ID | List Account SAS to upload files from Azure OpenAI Studio. |
| Azure Storage Account | Storage Blob Data Contributor | Developer's Microsoft Entra ID | Needed for developers to read and write to blob storage. |
| Azure Storage Account | Storage File Data Privileged Contributor | Developer's Microsoft Entra ID | Needed to Access File Share in Storage for Promptflow data. |
| The resource group or Azure subscription where the developer need to deploy the web app to | Contributor | Developer's Microsoft Entra ID | Deploy web app to the developer's Azure subscription. |
Use your data in Azure AI Foundry portal
Now, the data you add to Azure AI Foundry is secured to the isolated network provided by your Azure AI Foundry hub and project. For an example of using data, visit the build a question and answer copilot tutorial.
Deploy web apps
For information on configuring web app deployments, visit the Use Azure OpenAI on your data securely article.
Limitations
When using the Chat playground in Azure AI Foundry portal, don't navigate to another tab within Studio. If you do navigate to another tab, when you return to the Chat tab you must remove your data and then add it back.