Tutorial: Expose an on-premises Windows Communication Foundation (WCF) REST service to external client by using Azure WCF Relay
This tutorial describes how to build a WCF Relay client application and a service using Azure Relay. Like their original WCF counterparts, a service is a construct that exposes one or more endpoints. Each endpoint exposes one or more service operations. The endpoint of a service specifies an address where the service can be found, a binding that contains the information that a client must communicate with the service, and a contract that defines the functionality provided by the service to its clients. The main difference between WCF and WCF Relay is that the endpoint is exposed in the cloud instead of locally on your computer.
After you work through the sequence of sections in this tutorial, you'll have a running service. You'll also have a client that can invoke the operations of the service.
You do the following tasks in this tutorial:
- Install prerequisites for this tutorial.
- Create a Relay namespace.
- Create a WCF service contract.
- Implement the WCF contract.
- Host and run the WCF service to register with the Relay service.
- Create a WCF client for the service contract.
- Configure the WCF client.
- Implement the WCF client.
- Run the applications.
Prerequisites
To complete this tutorial, you need the following prerequisites:
- An Azure subscription. If you don't have one, create a free account before you begin.
- Visual Studio 2015 or later. The examples in this tutorial use Visual Studio 2019.
- Azure SDK for .NET. Install it from the SDK downloads page.
Create a Relay namespace
The first step is to create a namespace, and to obtain a Shared Access Signature (SAS) key. A namespace provides an application boundary for each application exposed through the relay service. An SAS key is automatically generated by the system when a service namespace is created. The combination of service namespace and SAS key provides the credentials for Azure to authenticate access to an application.
Sign in to the Azure portal.
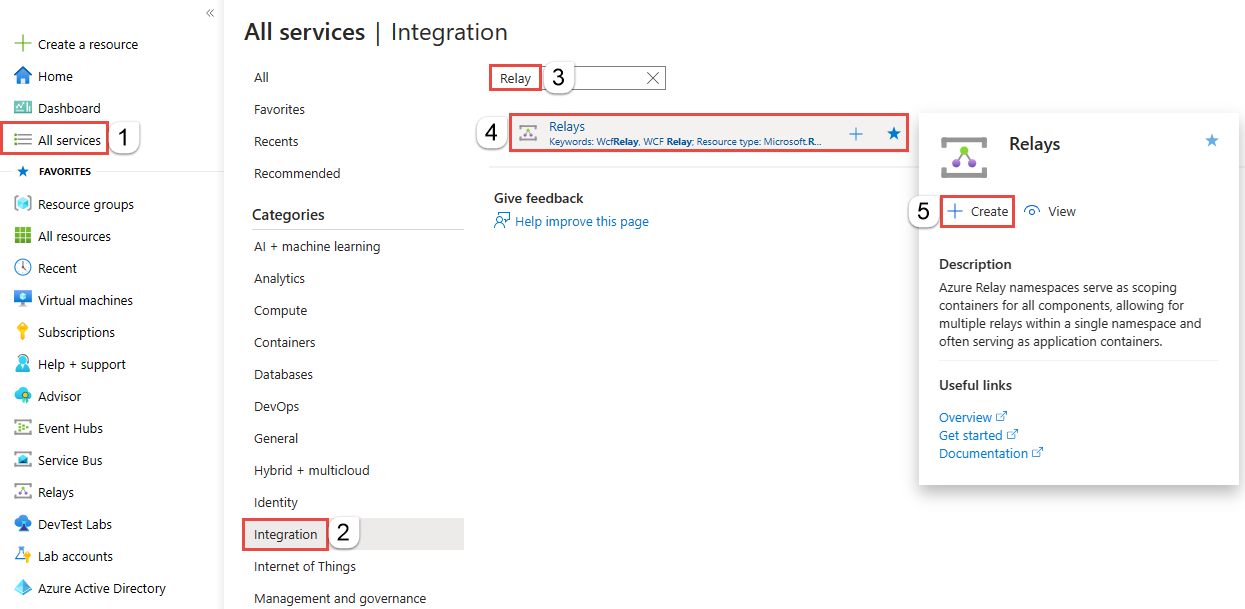
Select All services on the left menu. Select Integration, search for Relays, move the mouse over Relays, and then select Create.
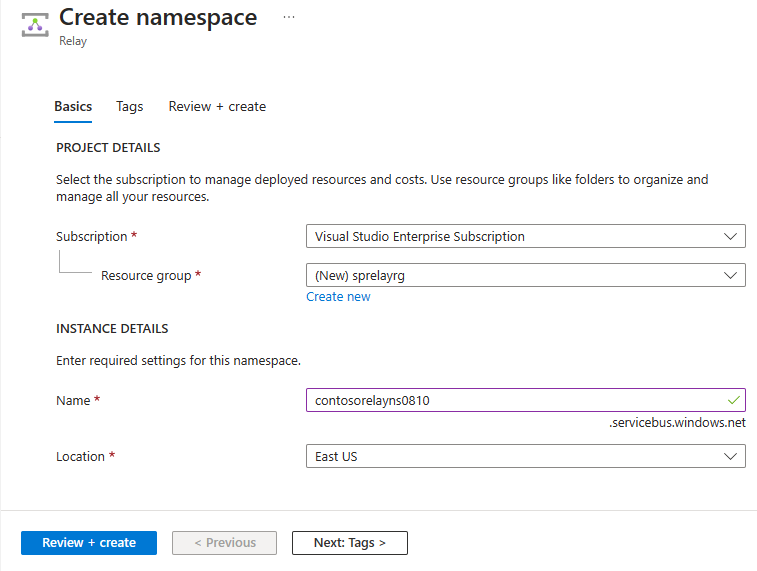
On the Create namespace page, follow these steps:
Choose an Azure subscription in which to create the namespace.
For Resource group, choose an existing resource group in which to place the namespace, or create a new one.
Enter a name for the Relay namespace.
Select the region in which your namespace should be hosted.
Select Review + create at the bottom of the page.
On the Review + create page, select Create.
After a few minutes, you see the Relay page for the namespace.

Get management credentials
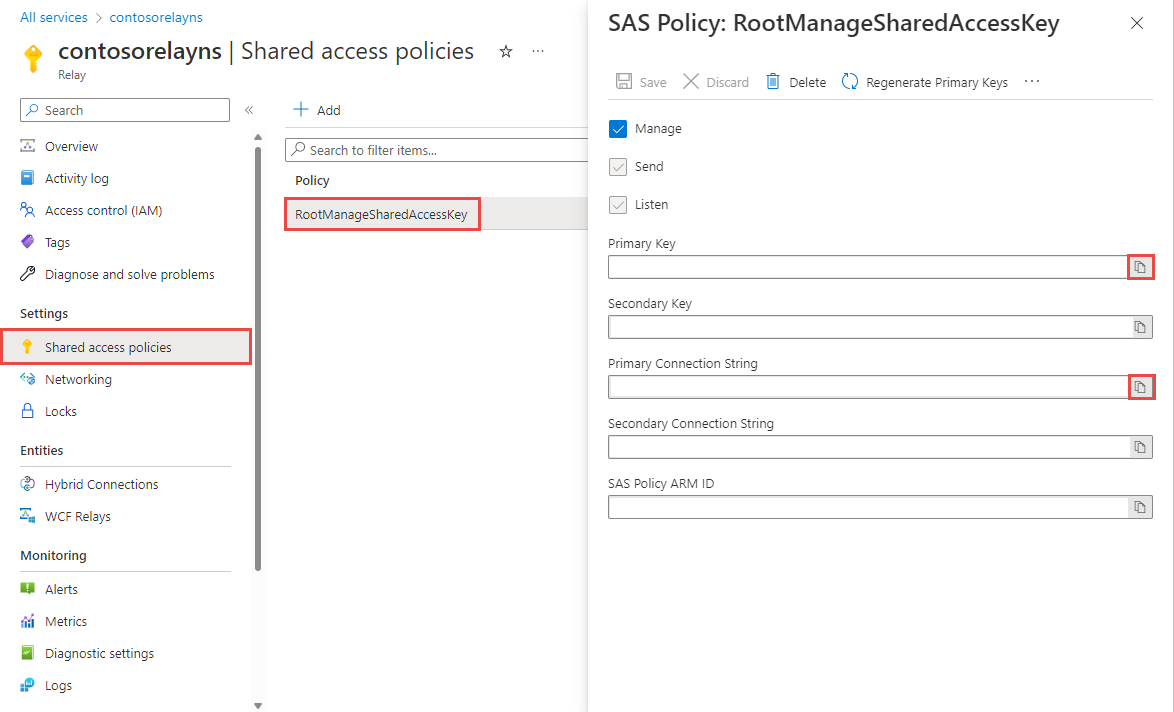
On the Relay page, select Shared access policies on the left menu.
On the Shared access policies page, select RootManageSharedAccessKey.
Under SAS Policy: RootManageSharedAccessKey, select the Copy button next to Primary Connection String. This action copies the connection string to your clipboard for later use. Paste this value into Notepad or some other temporary location.
Repeat the preceding step to copy and paste the value of Primary key to a temporary location for later use.
Define a WCF service contract
The service contract specifies what operations the service supports. Operations are web service methods or functions. Contracts are created by defining a C++, C#, or Visual Basic interface. Each method in the interface corresponds to a specific service operation. Each interface must have the ServiceContractAttribute attribute applied to it, and each operation must have the OperationContractAttribute attribute applied to it. If a method in an interface that has the ServiceContractAttribute attribute doesn't have the OperationContractAttribute attribute, that method isn't exposed. The code for these tasks is provided in the example following the procedure. For a larger discussion of contracts and services, see Designing and Implementing Services.
Create a relay contract with an interface
Start Microsoft Visual Studio as an administrator. To do so, right-click the Visual Studio program icon, and select Run as administrator.
In Visual Studio, select Create a new project.
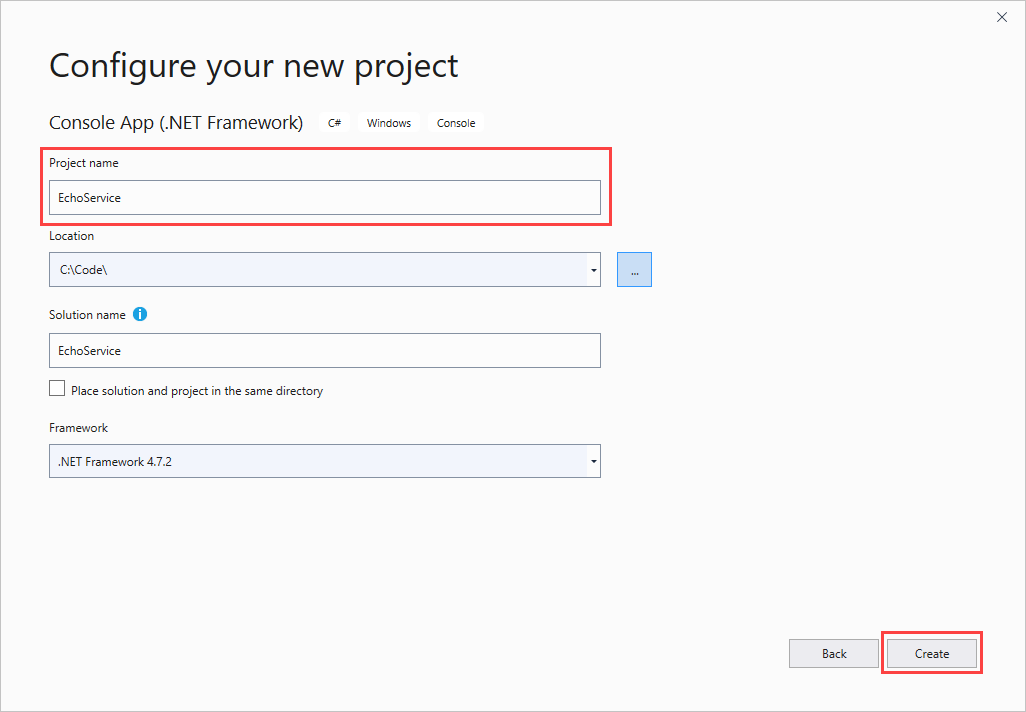
In Create a new project, choose Console App (.NET Framework) for C# and select Next.
Name the project EchoService and select Create.
In Solution Explorer, right-click the project and select Manage NuGet Packages. In the NuGet Package Manager, select Browse, then search for and choose WindowsAzure.ServiceBus. Select Install, and accept the terms of use.

This package automatically adds references to the Service Bus libraries and the WCF
System.ServiceModel. System.ServiceModel is the namespace that enables you to programmatically access the basic features of WCF. Service Bus uses many of the objects and attributes of WCF to define service contracts.Add the following
usingstatements at the top of Program.cs:using System.ServiceModel; using Microsoft.ServiceBus;Change the namespace name from its default name of
EchoServicetoMicrosoft.ServiceBus.Samples.Important
This tutorial uses the C# namespace
Microsoft.ServiceBus.Sampleswhich is the namespace of the contract-based managed type that is used in the configuration file in the Configure the WCF client section. You can specify any namespace you want when you build this sample. However, the tutorial will not work unless you then modify the namespaces of the contract and service accordingly, in the application configuration file. The namespace specified in the App.config file must be the same as the namespace specified in your C# files.Directly after the
Microsoft.ServiceBus.Samplesnamespace declaration, but within the namespace, define a new interface namedIEchoContractand apply theServiceContractAttributeattribute to the interface with a namespace value ofhttps://samples.microsoft.com/ServiceModel/Relay/. Paste the following code after the namespace declaration:[ServiceContract(Name = "IEchoContract", Namespace = "https://samples.microsoft.com/ServiceModel/Relay/")] public interface IEchoContract { }The namespace value differs from the namespace that you use throughout the scope of your code. Instead, the namespace value is used as a unique identifier for this contract. Specifying the namespace explicitly prevents the default namespace value from being added to the contract name.
Note
Typically, the service contract namespace contains a naming scheme that includes version information. Including version information in the service contract namespace enables services to isolate major changes by defining a new service contract with a new namespace and exposing it on a new endpoint. In this manner, clients can continue to use the old service contract without having to be updated. Version information can consist of a date or a build number. For more information, see Service Versioning. For this tutorial, the naming scheme of the service contract namespace does not contain version information.
Within the
IEchoContractinterface, declare a method for the single operation theIEchoContractcontract exposes in the interface and apply theOperationContractAttributeattribute to the method that you want to expose as part of the public WCF Relay contract, as follows:[OperationContract] string Echo(string text);Directly after the
IEchoContractinterface definition, declare a channel that inherits from bothIEchoContractand also to theIClientChannelinterface, as shown here:public interface IEchoChannel : IEchoContract, IClientChannel { }A channel is the WCF object through which the host and client pass information to each other. Later, you'll write code against the channel to echo information between the two applications.
Select Build > Build Solution or select Ctrl+Shift+B to confirm the accuracy of your work so far.
Example of a WCF contract
The following code shows a basic interface that defines a WCF Relay contract.
using System;
using System.ServiceModel;
namespace Microsoft.ServiceBus.Samples
{
[ServiceContract(Name = "IEchoContract", Namespace = "https://samples.microsoft.com/ServiceModel/Relay/")]
public interface IEchoContract
{
[OperationContract]
String Echo(string text);
}
public interface IEchoChannel : IEchoContract, IClientChannel { }
class Program
{
static void Main(string[] args)
{
}
}
}
Now that the interface is created, you can implement the interface.
Implement the WCF contract
Creating an Azure relay requires that you first create the contract by using an interface. For more information about creating the interface, see the previous section. The next procedure implements the interface. This task involves creating a class named EchoService that implements the user-defined IEchoContract interface. After you implement the interface, you then configure the interface using an App.config configuration file. The configuration file contains necessary information for the application. This information includes the name of the service, the name of the contract, and the type of protocol that is used to communicate with the relay service. The code used for these tasks is provided in the example that follows the procedure. For a more general discussion about how to implement a service contract, see Implementing Service Contracts.
Create a new class named
EchoServicedirectly after the definition of theIEchoContractinterface. TheEchoServiceclass implements theIEchoContractinterface.class EchoService : IEchoContract { }Similar to other interface implementations, you can implement the definition in a different file. However, for this tutorial, the implementation is located in the same file as the interface definition and the
Main()method.Apply the ServiceBehaviorAttribute attribute to the
IEchoContractinterface. The attribute specifies the service name and namespace. After doing so, theEchoServiceclass appears as follows:[ServiceBehavior(Name = "EchoService", Namespace = "https://samples.microsoft.com/ServiceModel/Relay/")] class EchoService : IEchoContract { }Implement the
Echomethod defined in theIEchoContractinterface in theEchoServiceclass.public string Echo(string text) { Console.WriteLine("Echoing: {0}", text); return text; }Select Build > Build Solution or select Ctrl+Shift+B.
Define the configuration for the service host
The configuration file is similar to a WCF configuration file. It includes the service name, endpoint, and binding. The endpoint is the location Azure Relay exposes for clients and hosts to communicate with each other. The binding is the type of protocol that is used to communicate. The main difference is that this configured service endpoint refers to a NetTcpRelayBinding binding, which isn't part of the .NET Framework. NetTcpRelayBinding is one of the bindings defined by the service.
In Solution Explorer, double-click App.config to open the file in the Visual Studio editor.
In the
<appSettings>element, replace the placeholders with the name of your Azure Relay namespace, and the SAS key that you copied in an earlier step.Within the
<system.serviceModel>tags, add a<services>element. You can define multiple relay applications in a single configuration file. However, this tutorial defines only one.<?xmlversion="1.0" encoding="utf-8"?> <configuration> <system.serviceModel> <services> </services> </system.serviceModel> </configuration>Within the
<services>element, add a<service>element to define the name of the service.<service name="Microsoft.ServiceBus.Samples.EchoService"> </service>Within the
<service>element, define the location of the endpoint contract, and also the type of binding for the endpoint.<endpoint contract="Microsoft.ServiceBus.Samples.IEchoContract" binding="netTcpRelayBinding"/>The endpoint defines where the client will look for the host application. Later, the tutorial uses this step to create a URI that fully exposes the host through Azure Relay. The binding declares that we're using TCP as the protocol to communicate with the relay service.
Select Build > Build Solution or select Ctrl+Shift+B to confirm the accuracy of your work so far.
Example of implementation of a service contract
The following code shows the implementation of the service contract.
[ServiceBehavior(Name = "EchoService", Namespace = "https://samples.microsoft.com/ServiceModel/Relay/")]
class EchoService : IEchoContract
{
public string Echo(string text)
{
Console.WriteLine("Echoing: {0}", text);
return text;
}
}
The following code shows the basic format of the App.config file associated with the service host.
<?xml version="1.0" encoding="utf-8" ?>
<configuration>
<system.serviceModel>
<services>
<service name="Microsoft.ServiceBus.Samples.EchoService">
<endpoint contract="Microsoft.ServiceBus.Samples.IEchoContract" binding="netTcpRelayBinding" />
</service>
</services>
<extensions>
<bindingExtensions>
<add name="netTcpRelayBinding"
type="Microsoft.ServiceBus.Configuration.NetTcpRelayBindingCollectionElement, Microsoft.ServiceBus, Culture=neutral, PublicKeyToken=31bf3856ad364e35"/>
</bindingExtensions>
</extensions>
</system.serviceModel>
</configuration>
Host and run the WCF service to register with the relay service
This step describes how to run an Azure Relay service.
Create the relay credentials
In
Main(), create two variables in which to store the namespace and the SAS key that are read from the console window.Console.Write("Your Service Namespace: "); string serviceNamespace = Console.ReadLine(); Console.Write("Your SAS key: "); string sasKey = Console.ReadLine();The SAS key will be used later to access your project. The namespace is passed as a parameter to
CreateServiceUrito create a service URI.Using a TransportClientEndpointBehavior object, declare that you'll be using an SAS key as the credential type. Add the following code directly after the code added in the last step.
TransportClientEndpointBehavior sasCredential = new TransportClientEndpointBehavior(); sasCredential.TokenProvider = TokenProvider.CreateSharedAccessSignatureTokenProvider("RootManageSharedAccessKey", sasKey);
Create a base address for the service
After the code you added in the previous section, create a Uri instance for the base address of the service. This URI specifies the Service Bus scheme, the namespace, and the path of the service interface.
Uri address = ServiceBusEnvironment.CreateServiceUri("sb", serviceNamespace, "EchoService");
The value "sb" is an abbreviation for the Service Bus scheme. It indicates that we're using TCP as the protocol. This scheme was also previously indicated in the configuration file, when NetTcpRelayBinding was specified as the binding.
For this tutorial, the URI is sb://putServiceNamespaceHere.windows.net/EchoService.
Create and configure the service host
Still working in
Main(), set the connectivity mode toAutoDetect.ServiceBusEnvironment.SystemConnectivity.Mode = ConnectivityMode.AutoDetect;The connectivity mode describes the protocol the service uses to communicate with the relay service; either HTTP or TCP. Using the default setting
AutoDetect, the service attempts to connect to Azure Relay over TCP if it's available, and HTTP if TCP isn't available. This result differs from the protocol the service specifies for client communication. That protocol is determined by the binding used. For example, a service can use the BasicHttpRelayBinding binding, which specifies that its endpoint communicates with clients over HTTP. That same service could specifyConnectivityMode.AutoDetectso that the service communicates with Azure Relay over TCP.Create the service host, using the URI created earlier in this section.
ServiceHost host = new ServiceHost(typeof(EchoService), address);The service host is the WCF object that instantiates the service. Here, you pass it the type of service you want to create, an
EchoServicetype, and also to the address at which you want to expose the service.At the top of the Program.cs file, add references to System.ServiceModel.Description and Microsoft.ServiceBus.Description.
using System.ServiceModel.Description; using Microsoft.ServiceBus.Description;Back in
Main(), configure the endpoint to enable public access.IEndpointBehavior serviceRegistrySettings = new ServiceRegistrySettings(DiscoveryType.Public);This step informs the relay service that your application can be found publicly by examining the Atom feed for your project. If you set
DiscoveryTypetoprivate, a client could still access the service. However, the service wouldn't appear when it searches theRelaynamespace. Instead, the client would have to know the endpoint path beforehand.Apply the service credentials to the service endpoints defined in the App.config file:
foreach (ServiceEndpoint endpoint in host.Description.Endpoints) { endpoint.Behaviors.Add(serviceRegistrySettings); endpoint.Behaviors.Add(sasCredential); }As stated previously, you could have declared multiple services and endpoints in the configuration file. If you had, this code would traverse the configuration file and search for every endpoint to which it should apply your credentials. For this tutorial, the configuration file has only one endpoint.
Open the service host
Still in
Main(), add the following line to open the service.host.Open();Inform the user that the service is running, and explain how to shut down the service.
Console.WriteLine("Service address: " + address); Console.WriteLine("Press [Enter] to exit"); Console.ReadLine();When finished, close the service host.
host.Close();Select Ctrl+Shift+B to build the project.
Example that hosts a service in a console application
Your completed service code should appear as follows. The code includes the service contract and implementation from previous steps in the tutorial, and hosts the service in a console application.
using System;
using System.ServiceModel;
using System.ServiceModel.Description;
using Microsoft.ServiceBus;
using Microsoft.ServiceBus.Description;
namespace Microsoft.ServiceBus.Samples
{
[ServiceContract(Name = "IEchoContract", Namespace = "https://samples.microsoft.com/ServiceModel/Relay/")]
public interface IEchoContract
{
[OperationContract]
String Echo(string text);
}
public interface IEchoChannel : IEchoContract, IClientChannel { };
[ServiceBehavior(Name = "EchoService", Namespace = "https://samples.microsoft.com/ServiceModel/Relay/")]
class EchoService : IEchoContract
{
public string Echo(string text)
{
Console.WriteLine("Echoing: {0}", text);
return text;
}
}
class Program
{
static void Main(string[] args)
{
ServiceBusEnvironment.SystemConnectivity.Mode = ConnectivityMode.AutoDetect;
Console.Write("Your Service Namespace: ");
string serviceNamespace = Console.ReadLine();
Console.Write("Your SAS key: ");
string sasKey = Console.ReadLine();
// Create the credentials object for the endpoint.
TransportClientEndpointBehavior sasCredential = new TransportClientEndpointBehavior();
sasCredential.TokenProvider = TokenProvider.CreateSharedAccessSignatureTokenProvider("RootManageSharedAccessKey", sasKey);
// Create the service URI based on the service namespace.
Uri address = ServiceBusEnvironment.CreateServiceUri("sb", serviceNamespace, "EchoService");
// Create the service host reading the configuration.
ServiceHost host = new ServiceHost(typeof(EchoService), address);
// Create the ServiceRegistrySettings behavior for the endpoint.
IEndpointBehavior serviceRegistrySettings = new ServiceRegistrySettings(DiscoveryType.Public);
// Add the Relay credentials to all endpoints specified in configuration.
foreach (ServiceEndpoint endpoint in host.Description.Endpoints)
{
endpoint.Behaviors.Add(serviceRegistrySettings);
endpoint.Behaviors.Add(sasCredential);
}
// Open the service.
host.Open();
Console.WriteLine("Service address: " + address);
Console.WriteLine("Press [Enter] to exit");
Console.ReadLine();
// Close the service.
host.Close();
}
}
}
Create a WCF client for the service contract
The next task is to create a client application and define the service contract you'll implement later. These steps resemble the steps used to create a service: defining a contract, editing an App.config file, using credentials to connect to the relay service, and so on. The code used for these tasks is provided in the example following the procedure.
Create a new project in the current Visual Studio solution for the client:
- In Solution Explorer, right-click the current solution (not the project), and select Add > New Project.
- In Add a new project, select Console App (.NET Framework) for C#, and select Next.
- Specify EchoClient as the name of the project and select Create.
In Solution Explorer, in the EchoClient project, double-click Program.cs to open the file in the editor, if it isn't already open.
Change the namespace name from its default name of
EchoClienttoMicrosoft.ServiceBus.Samples.Install the Service Bus NuGet package:
In Solution Explorer, right-click EchoClient and then select Manage NuGet Packages.
Select Browse, then search for and select WindowsAzure.ServiceBus. Select Install, and accept the terms of use.

Add a
usingstatement for the System.ServiceModel namespace in the Program.cs file.using System.ServiceModel;Add the service contract definition to the namespace, as shown in the following example. This definition is identical to the definition used in the Service project. Add this code at the top of the
Microsoft.ServiceBus.Samplesnamespace.[ServiceContract(Name = "IEchoContract", Namespace = "https://samples.microsoft.com/ServiceModel/Relay/")] public interface IEchoContract { [OperationContract] string Echo(string text); } public interface IEchoChannel : IEchoContract, IClientChannel { }Select Ctrl+Shift+B to build the client.
Example of the EchoClient project
The following code shows the current status of the Program.cs file in the EchoClient project.
using System;
using Microsoft.ServiceBus;
using System.ServiceModel;
namespace Microsoft.ServiceBus.Samples
{
[ServiceContract(Name = "IEchoContract", Namespace = "https://samples.microsoft.com/ServiceModel/Relay/")]
public interface IEchoContract
{
[OperationContract]
string Echo(string text);
}
public interface IEchoChannel : IEchoContract, IClientChannel { }
class Program
{
static void Main(string[] args)
{
}
}
}
Configure the WCF client
In this step, you create an App.config file for a basic client application that accesses the service created previously in this tutorial. This App.config file defines the contract, binding, and name of the endpoint. The code used for these tasks is provided in the example following the procedure.
In Solution Explorer, in the EchoClient project, double-click App.config to open the file in the Visual Studio editor.
In the
<appSettings>element, replace the placeholders with the name of your service namespace, and the SAS key that you copied in an earlier step.Within the
system.serviceModelelement, add a<client>element.<?xmlversion="1.0" encoding="utf-8"?> <configuration> <system.serviceModel> <client> </client> </system.serviceModel> </configuration>This code declares that you're defining a WCF-style client application.
Within the
clientelement, define the name, contract, and binding type for the endpoint.<endpoint name="RelayEndpoint" contract="Microsoft.ServiceBus.Samples.IEchoContract" binding="netTcpRelayBinding"/>This code defines the name of the endpoint. It also defines the contract defined in the service and the fact that the client application uses TCP to communicate with Azure Relay. The endpoint name is used in the next step to link this endpoint configuration with the service URI.
Select File > Save All.
Example of the App.config file
The following code shows the App.config file for the Echo client.
<?xml version="1.0" encoding="utf-8" ?>
<configuration>
<system.serviceModel>
<client>
<endpoint name="RelayEndpoint"
contract="Microsoft.ServiceBus.Samples.IEchoContract"
binding="netTcpRelayBinding"/>
</client>
<extensions>
<bindingExtensions>
<add name="netTcpRelayBinding"
type="Microsoft.ServiceBus.Configuration.NetTcpRelayBindingCollectionElement, Microsoft.ServiceBus, Culture=neutral, PublicKeyToken=31bf3856ad364e35"/>
</bindingExtensions>
</extensions>
</system.serviceModel>
</configuration>
Implement the WCF client
In this section, you implement a basic client application that accesses the service you created previously in this tutorial. Similar to the service, the client does many of the same operations to access Azure Relay:
- Sets the connectivity mode.
- Creates the URI that locates the host service.
- Defines the security credentials.
- Applies the credentials to the connection.
- Opens the connection.
- Performs the application-specific tasks.
- Closes the connection.
However, one of the main differences is that the client application uses a channel to connect to the relay service. The service uses a call to ServiceHost. The code used for these tasks is provided in the example following the procedure.
Implement a client application
Set the connectivity mode to
AutoDetect. Add the following code inside theMain()method of the EchoClient application.ServiceBusEnvironment.SystemConnectivity.Mode = ConnectivityMode.AutoDetect;Define variables to hold the values for the service namespace, and SAS key that are read from the console.
Console.Write("Your Service Namespace: "); string serviceNamespace = Console.ReadLine(); Console.Write("Your SAS Key: "); string sasKey = Console.ReadLine();Create the URI that defines the location of the host in your Relay project.
Uri serviceUri = ServiceBusEnvironment.CreateServiceUri("sb", serviceNamespace, "EchoService");Create the credential object for your service namespace endpoint.
TransportClientEndpointBehavior sasCredential = new TransportClientEndpointBehavior();
sasCredential.TokenProvider = TokenProvider.CreateSharedAccessSignatureTokenProvider("RootManageSharedAccessKey", sasKey);
Create the channel factory that loads the configuration described in the App.config file.
ChannelFactory<IEchoChannel> channelFactory = new ChannelFactory<IEchoChannel>("RelayEndpoint", new EndpointAddress(serviceUri));A channel factory is a WCF object that creates a channel through which the service and client applications communicate.
Apply the credentials.
channelFactory.Endpoint.Behaviors.Add(sasCredential);Create and open the channel to the service.
IEchoChannel channel = channelFactory.CreateChannel(); channel.Open();Write the basic user interface and functionality for the echo.
Console.WriteLine("Enter text to echo (or [Enter] to exit):"); string input = Console.ReadLine(); while (input != String.Empty) { try { Console.WriteLine("Server echoed: {0}", channel.Echo(input)); } catch (Exception e) { Console.WriteLine("Error: " + e.Message); } input = Console.ReadLine(); }The code uses the instance of the channel object as a proxy for the service.
Close the channel, and close the factory.
channel.Close(); channelFactory.Close();
Example code for this tutorial
Your completed code should appear as follows. This code shows how to create a client application, how to call the operations of the service, and how to close the client after the operation call is finished.
using System;
using Microsoft.ServiceBus;
using System.ServiceModel;
namespace Microsoft.ServiceBus.Samples
{
[ServiceContract(Name = "IEchoContract", Namespace = "https://samples.microsoft.com/ServiceModel/Relay/")]
public interface IEchoContract
{
[OperationContract]
String Echo(string text);
}
public interface IEchoChannel : IEchoContract, IClientChannel { }
class Program
{
static void Main(string[] args)
{
ServiceBusEnvironment.SystemConnectivity.Mode = ConnectivityMode.AutoDetect;
Console.Write("Your Service Namespace: ");
string serviceNamespace = Console.ReadLine();
Console.Write("Your SAS Key: ");
string sasKey = Console.ReadLine();
Uri serviceUri = ServiceBusEnvironment.CreateServiceUri("sb", serviceNamespace, "EchoService");
TransportClientEndpointBehavior sasCredential = new TransportClientEndpointBehavior();
sasCredential.TokenProvider = TokenProvider.CreateSharedAccessSignatureTokenProvider("RootManageSharedAccessKey", sasKey);
ChannelFactory<IEchoChannel> channelFactory = new ChannelFactory<IEchoChannel>("RelayEndpoint", new EndpointAddress(serviceUri));
channelFactory.Endpoint.Behaviors.Add(sasCredential);
IEchoChannel channel = channelFactory.CreateChannel();
channel.Open();
Console.WriteLine("Enter text to echo (or [Enter] to exit):");
string input = Console.ReadLine();
while (input != String.Empty)
{
    try
    {
        Console.WriteLine("Server echoed: {0}", channel.Echo(input));
    }
    catch (Exception e)
    {
        Console.WriteLine("Error: " + e.Message);
    }
    input = Console.ReadLine();
}
channel.Close();
channelFactory.Close();
}
}
}
Run the applications
Select Ctrl+Shift+B to build the solution. This action builds both the client project and the service project that you created in the previous steps.
Before running the client application, you must make sure that the service application is running. In Solution Explorer, right-click the EchoService solution, then select Properties.
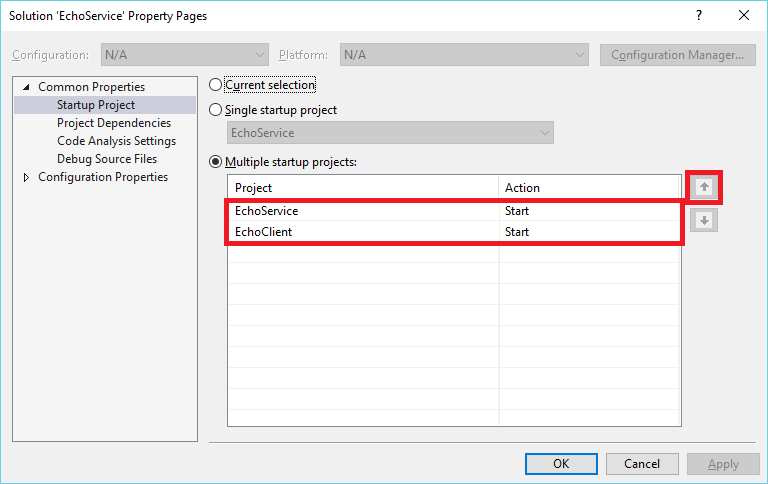
In Property Pages, Common Properties > Startup Project, then choose Multiple startup projects. Make sure EchoService appears first in the list.
Set the Action box for both the EchoService and EchoClient projects to Start.
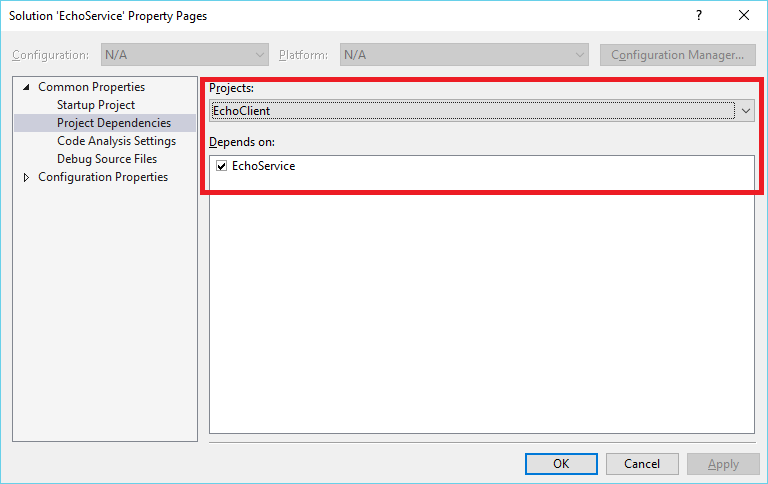
Select Project Dependencies. In Projects, select EchoClient. For Depends on, make sure EchoService is selected.
Select OK to close Property Pages.
Select F5 to run both projects.
Both console windows open and prompt you for the namespace name. The service must run first, so in the EchoService console window, enter the namespace and then select Enter.
Next, the console prompts you for your SAS key. Enter the SAS key and select Enter.
Here's example output from the console window. The values here are just examples.
Your Service Namespace: myNamespaceYour SAS Key: <SAS key value>The service application prints to the console window the address on which it's listening, as seen in the following example.
Service address: sb://mynamespace.servicebus.windows.net/EchoService/Press [Enter] to exitIn the EchoClient console window, enter the same information that you entered previously for the service application. Enter the same service namespace and SAS key values for the client application.
After you enter these values, the client opens a channel to the service and prompts you to enter some text as seen in the following console output example.
Enter text to echo (or [Enter] to exit):Enter some text to send to the service application and select Enter. This text is sent to the service through the Echo service operation and appears in the service console window as in the following example output.
Echoing: My sample textThe client application receives the return value of the
Echooperation, which is the original text, and prints it to its console window. The following text is example output from the client console window.Server echoed: My sample textYou can continue sending text messages from the client to the service in this manner. When you're finished, select Enter in the client and service console windows to end both applications.
Next step
Advance to the following tutorial: