Management and monitoring considerations for Red Hat Enterprise Linux on Azure
This article describes how to use various services and tools to manage and monitor Red Hat Enterprise Linux (RHEL) on Azure.
If you do a greenfield deployment, you can use the Azure change tracking feature to easily identify changes. You can also use the Azure Automation update management feature to manage operating system updates for your RHEL virtual machines (VMs).
For existing brownfield deployments, you can use Red Hat Satellite, and extend the service into Azure from on-premises environments to take advantage of existing skill sets.
Content flow
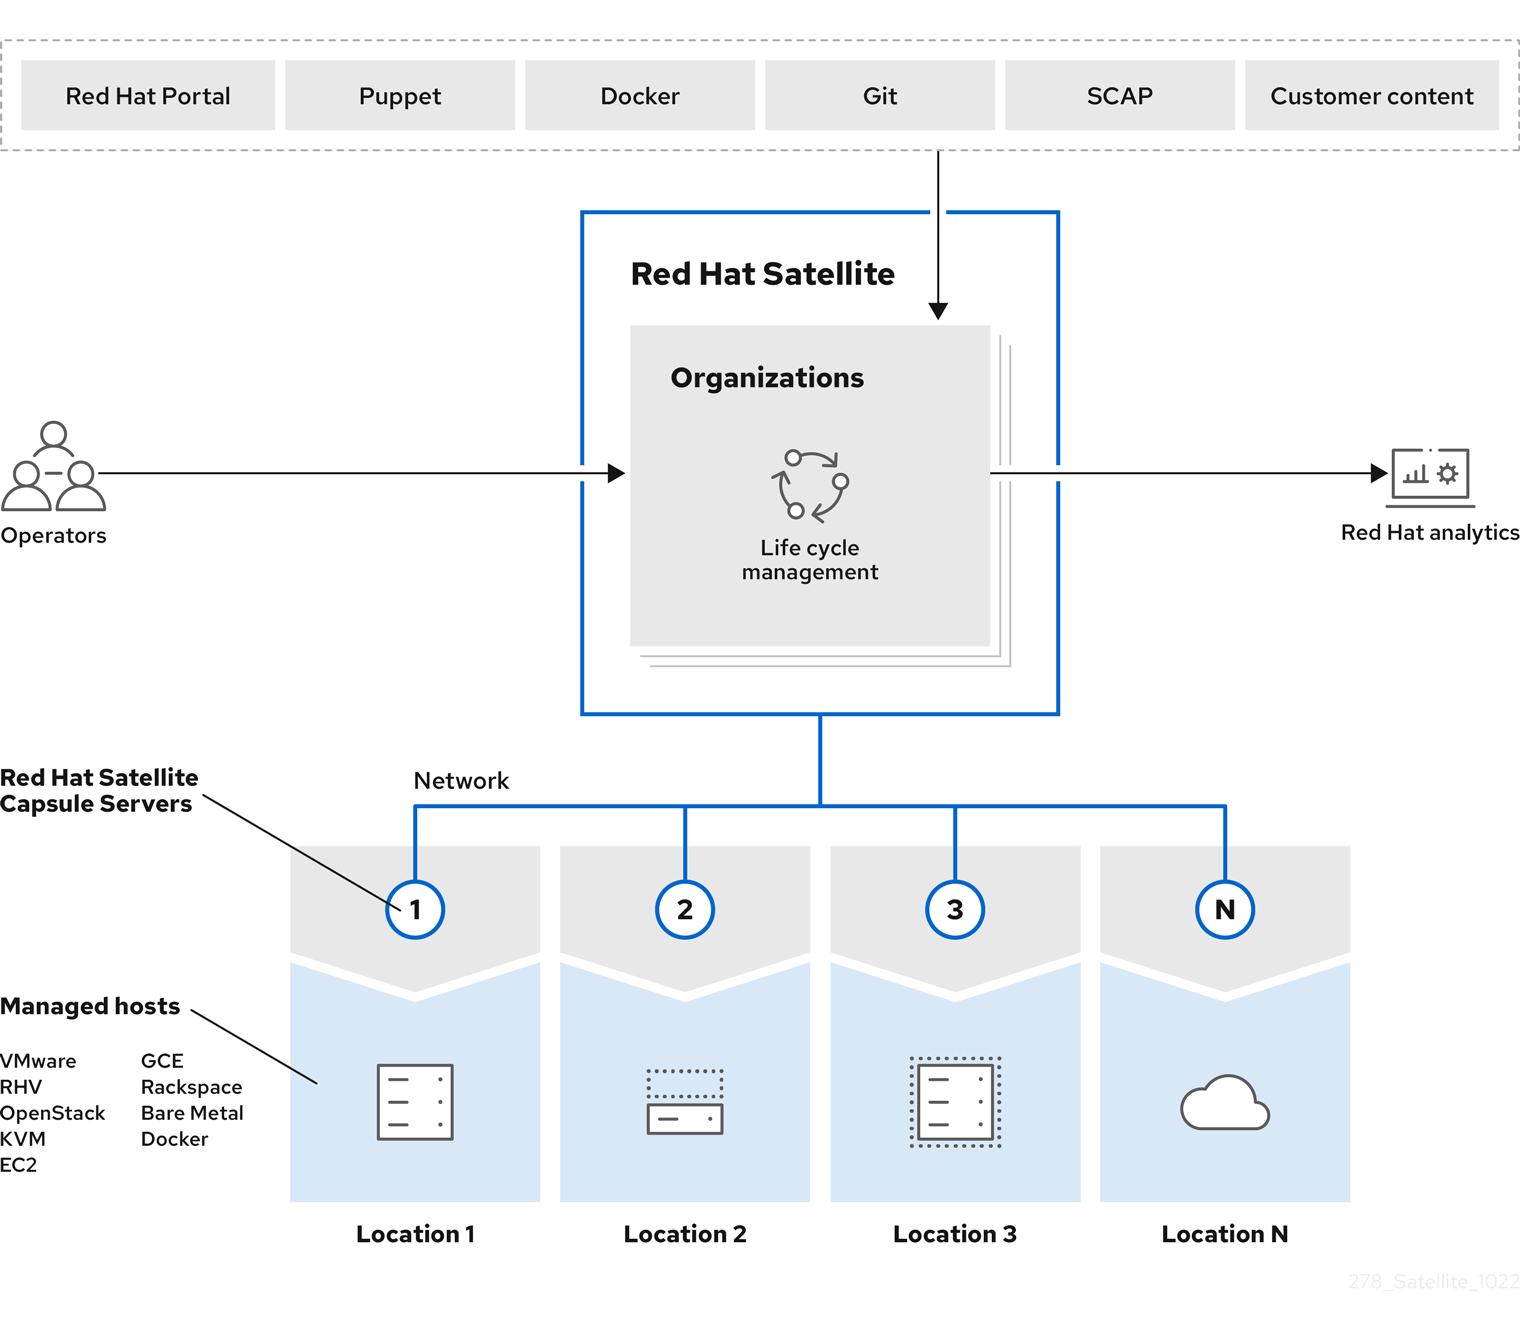
With Red Hat Satellite, you can provide content and apply patches to hosts systematically in all lifecycle stages. Content flow in Red Hat Satellite involves the management and distribution of content from external sources to hosts.
Content in Satellite flows from external content sources to Satellite Server. Capsule Servers mirror the content from Satellite Server to the hosts. The content flow consists of the following steps:
Configure external content sources. You can configure many content sources with Satellite. Supported content sources include the Red Hat Customer Portal, Git repositories, Ansible collections, Docker Hub, Security Content Automation Protocol (SCAP) repositories, or internal data stores in your organization.
Manage the content lifecycle. You can use Satellite Server to plan and manage the content lifecycle.
Establish content sources. Create Capsule Servers to establish content sources in various locations based on your needs. For example, you can establish a content source for individual geographical locations or establish multiple content sources for a datacenter with separate networks.
Assign a host system. When you assign a host system to a Capsule Server or directly to your Satellite Server, you ensure that the host receives the content that they provide. You can have physical or virtual hosts.
Deployment strategy
We recommend that you use automated software update management solutions instead of manual update installation processes. Consider the integration with on-premises solutions when you work with brownfield installations. When you deploy net-new workloads on Azure, use cloud-native tooling, such as update management or Ansible on Azure, to significantly reduce the time to value compared to using other partner open-source software.
Considerations
When you deploy any automated update management solution, consider the location of Linux software package repositories.
Microsoft offers a public repository to programmatically update packages for supported Linux distributions. Red Hat offers its own repositories for software packages for registered systems. Red Hat uses the Red Hat content delivery network and Red Hat Subscription Manager for RHEL 9.
Content delivery network structure
The Red Hat content delivery network is a geographically distributed series of static web servers that contain content and errata for systems to consume. Systems can consume this content directly, such as via a system that you register with Red Hat Subscription Management, or mirrored via an on-premises solution, such as Red Hat Satellite 6. You can access the Red Hat content delivery network via cdn.redhat.com. The x.509 certificate authentication protects the Red Hat content delivery network to ensure that only valid users can access it.
If you register a system to Red Hat Subscription Management, the attached subscriptions govern which subset of the content delivery network the system can access. If you register a system to Satellite 6, the subscriptions that are attached to the subscription manifest govern which subset of the content delivery system the system can access.
Recommendations
Implement the following recommendations to help manage and monitor your environment.
Use custom images instead of Azure Marketplace images
You can use predefined Azure Marketplace images to build Azure VMs. Or you can use custom Linux images to build and control your specific compliance and security needs. If you use supported Linux distributions, such as RHEL, follow specific guidance for building your customer image, such as RHEL 8 guidance. If you use custom Linux images, follow the update manager best practice guidance.
Perform update tests in a nonproduction environment
Separate test environments from production environments to help minimize potential negative effects on production workloads. Use Azure DevTest Labs to provide isolation and reduce cloud subscription costs while accelerating new update tests. Use Azure DevOps or a similar tool to implement continuous integration and continuous delivery (CI/CD) pipelines.
If a new update introduces critical problems, have a clear and tested rollback strategy. These strategies should include database backups, snapshotting, and quick deployment reversal mechanisms.
Consider scheduling and maintenance windows
You can use Automation accounts to help orchestrate schedules for software updates within your cloud environment.
Use a blue-green deployment model or Azure App Service deployment slot to help minimize the overall time that you need during a maintenance window for any given software update. Remember that Azure services update the underlying infrastructure and might affect your active VMs. For more information, see Azure Service Health in your Azure portal.
Configure security and compliance
Use Azure Policy to ensure that your environment meets your organization's security and compliance standards. For more information, Azure Policy overview.
You can use Azure Policy to:
- Enforce compliance and governance standards, such as audit and compliance reporting.
- Provide resource management and cost control, such as resource consistency and cost management.
- Provide security and access control, such as security baselines and role-based access control (RBAC).
Manage dependencies and compatibility
Properly document libraries, frameworks, and any partner services that your application relies on. Use infrastructure as code, such as Azure Resource Manager templates (ARM templates) or Terraform, to define and manage cloud resources with consistent configurations. Use this approach to reduce the risk of environmental drift.
Use Azure Artifacts for private package repositories to help ensure that you have the correct software installed consistently within your environment. Use tools, such as GitHub Dependabot, to help find software dependencies within your repositories.
Configure backup and recovery
For critical applications, consider using application-consistent snapshots. For less-complex scenarios, use file-consistent snapshots.
Types of snapshots that Azure Backup provides include:
- VM snapshots.
- Disk snapshots for disks that are attached to a given VM.
To manage snapshots, use:
Automated backup scheduling: You can take snapshots at regular intervals to ensure that you have consistent data backup without manual intervention.
Retention policies: Use Backup to set retention policies for how long you keep snapshots. Use this approach to comply with data-retention requirements and manage storage costs effectively.
Use point-in-time restores to revert a VM or disk to the state that the snapshot captures. Ensure that your environment quickly recovers from data corruption, accidental deletions, or similar incidents.
Configuration management and change management
For Red Hat infrastructure, you can use Ansible Automation Platform to do configuration management.
Overview of Red Hat Ansible Automation Platform
Red Hat Ansible Automation Platform simplifies the development and operation of automation workloads for managing enterprise application infrastructure lifecycles. Ansible Automation Platform works across multiple IT domains, including operations, networking, security, and development, and across diverse hybrid environments. You can use Ansible Automation Platform to rapidly implement enterprise-wide automation at any step in your automation journey.
You can use the Automation update management feature and Azure Update Manager to track and implement change management within your Azure environment. The Automation update management feature retires on August 31, 2024. We recommend that you use Update Manager going forward.
For more information, see:
- What's included in Ansible Automation Platform.
- Red Hat Ansible Automation Platform upgrade and migration guide.
- Ansible Automation Platform installation guide.
Azure-native tooling to manage updates
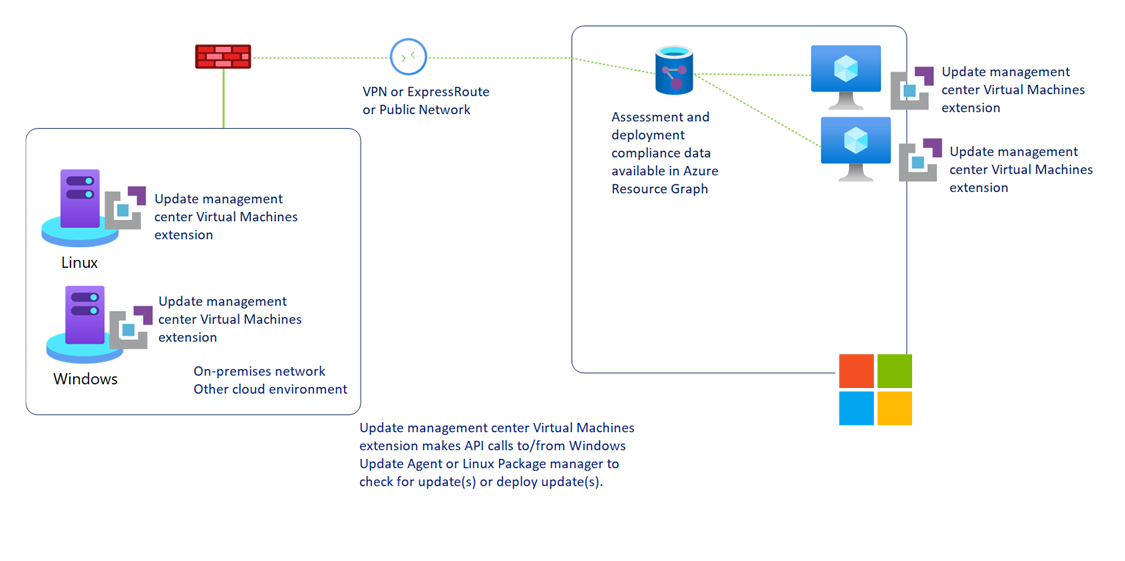
Unlike the Automation update management feature, Update Manager doesn't depend on Automation or Azure Monitor Logs. Update Manager offers many extra features and provides enhanced functionality compared to the original version in Automation.
The following diagram shows an Update Manager hybrid connectivity configuration.
For more information, see:
- Update Manager overview
- View updates for a single machine
- Deploy updates now (on-demand) for a single machine
- Schedule recurring updates
- Manage update settings in the portal
- Manage multiple machines using Update Manager
VM monitoring and reporting
RHEL provides a robust set of command line tools that provide deep-level performance and tuning of the operating system, running processes, and infrastructure components on an individual VM.
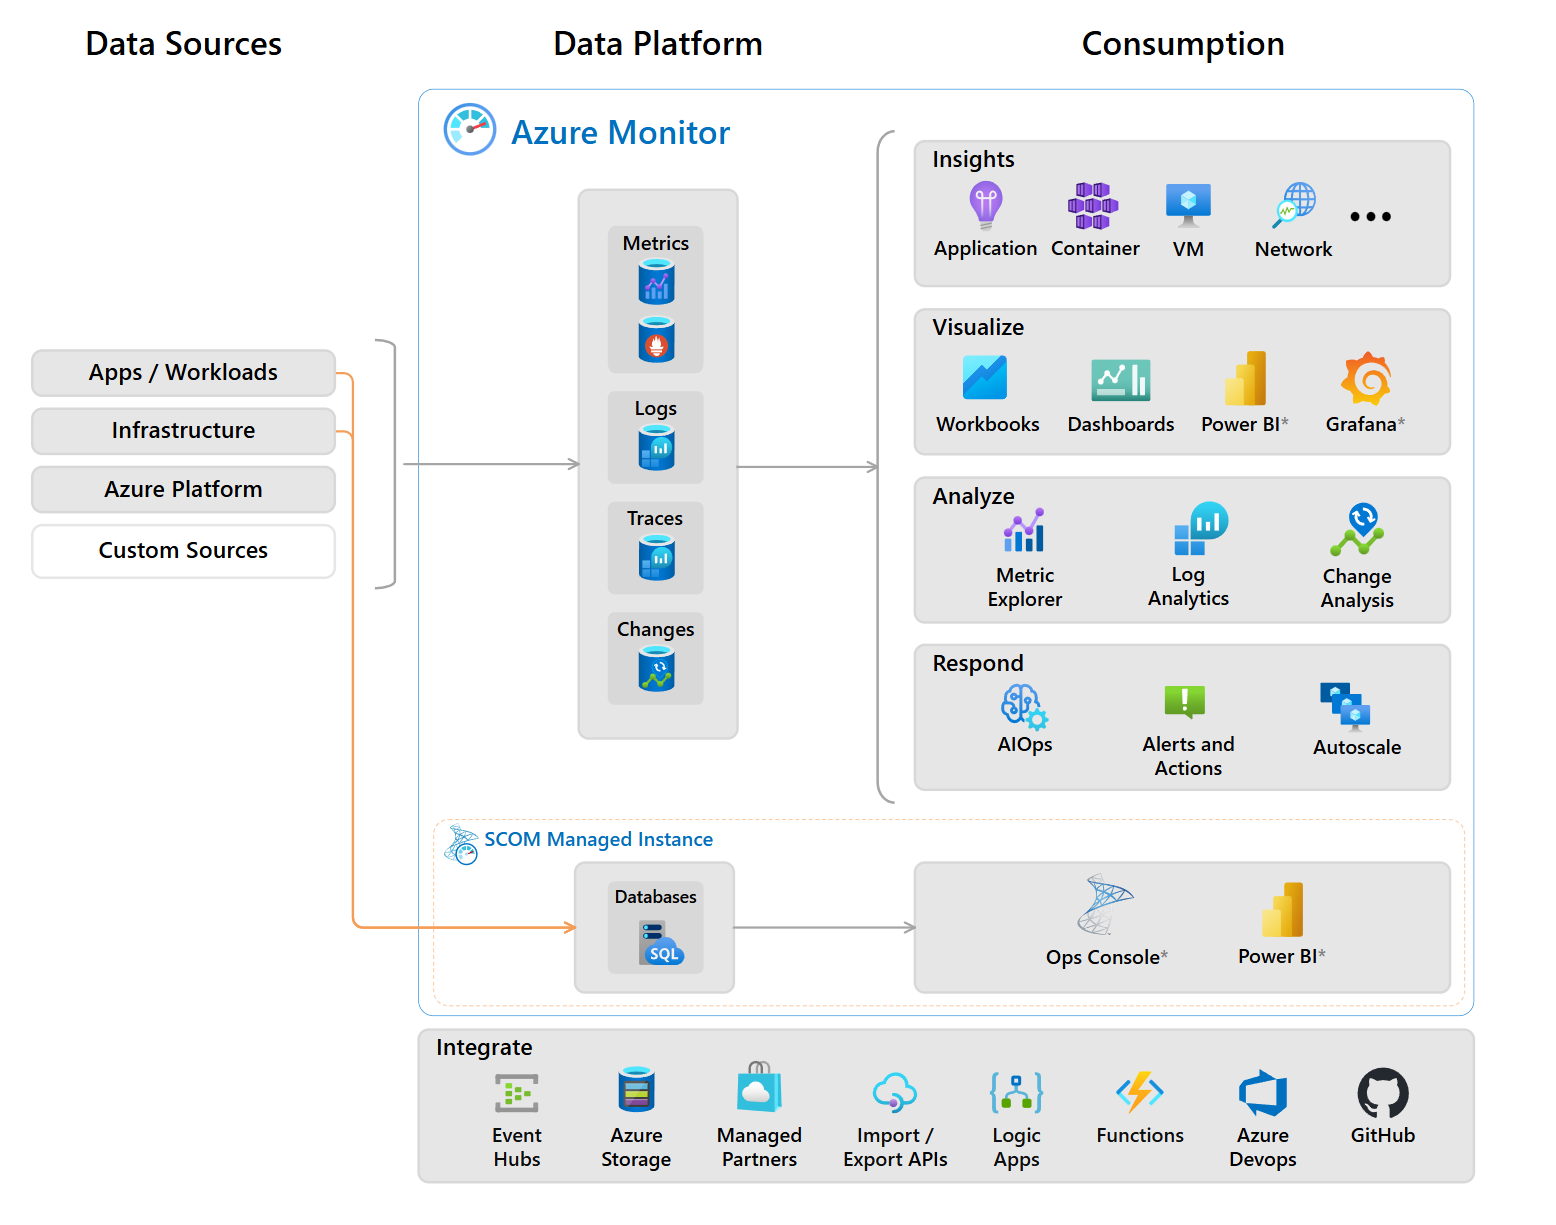
You can use Azure Monitor to collect data, analyze data, and create reports for both your cloud and on-premises environments. The following diagram shows the tools that you can use.
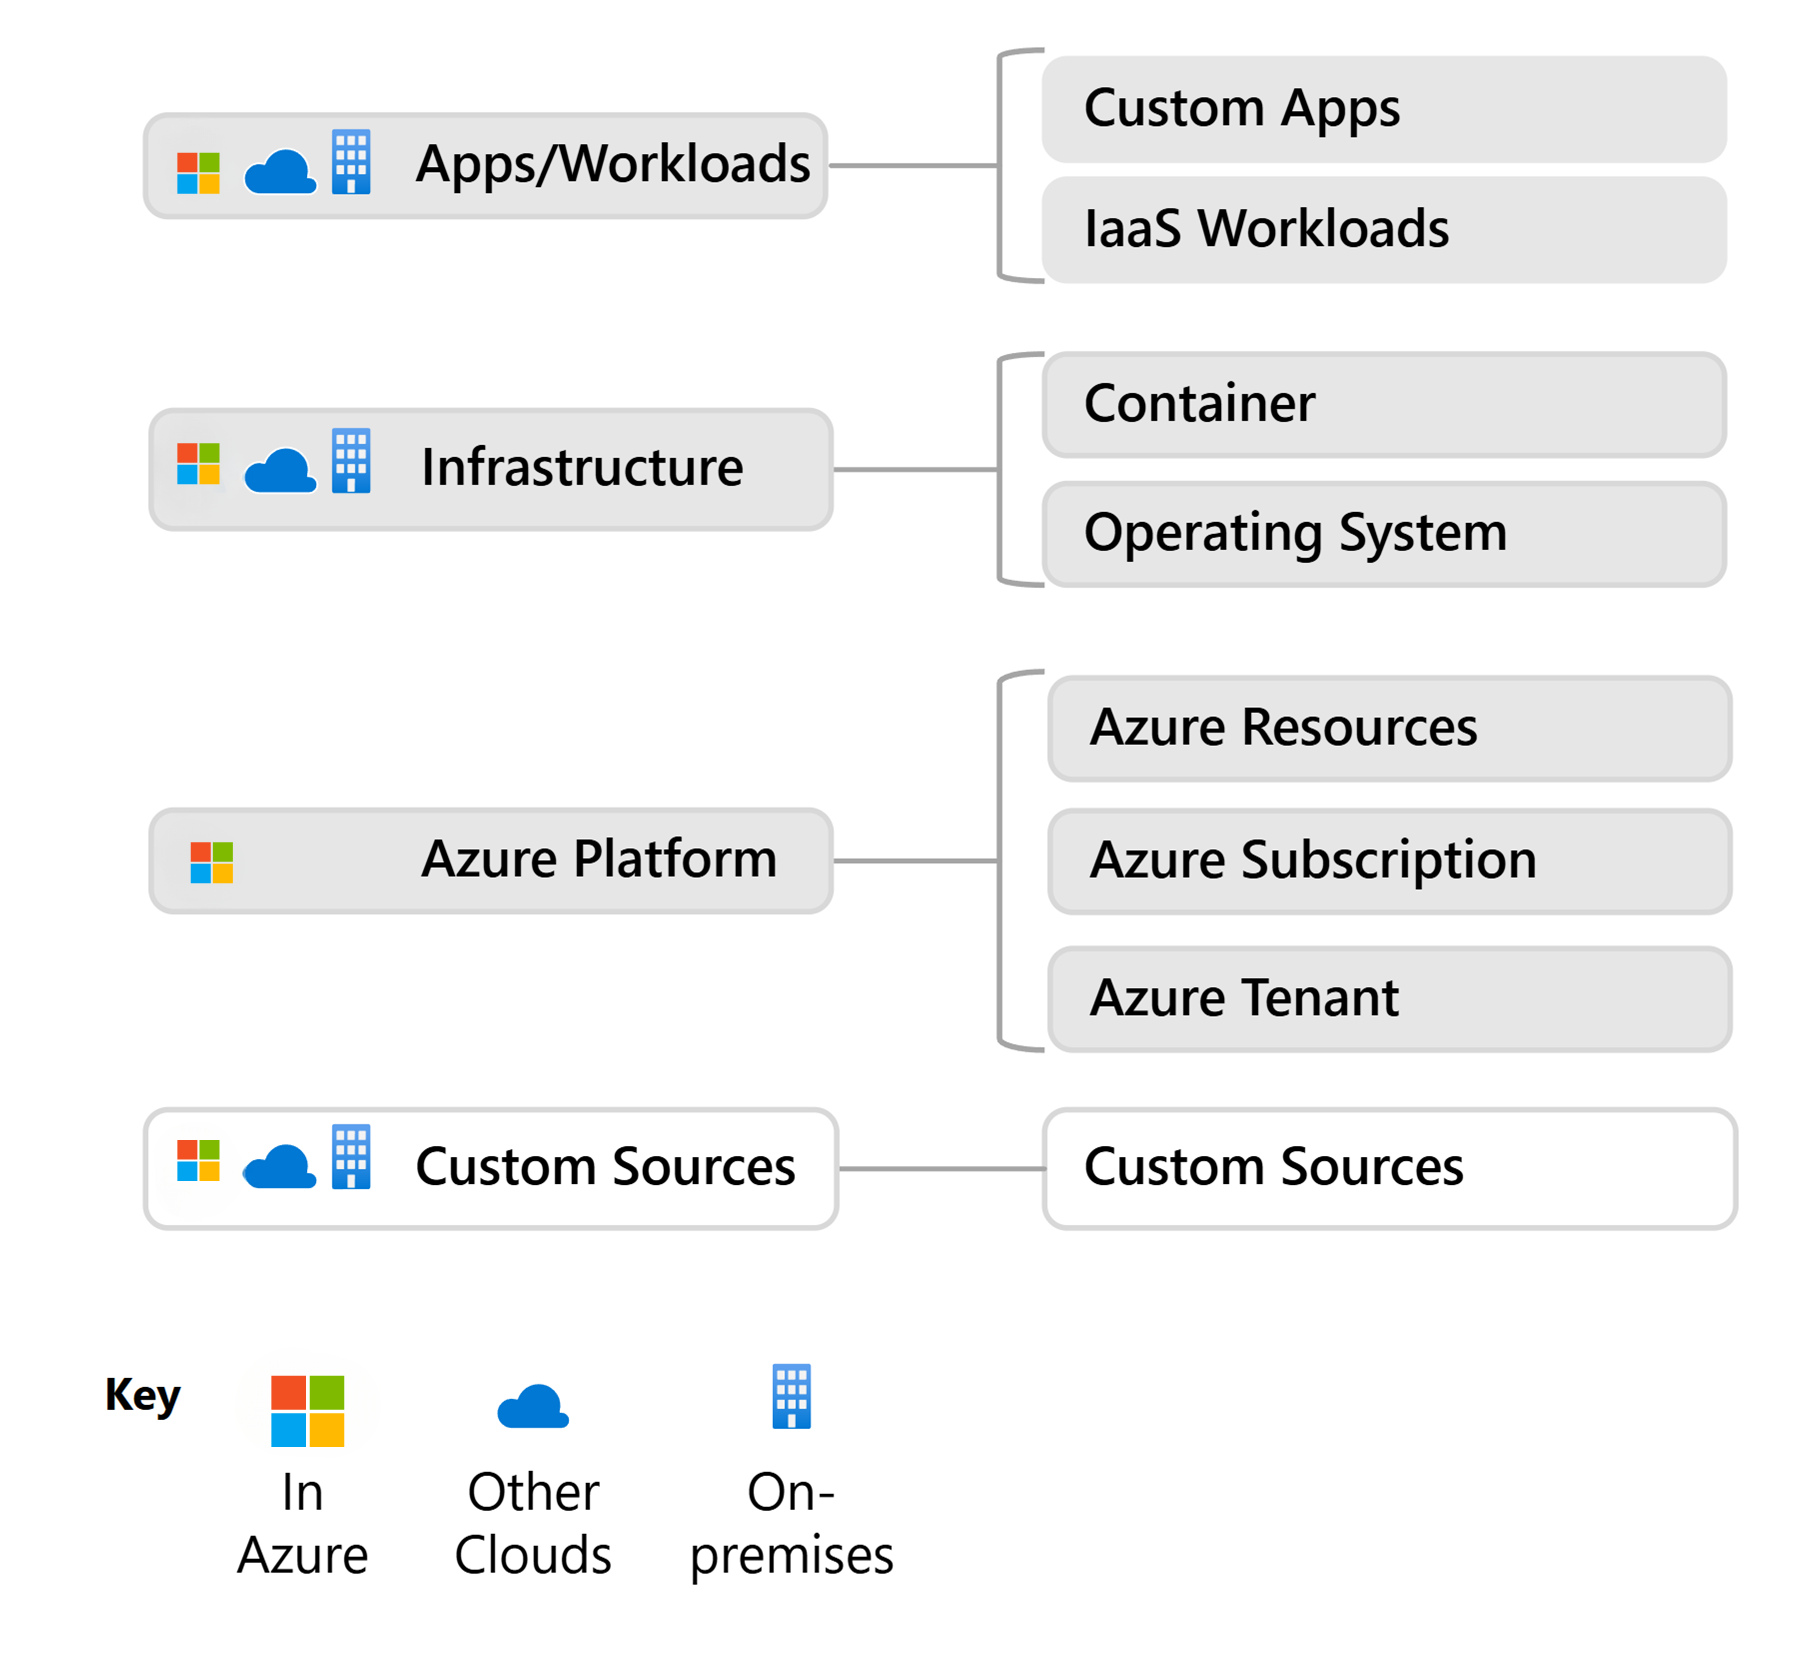
Azure monitoring has the capabilities to incorporate customer data sources as demonstrated in the following diagram.
Azure Linux VM monitoring
Azure Monitor uses agents to collect boot data and performance data from Azure VMs. It stores this data in Azure storage, and makes it accessible through the Azure portal, the Azure PowerShell module, and Azure CLI. To provide advanced monitoring for VMs, Azure Monitor collects performance metrics and discovers application components that are installed on the VMs. You can also use performance charts and dependency maps.
Native Azure VMs support boot diagnostics. For on-premises Linux VMs, we recommend Azure Arc for a comprehensive hybrid solution. Learn how to enable Azure Arc on a Linux VM.
Enable boot diagnostics on Azure Linux VMs
When Linux VMs start up, the boot diagnostic extension captures boot output and stores it in Azure storage. You can use this data to troubleshoot VM boot problems. When you use Azure CLI to create a Linux VM, boot diagnostics aren't automatically enabled.
Before you enable boot diagnostics, create a storage account for storing boot logs. Use the az storage account create command to create an account. Ensure that your storage account has a globally unique name that's between 3 and 24 characters and contains only numbers and lowercase letters.
After you enable boot diagnostics, every time you stop and start the VM, information about the boot process is written to a log file.
View host metrics
A Linux VM has a dedicated host in Azure that it interacts with. Metrics are automatically collected for the host, and you can view the metrics in the Azure portal.
In the Azure portal, select Resource groups, choose myResourceGroupMonitor, and then select myVM in the resource list.
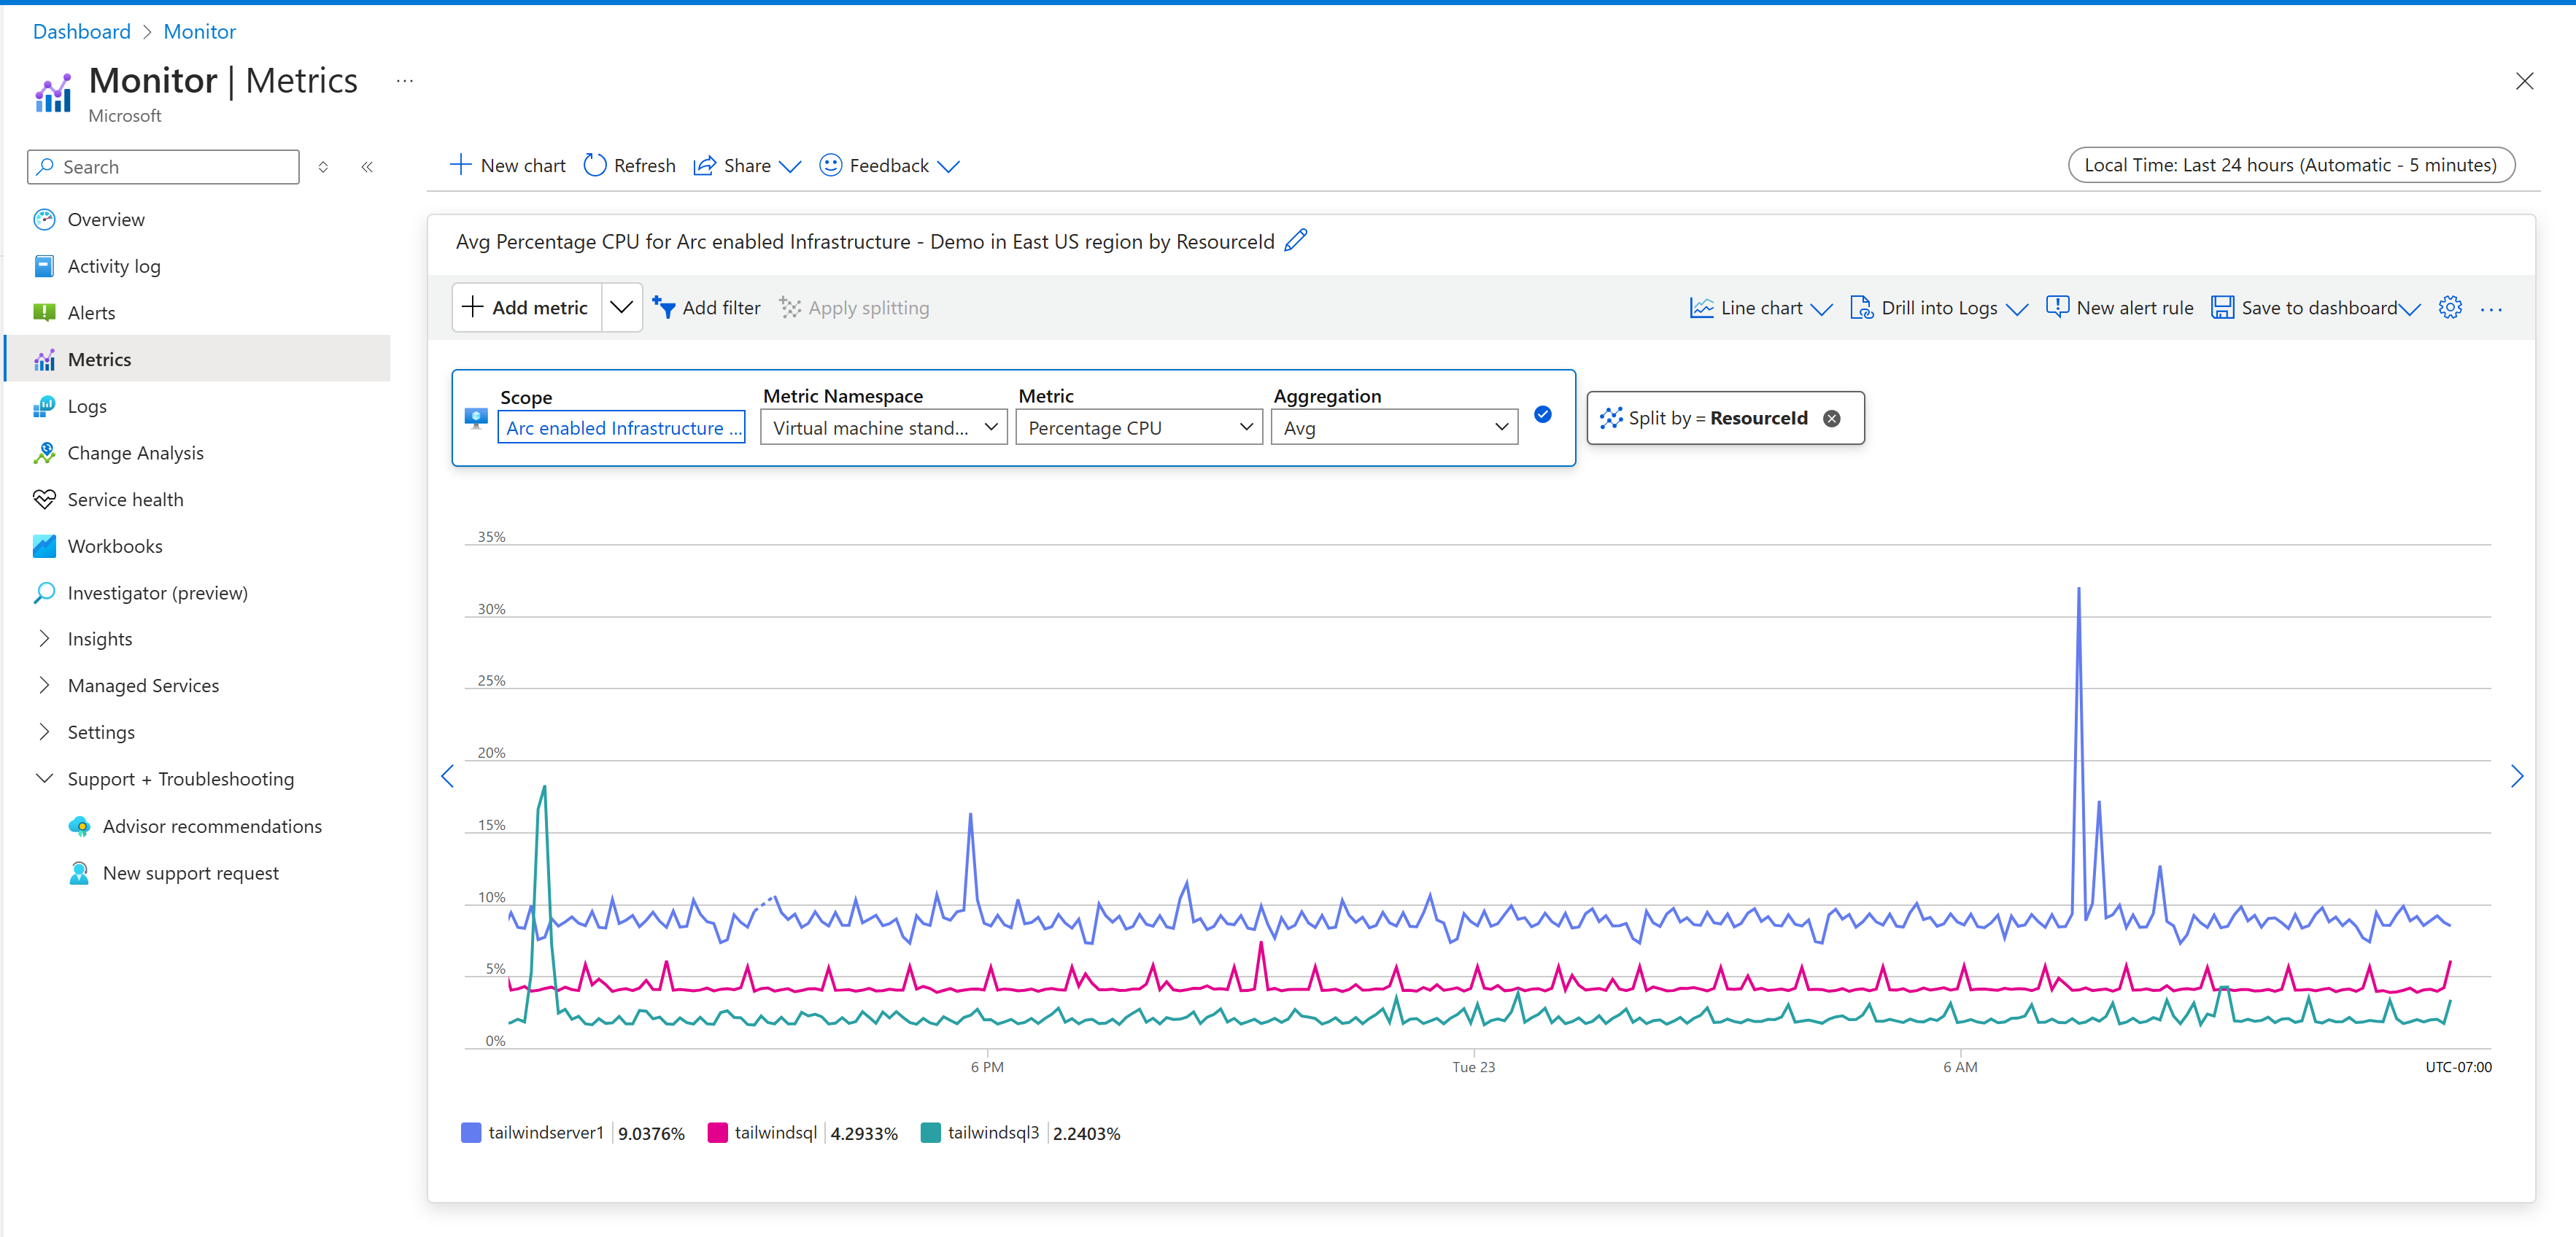
To see how the host VM performs, select Metrics in the Monitoring section, and then choose any of the [Host] metrics under Available metrics.
Enable advanced monitoring
To enable advanced monitoring in Azure Monitor for VMs:
In the Azure portal, select Resource groups, select myResourceGroupMonitor, and then select myVM in the resource list.
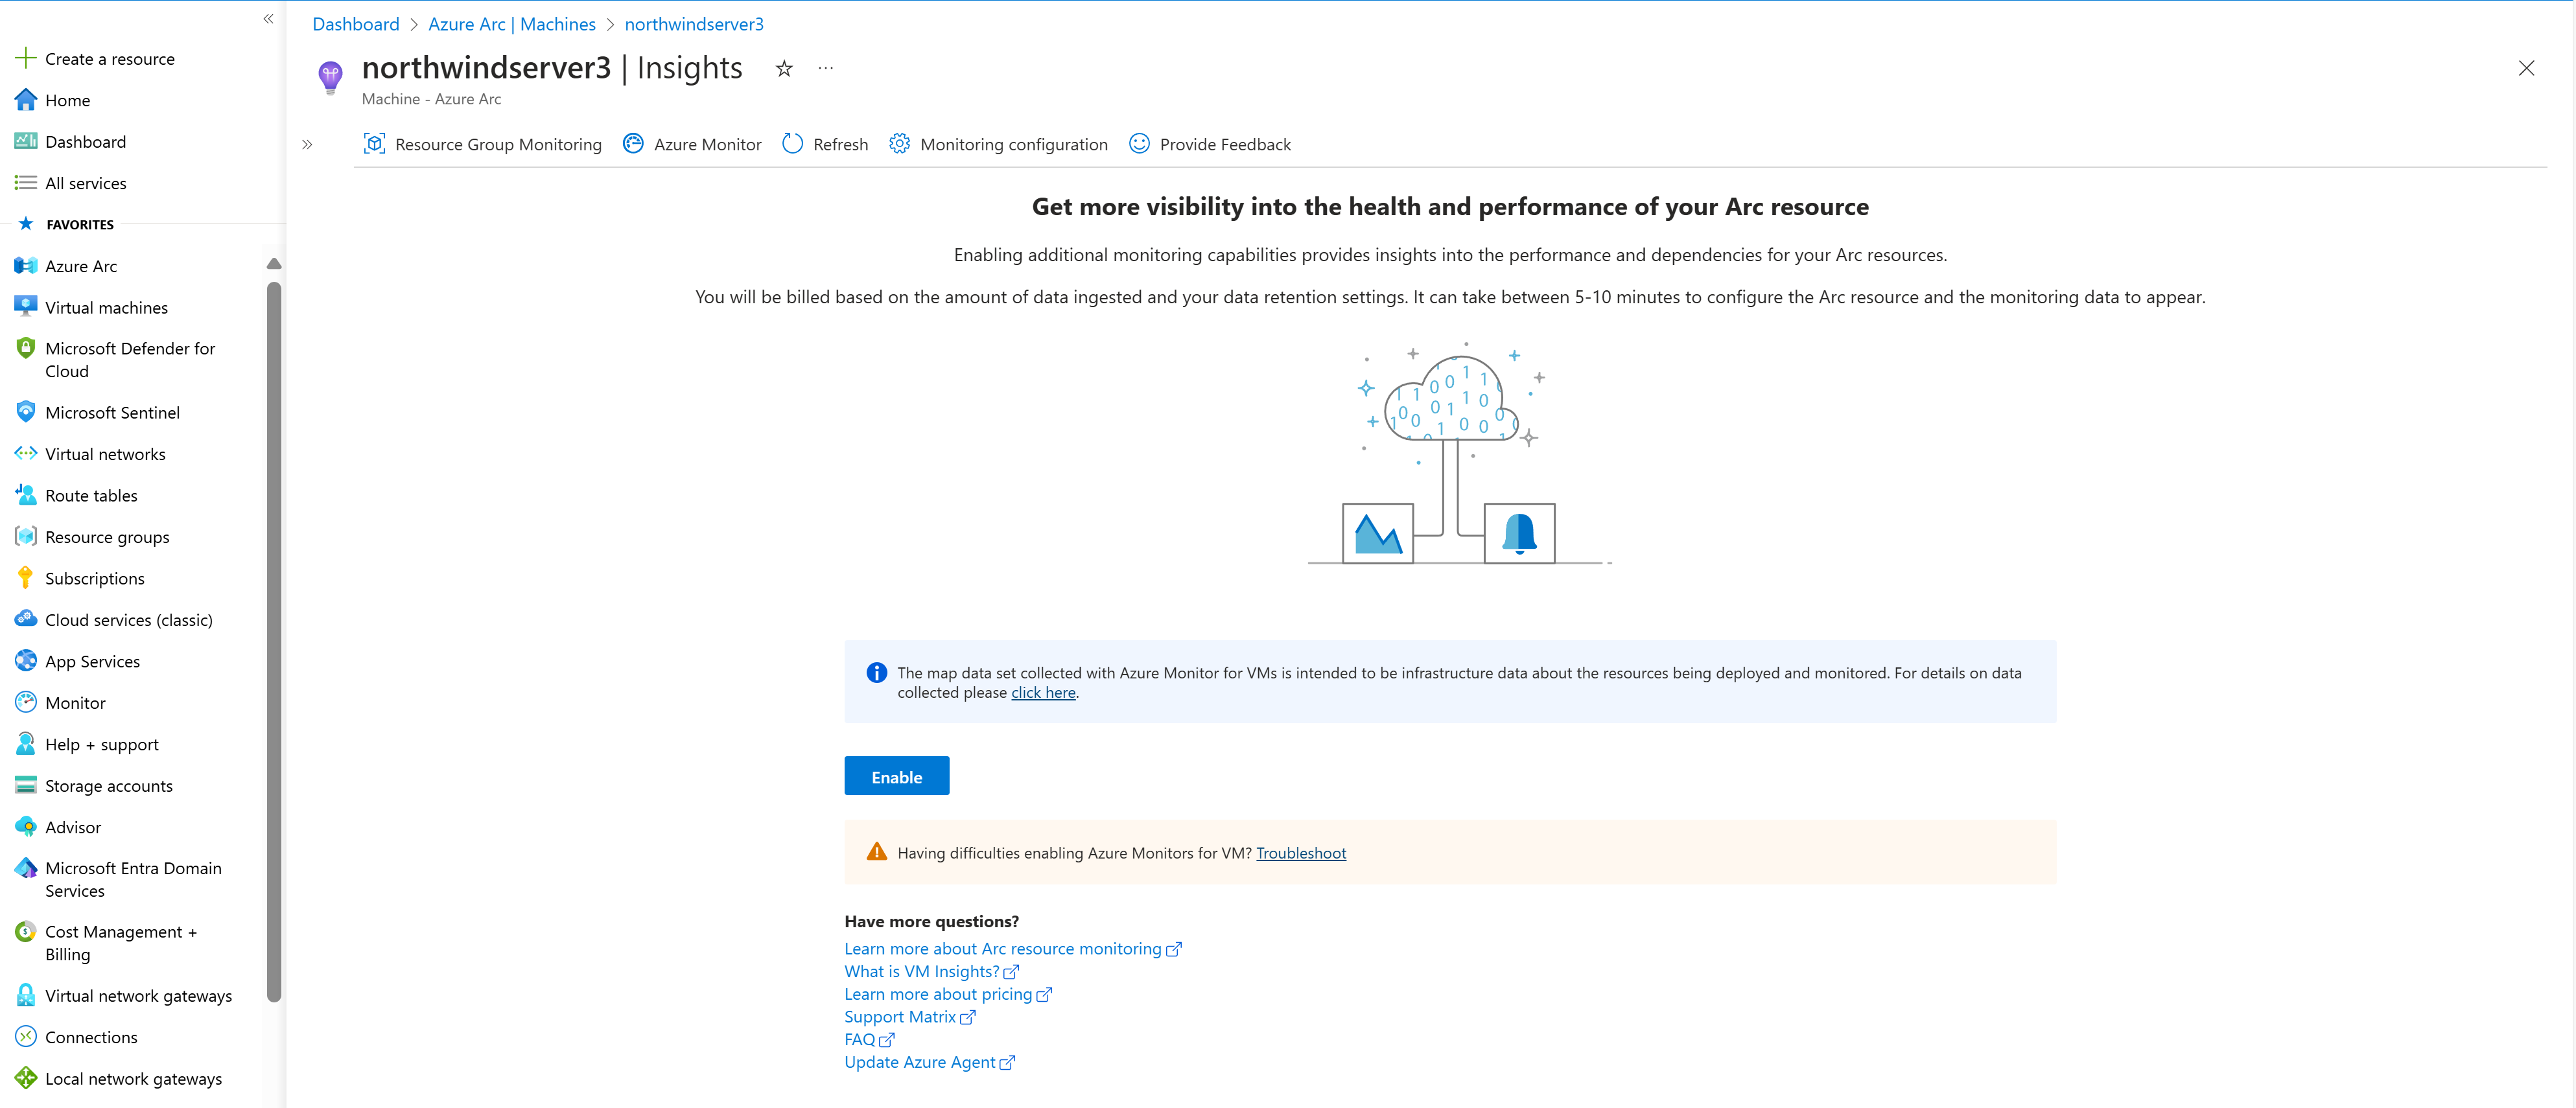
In the Monitoring section, select Insights.
Select Enable.
On the Azure Monitor Insights onboarding page, if you have an existing Log Analytics workspace in the same subscription, select it in the drop-down list.
The list preselects the default workspace and location where the VM is deployed in the subscription.
Note
To create a new Log Analytics workspace to store the monitoring data from the VM, see Create a Log Analytics workspace. The workspace must belong to one of the supported regions.
After you enable monitoring, you might need to wait several minutes before you can view the performance metrics for the VM.
View VM performance metrics
Azure Monitor for VMs includes a set of performance charts that target several key performance indicators to help you determine how well a VM performs. To access the charts from your VM, do the following steps.
- In the Azure portal, select Resource groups, select myResourceGroupMonitor, and then select myVM in the resource list.
- In the Monitoring section, select Insights.
- Select the Performance tab. This page includes performance usage charts and also provides a table for each discovered logical disk, its capacity, usage, and the total average of each measurement.
Create alerts
You can create alerts based on specific performance metrics. Use alerts to get notifications when certain events occur. For example you can get an alert when the average CPU usage exceeds a certain threshold or the available free disk space goes below a certain amount. You can view alerts in the Azure portal or receive them via email. You can also trigger Automation runbooks or Azure Logic Apps when you generate alerts.
The following example creates an alert for average CPU usage.
- In the Azure portal, select Resource groups, select myResourceGroupMonitor, and then select myVM in the resource list.
- Select Alert rules on the VM pane. Then select Add metric alert at the top of the Alerts pane.
- Provide a Name for your alert, such as myAlertRule.
- To trigger an alert when the CPU percentage exceeds 1.0 for 5 minutes, leave all the other defaults selected.
- Optionally, select Email owners, contributors, and readers to send email notifications. The default action presents a notification in their portal.
- Select OK.
