Create an AI agent
Important
This feature is in Public Preview.
This article shows you how to create a tool-calling AI agent using the Mosaic AI Agent Framework.
Learn how to give an agent tools and start chatting with them to test and prototype the agent. Once you’re done prototyping the agent, export the Python code that defines the agent to iterate and deploy your AI agent.
Requirements
- Understand the concepts of AI agents and tools as described in What are compound AI system and AI agents?
- Databricks recommends installing the latest version of the MLflow Python client when developing agents. See Authentication for dependent resources for information on
mlflowversion requirements.
Create AI agent tools
The first step is to create a tool to give to your agent. Agents use tools to perform actions besides language generation, for example to retrieve structured or unstructured data, execute code, or talk to remote services (e.g. send an email or Slack message).
To learn more about creating agent tools, see Create AI agent tools.
For this guide, create a Unity Catalog function that executes Python code. An agent can use this tool to run Python given them by a user, or written by the agent itself.
Run the following code in a notebook cell. It uses the %sql notebook magic to create a Unity Catalog function called python_exec.
%sql
CREATE OR REPLACE FUNCTION
main.default.python_exec (
code STRING COMMENT 'Python code to execute. Remember to print the final result to stdout.'
)
RETURNS STRING
LANGUAGE PYTHON
DETERMINISTIC
COMMENT 'Executes Python code in the sandboxed environment and returns its stdout. The runtime is stateless and you can not read output of the previous tool executions. i.e. No such variables "rows", "observation" defined. Calling another tool inside a Python code is NOT allowed. Use standard python libraries only.'
AS $$
import sys
from io import StringIO
sys_stdout = sys.stdout
redirected_output = StringIO()
sys.stdout = redirected_output
exec(code)
sys.stdout = sys_stdout
return redirected_output.getvalue()
$$
Prototype tool-calling agents in AI Playground
After creating the Unity Catalog function, use the AI Playground to give the tool to an LLM and test the agent. The AI Playground provides a sandbox to prototype tool-calling agents.
Once you’re happy with the AI agent, you can export it to develop it further in Python or deploy it as a Model Serving endpoint as is.
Note
Unity Catalog, and serverless compute, Mosaic AI Agent Framework, and either pay-per-token foundation models or external models must be available in the current workspace to prototype agents in AI Playground.
To prototype a tool-calling endpoint.
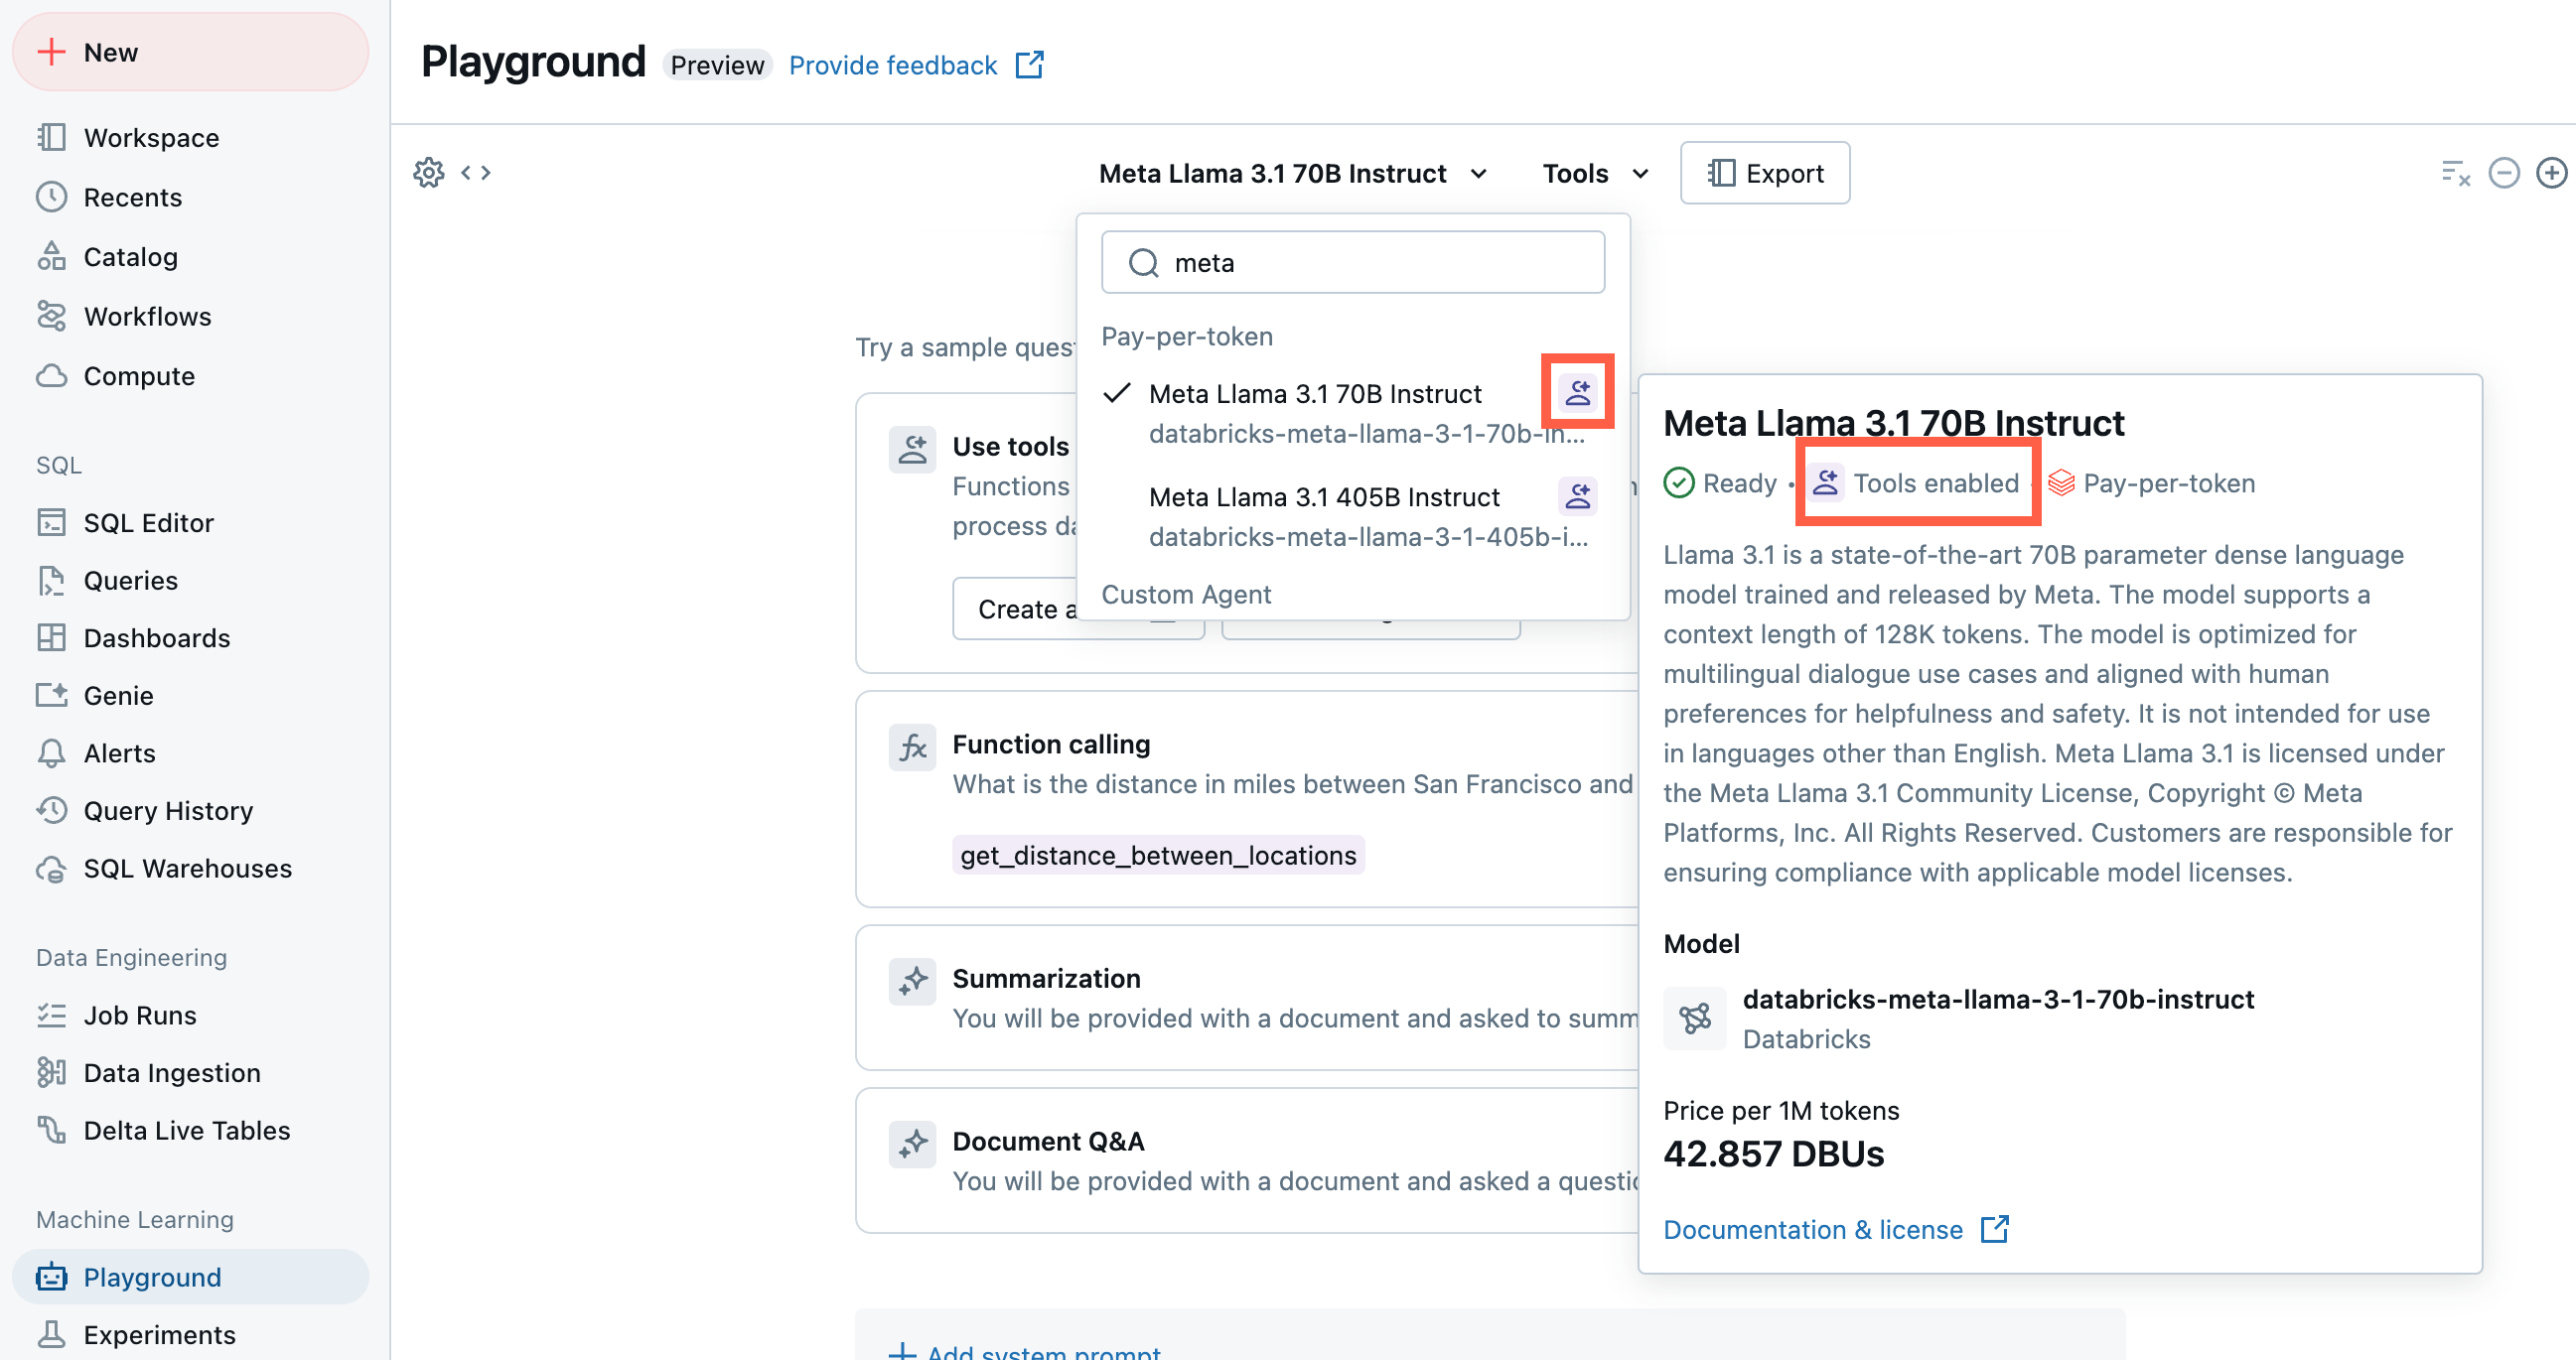
From Playground, select a model with the Tools enabled label.

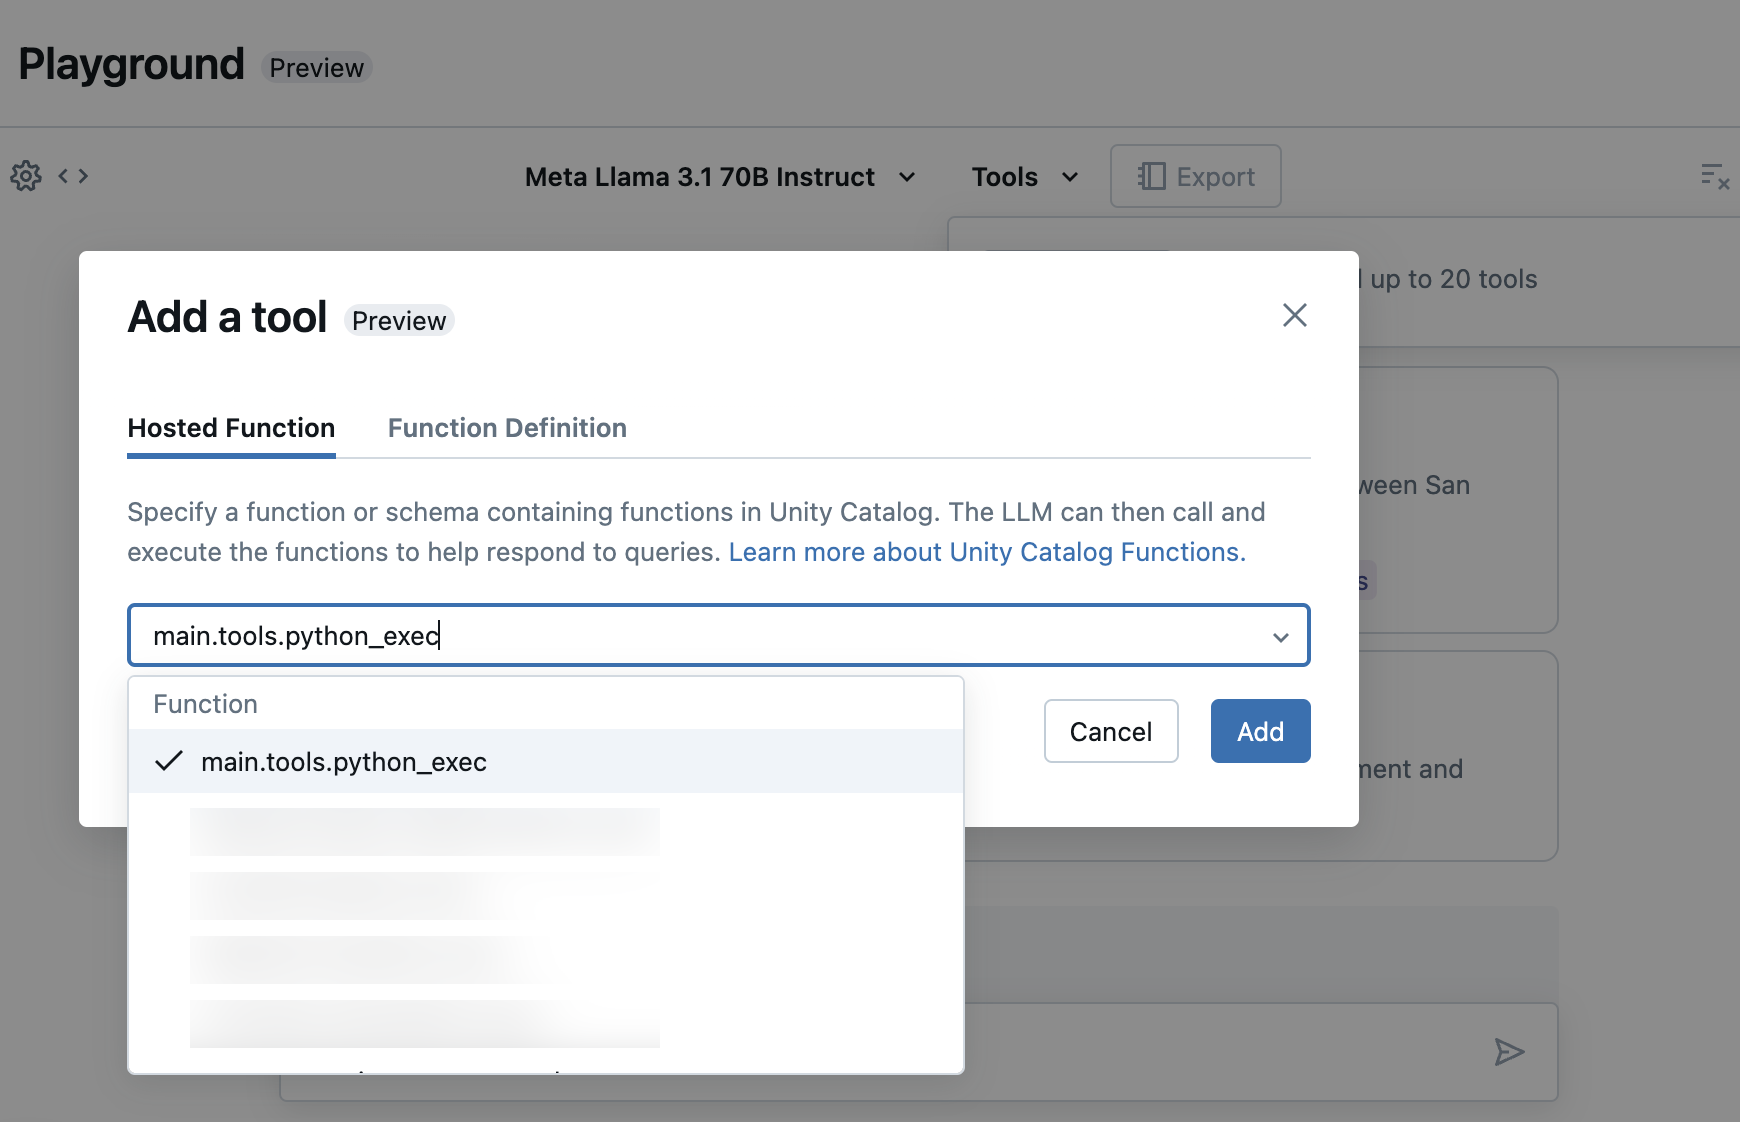
Select Tools and specify your Unity Catalog function names in the dropdown:

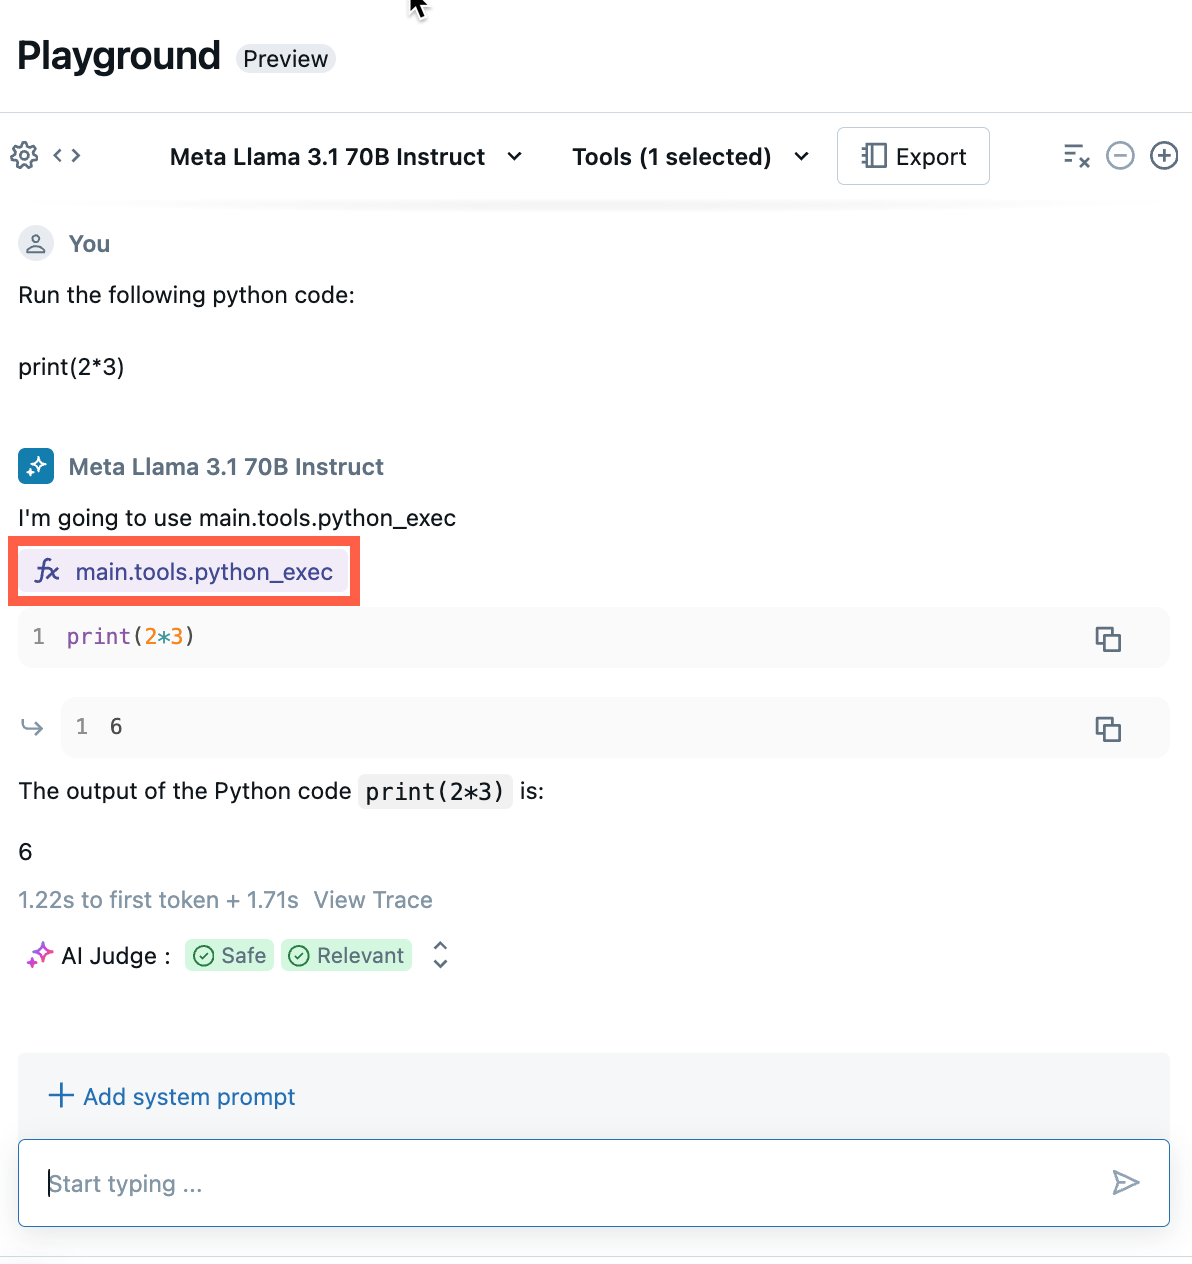
Chat to test out the current combination of LLM, tools, and system prompt, and try variations.

Export and deploy AI Playground agents
After adding tools and testing the agent, export the Playground agent to Python notebooks:
Click Export to generate Python notebooks that help you develop and deploy the AI agent.
After exporting the agent code, you see three files saved to your workspace:
agentnotebook: Contains Python code defining your agent using LangChain.drivernotebook: Contains Python code to log, trace, register, and deploy the AI agent using Mosaic AI Agent Framework.config.yml: Contains configuration information about your agent including tool definitions.
Open the
agentnotebook to see the LangChain code defining your agent, use this notebook to test and iterate on the agent programmatically such as defining more tools or adjusting the agent’s parameters.Note
The exported code might have different behavior from your AI playground session. Databricks recommends that you run the exported notebooks to iterate and debug further, evaluate agent quality, and then deploy the agent to share with others.
Once you’re happy with the agent’s outputs, you can run the
drivernotebook to log and deploy your agent to a Model Serving endpoint.
Define an agent in code
In addition to generating agent code from AI Playground, you can also define an agent in code yourself, using frameworks like LangChain or Python code. In order to deploy an agent using Agent Framework, its input must conform to one of the supported input and output formats.
Use parameters to configure the agent
In the Agent Framework, you can use parameters to control how agents are executed. This allows you to quickly iterate by varying characteristics of your agent without changing the code. Parameters are key-value pairs that you define in a Python dictionary or a .yaml file.
To configure the code, create a ModelConfig, a set of key-value parameters. ModelConfig is either a Python dictionary or a .yaml file. For example, you can use a dictionary during development and then convert it to a .yaml file for production deployment and CI/CD. For details about ModelConfig, see the MLflow documentation.
An example ModelConfig is shown below.
llm_parameters:
  max_tokens: 500
  temperature: 0.01
model_serving_endpoint: databricks-dbrx-instruct
vector_search_index: ml.docs.databricks_docs_index
prompt_template: 'You are a hello world bot. Respond with a reply to the user''s
  question that indicates your prompt template came from a YAML file. Your response
  must use the word "YAML" somewhere. User''s question: {question}'
prompt_template_input_vars:
- question
To call the configuration from your code, use one of the following:
# Example for loading from a .yml file
config_file = "configs/hello_world_config.yml"
model_config = mlflow.models.ModelConfig(development_config=config_file)

# Example of using a dictionary
config_dict = {
    "prompt_template": "You are a hello world bot. Respond with a reply to the user's question that is fun and interesting to the user. User's question: {question}",
    "prompt_template_input_vars": ["question"],
    "model_serving_endpoint": "databricks-dbrx-instruct",
    "llm_parameters": {"temperature": 0.01, "max_tokens": 500},
}

model_config = mlflow.models.ModelConfig(development_config=config_dict)

# Use model_config.get() to retrieve a parameter value
value = model_config.get('sample_param')
Set retriever schema
AI agents often use retrievers, a type of agent tool that finds and returns relevant documents using a Vector Search index. For more information on retrievers, see Create a vector search retriever tool.
To ensure that retrievers are traced properly, call mlflow.models.set_retriever_schema when you define your agent in code. Use set_retriever_schema to map the column names in the returned table to MLflow’s expected fields such as primary_key, text_column, and doc_uri.
# Define the retriever's schema by providing your column names
# These strings should be read from a config dictionary
mlflow.models.set_retriever_schema(
    name="vector_search",
    primary_key="chunk_id",
    text_column="text_column",
    doc_uri="doc_uri"
    # other_columns=["column1", "column2"],
)
Note
The doc_uri column is especially important when evaluating the retriever’s performance. doc_uri is the main identifier for documents returned by the retriever, allowing you to compare them against ground truth evaluation sets. See Evaluation sets
You can also specify additional columns in your retriever’s schema by providing a list of column names with the other_columns field.
If you have multiple retrievers, you can define multiple schemas by using unique names for each retriever schema.
Supported input and output formats
Agent Framework uses MLflow Model Signatures to define input and output schemas for agents. Mosaic AI Agent Framework features require a minimum set of input/output fields to interact with features such as the Review App and the AI Playground. For more information, see Define an agent’s input and output schema.
Example notebooks
These notebooks create a simple “Hello, world” chain to illustrate how to create a chain application in Databricks. The first example creates a simple chain. The second example notebook illustrates how to use parameters to minimize code changes during development.