Configure Microsoft Intune Endpoint Privilege Management for dev boxes
In this article, you learn how to configure Microsoft Intune Endpoint Privilege Management (EPM) for dev boxes so that dev box users don't need local administrative privileges.
Microsoft Intune Endpoint Privilege Management allows your organization's users to run as a standard user (without administrator rights) and complete tasks that require elevated privileges. Tasks that commonly require administrative privileges are application installs (like Microsoft 365 Applications), updating device drivers, and running certain Windows diagnostics.
Endpoint Privilege Management is built into Microsoft Intune, which means that all configuration is completed within the Microsoft Intune Admin Center. To get started with EPM, use the high-level process outlined as follows:
License Endpoint Privilege Management - Before you can use Endpoint Privilege Management policies, you must license EPM in your tenant as an Intune add-on. For licensing information, see Use Intune Suite add-on capabilities.
Deploy an elevation settings policy - An elevation settings policy activates EPM on the client device. This policy also allows you to configure settings that are specific to the client but aren't necessarily related to the elevation of individual applications or tasks.
Prerequisites
- A dev center with a dev box project.
- Microsoft Intune subscription.
License Endpoint Privilege Management
Endpoint Privilege Management requires either a stand-alone license that adds only EPM, or license EPM as part of the Microsoft Intune Suite.
In this section, you configure EPM licensing and assign the EPM license to a user.
License EPM in your tenant as an Intune add-on:
- Open the Microsoft Intune admin center, and navigate to Tenant admin > Intune add-ons.
- Select Endpoint Privilege Management.
Configure Intune admin role for EPM administration:
Apply the EPM license in Microsoft 365:
In the Microsoft 365 admin center, go to Billing > Purchase services > Endpoint Privilege Management, and then select your EPM license.
Assign E5 and EPM licenses to target user in Microsoft Entra ID:
Deploy an elevation settings policy
A dev box must have an elevation settings policy that enables support for EPM to process an elevation rules policy or manage elevation requests. When support is enabled, the EPM Microsoft Agent, which processes the EPM policies, is installed.
In this section, you create a dev box and an Intune group that you use to test the EPM policy configuration. Then, you create an EPM elevation settings policy and assign the policy to the group.
Create a dev box definition
In the Azure portal, create a dev box definition. Specify a supported OS, like Windows 11, version 22H2.
Note
EPM supports the following operating systems:
- Windows 11 (versions 23H2, 22H2, and 21H2)
- Windows 10 (versions 22H2, 21H2, and 20H2)
In your project, create a dev box pool that uses the new dev box definition.
Assign Dev Box User role to the test user.
Create a dev box for testing the policy
Sign in to the developer portal.
Create a dev box using the dev box pool you created in the previous step.
Determine the dev box hostname. You'll use this hostname add the dev box to and Intune group in the next step.
Create an Intune group and add the dev box to the group
Open the Microsoft Intune admin center, select Groups > New group.
In the Group type dropdown box, select Security.
In the Group name field, enter the name for the new group (for example, Contoso Testers).
Add a Group description for the group.
Set the Membership type to Assigned.
Under Members, select the dev box you created.
Create an EPM elevation settings policy and assign it to the group.
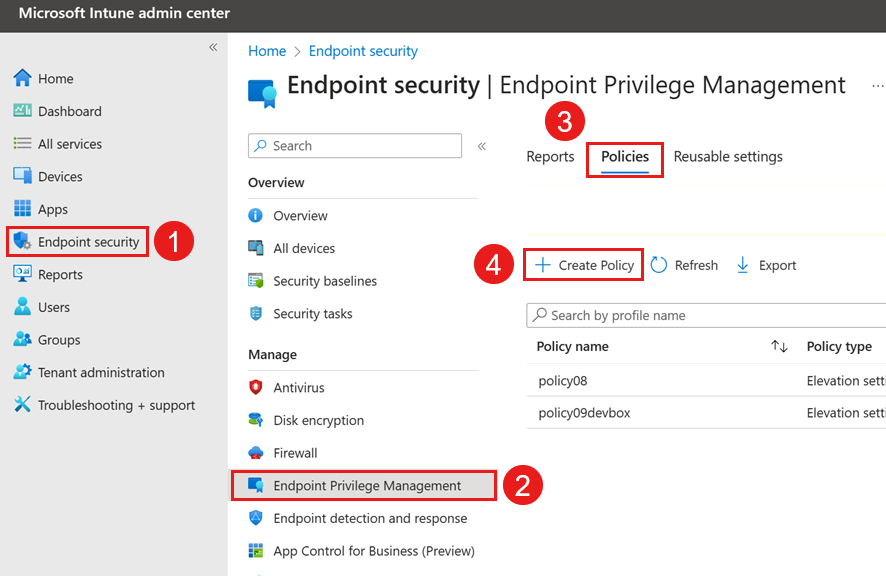
In the Microsoft Intune admin center, select Endpoint security > Endpoint Privilege Management > Policies > Create Policy.
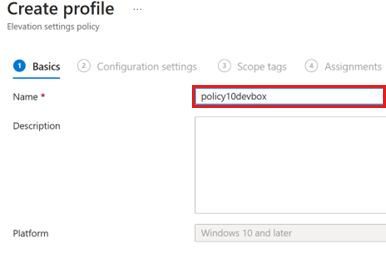
In the Create a profile pane, select the following settings:
- Platform: Windows 10 and later
- Profile type: Elevation settings policy
On the Basics tab, enter a name for the policy.
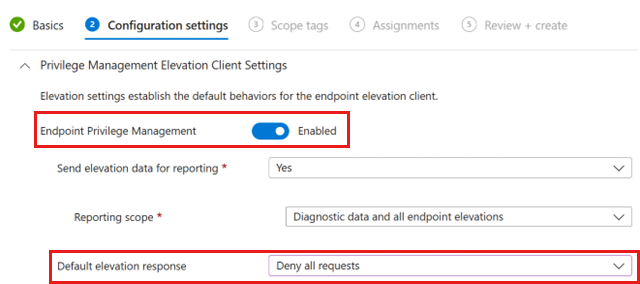
On the Configuration settings tab, in Default elevation response, select Deny all elevation requests.
On the Assignments tab, select Add groups, add the group you created earlier, and then select Create.
Verify administrative privilege restrictions
In this section, you validate that the Microsoft EPM Agent is installed and the policy is applied to the dev box.
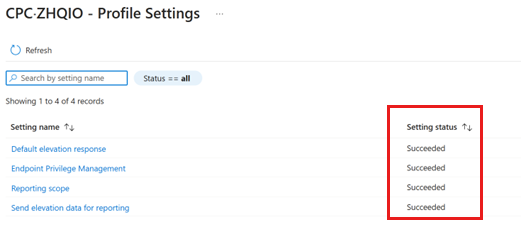
Verify that the policy is applied to the dev box:
Verify that the Microsoft EPM Agent is installed on the dev box:
- Sign in to the dev box you created earlier.
- Navigate to c:\Program Files, and verify that a folder named Microsoft EPM Agent exists.
Attempt to run an application with administrative privileges.
On your dev box, right-click an application and select Run with elevated access. You receive a message that the installation is blocked.


