Set up your project's backlogs and boards in Azure Boards
Azure DevOps Services | Azure DevOps Server 2022 - Azure DevOps Server 2019
In most cases, you can start using your product and portfolio backlogs once your project is created. A default team gets created along with associated backlogs and boards. You can start adding work items to your product backlog using the Backlog or Board.
However, you might need to ensure you've configured your backlogs and boards correctly. Ensure the configuration if you've added a team and want to start using the team backlogs and boards. Changes may be made to a project or team configuration over time. These changes can influence the work items that appear on your backlog and boards.
For an overview of the tools associated with your team, see Manage and configure team tools.
Prerequisites
- Project access: Be a project member.
- Permissions:
- Be a member of the Contributors or Project Administrators security group.
- To view or modify work items, have your View work items in this node and Edit work items in this node permissions set to Allow. By default, the Contributors group has this permission set to Allow. For more information, see Set work tracking permissions.
- Access levels: To add or modify work items, have at least Basic access. Users with Stakeholder access for public projects have full access to backlog and board features, like users with Basic access. For more information, see Stakeholder access quick reference.
- Defined iterations: To use the Planning pane, ensure your team administrator defined iteration (sprint) paths and configure team iterations.
- Project access: Be a project member
- Permissions:
- Be a member of the Contributors or Project Administrators security group.
- To view or modify work items, have your View work items in this node and Edit work items in this node permissions set to Allow. By default, the Contributors group has this permission set to Allow. For more information, see Set work tracking permissions.
- Access levels: To add or modify work items, have at least Basic access.
- Defined iterations: To use the Planning pane, ensure your team administrator defined iteration (sprint) paths and configure team iterations.
Default backlog and board work items
The first thing you need to understand is that your product Backlog and Board display work items that meet the following criteria:
- Work item type belongs to the Requirements category. The types differ depending on the process selected for your project:
- Work item Area Path matches one of the selected team's Area Paths
- Work item Iteration Path is under the team's Default Iteration Path
Note
The Basic process is available when you add a project to Azure DevOps Services or Azure DevOps Server 2019 Update 1. For earlier on-premises deployments, choose Agile, Scrum, or CMMI process.
You can determine the work item types that belong to your Requirements category. Determine the items by opening your product Backlog and checking the product backlog name.

Look up your team's Area Path(s) and Iteration Paths. For more information, see Define area paths and assign to a team and Define sprint paths and configure team iterations.
Default sprint backlog and Taskboard work items
Your sprint backlog and Taskboard apply the filters associated with your team's default backlog and board work items along with the Iteration Path you select.
You can only select Iteration Paths that have been preselected by your team.
Your sprint backlog displays only those work items assigned to the selected sprint. Child tasks assigned to other sprints aren't displayed.
Review checklist for work items, backlogs, and boards
If you don't see the work items you expect on your product Backlog or board, complete the following checks:
Make sure you've selected the team backlog or board of interest. To learn how, see Use breadcrumbs and selectors to go to and open artifacts.
Create a query of your backlog items, specifying the work item types that belong to your Requirements category and the Area Path associated with your team, for example:
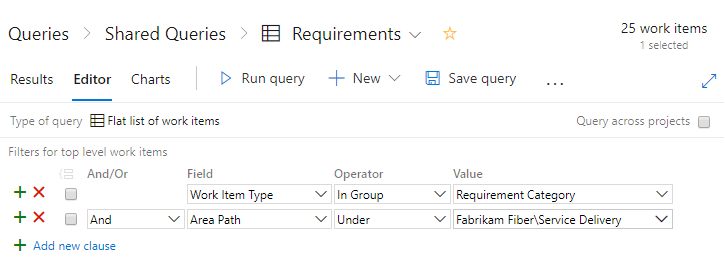
Add the State, Area Path, and Iteration Path fields to the column options.
Check the query results and that the values of the work items you expect to show up on your backlog meet these criteria:
- Area Path belongs to your team's area path(s)
- Iteration Path belongs under your team's default iteration path
- State isn't Closed, Completed, Done, or Removed.
Note
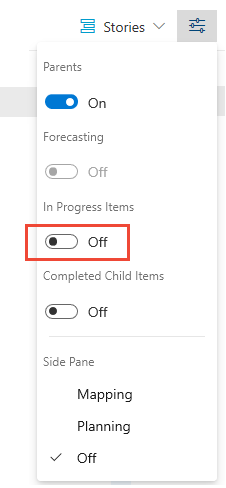
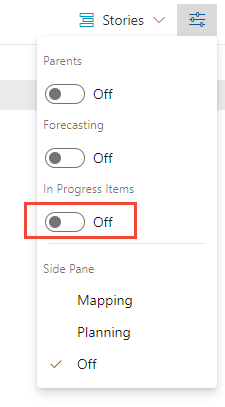
You can also filter your product backlog to show or hide work items that are in an In Progress state category, corresponding to an Active, Resolved, Committed, Doing workflow state.
Add bugs to your backlogs and boards
For all processes except the Basic process, each team manages the way bugs are tracked. Track bugs in the Requirements category because they show up on the Backlog and board or the Tasks category. They can also show up on the Taskboard or the Bugs category where they don't appear on either backlogs or boards.
Note
Bug work item types aren't available with the Basic process. The Basic process tracks bugs as Issues and is available when you create a new project from Azure DevOps Services or Azure DevOps Server 2019.1 or later versions.
If you want bugs to show up on your Backlog and Board, choose Bugs are managed with requirements.
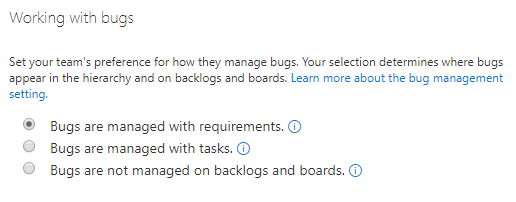
For more information, see Show bugs on backlogs and boards.
Correct your board configuration
If you see the following error when you open your board, you need to correct the configuration. The main reason for this error is that the workflow states of work item types that have been added to the Requirements category aren't mapped to the column.

Choose Correct this now to open the Settings dialog. To map the workflow states, refer to Add columns to your board, Update column-to-State mappings.
Customize your board checklist items
Checklists are a great way to create work items that are automatically linked with a parent-child link to another work item on a board. You can customize the work item types that you can add as a checklist by opening the Board Settings, choose Annotations, and enable the work item types you want to appear on the board. For more information, see Customize cards.
For example, here we've chosen to track bugs along with tasks, and enable Task, Bug, GitHub objects, and Tests to appear within checklists.

Note
The GitHub annotations require Azure DevOps Server 2019 update 1 or later version.
For more information about checklists, see the following articles:
Add other work item types to your board checklist
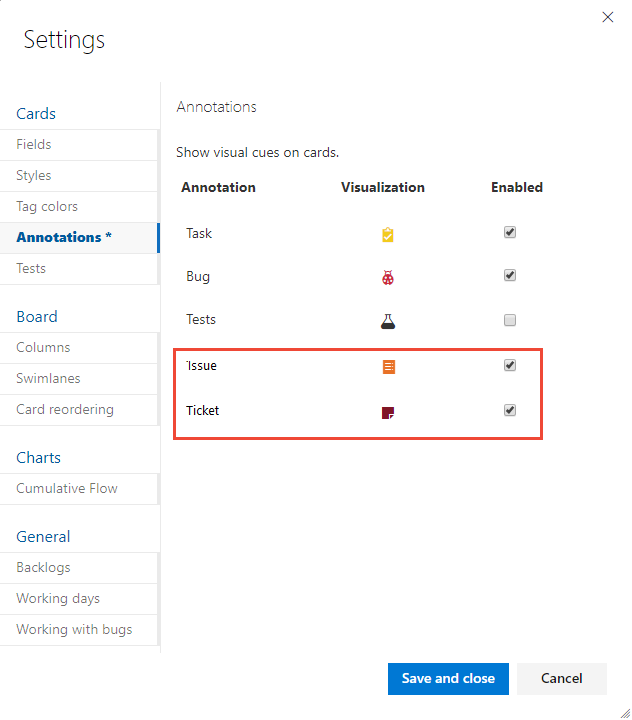
If you added work item types to the Task Category as described in Add custom work item types to your Taskboard later in this article, you can choose if these types appear within a checklist on your product board. You make this choice by opening Board Settings, choose Annotations, and enable the work item types you want to appear on the board. You can enable up to five annotations. For more information, see Customize cards.
For example, here we've chosen to track bugs along with tasks, and we enable Issue and Ticket and Task and Bug. For more information about checklists, see Add tasks or child items as checklists and Add, run, and update inline tests.
Hide or show backlog levels
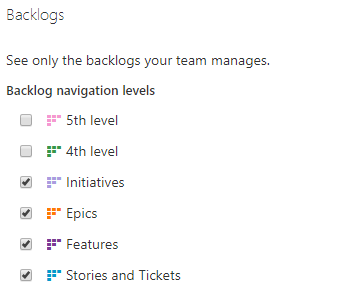
Your team can also choose to hide or show one or more backlog levels. Feature teams often manage backlog items, while management teams manage features and epics. In this situation, you can enable or disable a backlog level.
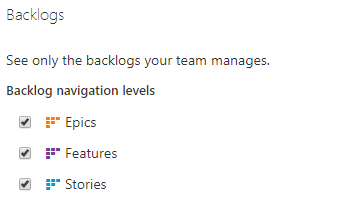
For more information, see Select backlog navigation levels for your team.
Add custom work item types to your backlogs and portfolio backlog levels
If you want to track different work item types on your product backlog, you can do that by adding custom work item types and adding them to a specific backlog level.
You can also add custom work item types and add them to portfolio backlogs. You can add up to five portfolio backlogs.
For example, here we've added Initiatives, fourth level, and fifth level work item types to support five levels of portfolio backlogs. We've also added a custom work item type named Ticket and added that to the product backlog.
For more information, see the following resources:
Inheritance process model:
- Add and manage work item types (Inherited process)
- Customize your backlogs or boards (Inherited process)
- Customize an inheritance process
On-premises XML process model:
Add custom work item types to your Taskboard
To add custom work item types to appear on your sprint Taskboard, follow the steps outlined next based on the process model your project uses.
Note
You can enable work item types that you add to your Iteration backlog to appear as a checklist on your product board. To learn how, see Customize your board checklist items provided earlier in this article.
Track custom work items with the Inherited process model
For example, if you want to track a custom work item type, Tickets, along with Tasks and Bugs, you do the following tasks:
Define the Ticket custom work item type. See Add and manage work item types.
Add the Ticket work item types to the Iteration backlog. For more information, see Customize your backlogs or boards for a process.
Add existing and custom work item types with the On-premises XML process model
For on-premises deployments that use the On-premises XML process model to customize work tracking, you can add existing and custom work item types to the sprint Taskboards. For example, if you want to track Issues (or Impediments for the Scrum process) and a custom work item type, Tickets, along with Tasks and Bugs, you would do the following tasks:
Define the Ticket custom work item type. See Add or modify a work item type.
Add Issue and Ticket work item types to the Task Category by modifying the Categories XML file. For more information, see Categories XML element reference.
For example, here we add Issue and Ticket to the Task Category.
  <CATEGORY name="Task Category" refname="Microsoft.TaskCategory">
    <DEFAULTWORKITEMTYPE name="Task" />
  <WORKITEMTYPE name="Issue" /
  <WORKITEMTYPE name="Ticket" /
  </CATEGORY>
Make sure that the Issue and Ticket workflow states are mapped to category states. As needed, modify the ProcessConfiguration XML file to add Issues and Tickets to the
TaskBacklogsection.For example, here the New, Active, and Closed states are mapped for the Task Category.
  <TaskBacklog category="Microsoft.TaskCategory" pluralName="Tasks" singularName="Task" workItemCountLimit="1000">
    <States>
      <State value="New" type="Proposed" />
      <State value="Active" type="InProgress" />
      <State value="Closed" type="Complete" />
    </States>
. . .
  </TaskBacklog>
To verify your changes, open a Sprint backlog and make sure you can add an Issue or Ticket in the same way you add a Task. See Add tasks.
Other factors that can affect work items in your backlogs and boards
The following settings can influence the type and number of work items that appear in your backlogs and boards.
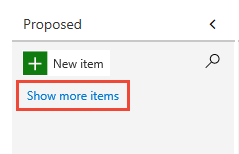
In your board, newly added work items may not appear if they're stack ranked lower within the product backlog. By choosing Show more items, you can cause the board to refresh and display more work items.
If you have nested work items that belong to the same category, only leaf nodes may appear on the board (for TFS 2018.1 and earlier versions). For this reason, we recommend that you don't nest work items of the same work item type or belonging to the same category. For more information, see Fix reordering and nesting issues, How backlogs and boards display hierarchical (nested) items.
If you've turned off the In Progress view, then those work items where work has started won't appear in the backlog list.
Work items appear in the priority order in which they're added or moved to. This order or sequence is managed by the Stack Rank (Basic, Agile, and CMMI processes) or Backlog Priority (Scrum) field. For more information, see the Stack rank section in Backlogs, portfolios, and Agile project management.
Each backlog can display up to 999 work items. If your backlog exceeds this limit, then you may want to consider adding a team and moving some of the work items to the other team's backlog.
Sprint backlogs show only those work items that meet the team's area path and the Iteration Path defined for the sprint.
Inheritance process model: If an administrator disables or deletes a work item type, it doesn't appear on backlogs and boards.
On-premises XML process model: If an administrator deletes or destroys a work item type, it doesn't appear on backlogs and boards.