Azure Resource Manager service connection special cases
Azure DevOps Services | Azure DevOps Server 2022 - Azure DevOps Server 2019
While the recommended option for Azure Resource Manager service connections is to use workload identity federation with an app registration or managed identity, there are times when you might need to use an agent-assigned managed identity or a publish profile instead. In this article, you'll learn how to create an Azure Resource Manager service connection that connects to a self-hosted agent on an Azure virtual machine and how to use a publish profile to create a service connection to an Azure App Service app.
You can also use Azure Resource Manager to connect to Azure Government Cloud and Azure Stack.
Create an Azure Resource Manager service connection to a VM that uses a managed identity
Note
To use a managed identity to authenticate, you must use a self-hosted agent on an Azure virtual machine (VM).
You can configure self-hosted agents on Azure VMs to use an Azure managed identity in Microsoft Entra ID. In this scenario, you use the agent-assigned managed identity to grant the agents access to any Azure resource that supports Microsoft Entra ID, such as an instance of Azure Key Vault.
In the Azure DevOps project, go to Project settings > Service connections.
For more information, see Open project settings.
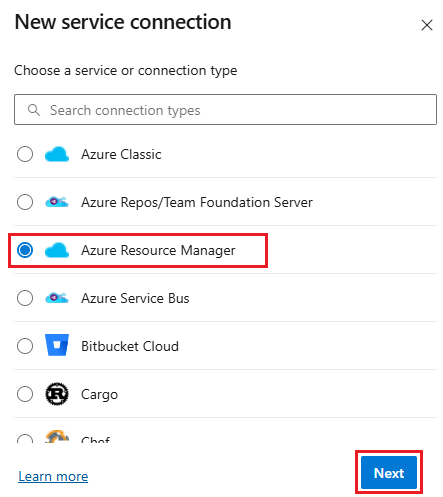
Select New service connection, then select Azure Resource Manager.

Select Managed identity (agent assigned) for the identity type.
For Environment, select the environment name (Azure Cloud, Azure Stack, or Government cloud options).
Select the Scope level. Select Subscription, Management Group, or Machine Learning Workspace. Management groups are containers that help you manage access, policy, and compliance across multiple subscriptions. A Machine Learning Workspace is place to create machine learning artifacts.
For the Subscription scope, enter the following parameters:
Parameter Description Subscription Id Required. Enter the Azure subscription ID. Subscription Name Required. Enter the Azure subscription name. For the Management Group scope, enter the following parameters:
Parameter Description Management Group Id Required. Enter the Azure management group ID. Management Group Name Required. Enter the Azure management group name. For the Machine Learning Workspace scope, enter the following parameters:
Parameter Description Subscription Id Required. Enter the Azure subscription ID. Subscription Name Required. Enter the Azure subscription name. Resource Group Required. Select the resource group containing the workspace. ML Workspace Name Required. Enter the name of the existing Azure Machine Learning workspace. ML Workspace Location Required. Enter the location of the existing Azure Machine Learning workspace.
Enter the Tenant Id.
Enter the Service connection name.
Optionally, enter a description for the service connection.
Select Grant access permission to all pipelines to allow all pipelines to use this service connection. If you don't select this option, you must manually grant access to each pipeline that uses this service connection.
Select Save.
After the new service connection is created:
- If you use the service connection in the UI, select the connection name that you assigned in the Azure subscription setting of your pipeline.
- If you use the service connection in a YAML file, copy the connection name into your code as the value for
azureSubscription.
Ensure that the VM (agent) has the appropriate permissions.
For example, if your code needs to call Azure Resource Manager, assign the VM the appropriate role by using role-based access control (RBAC) in Microsoft Entra ID.
For more information, see How can I use managed identities for Azure resources? and Use role-based access control to manage access to your Azure subscription resources.
For more information about the process, see Troubleshoot Azure Resource Manager service connections.
Create an Azure Resource Manager service connection using a publish profile
You can create a service connection by using a publish profile. You can use a publish profile to create a service connection to an Azure App Service.
In the Azure DevOps project, go to Project settings > Service connections.
For more information, see Open project settings.
Select New service connection, then select Azure Resource Manager and Next.

Select Publish profile for the identity type.
Enter the following parameters:
Parameter Description Subscription Required. Select an existing Azure subscription. If no Azure subscriptions or instances appear, see Troubleshoot Azure Resource Manager service connections. WebApp Required. Enter the name of the Azure App Service app. Service connection Name Required. The name that you use to refer to this service connection in task properties. Not the name of your Azure subscription. Description Optional. The description of the service connection. Select Grant access permission to all pipelines to allow all pipelines to use this service connection. If you don't select this option, you must manually grant access to each pipeline that uses this service connection.
Select Save.
After the new service connection is created:
- If you use the service connection in the UI, select the connection name that you assigned in the Azure subscription setting of your pipeline.
- If you use the service connection in a YAML file, copy the connection name and paste it into your code as the value for
azureSubscription.
Connect to an Azure Government Cloud
For information about connecting to an Azure Government Cloud, see Connect from Azure Pipelines (Azure Government Cloud).
Connect to Azure Stack
For information about connecting to Azure Stack, see these articles:
- Connect to Azure Stack
- Connect Azure Stack to Azure by using a VPN
- Connect Azure Stack to Azure by using Azure ExpressRoute
For more information, see Troubleshoot Azure Resource Manager service connections.
Help and support
- Explore troubleshooting tips.
- Get advice on Stack Overflow.
- Post your questions, search for answers, or suggest a feature in the Azure DevOps Developer Community.
- Get support for Azure DevOps.