Configure MQTT dataflow endpoints
Important
Azure IoT Operations Preview – enabled by Azure Arc is currently in preview. You shouldn't use this preview software in production environments.
You'll need to deploy a new Azure IoT Operations installation when a generally available release becomes available. You won't be able to upgrade a preview installation.
For legal terms that apply to Azure features that are in beta, in preview, or otherwise not yet released into general availability, see the Supplemental Terms of Use for Microsoft Azure Previews.
MQTT dataflow endpoints are used for MQTT sources and destinations. You can configure the endpoint settings, Transport Layer Security (TLS), authentication, and other settings.
Prerequisites
- An instance of Azure IoT Operations Preview
- A configured dataflow profile
Azure IoT Operations local MQTT broker
Azure IoT Operations provides a built-in local MQTT broker that you can use with dataflows. You can use the MQTT broker as a source to receive messages from other systems or as a destination to send messages to other systems.
Default endpoint
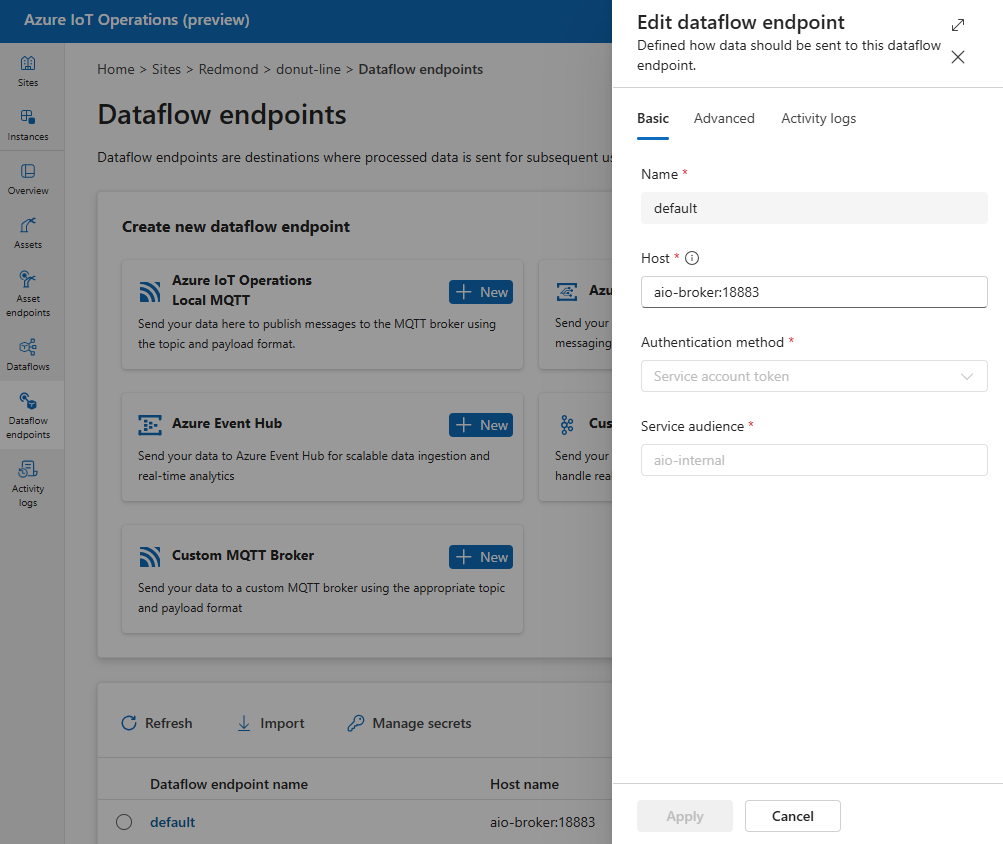
When you deploy Azure IoT Operations, an MQTT broker dataflow endpoint named "default" is created with default settings. You can use this endpoint as a source or destination for dataflows.
Important
The default endpoint must always be used as either the source or destination in every dataflow. To learn more about, see Dataflows must use local MQTT broker endpoint.
The default endpoint uses the following settings:
- Host:
aio-broker:18883through the default MQTT broker listener - Authentication: service account token (SAT) through the default BrokerAuthentication resource
- TLS: Enabled
- Trusted CA certificate: The default CA certificate
azure-iot-operations-aio-ca-trust-bundlefrom the default root CA
Caution
Don't delete the default endpoint. If you delete the default endpoint, you must recreate it with the same settings.
To view or edit the default MQTT broker endpoint settings:
In the operations experience, select the Dataflow endpoints.
Select the default endpoint to view or edit the settings.

Create new endpoint
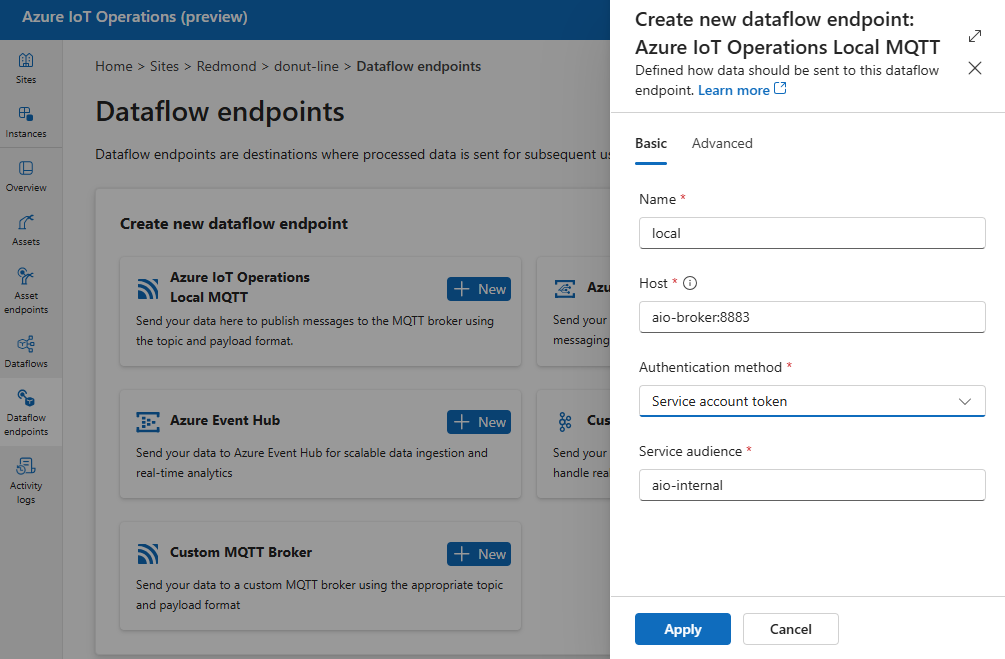
You can also create new local MQTT broker endpoints with custom settings. For example, you can create a new MQTT broker endpoint using a different port, authentication, or authorization settings. However, you must still always use the default endpoint as either the source or destination in every dataflow, even if you create new endpoints.
In the operations experience, select the Dataflow endpoints.
Under Create new dataflow endpoint, select Azure IoT Operations Local MQTT > New.

Enter the following settings for the endpoint:
Setting Description Name The name of the dataflow endpoint. Host The hostname and port of the MQTT broker. Use the format <hostname>:<port>Authentication method The method used for authentication. Choose Service account token, or X509 certificate Service audience The audience for the service account token. Required if using Service account token. X509 client certificate The X.509 client certificate used for authentication. Required if using X509 certificate. X509 client key The private key corresponding to the X.509 client certificate. Required if using X509 certificate. X509 intermediate certificates The intermediate certificates for the X.509 client certificate chain. Required if using X509 certificate.
Azure Event Grid
Azure Event Grid provides a fully managed MQTT broker that works with Azure IoT Operations dataflows. To configure an Azure Event Grid MQTT broker endpoint, we recommend that you use managed identity for authentication.
Configure Event Grid namespace
If you haven't done so already, create Event Grid namespace first.
Enable MQTT
Once you have an Event Grid namespace, go to Configuration and check:
- Enable MQTT: Select the checkbox.
- Maximum client sessions per authentication name: Set to 3 or more.
The max client sessions option is important so that dataflows can scale up and still be able to connect. To learn more, see Event Grid MQTT multi-session support.
Create a topic space
In order for dataflows to send or receive messages to Event Grid MQTT broker, you need to create at least one topic space in the Event Grid namespace. You can create a topic space in the Event Grid namespace by selecting Topic spaces > New topic space.
To quickly get started and for testing, you can create a topic space with the wildcard topic # as the topic template.
Assign permission to managed identity
Now that the topic space is created, you need to assign the managed identity of the Azure IoT Operations Arc extension to the Event Grid namespace or topic space.
In Azure portal, go to the Arc-connected Kubernetes cluster and select Settings > Extensions. In the extension list, find the name of your Azure IoT Operations extension. Copy the name of the extension.
Then, go to the Event Grid namespace > Access control (IAM) > Add role assignment. Assign the managed identity of the Azure IoT Operations Arc extension with an appropriate role like EventGrid TopicSpaces Publisher or EventGrid TopicSpaces Subscriber. This gives the managed identity the necessary permissions to send or receive messages for all topic spaces in the namespace.
Alternatively, you can assign the role at the topic space level. Go to the topic space > Access control (IAM) > Add role assignment. Assign the managed identity of the Azure IoT Operations Arc extension with an appropriate role like EventGrid TopicSpaces Publisher or EventGrid TopicSpaces Subscriber. This gives the managed identity the necessary permissions to send or receive messages for the specific topic space.
Create dataflow endpoint
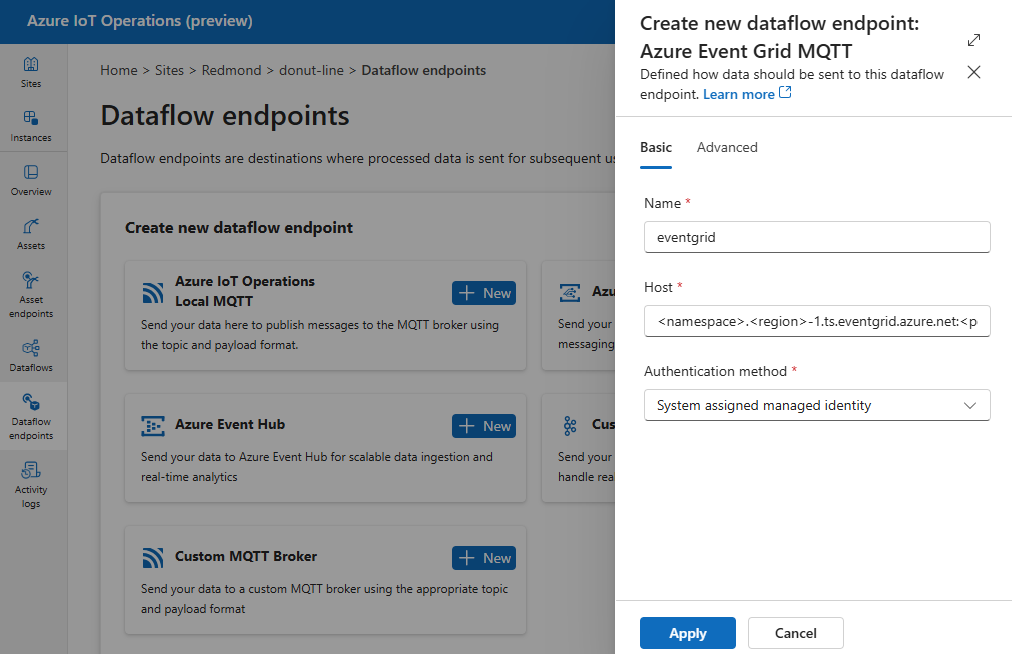
Once the Event Grid namespace is configured, you can create a dataflow endpoint for the Event Grid MQTT broker.
In the operations experience, select the Dataflow endpoints tab.
Under Create new dataflow endpoint, select Azure Event Grid MQTT > New.

Enter the following settings for the endpoint:
Setting Description Name The name of the dataflow endpoint. Host The hostname and port of the Event Grid MQTT broker. Use the format <NAMESPACE>.<REGION>-1.ts.eventgrid.azure.net:8883Authentication method The method used for authentication. Choose System assigned managed identity Select Apply to provision the endpoint.
Once the endpoint is created, you can use it in a dataflow to connect to the Event Grid MQTT broker as a source or destination. The MQTT topics are configured in the dataflow.
Use X.509 certificate authentication with Event Grid
We recommended using managed identity for authentication. You can also use X.509 certificate authentication with the Event Grid MQTT broker.
When you use X.509 authentication with an Event Grid MQTT broker, go to the Event Grid namespace > Configuration and check these settings:
- Enable MQTT: Select the checkbox.
- Enable alternative client authentication name sources: Select the checkbox.
- Certificate Subject Name: Select this option in the dropdown list.
- Maximum client sessions per authentication name: Set to 3 or more.
The alternative client authentication and maximum client sessions options allow dataflows to use client certificate subject name for authentication instead of MQTT CONNECT Username. This capability is important so that dataflows can spawn multiple instances and still be able to connect. To learn more, see Event Grid MQTT client certificate authentication and Multi-session support.
Then, follow the steps in X.509 certificate to configure the endpoint with the X.509 certificate settings.
Event Grid shared subscription limitation
Azure Event Grid MQTT broker doesn't support shared subscriptions, which means that you can't set the instanceCount to more than 1 in the dataflow profile if Event Grid is used as a source (where the dataflow subscribes to messages) for a dataflow. In this case, if you set instanceCount greater than 1, the dataflow fails to start.
Custom MQTT brokers
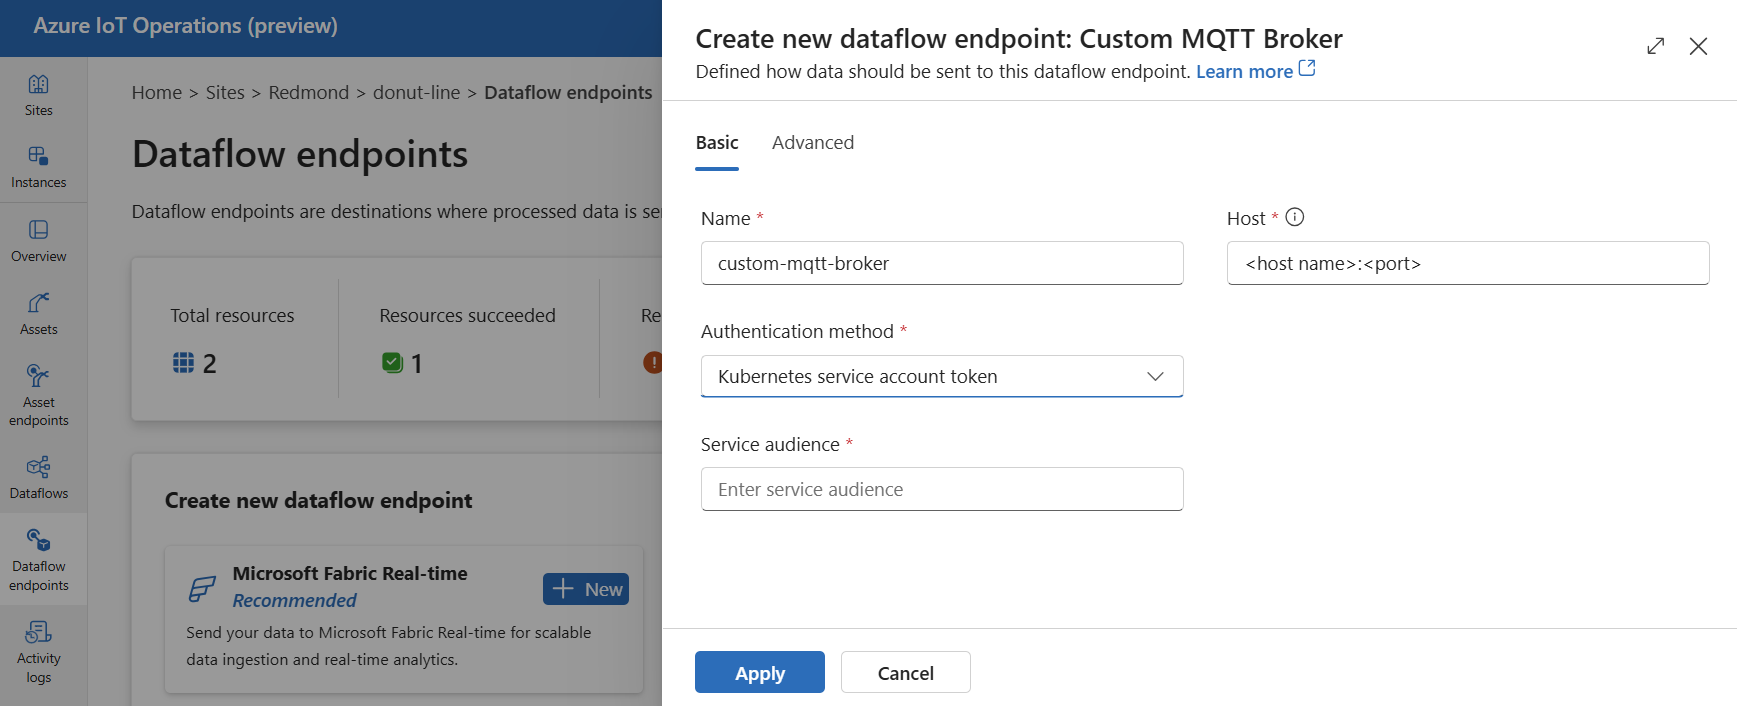
For other MQTT brokers, you can configure the endpoint, TLS, authentication, and other settings as needed.
In the operations experience, select the Dataflow endpoints tab.
Under Create new dataflow endpoint, select Custom MQTT Broker > New.

Enter the following settings for the endpoint:
Setting Description Name The name of the dataflow endpoint Host The hostname of the MQTT broker endpoint in the format <hostname>.<port>.Authentication method The method used for authentication. Choose System assigned managed identity, User assigned managed identity, or Service account token. Service audience The audience for the service account token. Required if using service account token. Client ID The client ID of the user-assigned managed identity. Required if using User assigned managed identity. Tenant ID The tenant ID of the user-assigned managed identity. Required if using User assigned managed identity. Access token secret name The name of the Kubernetes secret containing the SAS token. Required if using Access token. Select Apply to provision the endpoint.
To customize the MQTT endpoint settings, see the following sections for more information.
Available authentication methods
The following authentication methods are available for MQTT broker dataflow endpoints. For more information about enabling secure settings by configuring an Azure Key Vault and enabling workload identities, see Enable secure settings in Azure IoT Operations Preview deployment.
X.509 certificate
Many MQTT brokers, like Event Grid, support X.509 authentication. Dataflows can present a client X.509 certificate and negotiate the TLS communication.
In the operations experience dataflow endpoint settings page, select the Basic tab then choose Authentication method > X509 certificate.
Enter the following settings for the endpoint:
| Setting | Description |
|---|---|
| X509 client certificate | The X.509 client certificate used for authentication. |
| X509 intermediate certificates | The intermediate certificates for the X.509 client certificate chain. |
| X509 client key | The private key corresponding to the X.509 client certificate. |
System-assigned managed identity
To use system-assigned managed identity for authentication, you don't need to create a secret. The system-assigned managed identity is used to authenticate with the MQTT broker.
Before you configure the endpoint, make sure that the Azure IoT Operations managed identity has the necessary permissions to connect to the MQTT broker.
- In Azure portal, go to your Azure IoT Operations instance and select Overview.
- Copy the name of the extension listed after Azure IoT Operations Arc extension. For example, azure-iot-operations-xxxx7.
- Search for the managed identity in the Azure portal by using the name of the extension. For example, search for azure-iot-operations-xxxx7.
- Assign a role to the Azure IoT Operations Arc extension managed identity that grants permission to connect to the MQTT broker. For example, with Azure Event Grid MQTT broker, assign the managed identity to the Event Grid namespace or topic space with an appropriate role.
- Configure the endpoint with system-assigned managed identity settings.
In the operations experience dataflow endpoint settings page, select the Basic tab then choose Authentication method > System assigned managed identity.
In most cases when using with Event Grid, you can leave the settings empty as shown. This sets the managed identity audience to the Event Grid common audience https://eventgrid.azure.net. If you need to set a different audience, you can specify it in the settings.
Not supported.
User-assigned managed identity
To use user-managed identity for authentication, you must first deploy Azure IoT Operations with secure settings enabled. To learn more, see Enable secure settings in Azure IoT Operations Preview deployment.
Then, specify the user-assigned managed identity authentication method along with the client ID and tenant ID of the managed identity.
In the operations experience dataflow endpoint settings page, select the Basic tab then choose Authentication method > User assigned managed identity.
Here, the scope is optional and defaults to https://eventgrid.azure.net/.default which works for all Azure Event Grid namespaces. If you need to set a different scope, you can specify it in the settings via Bicep or Kubernetes.
Kubernetes service account token (SAT)
To use Kubernetes service account token (SAT) for authentication, you don't need to create a secret. The SAT is used to authenticate with the MQTT broker by matching the audience.
In the operations experience dataflow endpoint settings page, select the Basic tab then choose Authentication method > Service account token.
Enter the service audience.
Anonymous
To use anonymous authentication, set the authentication method to Anonymous.
Not yet supported in the operations experience. See known issues.
Advanced settings
You can set advanced settings for the MQTT broker dataflow endpoint such as TLS, trusted CA certificate, MQTT messaging settings, and CloudEvents. You can set these settings in the dataflow endpoint Advanced portal tab, within the dataflow endpoint custom resource.
In the operations experience, select the Advanced tab for the dataflow endpoint.
TLS settings
TLS mode
To enable or disable TLS for the Kafka endpoint, update the mode setting in the TLS settings.
In the operations experience dataflow endpoint settings page, select the Advanced tab then use the checkbox next to TLS mode enabled.
The TLS mode can be set to Enabled or Disabled. If the mode is set to Enabled, the dataflow uses a secure connection to the Kafka broker. If the mode is set to Disabled, the dataflow uses an insecure connection to the Kafka broker.
Trusted CA certificate
Configure the trusted CA certificate for the MQTT endpoint to establish a secure connection to the MQTT broker. This setting is important if the MQTT broker uses a self-signed certificate or a certificate signed by a custom CA that isn't trusted by default.
In the operations experience dataflow endpoint settings page, select the Advanced tab then use the Trusted CA certificate config map field to specify the ConfigMap containing the trusted CA certificate.
This ConfigMap should contain the CA certificate in PEM format. The ConfigMap must be in the same namespace as the MQTT dataflow resource. For example:
kubectl create configmap client-ca-configmap --from-file root_ca.crt -n azure-iot-operations
Tip
When connecting to Event Grid MQTT broker, the CA certificate isn't required because the Event Hubs service uses a certificate signed by a public CA that is trusted by default.
Client ID prefix
You can set a client ID prefix for the MQTT client. The client ID is generated by appending the dataflow instance name to the prefix.
Caution
Most applications should not modify the client ID prefix. Don't modify this after an initial IoT Operations deployment. Changing the client ID prefix after deployment might result in data loss.
In the operations experience dataflow endpoint settings page, select the Advanced tab then use the Client ID prefix field to specify the prefix.
QoS
You can set the Quality of Service (QoS) level for the MQTT messages to either 1 or 0. The default is 1.
In the operations experience dataflow endpoint settings page, select the Advanced tab then use the Quality of service (QoS) field to specify the QoS level.
Retain
Use the retain setting to specify whether the dataflow should keep the retain flag on MQTT messages. The default is Keep.
Setting this field to Keep is useful to ensure that the remote broker has the same messages retained as the local broker, which can be important for Unified Namespace (UNS) scenarios.
If set to Never, the retain flag is removed from the MQTT messages. This can be useful when you don't want the remote broker to retain any messages or if the remote broker doesn't support retain.
To configure retain settings:
In the operations experience dataflow endpoint settings page, select the Advanced tab then use the Retain field to specify the retain setting.
The retain setting only takes effect if the dataflow uses MQTT endpoint as both source and destination. For example, in an MQTT bridge scenario.
Important
Azure Event Grid MQTT broker currently doesn't support the retain flag. This means if you set the retain flag to Keep for an Event Grid MQTT broker endpoint and it's being used as a destination, the messages are rejected. To avoid this, set the retain flag to Never when using Event Grid MQTT broker as a destination.
Session expiry
You can set the session expiry interval for the dataflow MQTT client. The session expiry interval is the maximum time that an MQTT session is maintained if the dataflow client disconnects. The default is 3600 seconds. To configure the session expiry interval:
In the operations experience dataflow endpoint settings page, select the Advanced tab then use the Session expiry field to specify the session expiry interval.
MQTT or WebSockets protocol
By default, WebSockets isn't enabled. To use MQTT over WebSockets, set the protocol field to WebSockets.
In the operations experience dataflow endpoint settings page, select the Advanced tab then use the Protocol field to specify the protocol.
Max inflight messages
You can set the maximum number of inflight messages that the dataflow MQTT client can have. The default is 100.
In the operations experience dataflow endpoint settings page, select the Advanced tab then use the Maximum in-flight messages field to specify the maximum number of inflight messages.
For subscribe when the MQTT endpoint is used as a source, this is the receive maximum. For publish when the MQTT endpoint is used as a destination, this is the maximum number of messages to send before waiting for an acknowledgment.
Keep alive
You can set the keep alive interval for the dataflow MQTT client. The keep alive interval is the maximum time that the dataflow client can be idle before sending a PINGREQ message to the broker. The default is 60 seconds.
In the operations experience dataflow endpoint settings page, select the Advanced tab then use the Keep alive field to specify the keep alive interval.
CloudEvents
CloudEvents are a way to describe event data in a common way. The CloudEvents settings are used to send or receive messages in the CloudEvents format. You can use CloudEvents for event-driven architectures where different services need to communicate with each other in the same or different cloud providers.
The CloudEventAttributes options are Propagate orCreateOrRemap. To configure CloudEvents settings:
In the operations experience dataflow endpoint settings page, select the Advanced tab then use the Cloud event attributes field to specify the CloudEvents setting.
The following sections provide more information about the CloudEvents settings.
Propagate setting
CloudEvent properties are passed through for messages that contain the required properties. If the message doesn't contain the required properties, the message is passed through as is.
| Name | Required | Sample value | Output value |
|---|---|---|---|
specversion |
Yes | 1.0 |
Passed through as is |
type |
Yes | ms.aio.telemetry |
Passed through as is |
source |
Yes | aio://mycluster/myoven |
Passed through as is |
id |
Yes | A234-1234-1234 |
Passed through as is |
subject |
No | aio/myoven/telemetry/temperature |
Passed through as is |
time |
No | 2018-04-05T17:31:00Z |
Passed through as is. It's not restamped. |
datacontenttype |
No | application/json |
Changed to the output data content type after the optional transform stage. |
dataschema |
No | sr://fabrikam-schemas/123123123234234234234234#1.0.0 |
If an output data transformation schema is given in the transformation configuration, dataschema is changed to the output schema. |
CreateOrRemap setting
CloudEvent properties are passed through for messages that contain the required properties. If the message doesn't contain the required properties, the properties are generated.
| Name | Required | Generated value if missing |
|---|---|---|
specversion |
Yes | 1.0 |
type |
Yes | ms.aio-dataflow.telemetry |
source |
Yes | aio://<target-name> |
id |
Yes | Generated UUID in the target client |
subject |
No | The output topic where the message is sent |
time |
No | Generated as RFC 3339 in the target client |
datacontenttype |
No | Changed to the output data content type after the optional transform stage |
dataschema |
No | Schema defined in the schema registry |
Next steps
To learn more about dataflows, see Create a dataflow.