Chamber VMs
Chamber workload virtual machines (VM) are Azure VMs managed by the Workbench. Chamber VMs don't require expert users to select, deploy, configure, or manage. VMs are deployed quickly, preconfigured with drivers for the most common EDA (Electronic Design Automation) workloads, and with access to thousands of managed applications.
Chamber VMs deploy quickly and with little configuration in as little as 10 minutes. Chamber VMs are automatically:
- Deployed directly into the chamber with no more configuration
- Networked to the chamber's private virtual network
- Mounted to any existing chamber storage, user home directories, and the Data Pipeline mount points
- Preconfigured with drivers to work with major semiconductor design tools
User administration is managed from the parent chamber and all users of a chamber have access into all VMs in the chamber.
This article shows how to create, manage, and delete a chamber VM.
Prerequisites
- A Modeling and Simulation Workbench with at least one chamber.
- A user account with Workbench Owner privileges (Subscription Owner or Subscription Contributor) role.
Create a chamber VM
A chamber VM can only be deployed into an existing chamber. Once deployed, the chamber VM can't be moved to other chambers or renamed. The location of a chamber VM can't be specified as VMs are deployed to the same location as the parent Workbench.
The Azure Modeling and Simulation Workbench offers a select set of high-performance VMs. To see the VM offerings and features, refer to Modeling and Simulation Workbench VM Offerings.
All VMs are created with Red Hat Enterprise Linux version 8.8.
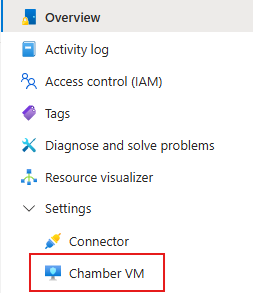
From the chamber overview page, select Chamber VM from the Settings menu in the left pane.
On the chamber VM page, select Create from the action bar.

In the Create chamber VM dialog, enter the name of the chamber VM, the VM type, and the number of VMs to be created (default is 1). The VM image type will be expanded in the future to support software for other scientific and engineering applications.
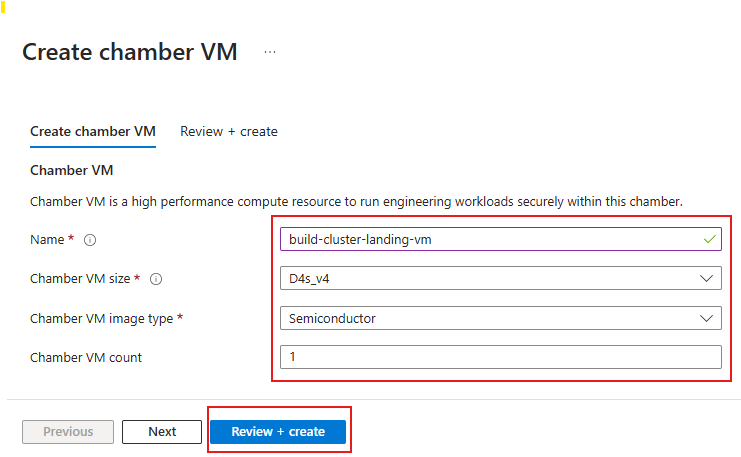 .
.
Read about the Chamber VM offerings to help you select the correct VM for your workload.
- Select Review + create.
- If prevalidation checks are successful, the Create button is enabled. Select Create. A chamber VM typically can take up to 10 minutes to deploy. Once deployed, the Power state status shows as "Running".
Manage a chamber VM
Once a chamber VM is created, a Workbench Owner or chamber Admin can administer it. Chamber VMs can only be stopped, started, or restarted. Chamber VMs can't be migrated or resized. Chamber VMs don't accept user role assignments. User administration happens at the chamber level. Chambers have access to shared storage (shared between chambers) and chamber storage, which is accessible only within the chamber by the members. IP addresses are managed by the deployment engine. Data and OS disks aren't configurable in chamber VMs. Microsoft recommends installing all your applications and data on the chamber storage volumes to allow you to create and destroy VMs that are instantly ready for use. All VMs have access to the chamber License servers.
Delete a chamber VM
If a chamber VM is no longer needed, it can be deleted. VMs don't need to be stopped before being deleted. Once a chamber is deleted, it can't be recovered.
- Navigate to the chamber VM.
- Select Delete from the action bar. Deleting a chamber can take up to 10 minutes.