Quickstart: Create an instance of Azure Database for PostgreSQL - Flexible Server
APPLIES TO:  Azure Database for PostgreSQL - Flexible Server
Azure Database for PostgreSQL flexible server is a managed service that allows you to run, manage, and scale highly available PostgreSQL databases in the cloud.
This article shows you how to create an instance of Azure Database for PostgreSQL Flexible Server using different mechanisms.
Create an Azure Database for PostgreSQL flexible server instance
If you don't have an Azure subscription, create a free Azure account before you begin.
An Azure Database for PostgreSQL flexible server instance is created with a configured set of compute and storage resources. The server is created within an Azure resource group.
Select any of the following tabs, depending on the method you want to use to deploy your instance:
Using the Azure portal:
Sign in with your credentials, if you're asked to do so.
Select Create a resource in the upper-left corner of the portal.
Under Categories, select Databases, and from the filtered list of resource types, find the one called Azure Database for PostgreSQL Flexible Server and select Create.
The New Azure Database for PostgreSQL Flexible server wizard launches, and you should provide all information required, starting from the Basics tab.
Use the following table to understand the meaning of the different fields available in the Basics page, and as guidance to fill the page:
Section Setting Suggested value Description Can be changed after instance creation Project details Subscription Select the name of the subscription in which you want to create the resource. A subscription is an agreement with Microsoft to use one or more Microsoft cloud platforms or services, for which charges accrue based on either a per-user license fee or on cloud-based resource consumption. If you have multiple subscriptions, choose the subscription in which you'd like to be billed for the resource. An existing Azure Database for PostgreSQL flexible server instance can be moved to a different subscription from the one it was originally created. For more information, see Move Azure resources to a new resource group or subscription. Resource group The resource group in the selected subscription, in which you want to create the resource. It can be an existing resource group, or you can select Create new, and provide a name in that subscription which is unique among the existing resource group names. A resource group is a container that holds related resources for an Azure solution. The resource group can include all the resources for the solution, or only those resources that you want to manage as a group. You decide how you want to allocate resources to resource groups based on what makes the most sense for your organization. Generally, add resources that share the same lifecycle to the same resource group so you can easily deploy, update, and delete them as a group An existing Azure Database for PostgreSQL flexible server instance can be moved to a different subscription from the one it was originally created. For more information, see Move Azure resources to a new resource group or subscription. Server details Server name The name that you want to assign to the server. A unique name that identifies your Azure Database for PostgreSQL flexible server instance. The domain name postgres.database.azure.comis appended to the server name you provide, to conform the fully qualified host name by which you can use a Domain Naming System server to resolve the IP address of your instance.Although the server name can't be changed after server creation, you can use the point in time recovery feature, to restore the server under a different name. An alternative approach to continue using the existing server, but being able to refer to it using a different server name, would use the virtual endpoints to create a writer endpoint with the new desired name. With this approach, you could refer to the instance by its original name, or that assigned to the write virtual endpoint. Region The name of one of the regions in which the service is supported, and is more adequate for you to deploy your instance. Compliance, data residency, pricing, proximity to your users, or availability of other services in the same region, are some of the requirements you should use when choosing the region. The service doesn't offer a feature to automatically and transparently relocate an instance to a different region. PostgreSQL version The version selected by default. You can select among the list of major versions of PostgreSQL currently supported by the service. Currently those versions are: 17 (preview), 16, 15, 14, 13, 12, 11 Workload type Default SKU selection. You can choose from Development(Burstable SKU),Production(General Purpose, by default, or Memory Optimized SKUs). You can further customize the SKU and storage by selecting Configure server.The service provides a built-in feature which can upgrade the current major version of your instance to any other higher version supported by the feature. For more information, see major version upgrades. Availability zone Your preferred availability zone. You can choose in which availability zone you want your server to be deployed. Being able to choose the availability zone in which your instance is deployed, is useful to colocate it with your application. If you choose No preference, a default availability zone is automatically assigned to your instance during its creation. Although the availability zone in which an instance is deployed can't be changed after its creation, you can use the point in time recovery feature to restore the server under a different name on a different availability zone. High availability High availability Enable it for Same zone or Zone redundant. If you select either of these two options, a standby server with the same configuration as your primary is automatically provisioned. The standby server is provisioned in the same availability zone or in a different availability zone within the same region, depending on the option selected. Notice that high availability can be enabled or disabled after the server is created. High availability can be enabled or disabled after server creation. However, if it's enabled, it can't be changed directly from Same zone to Zone redundant or viceversa. In order to implement such change, you first need to disable high availability, and then re-enable it choosing the newly desired mode. Authentication Authentication method Although the recommended authentication method is Microsoft Entra authentication, for the sake of simplicity, in this quickstart let's select PostgreSQL authentication only. By selecting PostgreSQL authentication only, you're required to provide a PostgreSQL native user name and a password. If you choose Microsoft Entra authentication, you need to provide the object identifier of the Microsoft Entra user or group which you want to assign as the administrator of the instance. If you choose, PostgreSQL and Microsoft Entra authentication, you need to satisfy both previous requirements. Can be changed to any of the three supported values after server creation. Admin username The name of the PostgreSQL native user that you want to assign as the administrator of your instance. For this example, let's set it to adminuser.The admin username must contain between 1 and 63 characters, must only consist of numbers and letters, can’t start with pg_ and can't be azure_superuser, azure_pg_admin, admin, administrator, root, guest, or public. The name of this user can't be changed after the instance is created. Also, it can't be replaced with some other PostgreSQL native user that you could create in the instance. Password The password that you want to assign to the PostgreSQL native user which is designated as an administrator. Specify a password for the server admin account. Make sure that your password is complex enough. Can be changed as many times as needed after the server is created. To configure the compute and storage further, under Server details, in the Compute + storage section, select Configure server. The Compute + storage page opens, where you can configure several settings specific to the type of compute and storage you want to use. Once you configure your compute and storage according to your needs, select Save to return to the Basics page and continue configuring your instance.
Use the following table to understand the meaning of the different fields available in the Compute + storage page, and as guidance to fill the page:
Section Setting Suggested value Description Can be changed after instance creation Cluster Cluster options Select Server. Possible values are Server (for workloads that can fit on one node) and Elastic cluster (for capacity larger than a single node, elastic cluster provides schema- and row-based sharding on a database distributed across a cluster). Can't be changed on existing servers. Node count Set it to 4. This option is only available when Cluster options is set to Elastic cluster. Allowed range of values span from 1 to 10. Can be changed on existing servers. Compute Compute tier Select General Purpose. Possible values are Burstable (typically used for development environments in which workloads don't need the full capacity of the CPU continuously) and General Purpose (typically used for production environments with most common workloads), and Memory Optimized (typically used for production environments running workloads that require a high memory to CPU ratio). For more information, see Compute options in Azure Database for PostgreSQL - Flexible Server. Can be changed after the server is created. However, if you're using some functionality which is only supported on certain tiers, and change the current tier to one in which the feature isn't supported, the feature stops being available or gets disabled. Compute Processor Leave the default setting. Notice that this option might not be visible for some regions. If the region selected in the Basics tab supports processors from more than one manufacturer, then the option is visible. In the regions supporting processors from different manufacturers, possible values are AMD and Intel. For more information, see Compute options in Azure Database for PostgreSQL - Flexible Server. Can be changed for existing instances, as long as the region in which the instance is deployed offers processors from more than one manufacturer. Compute size Leave the default setting. Notice that the list of supported values might vary across regions, depending on the hardware available on each region. For more information, see Compute options in Azure Database for PostgreSQL - Flexible Server. Can be changed after instance is created. Storage Storage type Select Premium SSD. Notice that the list of allowed values might vary depending on which other features you selected. For more information, see Storage options in Azure Database for PostgreSQL - Flexible Server. Can't be changed after the instance is created. Storage size Leave the default setting. Notice that the list of supported values might vary across regions, depending on the hardware available on each region. For more information, see Compute options in Azure Database for PostgreSQL - Flexible Server. Can be changed after the instance is created. It can only be increased. Manual or automatic shrinking of storage isn't supported. Acceptable values depend on the type of storage assigned to the instance. Performance Tier Leave the default setting. Performance of Premium solid-state drives (SSD) is set when you create the disk, in the form of their performance tier. When setting the provisioned size of the disk, a performance tier is automatically selected. This performance tier determines the IOPS and throughput of your managed disk. For Premium SSD disks, this tier can be changed at deployment or afterwards, without changing the size of the disk, and without downtime. Changing the tier allows you to prepare for and meet higher demand without using your disk's bursting capability. It can be more cost-effective to change your performance tier rather than rely on bursting, depending on how long the extra performance is necessary. This is ideal for events that temporarily require a consistently higher level of performance, like holiday shopping, performance testing, or running a training environment. To handle these events, you can switch a disk to a higher performance tier without downtime, for as long as you need the extra performance. You can then return to the original tier without downtime when the extra performance is no longer necessary. Can be changed after the instance is created. Storage Auto-growth Select this option to enable the autogrow feature. Notice that this option might not be supported for some storage types, and it might not be honored for certain storage sizes. For more information, see Configure storage autogrow in an Azure Database for PostgreSQL flexible server. Can be changed after the instance is created, as long as the storage type supports this feature. High availability High availability Leave the value that is selected by default. Supported values are Disabled (99.9% SLA), Same zone (99.95% SLA), and Zone redundant (99.99% SLA). Notice that supported high availability options might vary depending on the region in which you're trying to deploy your instance. For more information, see High availability in Azure Database for PostgreSQL - Flexible Server. High availability can be enabled or disabled after server creation. However, if it's enabled, it can't be changed directly from Same zone to Zone redundant or viceversa. In order to implement such change, you first need to disable high availability, and then re-enable it choosing the newly desired mode. Backups Backup retention period (in days) Leave the value that is selected by default. The default backup retention period is 7 days, but you can extend the period to a maximum of 35 days. Notice that supported high availability options might vary depending on the region in which you're trying to deploy your instance. For more information, see High availability in Azure Database for PostgreSQL - Flexible Server. Can be changed after instance is created. Backup Redundancy Options Automatically selected for you, based on the configuration of high availability and geo-redundancy of backups. Possible values are Locally redundant (provides at least 99.999999999% durability of backup objects over a year), Zone redundant (provides at least 99.9999999999% durability of backup objects over a year), and Geo-Redundant (provides at least 99.99999999999999% durability of backup objects over a year). When Geo-redundancy is enabled for the backup, then the backup redundancy option is set to Geo-Redundant. Otherwise, if high availability is set to Disabled or Same zone, then backup redundancy is set to Locally redundant. And if high availability is set to Zone redundant, then backup redundancy is set to Zone redundant. For more information, see Backup redundancy options in Azure Database for PostgreSQL - Flexible Server. Can't be changed after instance is created. Geo-redundancy Leave this option disabled. Geo-redundancy in backups is only supported on instances deployed in any of the Azure paired regions. For more information, see Geo-redundant backup and restore in Azure Database for PostgreSQL - Flexible Server Can't be changed after instance is created. After providing all required information in the Basics tab, select Next: Networking to move forward to the Network tab, from where you can configure the networking settings of your Azure Database for PostgreSQL flexible server instance:
Use the following table to understand the meaning of the different fields available in the Networking page, and as guidance to fill the page:
Section Setting Suggested value Description Can be changed after instance creation Network connectivity Connectivity method Select Public access (allowed IP addresses) and Private endpoint, for the sake of simplicity. Possible values are Public access (allowed IP addresses) and Private endpoint and Private access (VNET Integration). For more information, see Network with public access and private endpoints for Azure Database for PostgreSQL - Flexible Server with public access and Network with virtual network integration for Azure Database for PostgreSQL - Flexible Server. Can't be changed after instance is created. Public access Allow public access to this resource through the internet using a public IP address Enable the checkbox. By enabling this checkbox, you can configure firewall rules to control the IP address ranges from where clients can connect to your instance through the public endpoint. For more information, see Network with virtual network integration for Azure Database for PostgreSQL - Flexible Server Can be changed after instance is created. Firewall rules Allow public access from any Azure service within Azure to this server Leave the default setting. By enabling this checkbox, you configure a special firewall rule to allow connections from IP addresses allocated to any Azure service or asset, including connections from the subscriptions of other customers. For more information, see Network with virtual network integration for Azure Database for PostgreSQL - Flexible Server Can be changed after instance is created. + Add current client IP address ( ###.###.###.### ) Select the link with that text. That configures a firewall rule to allow connections from the IP address indicated in parenthesis. That IP address corresponds to the public IP address that's used by the computer from which you're accessing Azure portal. For more information, see Network with virtual network integration for Azure Database for PostgreSQL - Flexible Server Can be changed after instance is created. After providing all required information in the Networking tab, select Next: Security to move forward to the Security tab, from where you can configure the data security settings of your Azure Database for PostgreSQL flexible server instance:
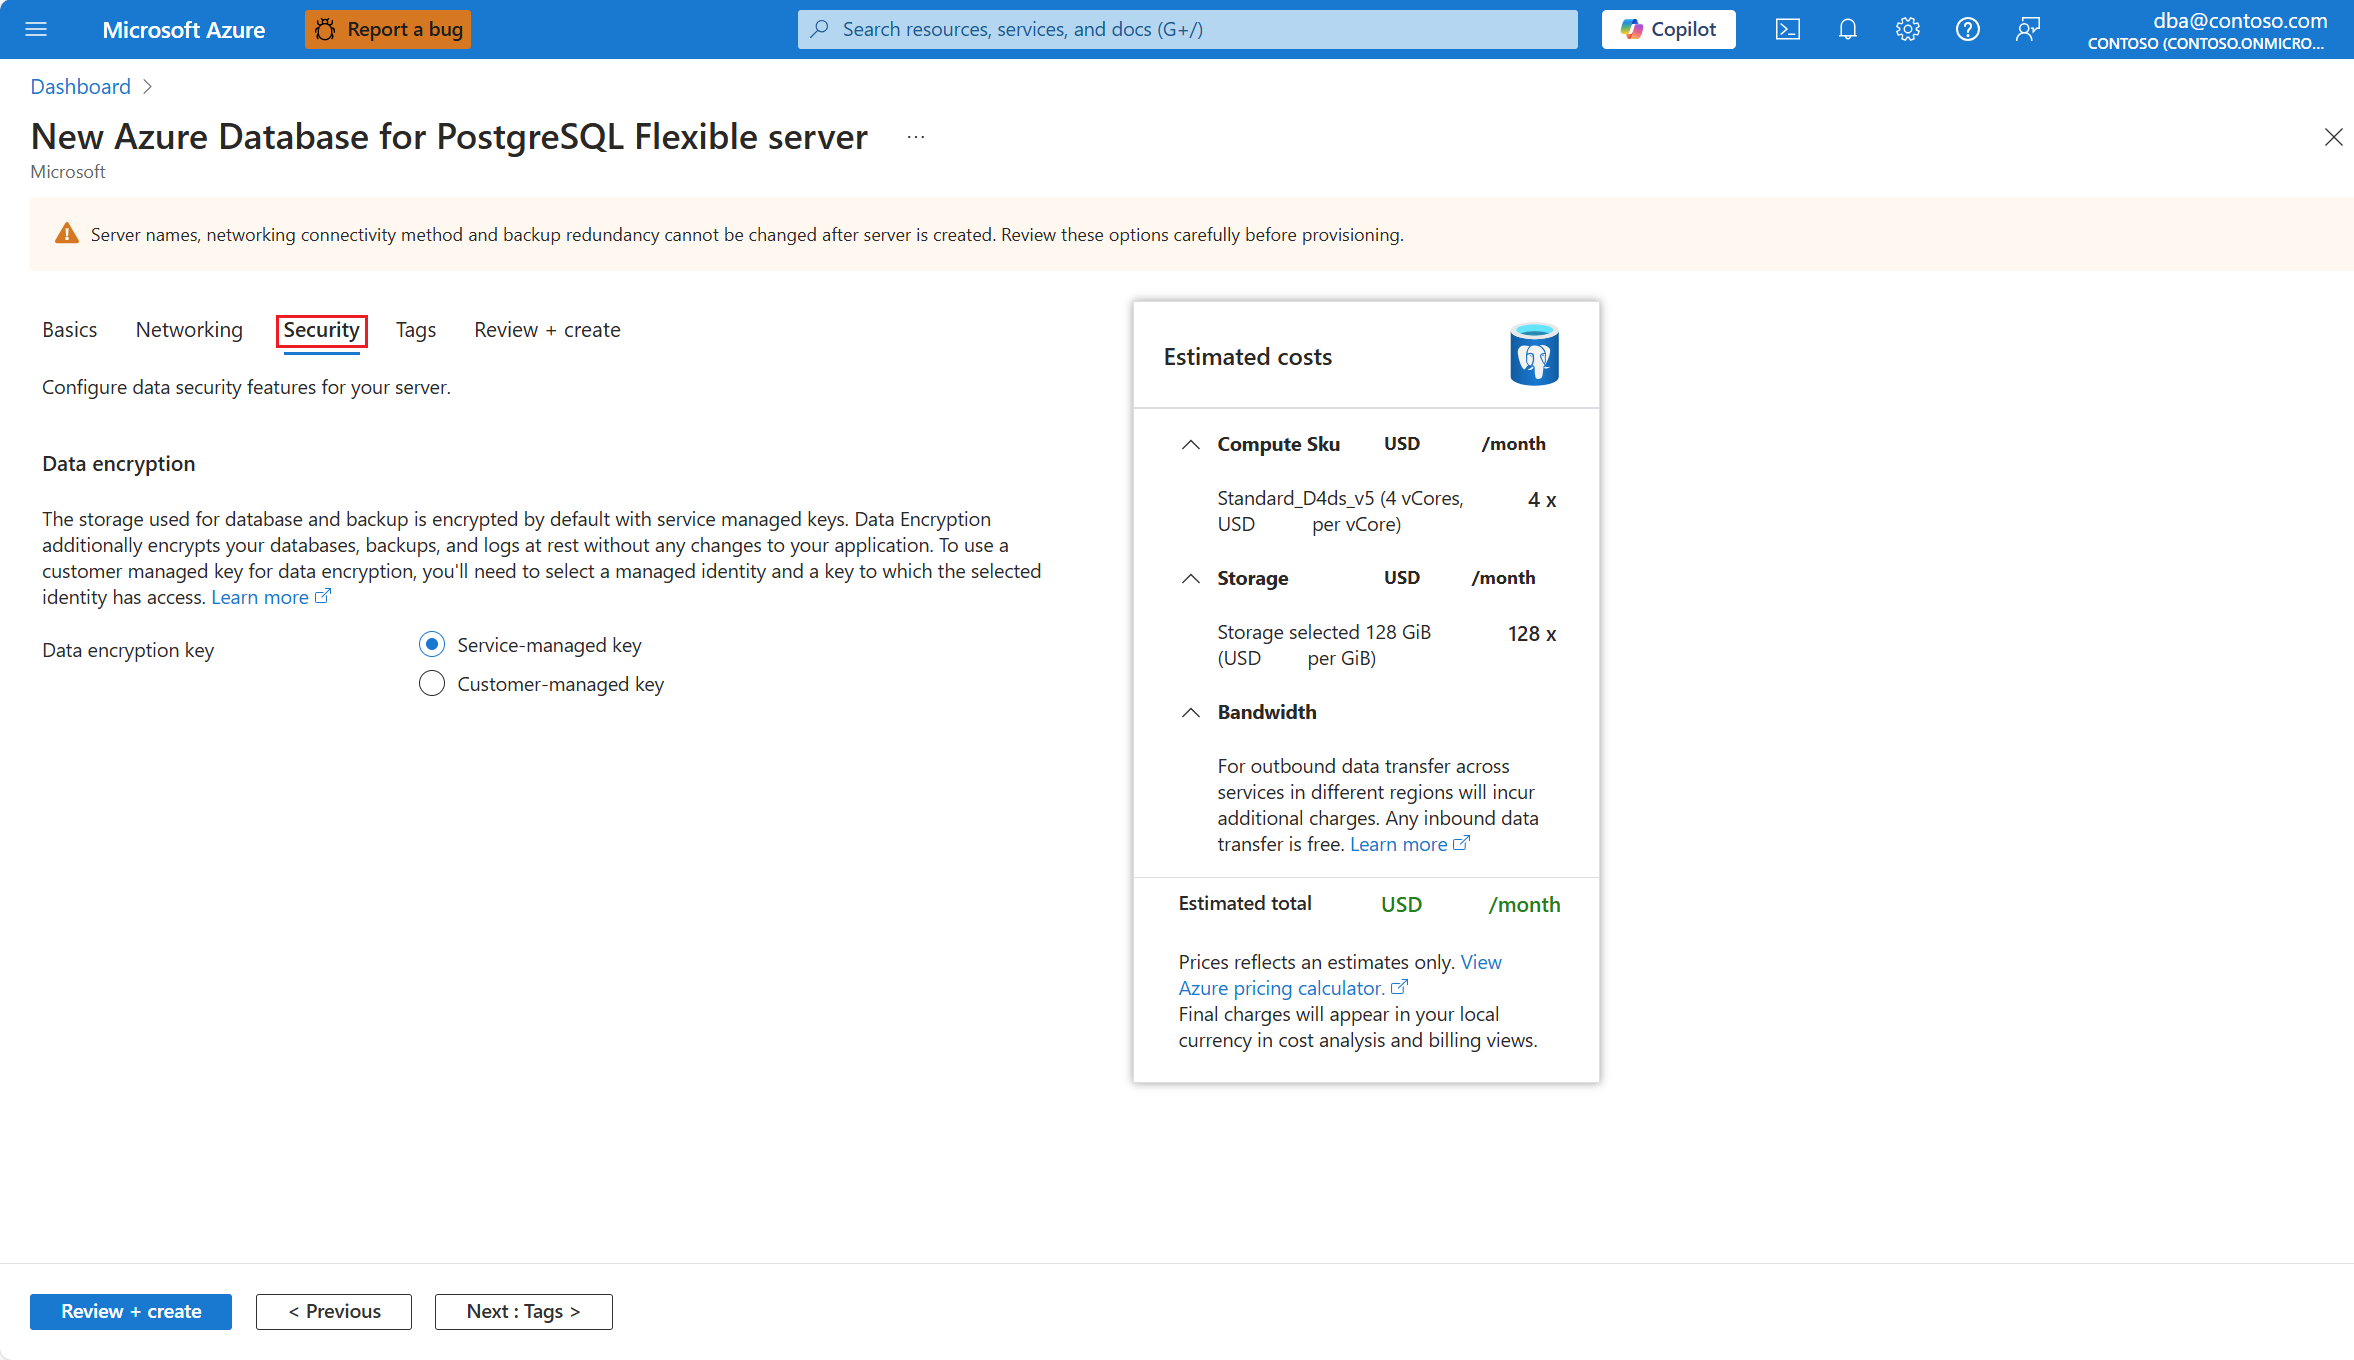
Use the following table to understand the meaning of the different fields available in the Security page, and as guidance to fill the page:
Section Setting Suggested value Description Can be changed after instance creation Data encryption Data encryption key Leave the default setting. Possible values are Service-managed key and Customer-managed key. For more information, see Data encryption in Azure Database for PostgreSQL - Flexible Server. Can't be changed after instance is created. After providing all required information in the Security tab, select Next: Tags to move forward to the Tags tab, from where you can attach some tags to your Azure Database for PostgreSQL flexible server instance:
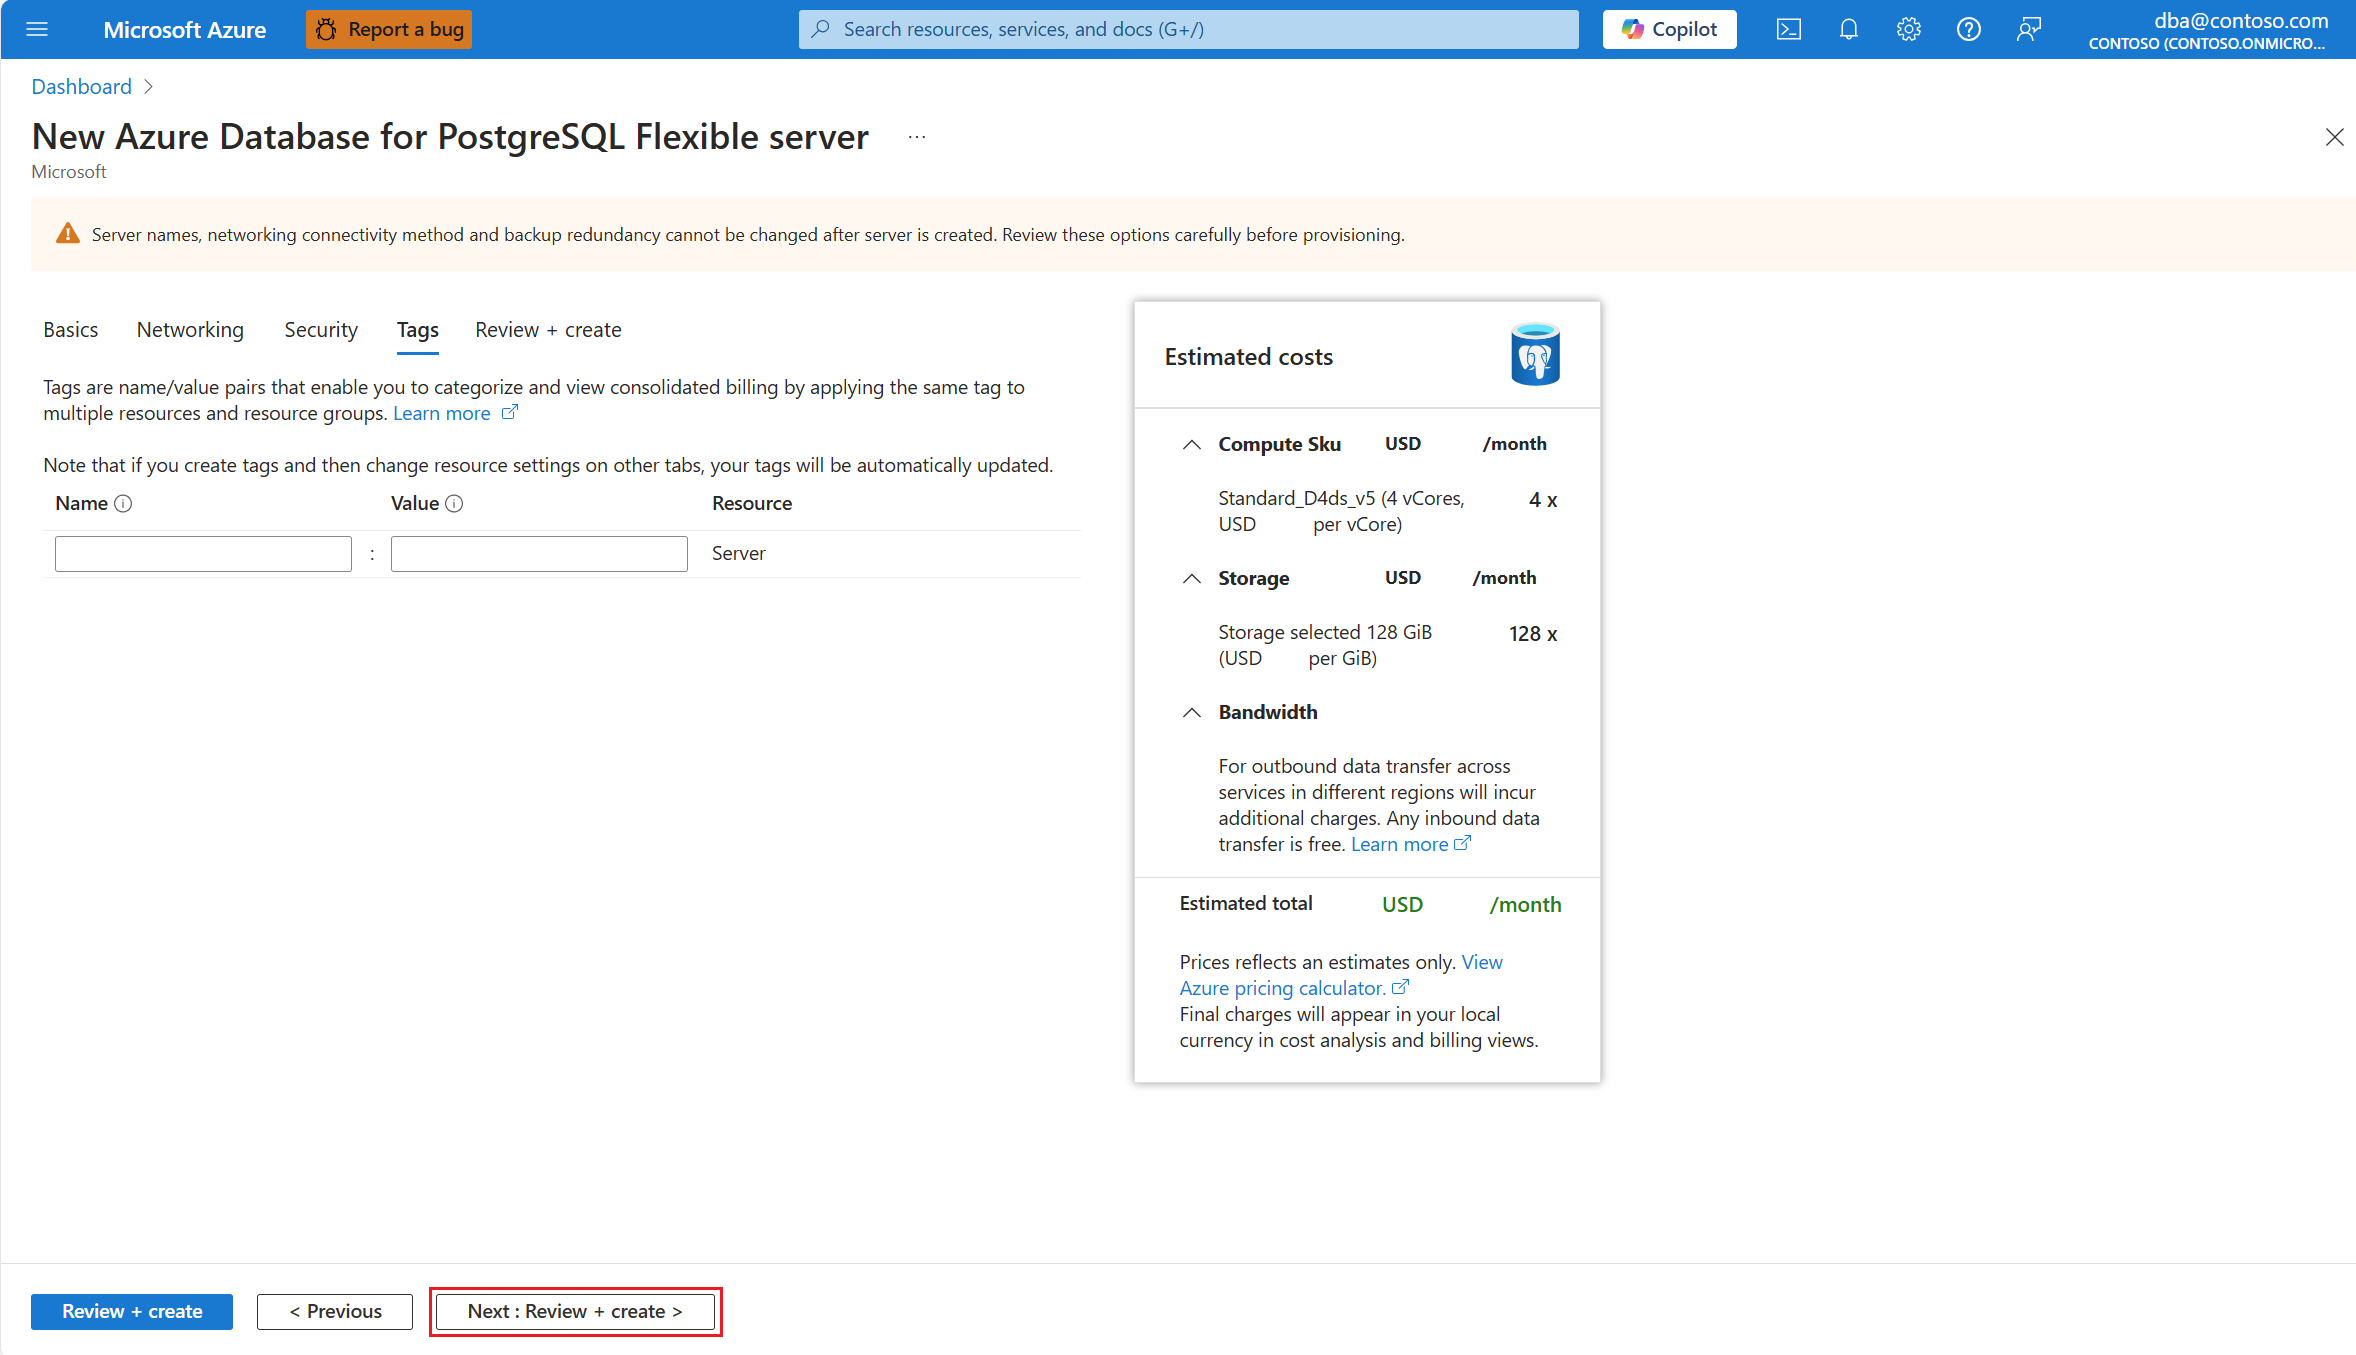
Use the following table to understand the meaning of the different fields available in the Tags page, and as guidance to fill the page:
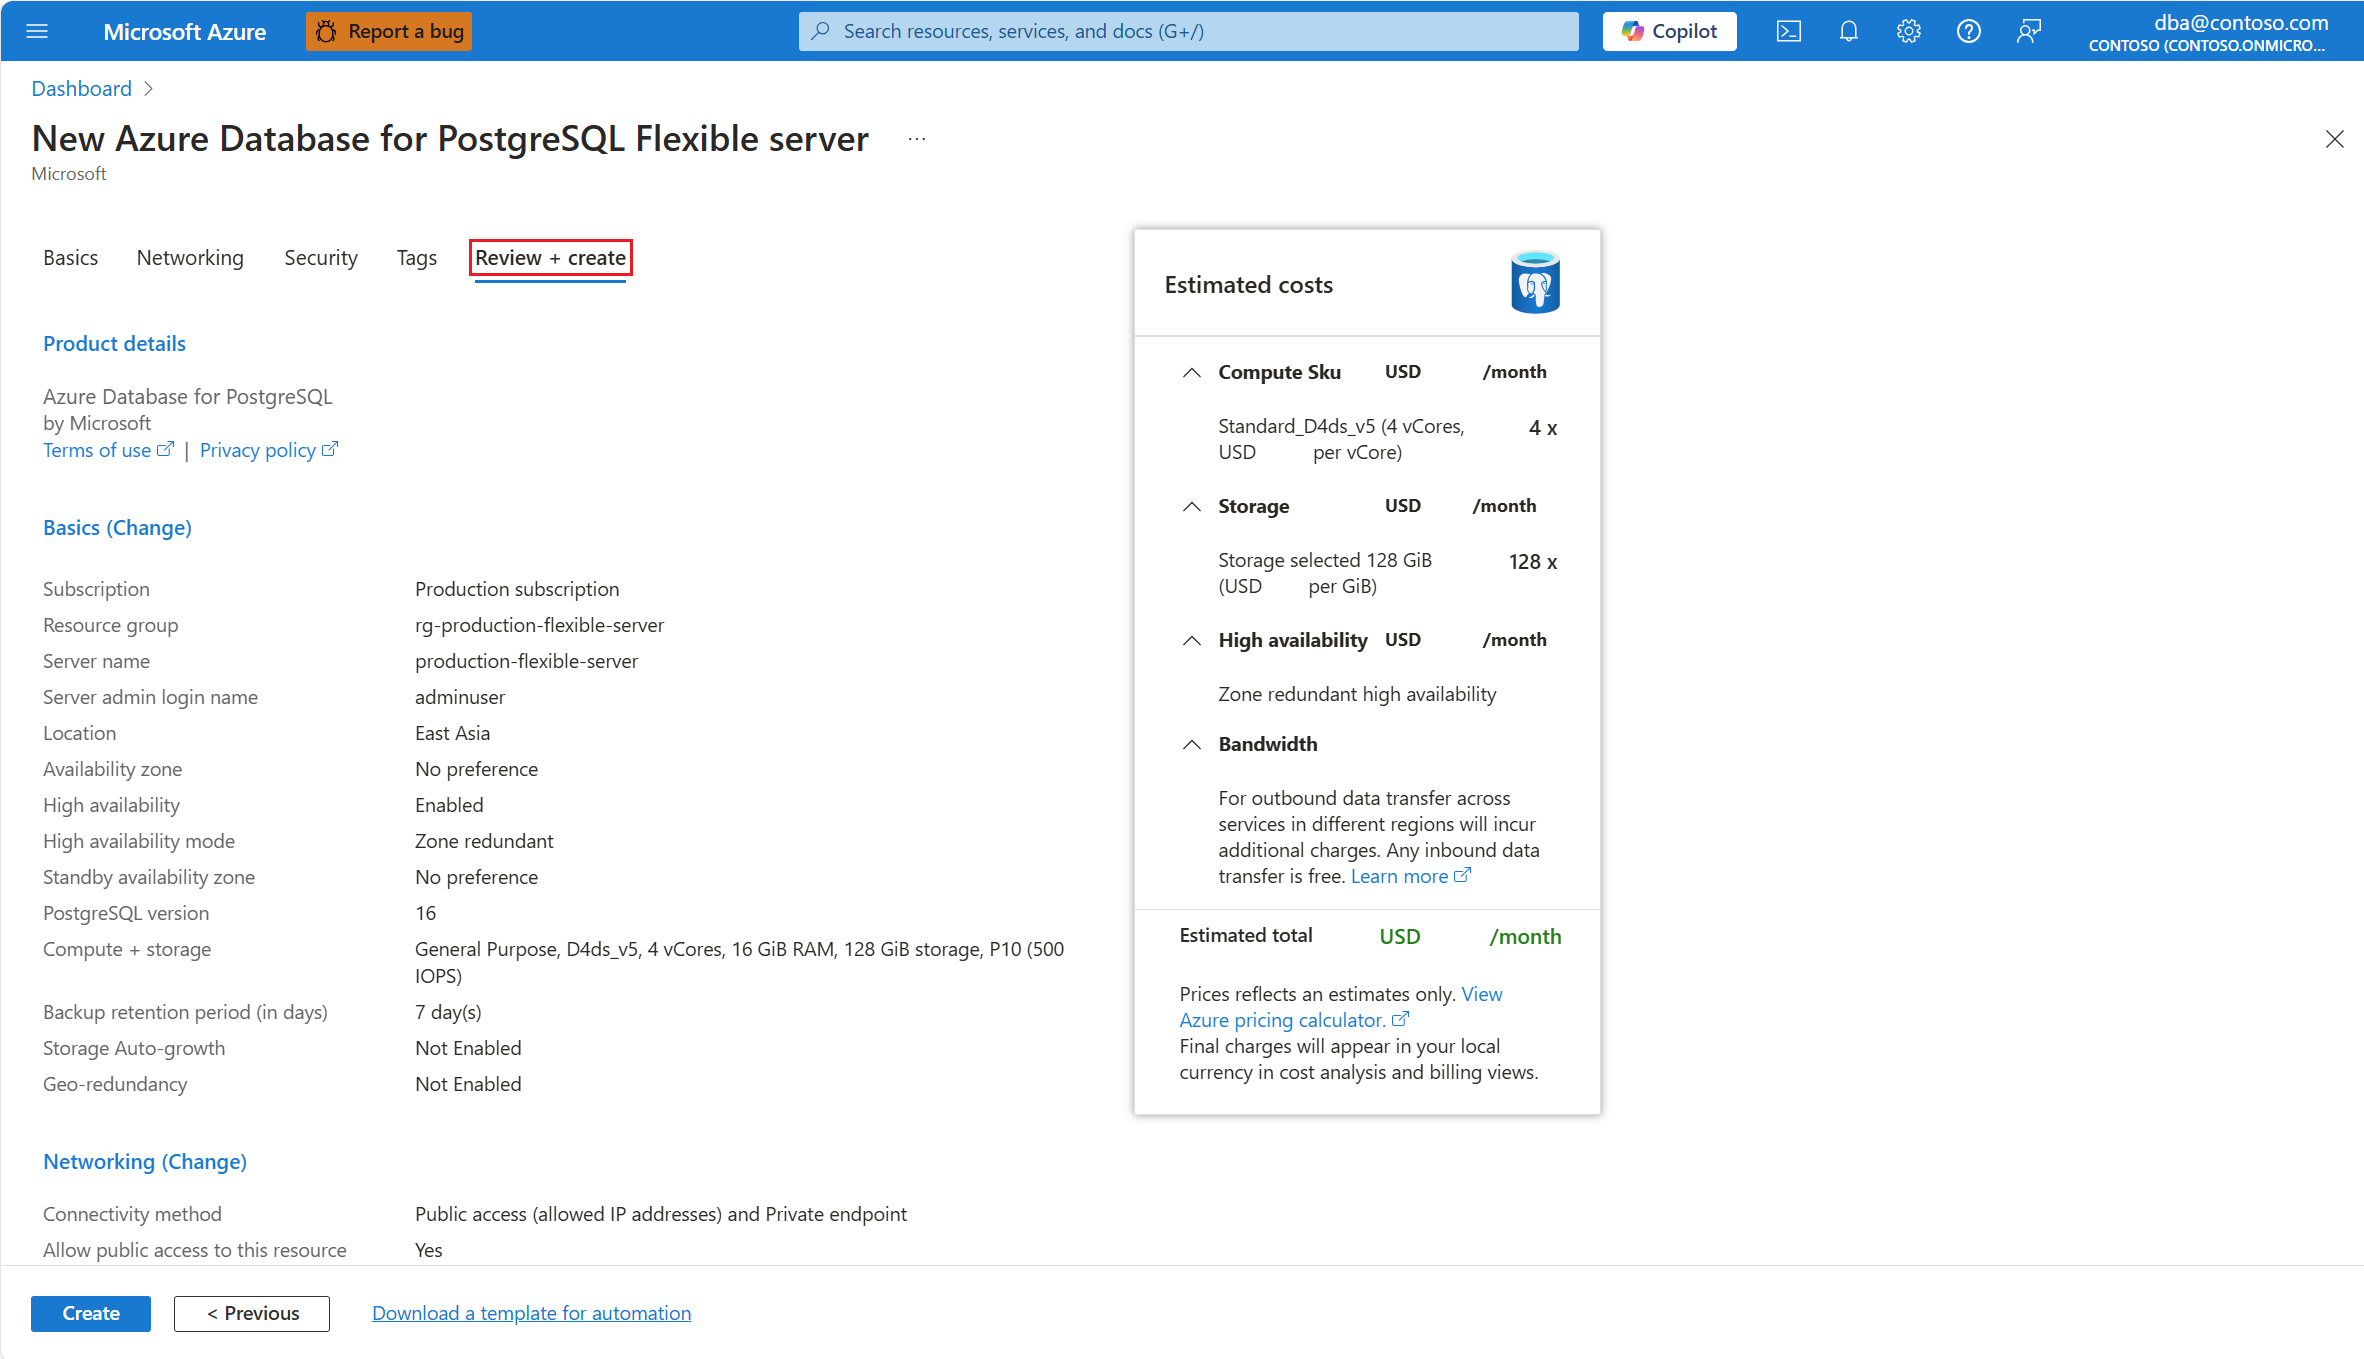
Section Setting Suggested value Description Can be changed after instance creation Name Set it to Environment.For more information about, see tags. Can be changed after instance is created. Value Set it to PostgreSQL Quickstart.For more information about, see tags. Can be changed after instance is created. After providing all required information in the Tags tab, select Next: Review + create to move forward to the Review + create tab, from where you can review all settings configured for your new Azure Database for PostgreSQL flexible server instance, before you trigger its creation:
After reviewing that the values of all settings match your requirements, select Create to initiate the deployment of your new Azure Database for PostgreSQL flexible server instance:
A new deployment is launched to create your Azure Database for PostgreSQL flexible server instance:
When the deployment completes, you can select Go to resource, to get you to the Overview page of your new Azure Database for PostgreSQL flexible server instance, and start using it:
Databases available in an Azure Database for PostgreSQL flexible server instance
By default, a database called postgres is created in your instance. The postgres database is a default database that's meant for use by users, utilities, and third-party applications.
A second database that is created on every instance is azure_maintenance. Although you can connect to this database, you have minimum permissions granted so you can barely do anything in it.
Finally, there's database azure_sys, which is used to host some objects used by features like query store and index tuning.
Note
Connections to your Azure Database for PostgreSQL flexible server instance typically communicate over port 5432. An exception to this is when you're connecting via a connection pooler like the built-in PgBouncer, which is integrated with Azure Database for PostgreSQL - Flexible Server. Built-in PgBouncer listens on port 6432. When you try to connect from within a corporate network, outbound traffic over port 5432 (or 6432 if you're connecting through PgBouncer) might be blocked by your network's firewall. If that's the case, you won't be able to connect to your instance, unless your IT department allows you to route traffic from your computer to the target instance, via the necessary port (5432 or 6432).
Get the connection information
To connect to your instance, you need to have its fully qualified name and the credentials of the user with which you want to connect. You should have noted those values from when you deployed the instance, earlier in this article. If you didn't, you can retrieve everything but the password of the administrator user. If you forgot the password assigned to your instance, you can always reset it. To learn how to do it, see reset admin password.
Using the Azure portal:
Connect using psql
There are many applications you can use to connect to your Azure Database for PostgreSQL flexible server instance. If your client computer has PostgreSQL installed, you can use a local instance of psql to connect to an Azure Database for PostgreSQL flexible server instance. If it isn't installed on your machine, download the ready-to-use package that targets your platform and install it.
Once installed, you can use the psql command-line utility to connect to the Azure Database for PostgreSQL flexible server instance.
Run the following psql command to connect to an Azure Database for PostgreSQL flexible server instance.
psql "host=<server> port=<port> user=<admin-user> dbname=postgres sslmode=require"For example, the following command connects to the default database called
postgreson your Azure Database for PostgreSQL flexible server instanceproduction-flexible-server.postgres.database.azure.comusing a user name calledadminuser. When prompted, type the password corresponding to that user.psql "host=production-flexible-server.postgres.database.azure.com port=5432 user=adminuser dbname=postgres sslmode=require"After you connect, the psql utility displays a postgres prompt where you type sql commands. In the initial connection output, a warning might appear because the psql you're using might be a different version than that of the Azure Database for PostgreSQL flexible server instance version.
Example psql output:
 psql (14.13, server 16.4)
 WARNING: psql major version 14, server major version 16.
         Some psql features might not work.
 SSL connection (protocol: TLSv1.3, cipher: TLS_AES_256_GCM_SHA384, bits: 256, compression: off)
 Type "help" for help.

 postgres=>
If there's no firewall rule on the instance for the public IP address from which you're trying to connect, you receive an error like:
psql: error: connection to server at "<server>.postgres.database.azure.com" (###.###.###.###), port 5432 failed: Connection timed out
        Is the server running on that host and accepting TCP/IP connections?
Create a blank database called
user_databaseat the prompt by typing the following command:CREATE DATABASE user_database;At the prompt, execute the following command to switch connections to the newly created database
user_database:\c user_databaseType
\q, and then select Enter to quit psql.
You connected to the Azure Database for PostgreSQL flexible server instance via psql, and you created a blank user database.
Clean up resources
You can clean up the resources that you created in this quickstart in one of two ways. You can delete the Azure resource group, which includes all the resources in the resource group. If you want to keep other resources deployed in the same resource group intact, you can delete only the Azure Database for PostgreSQL flexible server instance.
Using the Azure portal:
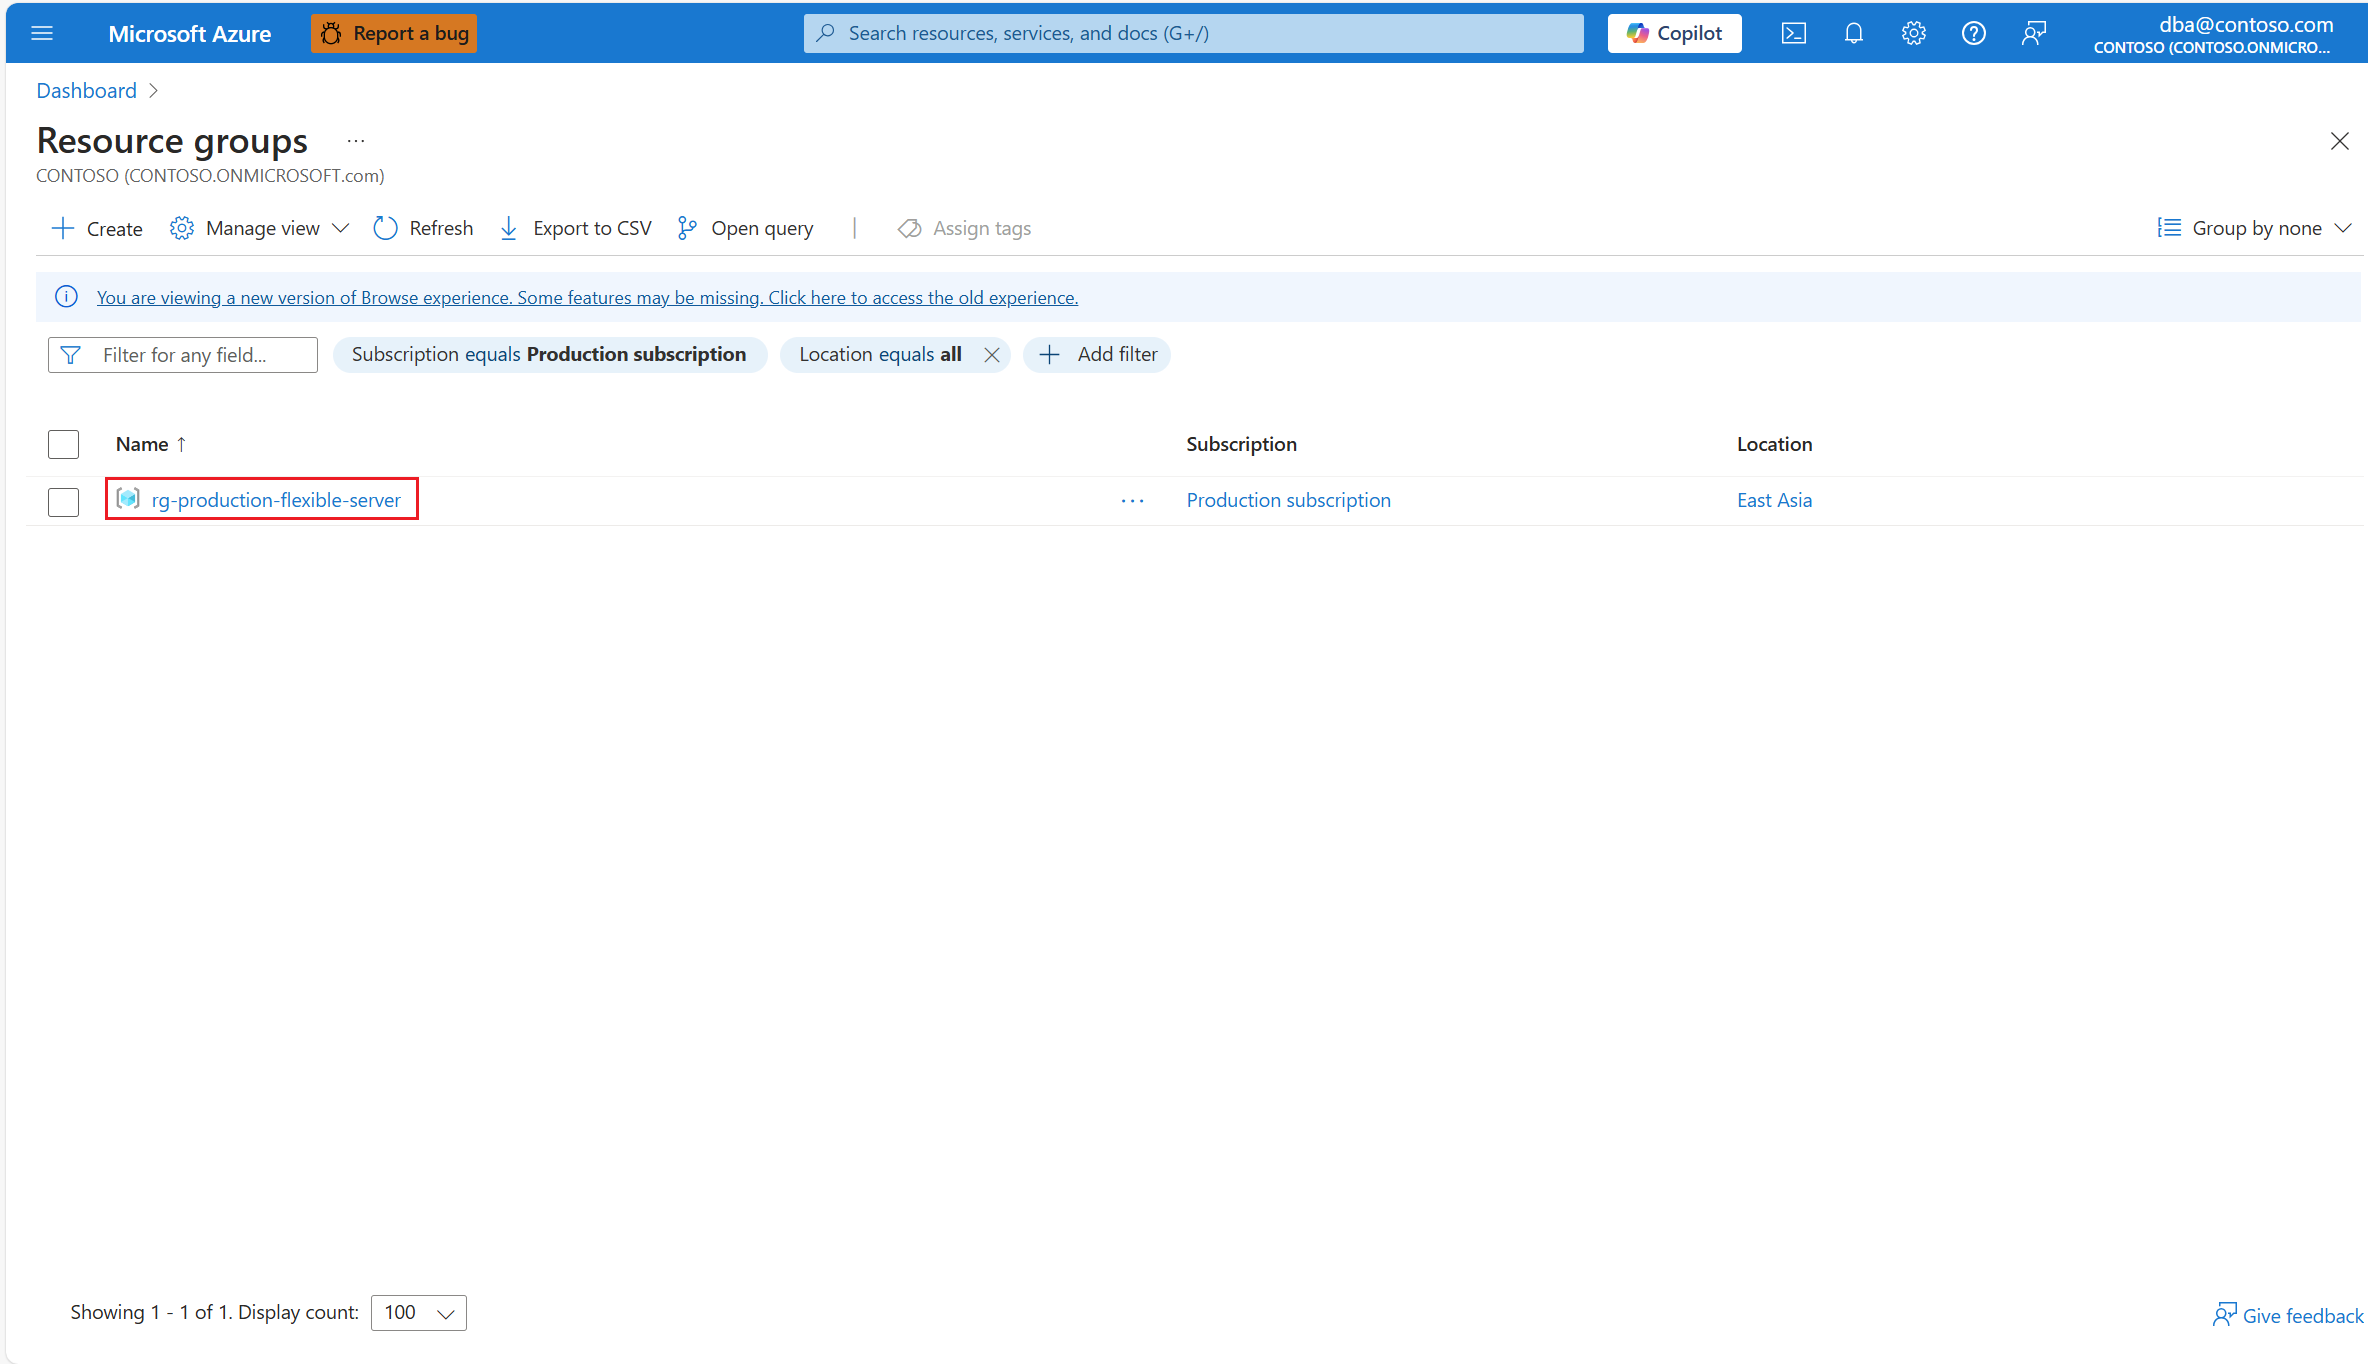
To delete the entire resource group, including the newly created server.
Select Resource groups.
Search for the resource group that you want to delete, and select its name.
In the Overview page of the resource group chosen, select Delete resource group, then enter the name of the resource group in the Enter resource group name to confirm deletion text box, and select Delete.
To delete only the newly created server.
Locate your server in the portal, if you don't have it open. One way to do it is by typing the name of the server in the search bar. When the resource with the matching name is shown, select that resource.
On the Overview page, select Delete. Select I have read and understand that this server, as well as any databases it contains, will be deleted., and select Delete.


