Eligible and time-bound role assignments in Azure RBAC
If you have a Microsoft Entra ID P2 or Microsoft Entra ID Governance license, Microsoft Entra Privileged Identity Management (PIM) is integrated into role assignment steps. For example, you can assign roles to users for a limited period of time. You can also make users eligible for role assignments so that they must activate to use the role, such as request approval. Eligible role assignments provide just-in-time access to a role for a limited period of time.
This article describes the integration of Azure role-based access control (Azure RBAC) and Microsoft Entra Privileged Identity Management (PIM) to create eligible and time-bound role assignments.
PIM functionality
If you have PIM, you can create eligible and time-bound role assignments using the Access control (IAM) page in the Azure portal. You can create eligible role assignments for users, but you can't create eligible role assignments for applications, service principals, or managed identities because they can't perform the activation steps. You can create eligible role assignments at management group, subscription, and resource group scope, but not at resource scope.
Here's an example of the Assignment type tab when you add a role assignment using the Access control (IAM) page. This capability is being deployed in stages, so it might not be available yet in your tenant or your interface might look different.
The assignment type options available to you might vary depending or your PIM policy. For example, PIM policy defines whether permanent assignments can be created, maximum duration for time-bound assignments, roles activations requirements (approval, multifactor authentication, or Conditional Access authentication context), and other settings. For more information, see Configure Azure resource role settings in Privileged Identity Management.
Users with eligible and/or time-bound assignments must have a valid license. If you don't want to use the PIM functionality, select the Active assignment type and Permanent assignment duration options. These settings create a role assignment where the principal always has permissions in the role.
To better understand PIM, you should review the following terms.
| Term or concept | Role assignment category | Description |
|---|---|---|
| eligible | Type | A role assignment that requires a user to perform one or more actions to use the role. If a user has been made eligible for a role, that means they can activate the role when they need to perform privileged tasks. There's no difference in the access given to someone with a permanent versus an eligible role assignment. The only difference is that some people don't need that access all the time. |
| active | Type | A role assignment that doesn't require a user to perform any action to use the role. Users assigned as active have the privileges assigned to the role. |
| activate | The process of performing one or more actions to use a role that a user is eligible for. Actions might include performing a multifactor authentication (MFA) check, providing a business justification, or requesting approval from designated approvers. | |
| permanent eligible | Duration | A role assignment where a user is always eligible to activate the role. |
| permanent active | Duration | A role assignment where a user can always use the role without performing any actions. |
| time-bound eligible | Duration | A role assignment where a user is eligible to activate the role only within start and end dates. |
| time-bound active | Duration | A role assignment where a user can use the role only within start and end dates. |
| just-in-time (JIT) access | A model in which users receive temporary permissions to perform privileged tasks, which prevents malicious or unauthorized users from gaining access after the permissions have expired. Access is granted only when users need it. | |
| principle of least privilege access | A recommended security practice in which every user is provided with only the minimum privileges needed to accomplish the tasks they're authorized to perform. This practice minimizes the number of Global Administrators and instead uses specific administrator roles for certain scenarios. |
For more information, see What is Microsoft Entra Privileged Identity Management?.
How to list eligible and time-bound role assignments
If you want to see which users are using the PIM functionality, here are options for how to list eligible and time-bound role assignments.
Option 1: List using the Azure portal
Sign in to the Azure portal, open the Access control (IAM) page, and select the Role assignments tab.
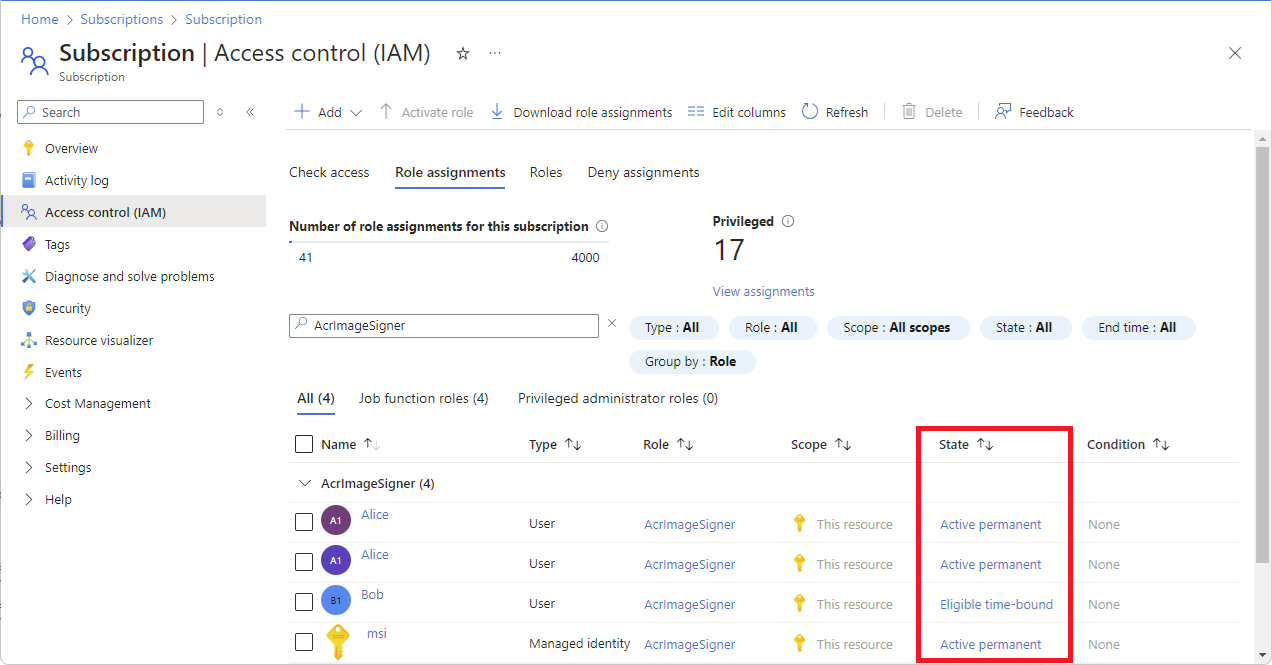
Filter the eligible and time-bound role assignments.
You can group and sort by State, and look for role assignments that aren't the Active permanent type.
Option 2: List using PowerShell
There isn't a single PowerShell command that can list both the eligible and active time-bound role assignments. To list your eligible role assignments, use the Get-AzRoleEligibilitySchedule command. To list your active role assignments, use the Get-AzRoleAssignmentSchedule command.
This example shows how to list eligible and time-bound role assignments in a subscription, which includes these role assignment types:
- Eligible permanent
- Eligible time-bound
- Active time-bound
The Where-Object command filters out active permanent role assignments that are available with Azure RBAC functionality without PIM.
Get-AzRoleEligibilitySchedule -Scope /subscriptions/<subscriptionId>
Get-AzRoleAssignmentSchedule -Scope /subscriptions/<subscriptionId> | Where-Object {$_.EndDateTime -ne $null }
For information about how scopes are constructed, see Understand scope for Azure RBAC.
How to convert eligible and time-bound role assignments to active permanent
If your organization has process or compliance reasons to limit the use of PIM, here are options for how to convert these role assignments to active permanent.
Option 1: Convert using the Azure portal
In the Azure portal, on the Role assignments tab and State column, select the Eligible permanent, Eligible time-bound, and Active time-bound links for each role assignment you want to convert.
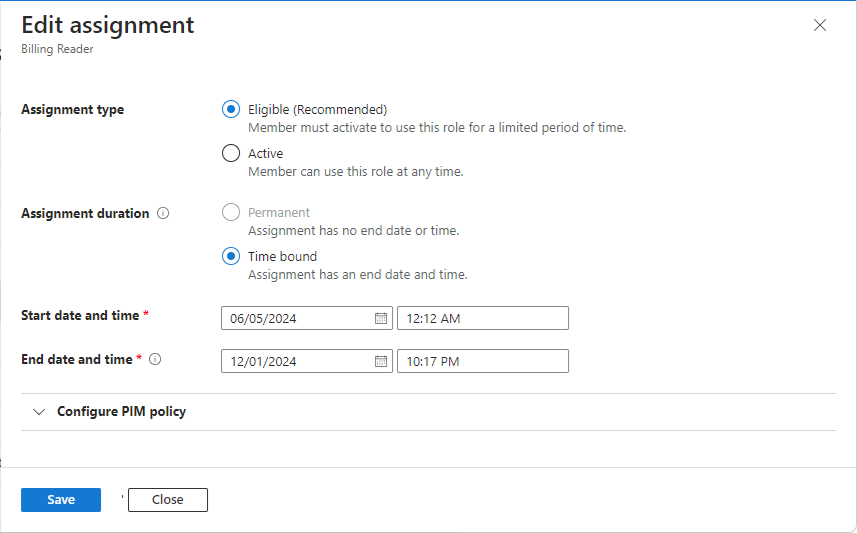
In the Edit assignment pane, select Active for the assignment type and Permanent for the assignment duration.
For more information, see Edit assignment.
When finished, select Save.
Your updates might take a while to be processed and reflected in the portal.
Repeat these steps for all role assignments at management group, subscription, and resource group scopes that you want to convert.
If you have role assignments at resource scope that you want to convert, you have to make changes directly in PIM.
Option 2: Convert using PowerShell
There isn't a command or API to directly convert role assignments to a different state or type, so instead you can follow these steps.
Important
Removing role assignments can potentially cause disruptions in your environment. Be sure that you understand the impact before you perform these steps.
Retrieve and save the list of all of your eligible and time-bound role assignment in a secure location to prevent data loss.
Important
It is important that you save the list of eligible and time-bound role assignments because these steps require you to remove these role assignments before you create the same role assignments as active permanent.
Use the New-AzRoleEligibilityScheduleRequest command to remove your eligible role assignments.
This example shows how to remove an eligible role assignment.
$guid = New-Guid
New-AzRoleEligibilityScheduleRequest -Name $guid -Scope <Scope> -PrincipalId <PrincipalId> -RoleDefinitionId <RoleDefinitionId> -RequestType AdminRemove
Use the New-AzRoleAssignmentScheduleRequest command to remove your active time-bound role assignments.
This example shows how to remove an active time-bound role assignment.
$guid = New-Guid
New-AzRoleAssignmentScheduleRequest -Name $guid -Scope <Scope> -PrincipalId <PrincipalId> -RoleDefinitionId <RoleDefinitionId> -RequestType AdminRemove
Use the Get-AzRoleAssignment command to check for an existing role assignment and use the New-AzRoleAssignment command to create an active permanent role assignment with Azure RBAC for each eligible and time-bound role assignment.
This example shows how to check for an existing role assignment and create an active permanent role assignment with Azure RBAC.
$result = Get-AzRoleAssignment -ObjectId $RA.PrincipalId -RoleDefinitionName $RA.RoleDefinitionDisplayName -Scope $RA.Scope;
if($result -eq $null) {
New-AzRoleAssignment -ObjectId $RA.PrincipalId -RoleDefinitionName $RA.RoleDefinitionDisplayName -Scope $RA.Scope
}
How to limit the creation of eligible or time-bound role assignments
If your organization has process or compliance reasons to limit the use of PIM, you can use Azure Policy to limit the creation of eligible or time-bound role assignments. For more information, see What is Azure Policy?.
Here's an example policy that limits the creation of eligible and time-bound role assignments except for a specific list of identities. Additional parameters and checks can be added for other allow conditions.
{
  "properties": {
    "displayName": "Limit eligible and active time-bound role assignments except for allowed principal IDs",
    "policyType": "Custom",
    "mode": "All",
    "metadata": {
      "createdBy": "aaaaaaaa-bbbb-cccc-1111-222222222222",
      "createdOn": "2024-11-05T02:31:25.1246591Z",
      "updatedBy": "aaaaaaaa-bbbb-cccc-1111-222222222222",
      "updatedOn": "2024-11-06T07:58:17.1699721Z"
    },
    "version": "1.0.0",
    "parameters": {
      "allowedPrincipalIds": {
        "type": "Array",
        "metadata": {
          "displayName": "Allowed Principal IDs",
          "description": "A list of principal IDs that can receive PIM role assignments."
        },
        "defaultValue": []
      }
    },
    "policyRule": {
      "if": {
        "anyof": [
          {
            "allOf": [
              {
                "field": "type",
                "equals": "Microsoft.Authorization/roleEligibilityScheduleRequests"
              },
              {
                "not": {
                  "field": "Microsoft.Authorization/roleEligibilityScheduleRequests/principalId",
                  "in": "[parameters('allowedPrincipalIds')]"
                }
              }
            ]
          },
          {
            "allOf": [
              {
                "field": "type",
                "equals": "Microsoft.Authorization/roleAssignmentScheduleRequests"
              },
              {
                "not": {
                  "field": "Microsoft.Authorization/roleAssignmentScheduleRequests/principalId",
                  "in": "[parameters('allowedPrincipalIds')]"
                }
              }
            ]
          }
        ]
      },
      "then": {
        "effect": "deny"
      }
    },
    "versions": [
      "1.0.0"
    ]
  },
  "id": "/subscriptions/aaaa0a0a-bb1b-cc2c-dd3d-eeeeee4e4e4ef/providers/Microsoft.Authorization/policyDefinitions/1aaaaaa1-2bb2-3cc3-4dd4-5eeeeeeeeee5",
  "type": "Microsoft.Authorization/policyDefinitions",
  "name": "1aaaaaa1-2bb2-3cc3-4dd4-5eeeeeeeeee5",
  "systemData": {
    "createdBy": "test1@contoso.com",
    "createdByType": "User",
    "createdAt": "2024-11-05T02:31:25.0836273Z",
    "lastModifiedBy": "test1@contoso.com",
    "lastModifiedByType": "User",
    "lastModifiedAt": "2024-11-06T07:58:17.1651655Z"
  }
}
For information about PIM resource properties, see these REST API docs:
For information about how to assign an Azure Policy with parameters, see Tutorial: Create and manage policies to enforce compliance.


