Extend an existing control
If you want to add more features to an existing control, you can create a control that inherits from an existing control. The new control contains all of the capabilities and visual aspect of the base control, but gives you opportunity to extend it. For example, if you created a control that inherits Button, your new control would look and act exactly like a button. You could create new methods and properties to customize the behavior of the control. Some controls allow you to override the OnPaint method to change the way the control looks.
Add a custom control to a project
After creating a new project, use the Visual Studio templates to create a user control. The following steps demonstrate how to add a user control to your project:
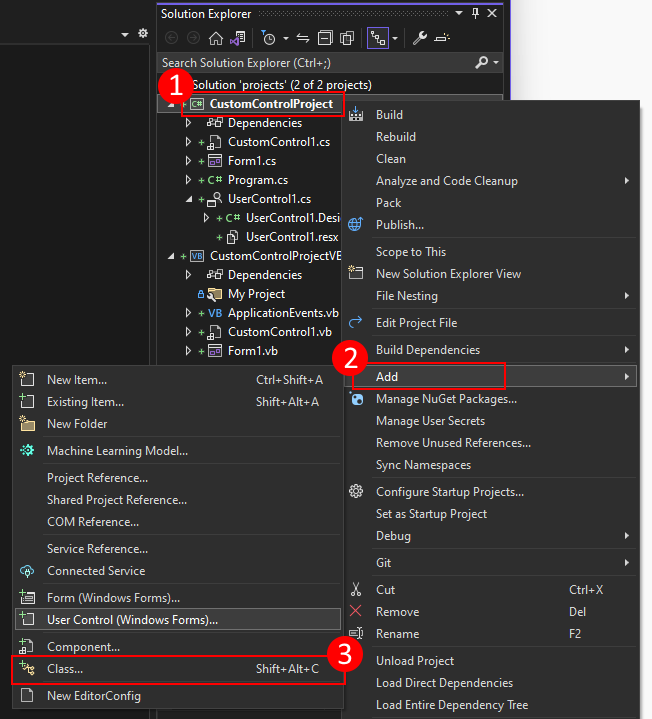
In Visual Studio, find the Project Explorer pane. Right-click on the project and choose Add > Class.

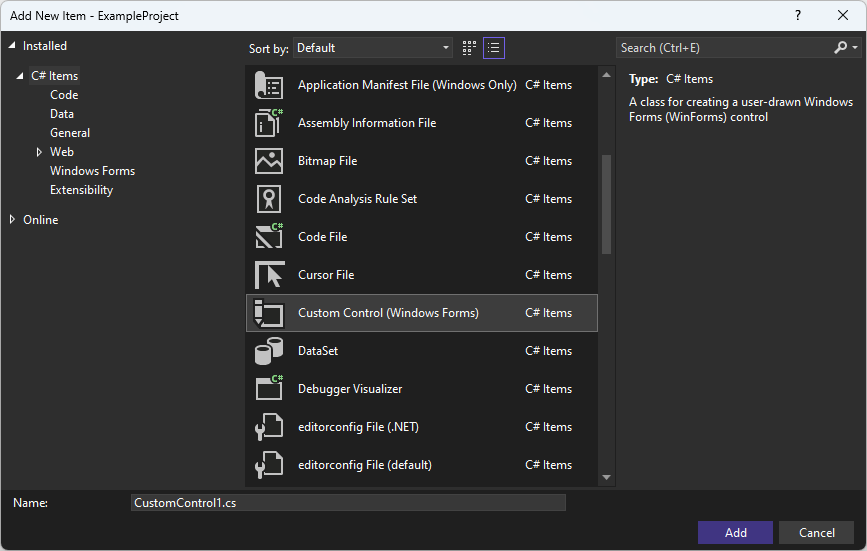
In the Name box, type a name for your user control. Visual Studio provides a default and unique name that you may use. Next, press Add.

After the user control is created, Visual Studio opens the code-editor for the control. The next step is to turn this custom control into a button and extend it.
Change the custom control to a button
In this section, you learn how to change a custom control into a button that counts and displays the number of times it's clicked.

After you add a custom control to your project named CustomControl1, the control designer should be opened. If it's not, double-click on the control in the Solution Explorer. Follow these steps to convert the custom control into a control that inherits from Button and extends it:
With the control designer opened, press F7 or right-click on the designer window and select View Code.
In the code-editor, you should see a class definition:
namespace CustomControlProject
{
    public partial class CustomControl2 : Control
    {
        public CustomControl2()
        {
            InitializeComponent();
        }

        protected override void OnPaint(PaintEventArgs pe)
        {
            base.OnPaint(pe);
        }
    }
}
Public Class CustomControl2 Protected Overrides Sub OnPaint(ByVal e As System.Windows.Forms.PaintEventArgs) MyBase.OnPaint(e) 'Add your custom paint code here End Sub End ClassChange the base class from
ControltoButton.Important
If you're using Visual Basic, the base class is defined in the *.designer.vb file of your control. The base class to use in Visual Basic is
System.Windows.Forms.Button.Add a class-scoped variable named
_counter.private int _counter = 0;Private _counter As Integer = 0Override the
OnPaintmethod. This method draws the control. The control should draw a string on top of the button, so you must call the base class'OnPaintmethod first, then draw a string.protected override void OnPaint(PaintEventArgs pe) { // Draw the control base.OnPaint(pe); // Paint our string on top of it pe.Graphics.DrawString($"Clicked {_counter} times", Font, Brushes.Purple, new PointF(3, 3)); }Protected Overrides Sub OnPaint(ByVal e As System.Windows.Forms.PaintEventArgs) ' Draw the control MyBase.OnPaint(e) ' Paint our string on top of it e.Graphics.DrawString($"Clicked {_counter} times", Font, Brushes.Purple, New PointF(3, 3)) End SubLastly, override the
OnClickmethod. This method is called every time the control is pressed. The code is going to increase the counter, and then call theInvalidatemethod, which forces the control to redraw itself.protected override void OnClick(EventArgs e) { // Increase the counter and redraw the control _counter++; Invalidate(); // Call the base method to invoke the Click event base.OnClick(e); }Protected Overrides Sub OnClick(e As EventArgs) ' Increase the counter and redraw the control _counter += 1 Invalidate() ' Call the base method to invoke the Click event MyBase.OnClick(e) End SubThe final code should look like the following snippet:
public partial class CustomControl1 : Button
{
    private int _counter = 0;

    public CustomControl1()
    {
        InitializeComponent();
    }

    protected override void OnPaint(PaintEventArgs pe)
    {
        // Draw the control
        base.OnPaint(pe);

        // Paint our string on top of it
        pe.Graphics.DrawString($"Clicked {_counter} times", Font, Brushes.Purple, new PointF(3, 3));
    }

    protected override void OnClick(EventArgs e)
    {
        // Increase the counter and redraw the control
        _counter++;
        Invalidate();

        // Call the base method to invoke the Click event
        base.OnClick(e);
    }
}
Public Class CustomControl1 Private _counter As Integer = 0 Protected Overrides Sub OnPaint(ByVal e As System.Windows.Forms.PaintEventArgs) ' Draw the control MyBase.OnPaint(e) ' Paint our string on top of it e.Graphics.DrawString($"Clicked {_counter} times", Font, Brushes.Purple, New PointF(3, 3)) End Sub Protected Overrides Sub OnClick(e As EventArgs) ' Increase the counter and redraw the control _counter += 1 Invalidate() ' Call the base method to invoke the Click event MyBase.OnClick(e) End Sub End Class
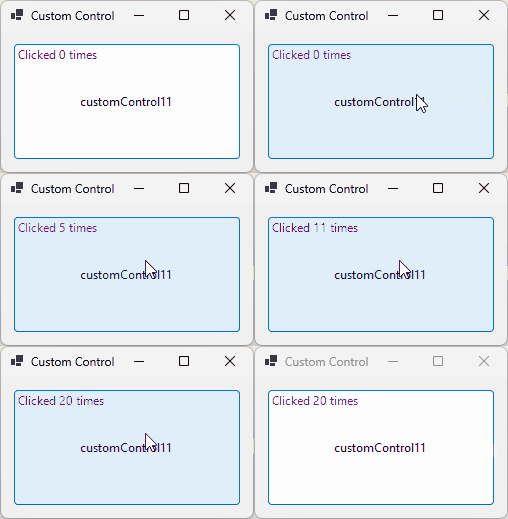
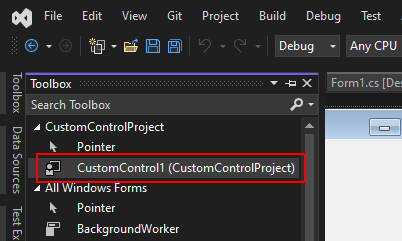
Now that the control is created, compile the project to populate the Toolbox window with the new control. Open a form designer and drag the control to the form. Run the project and press the button. Each press increases the number of clicks by one. The total clicks are printed as text on top of the button.

.NET Desktop feedback
