Use OneDrive for Business to manage your private documents
This article applies to Dynamics 365 Customer Engagement (on-premises) version 9.1 using the legacy web client. If you’re using Unified Interface, your apps work the same as Unified Interface for model-driven Power Apps. For the Power Apps version of this article, see: Use OneDrive for Business
With Customer Engagement, you can use the right storage option for the right situation. For example, you can store your private documents by using the new OneDrive for Business option. For collaborative storage, you can use Office 365 Groups and for public documents use SharePoint.
You might use OneDrive for Business to start and work on a document privately, such as for a draft sales pitch. When the draft is far enough along, move it to an Office 365 group for team collaboration. You have lots of storage space (1 TB or more) with OneDrive for Business, and documents stored there are automatically synced to your desktop and mobile devices. For example, if you put a presentation in Customer Engagement (on-premises) that's stored on OneDrive linked with an opportunity, that presentation is synced to all devices running OneDrive.
Before you can use OneDrive for Business, it must be enabled by your system administrator. More information:
Important
This feature requires that you have an Office 365 subscription or a subscription to an online service such as SharePoint Online or Exchange Online. For more information, see What is Office 365 and how does it relate to Dynamics 365 (online)?
The first time you view your documents
Go to the record for which you want to view the associated documents. For example, select Sales > Leads.
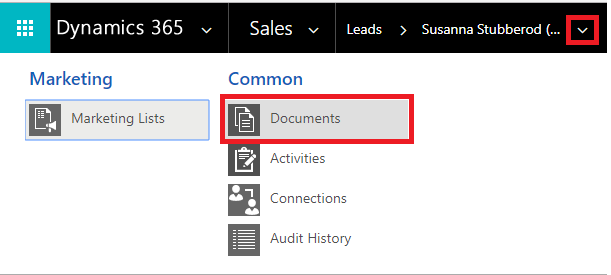
If you're using the web app, on the command bar, select the down arrow beside the record name, and then select Documents.
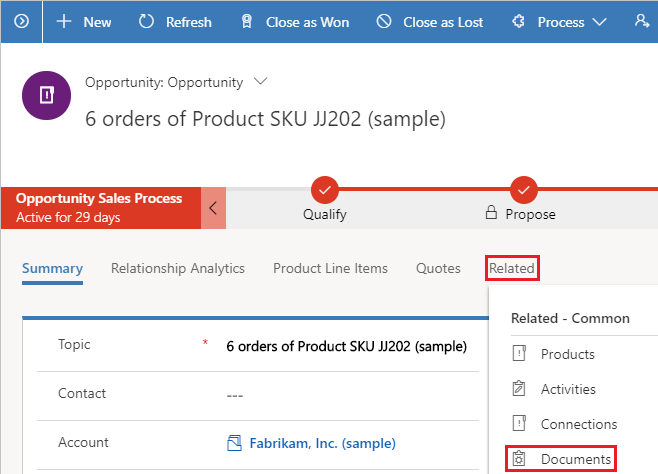
If you're using a mobile-optimized app, select the Related tab, and then select Documents.
After OneDrive for Business is enabled, you'll see the following dialog box when you go to the Document Associated Grid to view documents in Customer Engagement (on-premises) and upload a file to OneDrive, or when you attempt to create a new document or folder.
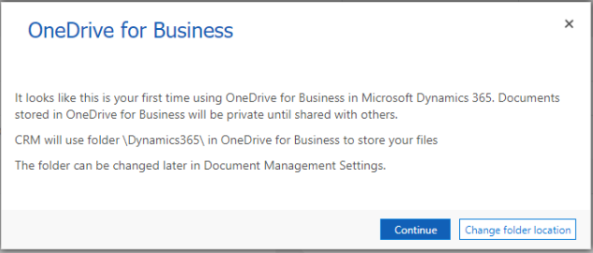
Select Change folder location to pick a new location to store OneDrive documents, or select Continue to accept the default folder location: \Dynamics365.
Note
The default folder location is set to \CRM for users who haven't upgraded to the Dynamics 365 for Customer Engagement apps version 9.0.
View existing OneDrive documents
Open the Document Associated Grid. The following example is for Opportunities, but works the same for all record types.
Select Sales > Opportunities
Choose an opportunity from the drop-down menu, and then select Documents.
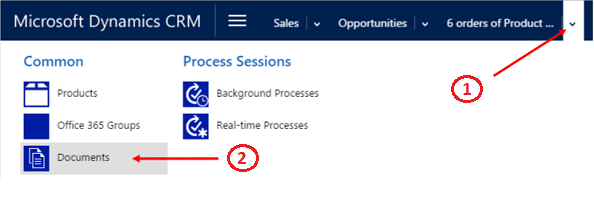
Customer Engagement (on-premises) now organizes documents in a consolidated view.
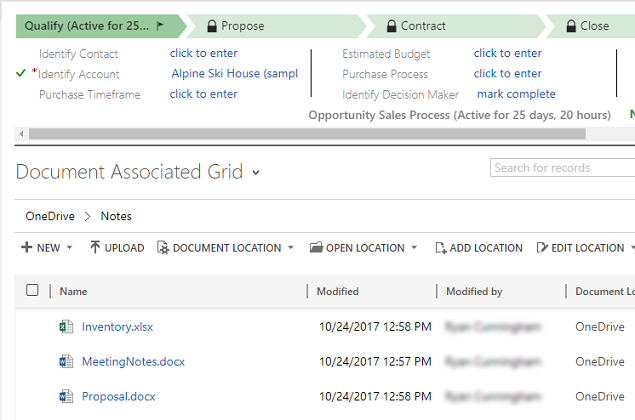
Select Document Location to filter the document list.
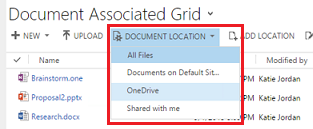
Select a location as described in the following table:
Document Location Description All files All document locations associated with this Customer Engagement (on-premises) record (only available in the web app) SharePoint site Documents stored in your default SharePoint site OneDrive Documents stored in OneDrive for Business Shared with me Documents that others shared with you that are associated with this Customer Engagement (on-premises) record
Create a new document
To create a new SharePoint or OneDrive document in Customer Engagement (on-premises):
Go to the Document Associated Grid.
Select Document Location, and change the location to OneDrive.
Select New, and then choose a document type such as PowerPoint or Word.
Enter a document name, and then select Save.
The document is created and opened in the Office 365 Online application.
Note
If you're are using the mobile-optimized app on tablets and phones, the document is opened within the Office app such as PowerPoint or Word.
Change your OneDrive folder settings (web app only)
You can change the location of your OneDrive documents and rename the folder used for OneDrive.
Select Settings > Document Management > OneDrive for Business Folder Settings.
Enter a new location for Customer Engagement (on-premises) to store OneDrive files, and then select OK.
Note
The OneDrive folder is renamed, and all existing files will now be associated with the new folder.
Things to consider
Be aware of the following regarding OneDrive for Business in Customer Engagement (on-premises):
OneDrive storage folders are created in the user's current Customer Engagement (on-premises) language. If the language changes, new folders will be created in the new language. Old folders will remain in the previous language.
There may be a delay between when the documents are shared in OneDrive and when they're available to other users.
This topic applies to Dynamics 365 Customer Engagement (on-premises). For the Power Apps version of this topic, see: Use OneDrive for Business
With Customer Engagement, you can use the right storage option for the right situation. For example, you can store your private documents by using the new OneDrive for Business option. For collaborative storage, you can use Office 365 Groups and for public documents use SharePoint.
You might use OneDrive for Business to start and work on a document privately, such as for a draft sales pitch. When the draft is far enough along, move it to an Office 365 group for team collaboration. You have lots of storage space (1 TB or more) with OneDrive for Business, and documents stored there are automatically synced to your desktop and mobile devices. For example, if you put a presentation in Customer Engagement (on-premises) that's stored on OneDrive linked with an opportunity, that presentation is synced to all devices running OneDrive.
Before you can use OneDrive for Business, it must be enabled by your system administrator. More information:
Important
This feature requires that you have an Office 365 subscription or a subscription to an online service such as SharePoint Online or Exchange Online. For more information, see What is Office 365 and how does it relate to Dynamics 365 (online)?
The first time you view your documents
Go to the record for which you want to view the associated documents. For example, select Sales > Leads.
If you're using the web app, on the command bar, select the down arrow beside the record name, and then select Documents.

If you're using a mobile-optimized app, select the Related tab, and then select Documents.

After OneDrive for Business is enabled, you'll see the following dialog box when you go to the Document Associated Grid to view documents in Customer Engagement (on-premises) and upload a file to OneDrive, or when you attempt to create a new document or folder.

Select Change folder location to pick a new location to store OneDrive documents, or select Continue to accept the default folder location: \Dynamics365.
Note
The default folder location is set to \CRM for users who haven't upgraded to the Dynamics 365 for Customer Engagement apps version 9.0.
View existing OneDrive documents
Open the Document Associated Grid. The following example is for Opportunities, but works the same for all record types.
Select Sales > Opportunities
Choose an opportunity from the drop-down menu, and then select Documents.

Customer Engagement (on-premises) now organizes documents in a consolidated view.

Select Document Location to filter the document list.

Select a location as described in the following table:
Document Location Description All files All document locations associated with this Customer Engagement (on-premises) record (only available in the web app) SharePoint site Documents stored in your default SharePoint site OneDrive Documents stored in OneDrive for Business Shared with me Documents that others shared with you that are associated with this Customer Engagement (on-premises) record
Create a new document
To create a new SharePoint or OneDrive document in Customer Engagement (on-premises):
Go to the Document Associated Grid.
Select Document Location, and change the location to OneDrive.
Select New, and then choose a document type such as PowerPoint or Word.
Enter a document name, and then select Save.
The document is created and opened in the Office 365 Online application.
Note
If you're are using the mobile-optimized app on tablets and phones, the document is opened within the Office app such as PowerPoint or Word.
Change your OneDrive folder settings (web app only)
You can change the location of your OneDrive documents and rename the folder used for OneDrive.
Select Settings > Document Management > OneDrive for Business Folder Settings.
Enter a new location for Customer Engagement (on-premises) to store OneDrive files, and then select OK.
Note
The OneDrive folder is renamed, and all existing files will now be associated with the new folder.
Things to consider
Be aware of the following regarding OneDrive for Business in Customer Engagement (on-premises):
OneDrive storage folders are created in the user's current Customer Engagement (on-premises) language. If the language changes, new folders will be created in the new language. Old folders will remain in the previous language.
There may be a delay between when the documents are shared in OneDrive and when they're available to other users.