Deploy content using Deployment pipelines
Any licensed user who's at least a contributor in the source and target workspace, can deploy content to an unassigned target stage. The workspace must reside on a capacity for the deployment to be completed.
You can also use the deployment pipelines REST APIs to programmatically perform deployments. For more information, see Automate your deployment pipeline using APIs and DevOps.
Note
The new Deployment pipeline user interface is currently in preview. To turn on or use the new UI, see Begin using the new UI.
Deploy to an empty stage
If you already have a workspace that you'd like to use with a specific stage, instead of deploying you can assign that workspace to the appropriate stage.
When you deploy content to an empty stage, the relationships between the items are kept. For example, a report that is bound to a semantic model in the source stage, is cloned alongside its semantic model, and the clones are similarly bound in the target workspace. The folder structure is also kept. If you have items in a folder in the source stage, a folder is created in the target stage. Since a folder is deployed only if one of its items is deployed, an empty folder can't be deployed.
Once the deployment is complete, refresh the semantic model. For more information, see deploying content to an empty stage.
Deploying options
Deployment pipelines offer three options when it comes to deploying your Fabric content:
Deploy all content - Deploy all your content to an adjacent stage.
Selective deployment - Select which content to deploy to an adjacent stage.
Backward deployment - Deploy content from a later stage to an earlier stage. Currently, this capability is available only when deploying to an empty stage.
After you choose how to deploy your content, you can Review your deployment and leave a note.
Deploy all content
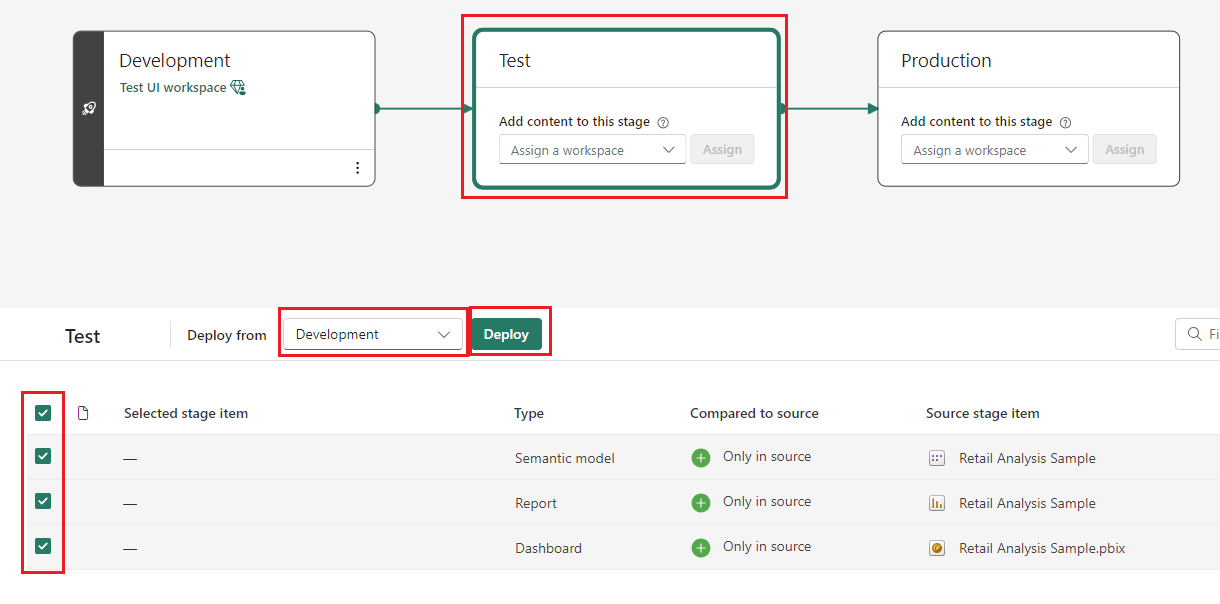
- Select the target stage.
- From the drop-down menu, choose an adjacent stage to deploy from.
- Select the items you want to deploy.
- Select the Deploy button.
The deployment process creates a duplicate workspace in the target stage. This workspace includes all the selected content from the source stage.
Selective deployment
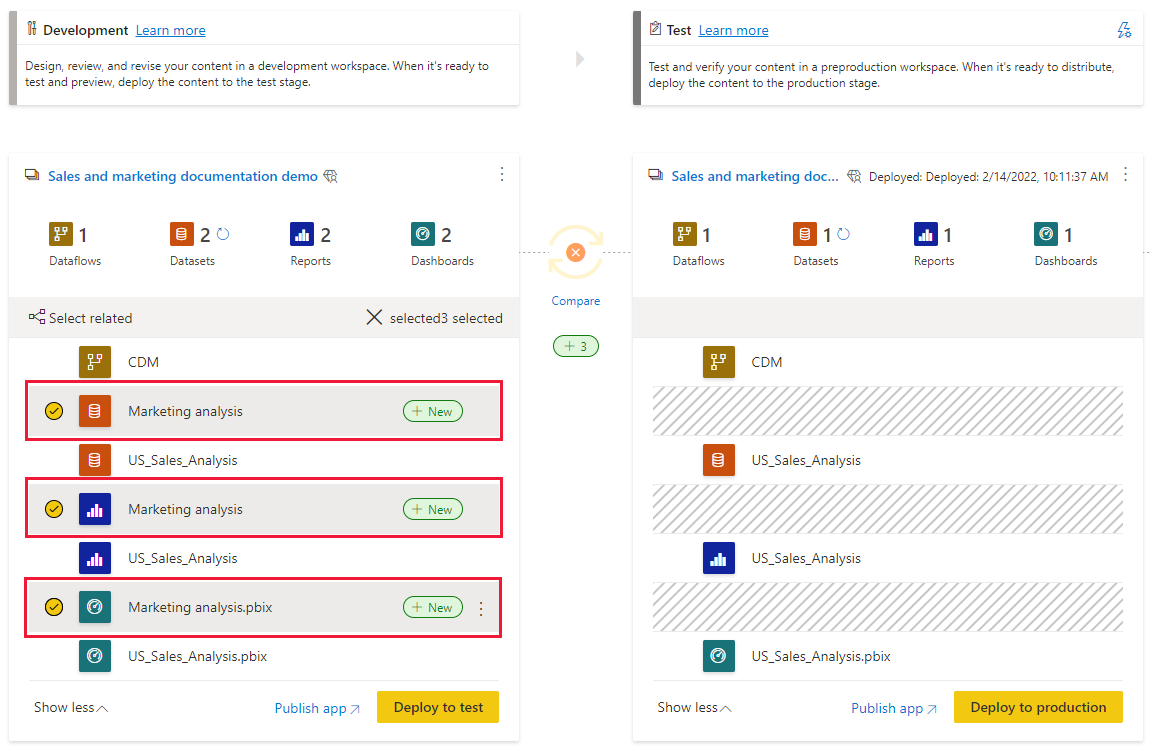
If you don't want to deploy everything from that stage, you can select specific items for deployment. Select the Show more link, and then select the items you wish to deploy. When you select the Deploy button, only the selected items are deployed to the next stage.
Fabric items are often related to or dependent on other items. Dashboards, reports, semantic models, dataflows, Lakehouses, and Warehouses are all examples of items that can be related to or dependent on other items. To include all items that are related to the item you want to deploy, use the select related button. For example, if you want to deploy a report to the next stage, select the Select related button to mark the semantic model that the report is connected to, so that both will be deployed together and the report won't break.
If you don't want to deploy everything from that stage, you can select only specific items for deployment. Since dashboards, reports, semantic models, and dataflows can have dependencies, you can use the select related button to see all the items that the selected item is dependent on. For example, if you want to deploy a report to the next stage, select the Select related button to mark the semantic model that the report is connected to, so that both will be deployed together and the report won't break.
The deploy button shows the number of items selected for deployment.
Unsupported items are also shown in this list. Unsupported items can't be deployed but they can be filtered.
Note
- You can't deploy a Fabric item to the next stage if the items it's dependent on don't exist in the stage you are deploying to. For example, deploying a report without a semantic model will fail, unless the semantic model already exists in the target stage.
- You might get unexpected results if you choose to deploy an item without the item it's dependent on. This can happen when a semantic model or a dataflow in the target stage has changed and is no longer identical to the one in the stage you're deploying from.
When deploying workspaces that contain folders, the following rules apply:
- Items of the same name and type are paired. If there are two items with the same name and type in a workspace, then the items are paired to items in the target stage only if the path is the same (they're in the same folder).
- Since a folder is deployed only if one or more of its items is deployed, an empty folder can't be deployed.
- Individual folders can't be deployed manually in deployment. Their deployment is triggered automatically when one or more of their items is deployed.
- Deploying only some items in a folder updates the structure of all items in the folder in the stage being deployed to, even though the items themselves aren't deployed.
- The folder hierarchy of paired items is updated only during deployment. During assignment, after the pairing process, the hierarchy of paired items isn't updated yet.
Backwards deployment
You might sometimes want to deploy content to a previous stage. For example, if you assign an existing workspace to a production stage and then deploy it backwards, first to the test stage, and then to the development stage. Deploying to a previous stage works only if the previous stage is empty.

Review your deployment and leave a note
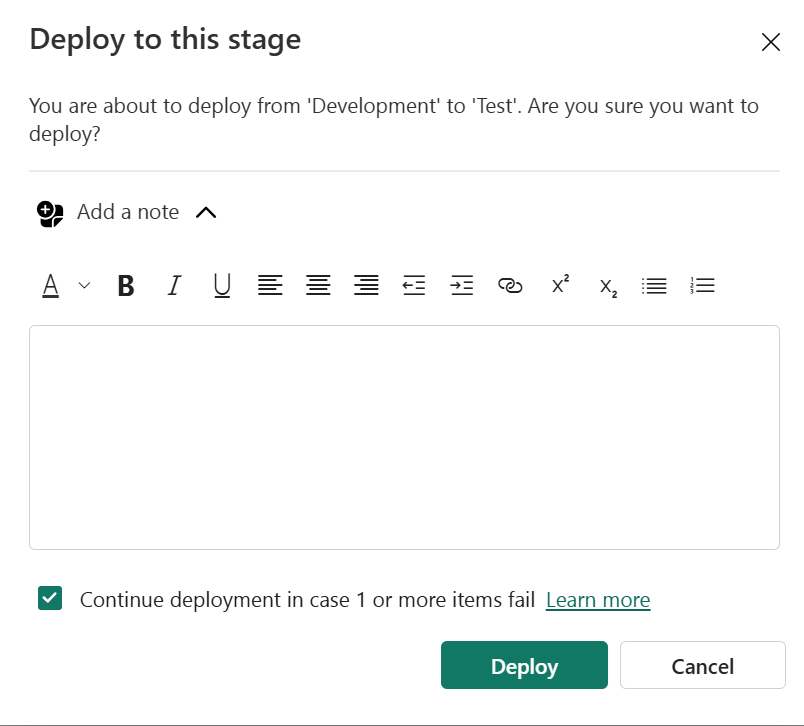
After selecting which content to deploy, a pop-up window lists all the items you're about to deploy. You can review the list and add a note, or comment, to the deployment. Adding a note is optional, but it's highly recommended as the notes are added to the deployment history. With a note for each deployment, reviewing the history of your pipelines becomes more meaningful.
To leave a note, expand the Add a note option and write your note in the text box. When you're ready to deploy, select Deploy.

Deploy content from one stage to another
Once you have content in a pipeline stage, you can deploy it to the next stage. Deploying content to another stage is usually done after you performed some actions in the pipeline. For example, made development changes to your content in the development stage, or tested your content in the test stage. Though you can have up to 10 different stages in the pipeline, a typical workflow for moving content is development to test stage, and then test to production. You can learn more about this process, in the deploy content to an existing workspace section.
When you deploy content to a stage that already has other content in it, select the items you want to deploy. An item that is paired with another item in the source stage (the paired item name appears on the last column) is overwritten by it.
Relationships between the items aren't kept. Therefore, if you deploy a report that is bound to a semantic model in the source stage, only the report is deployed. If you want to deploy everything connected to the report, use the Select related button.
To deploy content to the next stage in the deployment pipeline, select the items and then select the deploy button.
When reviewing the test and production stage cards, you can see the last deployment date and time. This indicates the last time content was deployed to the stage.
The deployment time is useful for establishing when a stage was last updated. It can also be helpful if you want to track time between test and production deployments.


