Create a SharePoint-hosted Project Server add-in
Of the three types of apps that you can create for Project Online (autohosted, provider-hosted, and SharePoint-hosted), the SharePoint-hosted app is the simplest to create and deploy. A SharePoint-hosted app does not require OAuth authentication, and does not use Azure or require maintenance of a local site for the provider-hosted resources. The App for SharePoint 2013 template in Visual Studio is a convenient framework for developing apps that can be published and sold in the Office Store or deployed to a private app catalog on SharePoint.
In Project, statusing is a process where a team member can use the Tasks page in Project Web App to submit the status of an assigned task, such as the number of hours worked each day of a week spent working on the task. The assignment owner (usually the project manager) can approve or reject the status. When the status is approved, Project recalculates the schedule. The QuickStatus app displays assigned tasks, where the user can quickly update percent complete and submit status of the selected assignments for approval. Although the Tasks page in Project Web App has much more functionality, the QuickStatus app is an example that provides a simplified interface.
The QuickStatus app is a sample for developers; it is not intended for use in a production environment. The primary purpose is to show an example of app development for Project Online, not to create a fully functional statusing app. For a better approach to statusing, see the recommendation in Next steps.
For general information about statusing, see Task progress. For more information about developing add-ins for SharePoint and Project Server, see SharePoint Add-ins.
Prerequisites for creating an app for Project Server 2013
To develop relatively simple apps that can be deployed to Project Online or to an on-premises installation of Project Server 2013, you can use the Napa, which provide an online development environment. For more complex apps, modifying the Project Web App ribbon, and easier debugging during development, you can use Visual Studio 2012 or Visual Studio 2013. For example, with an on-premises installation, you can manually check the Drafts datatables for changes in the Project Server database. This article shows how to do app development with Visual Studio.
Development of Project Server apps with Visual Studio requires the following:
Ensure that you have installed the most recent service packs and Windows updates on your local development computer. The operating system can be Windows 7, Windows 8, Windows Server 2008, or Windows Server 2012.
You must have a computer that has SharePoint Server 2013 and Project Server 2013 installed, where the computer is configured for app isolation and sideloading of apps. Sideloading enables Visual Studio to temporarily install the app for debugging. You can use an on-premises installation of SharePoint and Project Server. For more information, see Set up an on-premises development environment for apps for SharePoint.
Note
For an on-premises installation, configure an isolated app domain before you create a corporate app catalog.
The development computer can be a remote computer that has Office Developer Tools for Visual Studio 2012 installed. Ensure that you have installed the most recent version; see the Tools section of the Apps for Office and SharePoint downloads.
Verify that the Project Web App instance you will be using for development and testing is accessible in the browser.
For information about using the online tools, see Set up a development environment for SharePoint Add-ins on Microsoft 365. For a walkthrough of building a simple app for Project Server that uses the online tools, see the EPMSource blog series, Building your first Project Server app.
Using Visual Studio to create a Project Server app
Office Developer Tools for Visual Studio 2012 includes a template for SharePoint apps that can be used with Project Server 2013. When you create an app solution, the solution includes the following files for your custom code:
AppManifest.xml includes settings for the app title, permission request scope, and other properties. Procedure 1 includes steps to set the properties by using the Manifest Designer.
Default.aspx in the Pages folder is the main page of the app. Procedure 2 shows how to add HTML5 content for the QuickStatus app.
App.js in the Scripts folder is the primary file for the custom JavaScript code. Procedure 3 explains the JavaScript code for the QuickStatus app.
If you add commercial controls such as a jQuery-based grid or date picker, you can add references to additional JavaScript files in the Default.aspx file.
App.css in the Content folder is the primary file for custom CSS3 styles. Procedure 2 and Procedure 3 include information about cascading style sheets (CSS) styles for the QuickStatus app. You can add references to additional CSS files in the Default.aspx file.
AppIcon.png in the Images folder is the 96 x 96 icon that the app displays in the Office Store or the app catalog.
To modify the Project Web App ribbon, you can add a ribbon custom action. The Example code for the QuickStatus app section includes the complete code for the modified Default.aspx, App.js, App.css, Elements.xml, and AppManifest.xml files.
Procedure 1. To create an app project in Visual Studio
Run Visual Studio 2012 as an administrator, and then select New Project on the Start page.
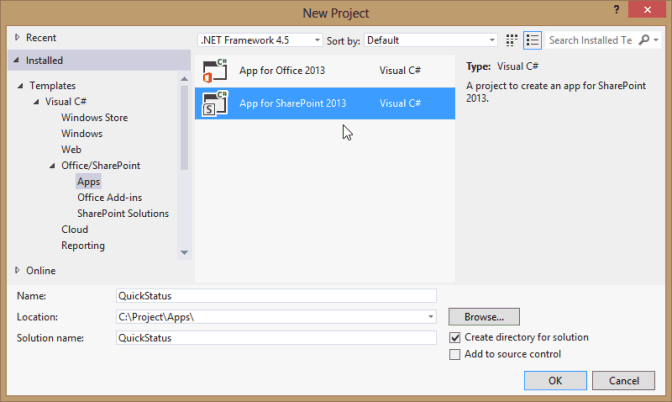
In the New Project dialog box, expand the Templates, Visual C#, and Office/SharePoint nodes, and then select Apps. Use the default .NET Framework 4.5 in the target framework drop-down list at the top of the center pane, and then select App for SharePoint 2013 (see Figure 1).
In the Name field, type QuickStatus, browse to the location where you want to save the app, and then choose OK.
Figure 1. Creating a Project Server app in Visual Studio
In the New app for SharePoint dialog box, fill in the following three fields:
In the top text box, type the name that you want the app to display in Project Web App. For example, type Quick Status Update.
For the site to use for debugging, type the URL of the Project Web App instance. For example, type
https://ServerName/ProjectServerName(replacing ServerName and ProjectServerName with your own values), and then choose Validate. If all goes well, Visual Studio shows Connection successful. If you get an error message, ensure that the Project Web App URL is correct and that the Project Server computer is configured for app isolation and sideloading of apps. For more information, see the Prerequisites for creating an app for Project Server 2013 section.In the How do you want to host your app for SharePoint drop-down list, choose SharePoint-hosted.
Caution
If you choose the default Provider-hosted project type by mistake, Visual Studio creates two projects in the solution: a QuickStatus project and a QuickStatusWeb project. If you see two projects, delete that solution and start again.
Choose OK to create the QuickStatus solution, QuickStatus project, and default files.
Open the Manifest Designer view (for example, double-click the AppManifest.xml file). On the General tab, the Title text box should show the app name that you typed in step 4. Choose the Permissions tab to add the following permission requests for the app (see Figure 2):
In the first row of the Permission requests list, in the Scope column, choose Statusing in the drop-down list. In the Permission column, choose SubmitStatus.
Add a row where the Scope is Multiple Projects and the Permission is Read.
Figure 2. Setting the permission scope for a statusing app
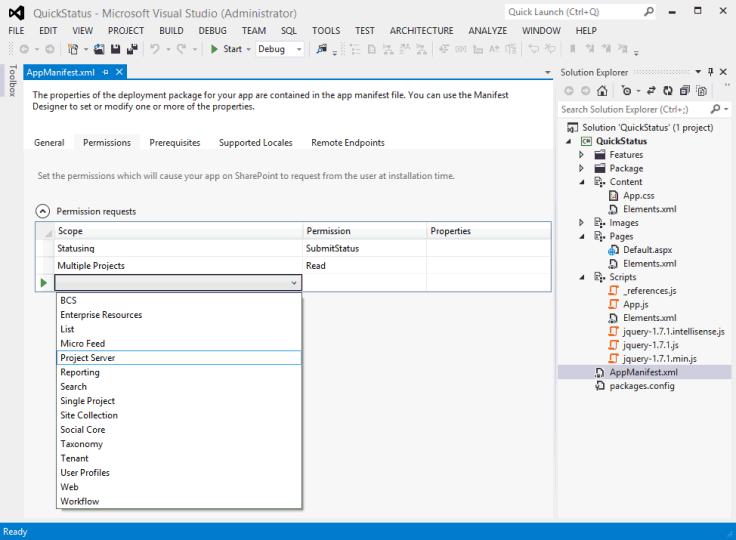
The QuickStatus app enables a Project Web App user to read assignments for that user from multiple projects, change the assignment percent complete, and submit the update. The other permission request scopes shown in the drop-down list in Figure 2 are not required for this app. The permission request scopes are the permissions that the app requests on behalf of the user. If the user does not have those permissions in Project Web App, the app does not run. An app can have multiple permission request scopes, including those for other SharePoint permissions, but should have only the minimum necessary for the app functionality. Following are the permission request scopes that are related to Project Server:
Enterprise Resources: Resource manager permissions, to read or write information about other Project Web App users.
Multiple Projects: Read or write to more than one project, where the user has the permissions requested.
Project Server: Requires the app user to have administrator permissions for Project Web App.
Reporting: Read the ProjectData OData service for Project Web App (requires only log on permission for Project Web App).
Single Project: Read or write to a project where the user has the permissions requested.
Statusing: Submit updates for status of assignments, such as times worked, percent complete, and new assignments.
Workflow: If the user has permission to run Project Server workflows, the app then runs with elevated permissions for the workflow.
For more information about permission request scopes for Project Server 2013, see the Project apps section in Updates for developers in Project 2013 and App permissions in SharePoint 2013.
Creating the HTML content for the QuickStatus app
Before you start coding the HTML content, design the user interface and user experience for the QuickStatus app (Figure 3 shows an example of the completed page). A design can also include an outline of the JavaScript functions that interact with the HTML code. For general information, see UX design for apps in SharePoint 2013.
Figure 3. Design of the QuickStatus app page
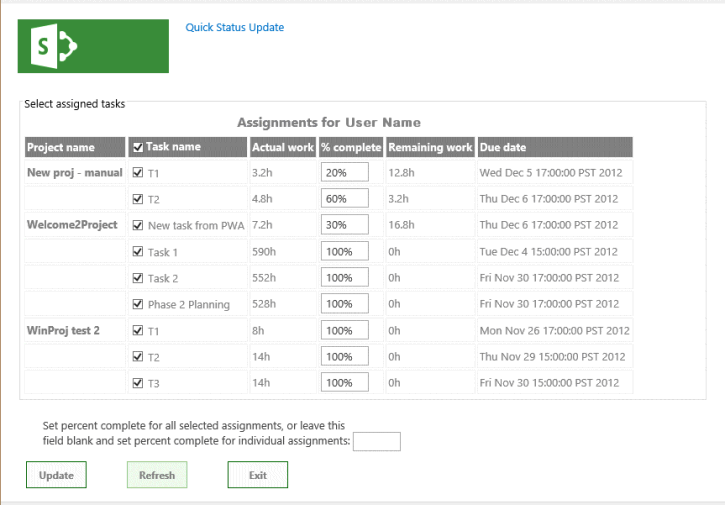
The app shows the display name at the top, which is the value of the Title element in AppManifest.xml.
By default, the page uses HTML5. Following are the standard HTML elements for the main UI objects that the QuickStatus app contains in the body of the page:
A form element contains all of the other UI elements.
A fieldset element creates a container and border for the table of assignments; the child legend element provides a label for the container.
A table element includes a caption and only a table header. JavaScript functions change the table caption and add rows for the assignments.
Note
To easily add paging and sorting, a production app would probably use a commercial jQuery-based grid control instead of a table.
The table includes columns for the project name, task name with a check box, actual work, percent complete, remaining work, and the assignment finish date. JavaScript functions create the check box and the text input field for the percent complete of each task.
An input element for a text box sets percent complete for all selected assignments.
A button element submits the status changes.
A button element refreshes the page.
A button element exits the app and returns to the Tasks page in Project Web App.
The bottom text box and button elements are within div elements, so that CSS can easily manage the position and appearance of the UI objects. A JavaScript function adds a paragraph at the bottom of the page that contains results for success or failure of the status update.
Procedure 2. To create the HTML content
In Visual Studio, open the Default.aspx file.
The file includes two asp:Content elements: The element with the
ContentPlaceHolderID="PlaceHolderAdditionalPageHead"attribute is added within the page header, and the element with theContentPlaceHolderID="PlaceHolderMain"attribute is placed within the page body element.In the
<asp:Content ContentPlaceHolderID="PlaceHolderAdditionalPageHead" runat="server">control for the page header, add a reference to the PS.js file on the Project Server computer. For testing and debugging, you can use PS.debug.js.<script type="text/javascript" src="/_layouts/15/ps.debug.js"></script>The app infrastructure uses the
/_layouts/15/virtual directory for the SharePoint site in IIS. The physical file is%ProgramFiles%\Common Files\Microsoft Shared\Web Server Extensions\15\TEMPLATE\LAYOUTS\PS.debug.js.Note
Before you deploy the app for production use, remove
.debugfrom the script references to improve performance.In the
<asp:Content ContentPlaceHolderID="PlaceHolderMain" runat="server">control for the page body, delete the generated div element, and then add the HTML code for the UI objects. The table element contains only a header row. The Task name column includes a check box input control. Text for the caption element is replaced by the onGetUserNameSuccess callback for the getUserInfo function in the App.js file.<form> <fieldset> <legend>Select assigned tasks</legend> <table id="assignmentsTable"> <caption id="tableCaption">Replace caption</caption> <thead> <tr id="headerRow"> <th>Project name</th> <th><input type="checkbox" id="headercheckbox" checked="checked" />Task name</th> <th>Actual work</th> <th>% complete</th> <th>Remaining work</th> <th>Due date</th> </tr> </thead> </table> </fieldset> <div id="inputPercentComplete" > Set percent complete for all selected assignments, or leave this <br /> field blank and set percent complete for individual assignments: <input type="text" name="percentComplete" id="pctComplete" size="4" maxlength="4" /> </div> <div id="submitResult"> <p><button id="btnSubmitUpdate" type="button" class="bottomButtons" ></button></p> <p id="message"></p> </div> <div id="refreshPage"> <p><button id="btnRefresh" type="button" class="bottomButtons" >Refresh</button></p> </div> <div id="exitPage"> <p><button id="btnExit" type="button" class="bottomButtons" >Exit</button></p> </div> </form>In the App.css file, add CSS code for the position and appearance of the UI elements. For the complete CSS code of the QuickStatus app, see the Example code for the QuickStatus app section.
Procedure 3 adds the JavaScript functions to read the assignments and create the table rows, and to change and update the assignment percent complete. The actual steps are more iterative in developing an app, where you alternately create some of the HTML code, add and test related styles and JavaScript functions, modify or add more HTML code, and then repeat the process.
Creating the JavaScript functions for the QuickStatus app
The Visual Studio template for a SharePoint app includes the App.js file, which contains default initialization code that gets the SharePoint client context and demonstrates basic get and set actions for the app page. The JavaScript namespace for the SharePoint client-side SP.js library is SP. Because a Project Server app uses the PS.js library, the app uses the PS namespace to get the client context and access the JSOM for Project Server.
JavaScript functions in the QuickStatus app include the following:
The document ready event handler runs when the document object model (DOM) is instantiated. The ready event handler does the following four steps:
Initializes the projContext global variable with the client context for the Project Server JSOM and the pwaWeb global variable.
Calls the getUserInfo function to initialize the projUser global variable.
Calls the getAssignments function, which gets specified assignment data for the user.
Binds click event handlers to the table header check box, and to the check boxes in each row of the table. The click event handlers manage the checked attribute of the check boxes when the user selects or clears any check box in the table.
If the getAssignments function is successful, it calls the onGetAssignmentsSuccess function. That function inserts a row in the table for each assignment, initializes the HTML controls in each row, and then initializes the bottom button properties.
The onClick event handler for the Update button calls the updateAssignments function. That function gets the percent complete value that is applied to each selected assignment; or if the percent complete text box is empty, the function gets the percent complete of each selected assignment in the table. The updateAssignments function then saves and submits the status updates and writes a message about the results to the bottom of the page.
Procedure 3. To create the JavaScript functions
In Visual Studio, open the App.js file, and then delete all the content in the file.
Add the global variables and the document ready event handler. The document object is accessed by using a jQuery function.
The click event handler for the table header check box sets the checked state of the row check boxes. If all of the row check boxes are selected or all are clear, the click event handler for the row check boxes sets the checked state of the header check box. The click event handlers also set the results message at the bottom of the page to an empty string.
var projContext; var pwaWeb; var projUser; // This code runs when the DOM is ready and creates a ProjectContext object. // The ProjectContext object is required to use the JSOM for Project Server. $(document).ready(function () { projContext = PS.ProjectContext.get_current(); pwaWeb = projContext.get_web(); getUserInfo(); getAssignments(); // Bind a click event handler to the table header check box, which sets the row check boxes // to the checked state of the header check box, and sets the results message to an empty string. $('#headercheckbox').live('click', function (event) { $('input:checkbox:not(#headercheckbox)').attr('checked', this.checked); $get("message").innerText = ""; }); // Bind a click event handler to the row check boxes. If any row check box is cleared, clear // the header check box. If all of the row check boxes are selected, select the header check box. $('input:checkbox:not(#headercheckbox)').live('click', function (event) { var isChecked = true; $('input:checkbox:not(#headercheckbox)').each(function () { if (this.checked == false) isChecked = false; $get("message").innerText = ""; }); $("#headercheckbox").attr('checked', isChecked); }); });Add the getUserInfo function, which calls onGetUserNameSuccess if the query is successful. The onGetUserNameSuccess function replaces the contents of the caption paragraph with a table caption that includes the user name.
// Get information about the current user. function getUserInfo() { projUser = pwaWeb.get_currentUser(); projContext.load(projUser); projContext.executeQueryAsync(onGetUserNameSuccess, // Anonymous function to execute if getUserInfo fails. function (sender, args) { alert('Failed to get user name. Error: ' + args.get_message()); }); } // This function is executed if the getUserInfo call is successful. function onGetUserNameSuccess() { var prefaceInfo = 'Assignments for ' + projUser.get_title(); $('#tableCaption').text(prefaceInfo); }Add the getAssignments function, which calls onGetAssignmentsSuccess (see step 5) if the assignment query is successful. The Include option limits the query to return only the fields specified.
// Get the collection of assignments for the current user. function getAssignments() { assignments = PS.EnterpriseResource.getSelf(projContext).get_assignments(); // Register the request that you want to run on the server. The optional "Include" parameter // requests only the specified properties for each assignment in the collection. projContext.load(assignments, 'Include(Project, Name, ActualWork, ActualWorkMilliseconds, PercentComplete, RemainingWork, Finish, Task)'); // Run the request on the server. projContext.executeQueryAsync(onGetAssignmentsSuccess, // Anonymous function to execute if getAssignments fails. function (sender, args) { alert('Failed to get assignments. Error: ' + args.get_message()); }); }Add the onGetAssignmentsSuccess function, which adds a row for each assignment to the table. The prevProjName variable is used to determine whether a row is for a different project. If so, the project name is shown in a bold font; if not, the project name is set to an empty string.
Note
The JSOM does not include TimeSpan properties that the CSOM includes, such as ActualWorkTimeSpan. Instead, the JSOM uses properties for the number of milliseconds, such as the PS.StatusAssignment.actualWorkMilliseconds property. The method to get that property is get_actualWorkMilliseconds, which returns an integer value. > The get_actualWork method returns a string such as "3h". You could use either value in the QuickStatus app, but display it differently. The assignments query includes both properties, so you can test the value during debugging. If you remove the actualWork variable, you can also remove the ActualWork property in the assignments query.
Finally, the onGetAssignmentsSuccess function initializes the Update button and the Refresh button with click event handlers. The text value of the Update button could also be set in the HTML code.
// Get the enumerator, iterate through the assignment collection, // and add each assignment to the table. function onGetAssignmentsSuccess(sender, args) { if (assignments.get_count() > 0) { var assignmentsEnumerator = assignments.getEnumerator(); var projName = ""; var prevProjName = "3D2A8045-4920-4B31-B3E7-9D0C5195FC70"; // Any unique name. var taskNum = 0; var chkTask = ""; var txtPctComplete = ""; // Constants for creating input controls in the table. var INPUTCHK = '<input type="checkbox" class="chkTask" checked="checked" id="chk'; var LBLCHK = '<label for="chk'; var INPUTTXT = '<input type="text" size="4" maxlength="4" class="txtPctComplete" id="txt'; while (assignmentsEnumerator.moveNext()) { var statusAssignment = assignmentsEnumerator.get_current(); projName = statusAssignment.get_project().get_name(); // Get an integer, such as 3600000. var actualWorkMilliseconds = statusAssignment.get_actualWorkMilliseconds(); // Get a string, such as "1h". Not used here. var actualWork = statusAssignment.get_actualWork(); if (projName === prevProjName) { projName = ""; } prevProjName = statusAssignment.get_project().get_name(); // Create a row for the assignment information. var row = assignmentsTable.insertRow(); taskNum++; // Create an HTML string with a check box and task name label, for example: // <input type="checkbox" class="chkTask" checked="checked" id="chk1" /> <label for="chk1">Task 1</label> chkTask = INPUTCHK + taskNum + '" /> ' + LBLCHK + taskNum + '">' + statusAssignment.get_name() + '</label>'; txtPctComplete = INPUTTXT + taskNum + '" />'; // Insert cells for the assignment properties. row.insertCell().innerHTML = '<strong>' + projName + '</strong>'; row.insertCell().innerHTML = chkTask; row.insertCell().innerText = actualWorkMilliseconds / 3600000 + 'h'; row.insertCell().innerHTML = txtPctComplete; row.insertCell().innerText = statusAssignment.get_remainingWork(); row.insertCell().innerText = statusAssignment.get_finish(); // Initialize the percent complete cell. $get("txt" + taskNum).innerText = statusAssignment.get_percentComplete() + '%' } } else { $('p#message').attr('style', 'color: #0f3fdb'); // Blue text. $get("message").innerText = projUser.get_title() + ' has no assignments' } // Initialize the button properties. $get("btnSubmitUpdate").onclick = function() { updateAssignments(); }; $get("btnSubmitUpdate").innerText = 'Update'; $get('btnRefresh').onclick = function () { window.location.reload(true); }; $get('btnExit').onclick = function () { exitToPwa(); }; }Add the updateAssignments click event handler for the Update button. When the user changes a value for percent complete of a task, or adds a value in the percentComplete text box, the value could be entered in several formats such as "60", "60%", or "60 %". The getNumericValue method returns the numeric value of the input text.
Note
In an app that is designed for production use, input values for numeric information should include field validation and additional error checking.
The updateAssignments example includes some basic error checking, and displays information in the message paragraph at the bottom of the page—green if the update query is successful and red if there is an input error or the update query is unsuccessful.
Before using the submitAllStatusUpdates method, the app must save the updates to the server by using the PS.StatusAssignmentCollection.update method.
// Update all checked assignments. If the bottom percent complete field is blank, // use the value in the % complete field of each selected row in the table. function updateAssignments() { // Get percent complete from the bottom text box. var pctCompleteMain = getNumericValue($('#pctComplete').val()).trim(); var pctComplete = pctCompleteMain; var assignmentsEnumerator = assignments.getEnumerator(); var taskNum = 0; var taskRow = ""; var indexPercent = ""; var doSubmit = true; while (assignmentsEnumerator.moveNext()) { var pctCompleteRow = ""; taskRow = "chk" + ++taskNum; if ($get(taskRow).checked) { var statusAssignment = assignmentsEnumerator.get_current(); if (pctCompleteMain === "") { // Get percent complete from the text box field in the table row. pctCompleteRow = getNumericValue($('#txt' + taskNum).val()); pctComplete = pctCompleteRow; } // If both percent complete fields are empty, show an error. if (pctCompleteMain === "" && pctCompleteRow === "") { $('p#message').attr('style', 'color: #e11500'); // Red text. $get("message").innerHTML = '<b>Error:</b> Both <i>Percent complete</i> fields are empty, in row ' + taskNum + ' and in the bottom textbox.<br/>One of those fields must have a valid percent.' + '<p>Please refresh the page and try again.</p>'; doSubmit = false; taskNum = 0; break; } if (doSubmit) statusAssignment.set_percentComplete(pctComplete); } } // Save and submit the assignment updates. if (doSubmit) { assignments.update(); assignments.submitAllStatusUpdates(); projContext.executeQueryAsync(function (source, args) { $('p#message').attr('style', 'color: #0faa0d'); // Green text. $get("message").innerText = 'Assignments have been updated.'; }, function (source, args) { $('p#message').attr('style', 'color: #e11500'); // Red text. $get("message").innerText = 'Error updating assignments: ' + args.get_message(); }); } } // Get the numeric part for percent complete, from a string. For example, with "20 %", return "20". function getNumericValue(pctComplete) { pctComplete = pctComplete.trim(); pctComplete = pctComplete.replace(/ /g, ""); // Remove interior spaces. indexPercent = pctComplete.indexOf('%', 0); if (indexPercent > -1) pctComplete = pctComplete.substring(0, indexPercent); return pctComplete; }Add the exitToPwa function, which uses the SPHostUrl query string parameter for the URL of the host Project Web App site. To navigate back to the Tasks page, append
"/Tasks.aspx"to the URL. For example, the spHostUrl variable would be set tohttps://ServerName/ProjectServerName/Tasks.aspx.The getQueryStringParameter function splits the URL of the QuickStatus page to extract and return the specified parameter in the URL options. Following is an example of the document.URL value for the QuickStatus document (all on one line):
https://app-ef98082fa37e3c.servername.officeapps.selfhost.corp.microsoft.com/pwa/ QuickStatus/Pages/Default.aspx ?SPHostUrl=https%3A%2F%2Fsphvm%2D85178%2Fpwa &SPLanguage=en%2DUS &SPClientTag=1 &SPProductNumber=15%2E0%2E4420%2E1022 &SPAppWebUrl=https%3A%2F%2Fapp%2Def98082fa37e3c%2Eservername %2Eofficeapps%2Eselfhost%2Ecorp%2Emicrosoft%2Ecom%2Fpwa%2FQuickStatusFor the previous URL, the getQueryStringParameter function returns the SPHostUrl query string value,
https://ServerName/pwa.// Exit the QuickStatus page and go back to the Tasks page in Project Web App. function exitToPwa() { // Get the SharePoint host URL, which is the top page of PWA, and add the Tasks page. var spHostUrl = decodeURIComponent(getQueryStringParameter('SPHostUrl')) + "/Tasks.aspx"; // Set the top window for the QuickStatus IFrame to the Tasks page. window.top.location.href = spHostUrl; } // Get a specified query string parameter from the {StandardTokens} URL option string. function getQueryStringParameter(urlParameterKey) { var docUrl = document.URL; var params = docUrl.split('?')[1].split('&'); for (var i = 0; i < params.length; i++) { var theParam = params[i].split('='); if (theParam[0] == urlParameterKey) return decodeURIComponent(theParam[1]); } }
If you publish the QuickStatus app at this point and add it to Project Web App, the app can be run from the Site Contents page, but it is not easily available to users. To help users find and run the app, you can add a button for it to the ribbon on the Tasks page. Procedure 4 shows how to add a ribbon custom action.
Adding a ribbon custom action
Ribbon tabs, groups, and controls for Project Web App are specified in the pwaribbon.xml file, which is installed in the [Program Files]\Common Files\Microsoft Shared\Web Server Extensions\15\TEMPLATE\FEATURES\PWARibbon\listtemplates directory on the computer running Project Server. To help design custom actions for the Project Web App ribbon, the Project 2013 SDK download includes a copy of pwaribbon.xml.
Project Web App uses different ribbon definitions for the Tasks page, depending on whether the Project Web App instance uses single entry mode that enables users to enter values for both the timesheet and task status. If you have administrative permissions for Project Web App, to determine the entry mode, choose PWA Settings in the drop-down settings menu at the top-right corner of the page. On the PWA Settings page, choose Timesheet Settings and Defaults, and then look at the Single Entry Mode check box at the bottom of the page.
When single entry mode is off, the ribbon on the Tasks page is defined by the My Work region in pwaribbon.xml:
<!-- REGION My Work Ribbon-->
<CustomAction
Id="Ribbon.ContextualTabs.MyWork"
. . .
When single entry mode is on, the Tasks page ribbon is defined by the Tied Mode region in pwaribbon.xml:
<!-- REGION Tied Mode Ribbon-->
<CustomAction
Id="Ribbon.ContextualTabs.TiedMode"
. . .
Although the groups and controls in each region look similar, a control for the tied mode can call a different function than the same control for the non-tied mode. Procedure 4 shows how to add a button control for the QuickStatus app when single entry mode is off (the Single Entry Mode check box is clear).
Note
For general information about adding custom actions to a ribbon or to a menu in a SharePoint application, see Create custom actions to deploy with apps for SharePoint.
Procedure 4. To add a ribbon custom action to the Tasks page
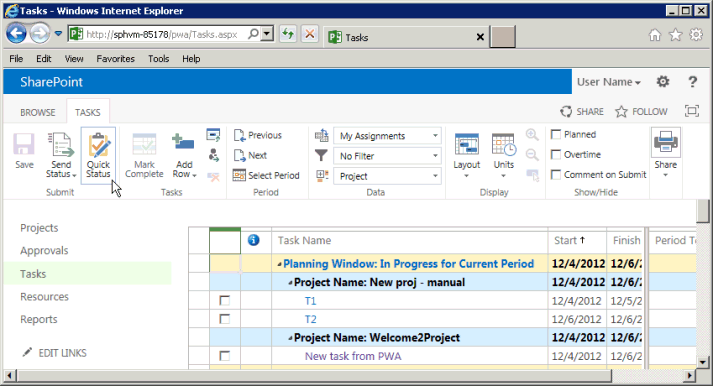
Examine the ribbon on the Tasks page in Project Web App. Select the TASKS tab on the ribbon and plan how to modify it. There are seven groups, such as Submit, Tasks, and Period. The Submit group has two controls, a Save button and a Send Status drop-down menu. You can add a control at any location in a group, add a group with a new control at any location in the TASKS tab, or add another ribbon tab that has custom groups and controls. In this example, we add a third button to the Submit group, where the button invokes the URL of the QuickStatus app.
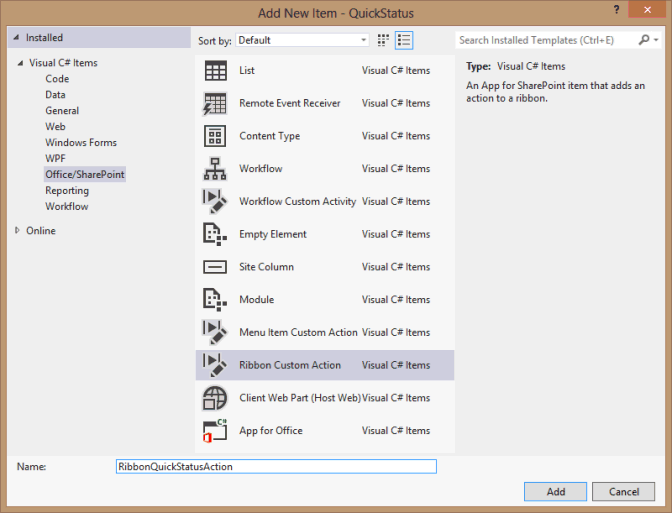
In the Solution Explorer pane in Visual Studio, right-click the QuickStatus project, and then add a new item. In the Add New Item dialog box, choose Ribbon Custom Action (see Figure 4). For example, name the custom action RibbonQuickStatusAction, and then choose Add.
Figure 4. Adding a ribbon custom action
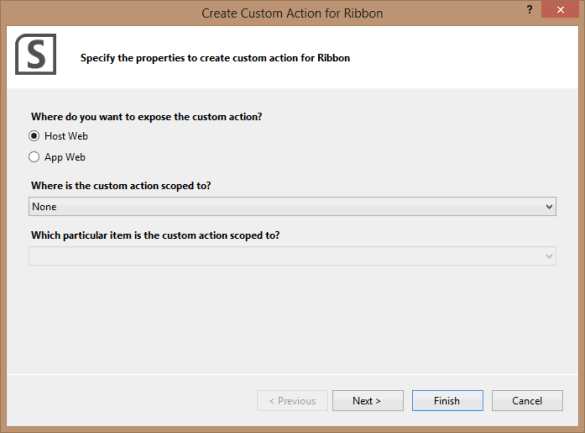
On the first page of the Create Custom Action for Ribbon wizard, leave the Host Web option selected, choose None in the drop-down list for the custom action scope, and then choose Next (see Figure 5). The items in the drop-down lists are relevant to SharePoint, not to Project Server. We will replace most of the generated XML for the custom action so that it applies to Project Server.
Figure 5. Specifying properties for the ribbon custom action
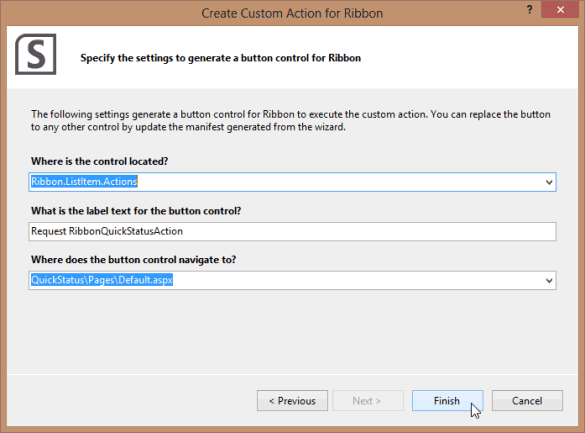
On the next page of the Create Custom Action for Ribbon wizard, leave all the default values for the settings, and then choose Finish (see Figure 6). Visual Studio creates the RibbonQuickStatusAction folder, which contains an Elements.xml file.
Figure 6. Specifying the settings for a button control
Modify the default generated code in the Elements.xml file for the ribbon custom action. Following is the default XML code:
<?xml version="1.0" encoding="utf-8"?> <Elements xmlns="http://schemas.microsoft.com/sharepoint/"> <CustomAction Id="21ea3aaf-79e5-4aac-9479-8eef14b4d9df.RibbonQuickStatusAction" Location="CommandUI.Ribbon" Sequence="10001" Title="Invoke 'RibbonQuickStatusAction' action"> <CommandUIExtension> <!-- Update the UI definitions below with the controls and the command actions that you want to enable for the custom action. --> <CommandUIDefinitions> <CommandUIDefinition Location="Ribbon.ListItem.Actions.Controls._children"> <Button Id="Ribbon.ListItem.Actions.RibbonQuickStatusActionButton" Alt="Request RibbonQuickStatusAction" Sequence="100" Command="Invoke_RibbonQuickStatusActionButtonRequest" LabelText="Request RibbonQuickStatusAction" TemplateAlias="o1" Image32by32="_layouts/15/images/placeholder32x32.png" Image16by16="_layouts/15/images/placeholder16x16.png" /> </CommandUIDefinition> </CommandUIDefinitions> <CommandUIHandlers> <CommandUIHandler Command="Invoke_RibbonQuickStatusActionButtonRequest" CommandAction="~appWebUrl/Pages/Default.aspx"/> </CommandUIHandlers> </CommandUIExtension > </CustomAction> </Elements>In the CustomAction element, delete the Sequence attribute and the Title attribute.
To add a control to the Submit group, find the first group in the
Ribbon.ContextualTabs.MyWork.Home.Groupscollection in the pwaribbon.xml file, which is the element that begins,<Group Id="Ribbon.ContextualTabs.MyWork.Home.Page" Command="PageGroup" Sequence="10" Title="$Resources:pwafeatures,PAGE_PDP_CM_SUBMIT". To add a child control to the Submit group, the following code shows the correct Location attribute of the CommandUIDefinition element in the Elements.xml file:<CommandUIDefinitions> <CommandUIDefinition Location="Ribbon.ContextualTabs.MyWork.Home.Page.Controls._children"> . . . </CommandUIDefinition> </CommandUIDefinitions>Change the attribute values of the child Button element as follows:
<Button Id="Ribbon.ContextualTabs.MyWork.Home.Page.QuickStatus" Alt="Quick Status app" Sequence="30" Command="Invoke_QuickStatus" LabelText="Quick Status" TemplateAlias="o1" Image16by16="_layouts/15/1033/images/ps16x16.png" Image16by16Left="-80" Image16by16Top="-144" Image32by32="_layouts/15/1033/images/ps32x32.png" Image32by32Left="-32" Image32by32Top="-288" ToolTipTitle="QuickStatus" ToolTipDescription="Run the QuickStatus app" />To make the button the third control in the group, the Sequence attribute can be any number higher than the
Sequence="20"value of the existing Send Status control (which is a FlyoutAnchor element in pwaribbon.xml). By convention, the sequence numbers of groups and controls are10, 20, 30, …, which enables elements to be inserted in intermediate positions.The Command attribute specifies the command to run in the CommandUIHandler element (see the following step 5.d). You can simplify the command name to make it easier for the next developer. For example
Command="Invoke_QuickStatus"is easier to read thanCommand="Invoke_RibbonQuickStatusActionButtonRequest".The image attributes specify the 16 x 16-pixel icon and the 32 x 32-pixel icon for the button control. In the default Elements.xml file,
Image32by32="_layouts/15/images/placeholder32x32.png"specifies an orange dot. You can extract icons from the image map files (ps16x16.png and ps32x32.png) that are installed in the[Program Files]\Common Files\Microsoft Shared\Web Server Extensions\15\TEMPLATE\LAYOUTS\1033\IMAGESdirectory on the computer running Project Server. For example, the 32 x 32-pixel icon is in the second column of icons from the left and the tenth row down from the top of the ps32x32.png image map (the top of the icon is after the end of the ninth row; 9 rows x 32 pixels/row = 288 pixels).To show a tool tip for the button control, add the ToolTipTitle attribute and the ToolTipDescription attribute.
Change the attributes of the CommandUIHandler element. For example, ensure that the Command attribute matches the Command attribute value for the Button element. For the CommandAction attribute,
~appWebUrlis a placeholder for the URL of the QuickStatus webpage. When the ribbon button invokes the QuickStatus app, the {StandardTokens} token is replaced by URL options that include SPHostUrl, SPLanguage, SPClientTag, SPProductNumber, and SPAppWebUrl.<CommandUIHandlers> <CommandUIHandler Command="Invoke_QuickStatus" CommandAction="~appWebUrl/Pages/Default.aspx?{StandardTokens}"/> </CommandUIHandlers>
In Solution Explorer, open the Feature1.feature designer, and move the RibbonQuickStatusAction item from the Items in the Solution pane to the Items in the Feature pane. If you then open the Package.package designer, the RibbonQuickStatusAction item will be in the Items in the Package pane.
As you develop the app and add a ribbon button, you normally test the app and set breakpoints in the JavaScript code for debugging. When you press F5 to start debugging, Visual Studio compiles the app, deploys it to the site that is specified in the Site URL property of the QuickStatus project, and displays a page that asks whether you trust the app. When you proceed and then exit the QuickStatus app, it returns to the Tasks page in Project Web App.
Note
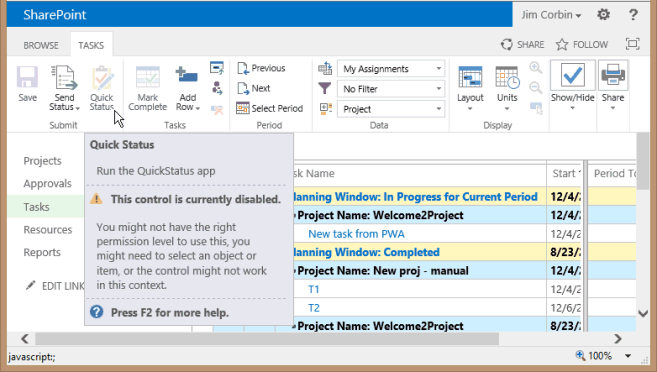
Figure 7 shows that the Quick Status button on the TASKS tab of the ribbon is disabled. After many debug deployments with Visual Studio, custom ribbon controls can be blocked when you continue to debug or deploy the published app on the same test server. To enable the button, delete the RibbonQuickStatusAction item in Visual Studio, and then create a new ribbon action that has a different name and ID. If that doesn't solve the problem, try removing the app from the Project Web App test instance, and then recreate the app with a different app ID.
Figure 7. Viewing the tooltip of the disabled Quick Status button
Procedure 5 shows how to deploy and install the QuickStatus app. Procedure 6 shows some additional steps in testing the app after you have installed it.
Deploying the QuickStatus app
There are several ways to deploy an app to a SharePoint web application such as Project Web App. Which deployment you use will depend on whether you want to publish the app to a private SharePoint catalog or to the public Office Store, and whether SharePoint is installed on-premises or is an online tenancy. Procedure 5 shows how to deploy the QuickStatus app to an on-premises installation in a private app catalog. For more information, see Install and manage apps for SharePoint 2013 and Publish apps for SharePoint
Note
Adding an app to a SharePoint catalog requires SharePoint administrator permissions.
Procedure 5. To deploy the QuickStatus app
In Visual Studio, save all of the files, and then right-click the QuickStatus project in the Solution Explorer and choose Publish.
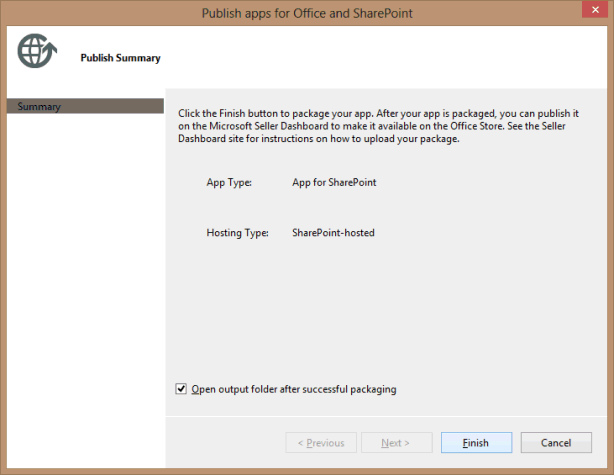
Because the QuickStatus app is SharePoint-hosted, there are very few options for publishing (see Figure 8). In the Publish apps for Office and SharePoint dialog box, choose Finish.
Figure 8. Publishing the QuickStatus app
Copy the QuickStatus.app file from the
~\QuickStatus\bin\Debug\app.publish\1.0.0.0directory to a convenient directory on the local computer (or to the SharePoint computer for an on-premises installation).In SharePoint Central Administration, choose Apps in the Quick Launch, and then choose Manage App Catalog.
If an app catalog does not exist, create a site collection for the app catalog, by following the Configure the App Catalog site for a web application section in Manage the App Catalog in SharePoint 2013.
If an app catalog exists, navigate to the site URL on the Manage App Catalog page. For example, in the following steps, the app catalog site is
https://ServerName/sites/TestApps.On the app catalog page, choose Apps for SharePoint in the Quick Launch. On the Apps for SharePoint page, on the FILES tab of the ribbon, choose Upload Document.
In the Add a document dialog box, browse for the QuickStatus.app file, add comments for the version, and then choose OK.
When you add an app, you can also add local information for the app description, icon, and other information. In the Apps for SharePoint - QuickStatus.app dialog box, add the information that you want to show for the app in the SharePoint site collection. For example, add the following information:
Short Description field: Type Quick Status test app.
Description field: Type Test app to update percent complete for tasks in multiple projects.
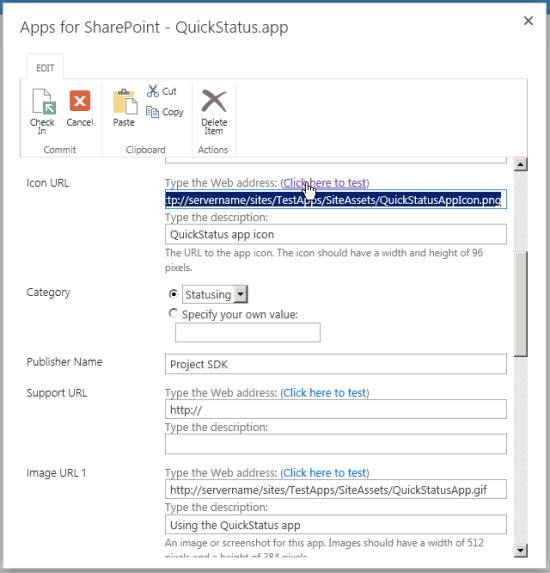
Icon URL fields: Add a 96 x 96-pixel image for the app icon to the site assets for the app catalog. For example, navigate to
https://ServerName/sites/TestApps, choose Site contents in the Settings drop-down menu, choose Site Assets, and then add the quickStatusApp.png image. Right-click the quickStatusApp item, choose Properties, and then copy the Address (URL) value in the Properties dialog box. For example, copyhttps://ServerName/sites/TestApps/SiteAssets/QuickStatusApp.png, and then paste the value in the Icon URL web address field. Type a description for the icon, for example (as in Figure 9), type QuickStatus app icon. Test that the URL is valid.Figure 9. Adding an icon URL for the QuickStatus app
Category field: Choose an existing category, or specify your own value. For example, type Statusing.
Note
A category named Statusing is just for testing purposes. A typical category for Project Server apps is Project Management.
Publisher name field: Type the name of the publisher. In this example, type Project SDK.
Enabled field: To make the app visible to Project Web App site administrators for installation, select the Enabled check box.
Additional fields are optional. For example, you can add a support URL and multiple help images for the app details page. In Figure 9, the Image URL 1 fields include the URL for a screenshot of the app and a description of the screenshot.
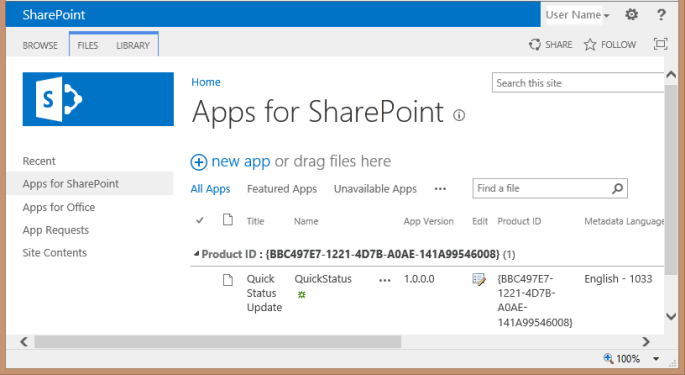
In the Apps for SharePoint - QuickStatus.app dialog box, choose Save. In Figure 9, the Quick Status Update item in the Apps for SharePoint library is checked out for editing, so on the EDIT tab of the dialog box ribbon, you would choose Check In to complete the process (see Figure 10).
Figure 10. The QuickStatus app is added to the Apps for SharePoint library.
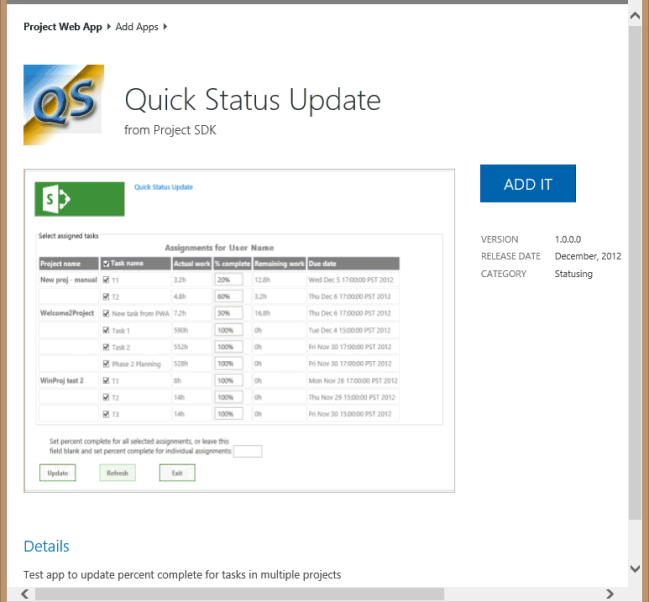
In Project Web App, in the Settings drop-down menu, choose Add an app. On the Your Apps page, in the Quick Launch, choose From Your Organization, and then choose App Details for the Quick Status Update app. Figure 11 shows the details page with the app icon, screenshot, and other information that you added in the previous step.
Figure 11. Using the Quick Status Update details page in Project Web App
On the Quick Status Update details page, choose ADD IT. Project Web App displays a dialog box that lists the operations that the QuickStatus app can perform (see Figure 12). The list of operations is derived from the AppPermissionRequest elements in the AppManifest.xml file.
Figure 12. Verifying that you trust the Quick Status app
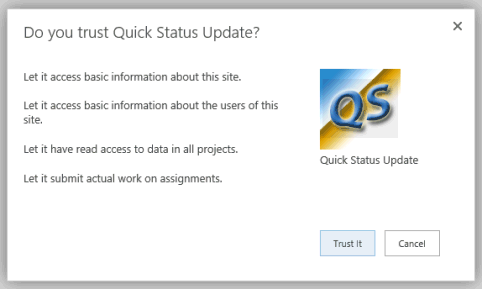
In the Do you trust Quick Status Update dialog box, choose Trust It. The app is added to the Project Web App Site Contents page (see Figure 13).
Figure 13. Viewing the Quick Status app on the Site Contents page
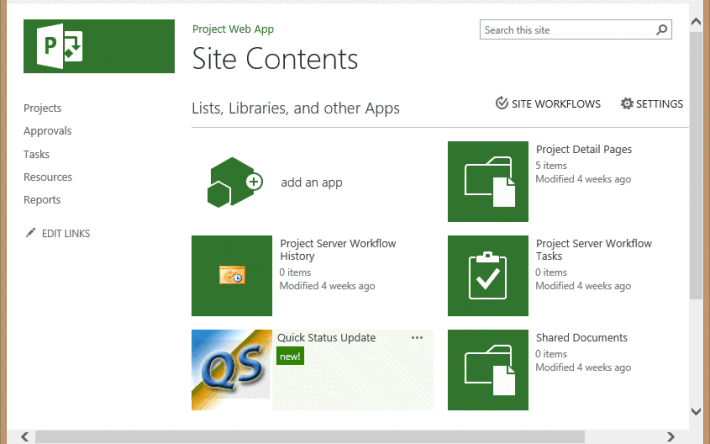
On the Site Contents page, you can select the Quick Status Update icon to run the app.
Note
For additional commands that provide information about the app, on the Site Contents page, choose the region that contains the Quick Status Update name and the ellipsis (...). You can review the About page for the app, view the App Details page that contains information about app errors, review the app permissions page, or remove the app from Project Web App.
On the Tasks page in Project Web App (see Figure 14), the QuickStatus button should be enabled on the ribbon. If the Quick Status button is disabled, try the actions described in the note for Figure 7.
Figure 14. Starting the QuickStatus app from the TASKS tab
Procedure 6 shows some tests to make with the QuickStatus app.
Testing the QuickStatus app
Every operation that a user might try in the QuickStatus app should be tested on a test installation of Project Server before deploying the app to a production server or to a production tenant of Project Online. A test installation enables you to change and delete assignments for users without affecting actual projects. Testing should also involve several users who have different sets of permissions, such as administrator, project manager, and team member. Thorough testing can uncover changes that should be made in the app, which were not apparent in testing during development. Procedure 6 lists several tests for the QuickStatus app, but does not include an exhaustive series of tests.
Procedure 6. To test the QuickStatus app
Run the QuickStatus app where the user has no assignments. The app should show a blue message at the bottom of the page, for example, User Name has no assignments.
Choose Update, and the message changes to a green Assignments have been updated.
Note
The app behavior should be changed so that the Update button is disabled when there are no assignments.
Run the app where the user has multiple assignments in several different projects and some assignments are not complete. Notice the appearance of the app and perform actions as follows (see Figure 15):
The onGetAssignmentsSuccess function creates a row in the table for each assignment for the current user. The project name shows only once, in a bold font, for the first assignment in each project.
Clear the check box in the Task name column header. The table header click event handler clears all of the other check boxes in the task rows.
Select all of the tasks. The click event handler for each row determines whether all rows are selected, and if so, selects the Task name column header.
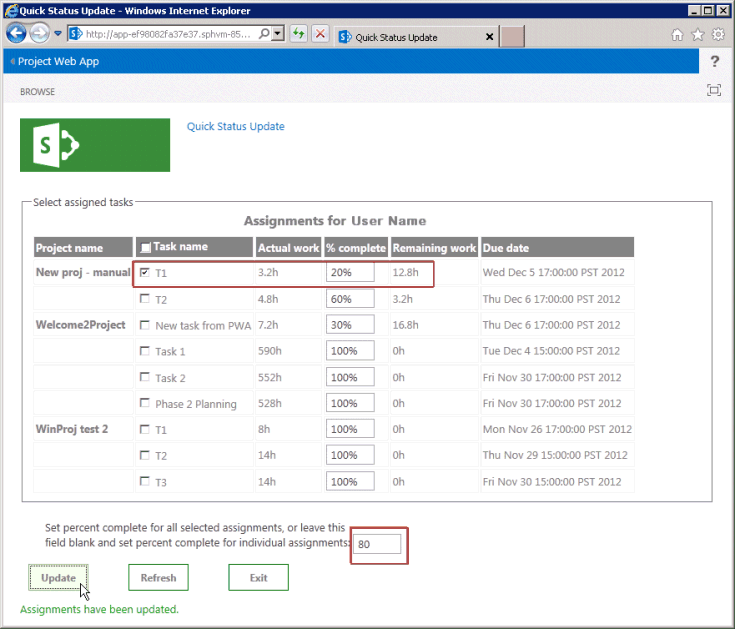
Clear all of the check boxes again, and then select one assignment that has some remaining work. For example, Figure 15 shows the top task T1 has 20% remaining work to complete.
In the Set percent complete text box, type 80, and then choose Update. The bottom of the page should show a green message, Assignments have been updated.
Figure 15. Updating an assignment in the QuickStatus app
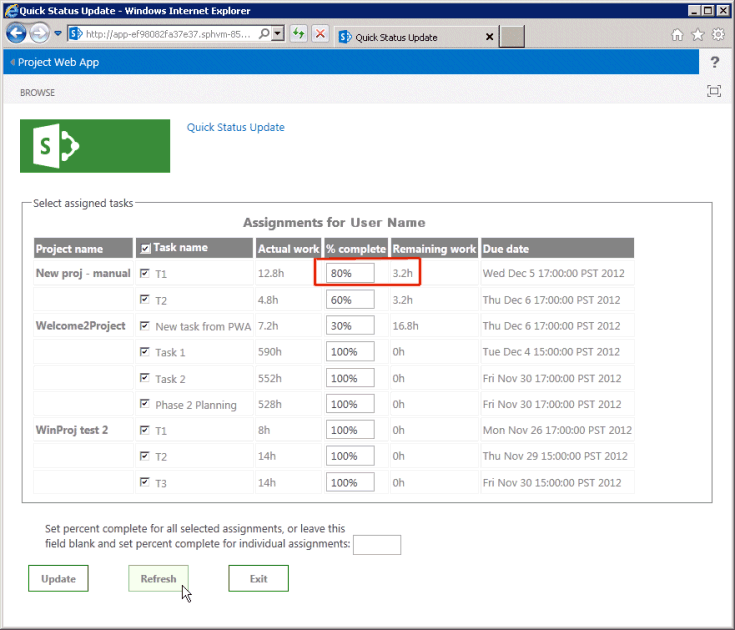
Choose Refresh (see Figure 16). All of the tasks are selected again, and the top task shows 80% complete.
Figure 16. Refreshing the Quick Status Update page
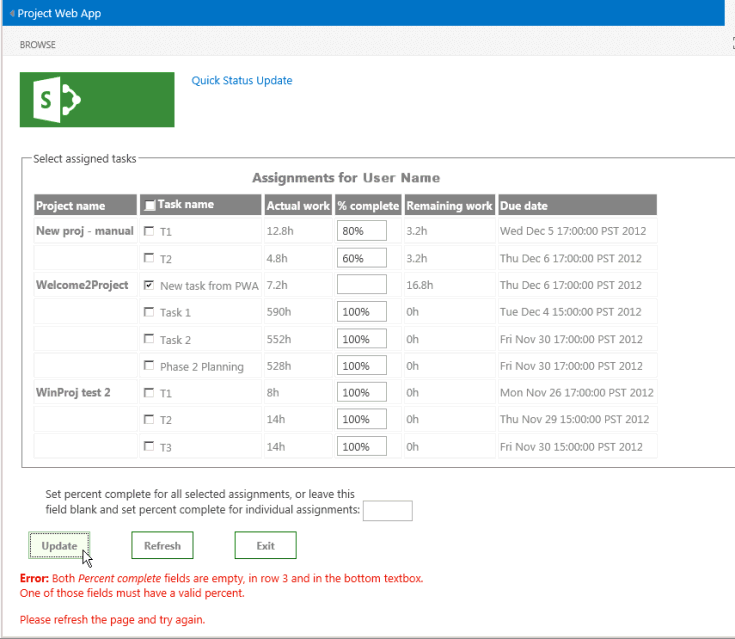
Clear all of the check boxes, and then select another task. For example, select New task from PWA. Leave the Set percent complete text box empty, delete all text in the % complete column for the selected task, and then choose Update. Because both text boxes are empty, the app shows a red error message (see Figure 17).
Figure 17. Testing the error message
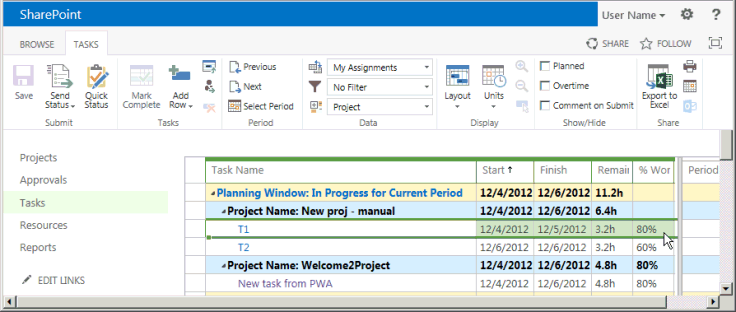
Update the previous task to 80% complete, and then choose Exit. The exitToPwa function changes the browser window location to the Tasks page in the SharePoint host application (that is, the URL changes to <
https://ServerName/pwa/Tasks.aspx>). Figure 18 shows that the T1 task and the New task from PWA task each show 80% complete.Figure 18. Verifying the tasks are updated in Project Web App
Before the updated status shows in Project Professional 2013, the changes must be submitted for approval, and then approved by the project manager.
Testing reveals several other changes that should be made in the QuickStatus app for improved usability. For example:
There should be additional error checks and validation of text box values. Currently, a user can enter a non-numeric value or a negative value for percent complete, which results in an unfriendly error message. For example, with a negative value, the error message is Error updating assignments: PJClientCallableException: StatusingSetDataValueInvalid.
The error message for blank text boxes could list the project and task, in addition to the row number.
The success message could include a list of the tasks updated; or if the updateAssignments function is successful, it could perform an automatic page refresh and show updated tasks or percentages in a different color and bold font.
To avoid a very large table, the table of assignments should be limited to tasks that are less than 100% complete. Or, add an option to show all tasks. This problem could also be solved by using a jQuery-based grid instead of a table, where you can easily implement filtering and grid paging.
Because the QuickStatus app does not submit status, the Quick Status icon on the TASKS tab of the ribbon would more logically be the first icon in the Tasks group, rather than the last icon in the Submit group.
Because the onGetAssignmentsSuccess function initializes the btnSubmitUpdate button text, but the other button text values are initialized in HTML, the page is left in a partially initialized state while the getAssignments function runs. Buttons on the page would appear more consistent if the text values were all initialized in HTML.
Most importantly, the approach that the QuickStatus app uses, where it changes percent complete for assignments, should be revised in a production app. For more information, see the Next steps section.
Example code for the QuickStatus app
Default.aspx file
The following code is in the Pages\Default.aspx file of the QuickStatus project:
<%-- The following lines are ASP.NET directives needed when using SharePoint components --%>
<%@ Page Inherits="Microsoft.SharePoint.WebPartPages.WebPartPage, Microsoft.SharePoint, Version=15.0.0.0,
Culture=neutral, PublicKeyToken=71e9bce111e9429c" MasterPageFile="~masterurl/default.master" Language="C#" %>
<%@ Register TagPrefix="Utilities" Namespace="Microsoft.SharePoint.Utilities" Assembly="Microsoft.SharePoint, Version=15.0.0.0,
Culture=neutral, PublicKeyToken=71e9bce111e9429c" %>
<%@ Register TagPrefix="WebPartPages" Namespace="Microsoft.SharePoint.WebPartPages" Assembly="Microsoft.SharePoint, Version=15.0.0.0,
Culture=neutral, PublicKeyToken=71e9bce111e9429c" %>
<%@ Register TagPrefix="SharePoint" Namespace="Microsoft.SharePoint.WebControls" Assembly="Microsoft.SharePoint, Version=15.0.0.0,
Culture=neutral, PublicKeyToken=71e9bce111e9429c" %>
<%-- The markup and script in the following Content element will be placed in the <head> of the page.
For production deployment, change the .debug.js JavaScript references to .js. --%>
<asp:Content ContentPlaceHolderID="PlaceHolderAdditionalPageHead" runat="server">
<script type="text/javascript" src="../Scripts/jquery-1.7.1.min.js"></script>
<script type="text/javascript" src="/_layouts/15/sp.runtime.debug.js"></script>
<script type="text/javascript" src="/_layouts/15/sp.debug.js"></script>
<script type="text/javascript" src="/_layouts/15/ps.debug.js"></script>
<!-- CSS styles -->
<link rel="Stylesheet" type="text/css" href="../Content/App.css" />
<!-- Add your JavaScript to the following file -->
<script type="text/javascript" src="../Scripts/App.js"></script>
</asp:Content>
<%-- The markup and script in the following Content element will be placed in the <body> of the page --%>
<asp:Content ContentPlaceHolderID="PlaceHolderMain" runat="server">
<form>
    <fieldset>
    <legend>Select assigned tasks</legend>
    <table id="assignmentsTable">
        <caption id="tableCaption">Replace caption</caption>
        <thead>
        <tr id="headerRow">
            <th>Project name</th>
            <th><input type="checkbox" id="headercheckbox" checked="checked" />Task name</th>
            <th>Actual work</th>
            <th>% complete</th>
            <th>Remaining work</th>
            <th>Due date</th>
        </tr>
        </thead>
    </table>
    </fieldset>
    <div id="inputPercentComplete" >
    Set percent complete for all selected assignments, or leave this
    <br /> field blank and set percent complete for individual assignments:
    <input type="text" name="percentComplete" id="pctComplete" size="4"  maxlength="4" />
    </div>
    <div id="submitResult">
    <p><button id="btnSubmitUpdate" type="button" class="bottomButtons" ></button></p>
    <p id="message"></p>
    </div>
    <div id="refreshPage">
    <p><button id="btnRefresh" type="button" class="bottomButtons" >Refresh</button></p>
    </div>
    <div id="exitPage">
    <p><button id="btnExit" type="button" class="bottomButtons" >Exit</button></p>
    </div>
</form>
</asp:Content>
App.js file
The following code is in the Scripts\App.js file of the QuickStatus project:
var projContext;
var pwaWeb;
var projUser;
// This code runs when the DOM is ready and creates a ProjectContext object.
// The ProjectContext object is required to use the JSOM for Project Server.
$(document).ready(function () {
projContext = PS.ProjectContext.get_current();
pwaWeb = projContext.get_web();
getUserInfo();
getAssignments();
// Bind a click event handler to the table header check box, which sets the row check boxes
// to the selected state of the header check box, and sets the results message to an empty string.
$('#headercheckbox').live('click', function (event) {
$('input:checkbox:not(#headercheckbox)').attr('checked', this.checked);
$get("message").innerText = "";
});
// Bind a click event handler to the row check boxes. If any row check box is cleared, clear
// the header check box. If all of the row check boxes are selected, select the header check box.
$('input:checkbox:not(#headercheckbox)').live('click', function (event) {
var isChecked = true;
$('input:checkbox:not(#headercheckbox)').each(function () {
if (this.checked == false) isChecked = false;
$get("message").innerText = "";
});
$("#headercheckbox").attr('checked', isChecked);
});
});
// Get information about the current user.
function getUserInfo() {
projUser = pwaWeb.get_currentUser();
projContext.load(projUser);
projContext.executeQueryAsync(onGetUserNameSuccess,
// Anonymous function to execute if getUserInfo fails.
function (sender, args) {
alert('Failed to get user name. Error: ' + args.get_message());
});
}
// This function is executed if the getUserInfo call is successful.
// Replace the contents of the 'caption' paragraph with the project user name.
function onGetUserNameSuccess() {
var prefaceInfo = 'Assignments for ' + projUser.get_title();
$('#tableCaption').text(prefaceInfo);
}
 // Get the collection of assignments for the current user.
 function getAssignments() {
     assignments = PS.EnterpriseResource.getSelf(projContext).get_assignments();
     // Register the request that you want to run on the server. The optional "Include" parameter
     // requests only the specified properties for each assignment in the collection.
     projContext.load(assignments,
         'Include(Project, Name, ActualWork, ActualWorkMilliseconds, PercentComplete, RemainingWork, Finish, Task)');
     // Run the request on the server.
     projContext.executeQueryAsync(onGetAssignmentsSuccess,
         // Anonymous function to execute if getAssignments fails.
         function (sender, args) {
             alert('Failed to get assignments. Error: ' + args.get_message());
         });
 }
// Get the enumerator, iterate through the assignment collection,
// and add each assignment to the table.
function onGetAssignmentsSuccess(sender, args) {
if (assignments.get_count() > 0) {
var assignmentsEnumerator = assignments.getEnumerator();
var projName = "";
var prevProjName = "3D2A8045-4920-4B31-B3E7-9D0C5195FC70"; // Any unique name.
var taskNum = 0;
var chkTask = "";
var txtPctComplete = "";
// Constants for creating input controls in the table.
var INPUTCHK = '<input type="checkbox" class="chkTask" checked="checked" id="chk';
var LBLCHK = '<label for="chk';
var INPUTTXT = '<input type="text" size="4" maxlength="4" class="txtPctComplete" id="txt';
while (assignmentsEnumerator.moveNext()) {
var statusAssignment = assignmentsEnumerator.get_current();
projName = statusAssignment.get_project().get_name();
// Get an integer value for the number of milliseconds of actual work, such as 3600000.
var actualWorkMilliseconds = statusAssignment.get_actualWorkMilliseconds();
// Get a string value for the assignment actual work, such as "1h". Not used here.
var actualWork = statusAssignment.get_actualWork();
if (projName === prevProjName) {
projName = "";
}
prevProjName = statusAssignment.get_project().get_name();
// Create a row for the assignment information.
var row = assignmentsTable.insertRow();
taskNum++;
// Create an HTML string with a check box and task name label, for example:
// <input type="checkbox" class="chkTask" checked="checked" id="chk1" />
// <label for="chk1">Task 1</label>
chkTask = INPUTCHK + taskNum + '" /> ' + LBLCHK + taskNum + '">'
+ statusAssignment.get_name() + '</label>';
txtPctComplete = INPUTTXT + taskNum + '" />';
// Insert cells for the assignment properties.
row.insertCell().innerHTML = '<strong>' + projName + '</strong>';
row.insertCell().innerHTML = chkTask;
row.insertCell().innerText = actualWorkMilliseconds / 3600000 + 'h';
row.insertCell().innerHTML = txtPctComplete;
row.insertCell().innerText = statusAssignment.get_remainingWork();
row.insertCell().innerText = statusAssignment.get_finish();
// Initialize the percent complete cell.
$get("txt" + taskNum).innerText = statusAssignment.get_percentComplete() + '%'
}
}
else {
$('p#message').attr('style', 'color: #0f3fdb'); // Blue text.
$get("message").innerText = projUser.get_title() + ' has no assignments'
}
// Initialize the button properties.
$get("btnSubmitUpdate").onclick = function() { updateAssignments(); };
$get("btnSubmitUpdate").innerText = 'Update';
$get('btnRefresh').onclick = function () { window.location.reload(true); };
$get('btnExit').onclick = function () { exitToPwa(); };
}
// Update all selected assignments. If the bottom percent complete field is blank,
// use the value in the % complete field of each selected row in the table.
function updateAssignments() {
// Get percent complete from the bottom text box.
var pctCompleteMain = getNumericValue($('#pctComplete').val()).trim();
var pctComplete = pctCompleteMain;
var assignmentsEnumerator = assignments.getEnumerator();
var taskNum = 0;
var taskRow = "";
var indexPercent = "";
var doSubmit = true;
while (assignmentsEnumerator.moveNext()) {
var pctCompleteRow = "";
taskRow = "chk" + ++taskNum;
if ($get(taskRow).checked) {
var statusAssignment = assignmentsEnumerator.get_current();
if (pctCompleteMain === "") {
// Get percent complete from the text box field in the table row.
pctCompleteRow = getNumericValue($('#txt' + taskNum).val());
pctComplete = pctCompleteRow;
}
// If both percent complete fields are empty, show an error.
if (pctCompleteMain === "" && pctCompleteRow === "") {
$('p#message').attr('style', 'color: #e11500'); // Red text.
$get("message").innerHTML =
'<b>Error:</b> Both <i>Percent complete</i> fields are empty, in row '
+ taskNum
+ ' and in the bottom textbox.<br/>One of those fields must have a valid percent.'
+ '<p>Please refresh the page and try again.</p>';
doSubmit = false;
taskNum = 0;
break;
}
if (doSubmit) statusAssignment.set_percentComplete(pctComplete);
}
}
// Save and submit the assignment updates.
if (doSubmit) {
assignments.update();
assignments.submitAllStatusUpdates();
projContext.executeQueryAsync(function (source, args) {
$('p#message').attr('style', 'color: #0faa0d'); // Green text.
$get("message").innerText = 'Assignments have been updated.';
}, function (source, args) {
$('p#message').attr('style', 'color: #e11500'); // Red text.
$get("message").innerText = 'Error updating assignments: ' + args.get_message();
});
}
}
// Get the numeric part for percent complete, from a string.
// For example, with "20 %", return "20".
function getNumericValue(pctComplete) {
pctComplete = pctComplete.trim();
pctComplete = pctComplete.replace(/ /g, ""); // Remove interior spaces.
indexPercent = pctComplete.indexOf('%', 0);
if (indexPercent > -1) pctComplete = pctComplete.substring(0, indexPercent);
return pctComplete;
}
     // Exit the QuickStatus page and go back to the Tasks page in Project Web App.
     function exitToPwa() {
         // Get the SharePoint host URL, which is the top page of PWA, and add the Tasks page.
         var spHostUrl = decodeURIComponent(getQueryStringParameter('SPHostUrl'))
                         + "/Tasks.aspx";
         // Set the top window for the QuickStatus IFrame to the Tasks page.
         window.top.location.href = spHostUrl;
     }
     // Get a specified query string parameter from the {StandardTokens} URL option string.
     function getQueryStringParameter(urlParameterKey) {
         var docUrl = document.URL;
         var params = docUrl.split('?')[1].split('&');
         for (var i = 0; i < params.length; i++) {
             var theParam = params[i].split('=');
             if (theParam[0] == urlParameterKey)
                 return decodeURIComponent(theParam[1]);
         }
     }
App.css file
The following CSS code is in the Content\App.css file of the QuickStatus project:
/* Custom styles for the QuickStatus app. */
/*============= Table elements ========================================*/
table {
width: 90%;
}
caption {
font-size: 16px;
padding-bottom: 5px;
font-weight: bold;
color: gray;
}
table th {
background-color: gray;
color: white;
}
table td, th {
width: auto;
text-align: left;
padding: 2px;
border: solid 1px whitesmoke;
color: gray;
}
/*=== Class for check boxes added to rows
*/
.chkTask {
width: 12px;
height: 12px;
color: gray;
}
/*========== DIV id for the Percent Complete text box ================*/
#inputPercentComplete {
position: fixed;
top: auto;
height: auto;
padding-top: 20px;
margin-left: 30px;
}
/*========== DIV id for the Submit Result button ====================*/
#submitResult {
position: fixed;
top: auto;
height: auto;
padding-top: 60px;
}
/*========== DIV id for the Refresh Page button ====================*/
#refreshPage {
position: fixed;
top: auto;
height: auto;
padding-top: 60px;
margin-left: 120px;
}
/*========== DIV id for the Exit Page button ====================*/
#exitPage {
position: fixed;
top: auto;
height: auto;
padding-top: 60px;
margin-left: 240px;
}
/*========== Class for the buttons at the bottom of the page =======*/
.bottomButtons {
color: gray;
font-weight: bold;
font-size: 12px;
border-color: darkgreen;
border-width: thin;
}
Elements.xml file for the ribbon
The following XML definition, for the added button on the TASKS tab on the ribbon, is in the RibbonQuickStatusAction\Elements.xml file of the QuickStatus project:
<?xml version="1.0" encoding="utf-8"?>
<Elements xmlns="http://schemas.microsoft.com/sharepoint/">
<CustomAction Id="21ea3aaf-79e5-4aac-9479-8eef14b4d9df.RibbonQuickStatusAction"
Location="CommandUI.Ribbon">
<CommandUIExtension>
<!--
Add a button that invokes the QuickStatus app. The Quick Status button is displayed as
the third control in the Page group (the group title is "Submit").
-->
<CommandUIDefinitions>
<CommandUIDefinition Location="Ribbon.ContextualTabs.MyWork.Home.Page.Controls._children">
<Button Id="Ribbon.ContextualTabs.MyWork.Home.Page.QuickStatus"
Alt="Quick Status app"
Sequence="30"
Command="Invokae_QuickStatus"
LabelText="Quick Status"
TemplateAlias="o1"
Image16by16="_layouts/15/1033/images/ps16x16.png"
Image16by16Left="-80"
Image16by16Top="-144"
Image32by32="_layouts/15/1033/images/ps32x32.png"
Image32by32Left="-32"
Image32by32Top="-288"
ToolTipTitle="Quick Status"
ToolTipDescription="Run the QuickStatus app" />
</CommandUIDefinition>
</CommandUIDefinitions>
    <CommandUIHandlers>
        <CommandUIHandler Command="Invoke_QuickStatus"
                          CommandAction="~appWebUrl/Pages/Default.aspx?{StandardTokens}"/>
    </CommandUIHandlers>
</CommandUIExtension >
</CustomAction>
</Elements>
AppManifest.xml file
Following is the XML for the app manifest of the QuickStatus project, which includes the two permission request scopes that are necessary for updating the app user's assignment status in multiple projects:
    <?xml version="1.0" encoding="utf-8" ?>
    <!--Created:cb85b80c-f585-40ff-8bfc-12ff4d0e34a9-->
    <App xmlns="http://schemas.microsoft.com/sharepoint/2012/app/manifest"
        Name="QuickStatus"
        ProductID="{bbc497e7-1221-4d7b-a0ae-141a99546008}"
        Version="1.0.0.0"
        SharePointMinVersion="15.0.0.0"
    >
    <Properties>
        <Title>Quick Status Update</Title>
        <StartPage>~appWebUrl/Pages/Default.aspx?{StandardTokens}</StartPage>
    </Properties>
    <AppPrincipal>
        <Internal />
    </AppPrincipal>
    <AppPermissionRequests>
        <AppPermissionRequest Scope="https://sharepoint/projectserver/statusing" Right="SubmitStatus" />
        <AppPermissionRequest Scope="https://sharepoint/projectserver/projects" Right="Read" />
    </AppPermissionRequests>
    </App>
AppIcon.png file
The complete Visual Studio solution for the QuickStatus app includes a custom AppIcon.png file. The solution will be included in the Project 2013 SDK download.
Next steps
The QuickStatus app is a relatively simple example of how to write apps that can be installed on Project Server 2013 and Project Online. The Testing the QuickStatus app section lists several improvements that can be made for better usability. The QuickStatus app uses JavaScript functions to update assignment status for Project Web App. But, changing the assignment percent complete is not a recommended project management practice. Another approach would be to update the actual start date and remaining duration of assigned tasks. For a discussion of the issues, see Update Better in the MPUG newsletter.