Turn Project for the web or Roadmap on or off for users in your organization
 Microsoft Project for the web will soon become Microsoft Planner, which is currently rolling out to customers. To learn more about setting up the new Planner for your organization, see Microsoft Planner for admins.
Access to Project for the web is available to users if they’re assigned one of the following licenses:
- Planner Plan 1
- Planner and Project Plan 3 (previously called Project Online Professional)
- Planner and Project Plan 5 (previously called Project Online Premium)
Users who have Planner and Project Plan 3 and Planner and Project Plan 5 licenses have access to not only Project Online and the Project Online Desktop Client, but also Project for the web and Roadmap.
Note
Users only have read-only access to Roadmap through the Planner Plan 1 license.
How admins can control access to Project for the web and Roadmap
An Office 365 admin may want to control user access to Project for the web or Roadmap in their Office 365 tenant for various reasons, such as:
Turn on Project for the web for the organization, but turn it off for some users who currently work exclusively in Project Online.
Turn off Project for the web temporarily to all users so that they can roll it out gradually.
Turn the Roadmap feature on to all users in the tenant, even if Project for the web is turned off.
Only provide Project for the web and Roadmap to specific users, and not give them access to Project Online.
This article describes how admins can do the following to address similar scenarios:
- Turn Project for the web on or off for all users
- Turn Project for the web on or off only for specific users
- Turn the Roadmap feature on or off to all users
- Turn off Project Online to specific users
Turn Project for the web on or off for all users in your organization
An admin can turn Project for the web on or off for all users in their organization through the Project settings page in the Microsoft 365 admin center.
Important
This setting is only available in the new Microsoft 365 admin center. If you are using the classic admin center, you will need to switch to the new Microsoft 365 admin center to access this setting.
To turn on or off Project for the web:
- In the Microsoft 365 admin center, expand the navigation menu, select Settings, and then select Org Settings.
- Select Project.
- On the Project settings page, select or deselect Turn on Project for the web for your organization, and then select Save changes.
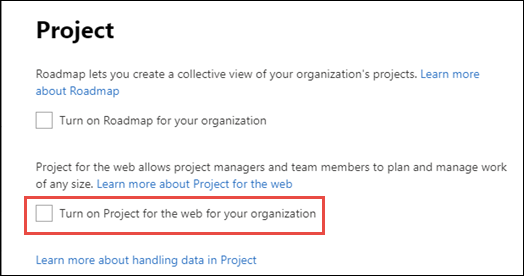
If an admin tries to access the Project settings page and receives the error message Unable to retrieve settings, have a licensed user go to their Project Home page (project.microsoft.com). This will initiate Project for the web on the tenant and will make the Project settings available for the admin.
Important
Currently, if you turn on Project for the web, actual activation on your tenant will happen at a later date (for more information, see your Message Center).
Important
Turning Project for the web on or off will have no effect on your ability to use Project Online.
Project for the web isn’t turned on for your organization
If your licensed users were previously able to use Project for the web, but are no longer able to, you can resolve this by turning on Project for the web in the steps described earlier.
The problem will appear as:
- Your users will no longer see the New blank project option on the Project Home page.
- When opening a project, users will see the error Project is not turned on for your organization.
Turn off Project for the web for specific users in your organization
An admin can manage access to Project for the web for specific users by turning off the service for their associated Project Plan licenses. This assumes that that Project for the web is turned on for the organization in the Project settings page in the Microsoft 365 admin center.
If you want to turn off Project for the web for specific users in your organization, an admin can do this by turning off the Project P3 service for the user in the Microsoft 365 admin center.
You might want to do this if your users currently use Project Online (through Project Plan P3 or Project Plan P5 licenses) and you don't want to give all of your users access to Project for the web at the moment.
Note
Turning off Project for the web for the individual user will also turn off the Roadmap feature for them, even if the Roadmap admin setting is turned on.
To turn off Project for the web for a user:
In the Microsoft 365 admin center, select Users, then choose Active Users.
From the Active users list, select the checkbox next to the user, and then choose Manage product licenses.
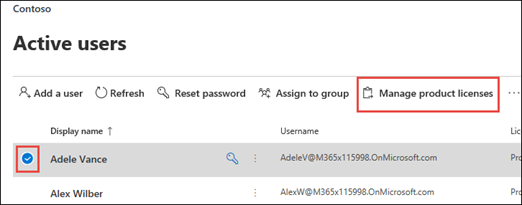
On the user information page, select the licenses and app tab, in the Apps section, select the user's Project Online license from the Show apps for drop-down menu. This would be either Project Online Professional or Project Online Premium.
In the list of apps that display, uncheck Project P3, and then choose Save changes.
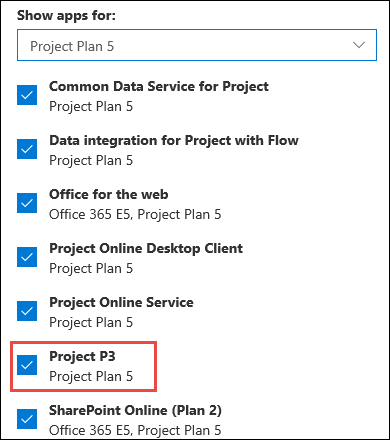
You can repeat this procedure for each user that you don't want to use Project for the web.
Important
The service plan that disables Project for the web is called Project P3. It is important to distinguish it from Planner and Project Plan 3, which is one of the three licenses in which Project for the web is available. Planner Plan 1, Planner and Project Plan 3, and Planner and Project Plan 5 are all licenses that have the Project P3 service plan.
Turn Project for the web off for multiple users using Windows PowerShell
If you need to turn off Project for the web for a large number of users, it may be easier for an admin to do this through Windows PowerShell instead of through the Microsoft 365 admin center.
Note
Before attempting this, you first need to install the required modules and be a global admin on your tenant.
Also, when you open Windows PowerShell, make sure to run as an administrator.
In Windows PowerShell, type and enter the following to sign into your tenant.
Connect-MsolServiceType the following to find the AccountSkuId of your Project Online licenses.
Get-MsolAccountSkuYou should see a list of the licenses available on your tenant, for example:

Look for the accountSKUid values that contain PROJECTPREMIUM or PROJECTPROFESSIONAL.
PROJECTPREMIUM is Planner and Project Plan 5 (Project Online Premium)
PROJECTPROFESSIONAL is Planner and Project Plan 3 (Project Online Professional)
The value will be prefixed by the tenant domain name. For example, in the previous image, the AccountSKUID value for the Project Online Premium license is M365x115998:PROJECTPREMIUM.
Create a $LicenseOption object that disables the Project P3 service plan (PROJECT_PROFESSIONAL) from the Planner and Project Plan 3 and Planner and Project Plan 5 licenses (the AccountSKUID values).
In our example, the following cmdlet will disable the Project P3 service plan in a Planner and Project Plan 5 license.
$LicenseOptionsPremium = New-MsolLicenseOptions -AccountSkuId "M365x115998:PROJECTPREMIUM" -DisabledPlans "PROJECT_PROFESSIONAL"If the tenant had Project Plan P3 licenses (Project Online Professional), the following cmdlet will disable it in that license.
$LicenseOptionsProfessional = New-MsolLicenseOptions -AccountSkuId "M365x115998:PROJECTPROFESSIONAL" -DisabledPlans "PROJECT_PROFESSIONAL"After you've created the objects, create a list of your user accounts in which you'd like to disable Project for the web. There are different ways to do this, such as importing from a CSV file. For our example, we'll create a UPNList with the user accounts in which we want to disable Project for the web.
`$UPNList = @("AdeleV@M365x115998.OnMicrosoft.com","AlexW@M365x115998.OnMicrosoft.com")After creating your list, apply the applicable $LicenseOption object to each user account.
For our example, we're applying the $LicenseOptionsPremium object to each user in the UPNList, which would disable Project for the web from each user who has a Project Plan P5 license.
ForEach ($UPN in $UPNList)
{
    Set-MsolUserLicense -UserPrincipalName $UPN -LicenseOptions $LicenseOptionsPremium
}
For more information about disabling services through Office 365 PowerShell, see Disable access to services with Office 365 PowerShell.
Turn Roadmap on or off
An admin can do the following to turn Roadmap on or off for their organization:
In the Microsoft 365 admin center, expand the navigation menu, select Settings, and then select Settings.
Select Project.
On the Project settings page, select or deselect Turn on Roadmap for your organization, and then choose Save changes.
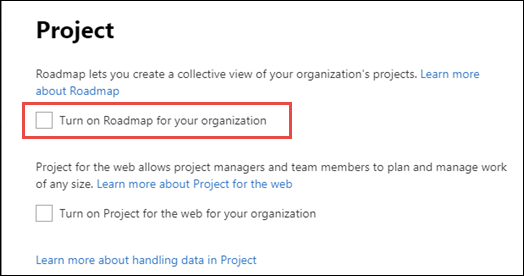
Project Roadmap may require the Project Roadmap connector to be added to a Data Policy in the Power Platform admin center. At the moment, the Project Roadmap connector doesn’t show up in the GUI of the Data Policy. Follow along this guidance in order to add the Project Roadmap connector to the data group Business in the desired Data Policy.
$userName = "<your username>"
$userPassword =  "<your userpassword>"
$DlpDisplayName = "<your desired Microsoft Purview DLP Policy DisplayName"

# Connect to PowerApps
Add-PowerAppsAccount -Username $userName -Password $userPassword

# Get all Power Platform DLP policies (Data Policies)
Get-AdminDlpPolicy

# Set desired DLP policy to be modified
$DlpPolicy = Get-AdminDlpPolicy | Where-Object DisplayName -EQ $DlpDisplayName

# Get BusinessDataGropup connectors of specific DLP Policy and check for ConnectorId '/providers/Microsoft.PowerApps/apis/shared_projectroadmap'
Get-AdminDlpPolicy -PolicyName $DlpPolicy.PolicyName | Select-Object –ExpandProperty BusinessDataGroup

# Add Connector "Project Roadmap" to BusinessDataGropup of DLP policy and check for Status 200 / Description OK
Add-CustomConnectorToPolicy -PolicyName $DlpPolicy.PolicyName -ConnectorId '/providers/Microsoft.PowerApps/apis/shared_projectroadmap' -GroupName hbi -ConnectorName "Project Roadmap" -ConnectorType "Microsoft.PowerApps/apis"

# Verify DLP policy settings
Get-AdminDlpPolicy -PolicyName $DlpPolicy.PolicyName | Select-Object –ExpandProperty BusinessDataGroup | Where-Object name -EQ "Project Roadmap"
Roadmap isn’t turned on for your organization
If your licensed users were previously able to use Roadmap, but are no longer able to, you can resolve this by turning on Roadmap in the steps described earlier.
The problem will appear as:
- Your users will no longer see the New Roadmap option on the Project Home page.
- When opening a roadmap, users will see the error Roadmap is not turned on for your organization.
Turn Project Online off
An admin may want certain users to have access to Project for the web and the Roadmap feature, and not Project Online. To do this, the admin wouldn’t only need to turn on Project for the web and Roadmap in Project settings, but also need to turn off the Project Online service for the user through their assigned Planner and Project Plan 3 or Planner and Project Plan 5 license.
To turn off Project Online:
In the Microsoft 365 admin center, select Users, then select Active Users.
From the Active users list, select the checkbox next to the user, and then choose Manage product licenses.

On the user information page, select the licenses and app tab, in the Apps section, select the user's Project Online license from the Show apps for drop-down menu. This would be either Planner and Project Plan 3 or Planner and Project Plan 5.
In the list of apps that display, uncheck Project Online Service, and then choose Save changes.
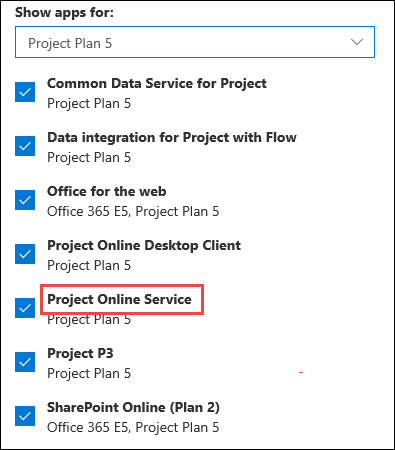
You can repeat this procedure for each user that you want to use only Project for the web and Roadmap.
Important
Turning Project Online on or off for a specific user will have no effect on their ability to use Project for the web.