Guide to migrate data from Stream (Classic) to Stream (on SharePoint) - Part 1
Note
This is the first part of a three-part guide for IT admins to help them migrate from Stream (Classic) to Stream (on SharePoint) using the migration tool. Find second and third part here:
We're merging the powerful capabilities of Stream and SharePoint to bring you native video experiences integrated across Microsoft 365. In new Stream, videos will behave just like any other file type. For more information, see the Stream (on SharePoint) overview.
Stream (Classic), which you can access from https://web.microsoftstream.com/, is being deprecated on 15 April 2024 for all Commercial customers and on 30 July 2024 for all GCC customers. Stream (on SharePoint), which you can access from https://stream.office.com/, is your new home for videos and you need to migrate your existing videos from Stream (Classic) to Stream (on SharePoint) before the deprecation date.
Post the deprecation date, all remaining videos on Stream (Classic) would be deleted, and the Stream (Classic) portal won't be accessible.
Step 1: Access the Migration tool
The migration tool is available on Microsoft Admin Center. Direct link to access the migration tool is https://admin.microsoft.com/#/featureexplorer/migration/StreamMigration/.
Alternatively, you can also access it by following any of the following two routes:
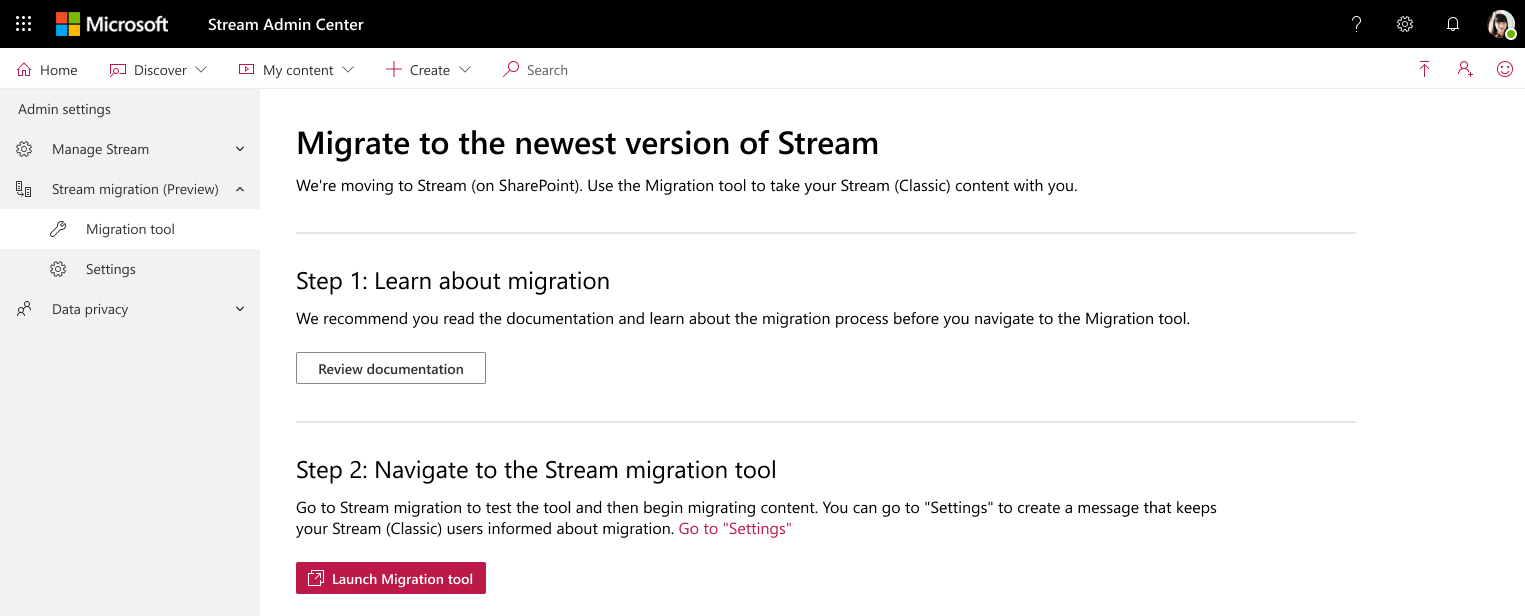
- Stream admin center: Sign in to the Stream Admin Center. Navigate to Stream migration -> Migration tool -> Launch migration tool.
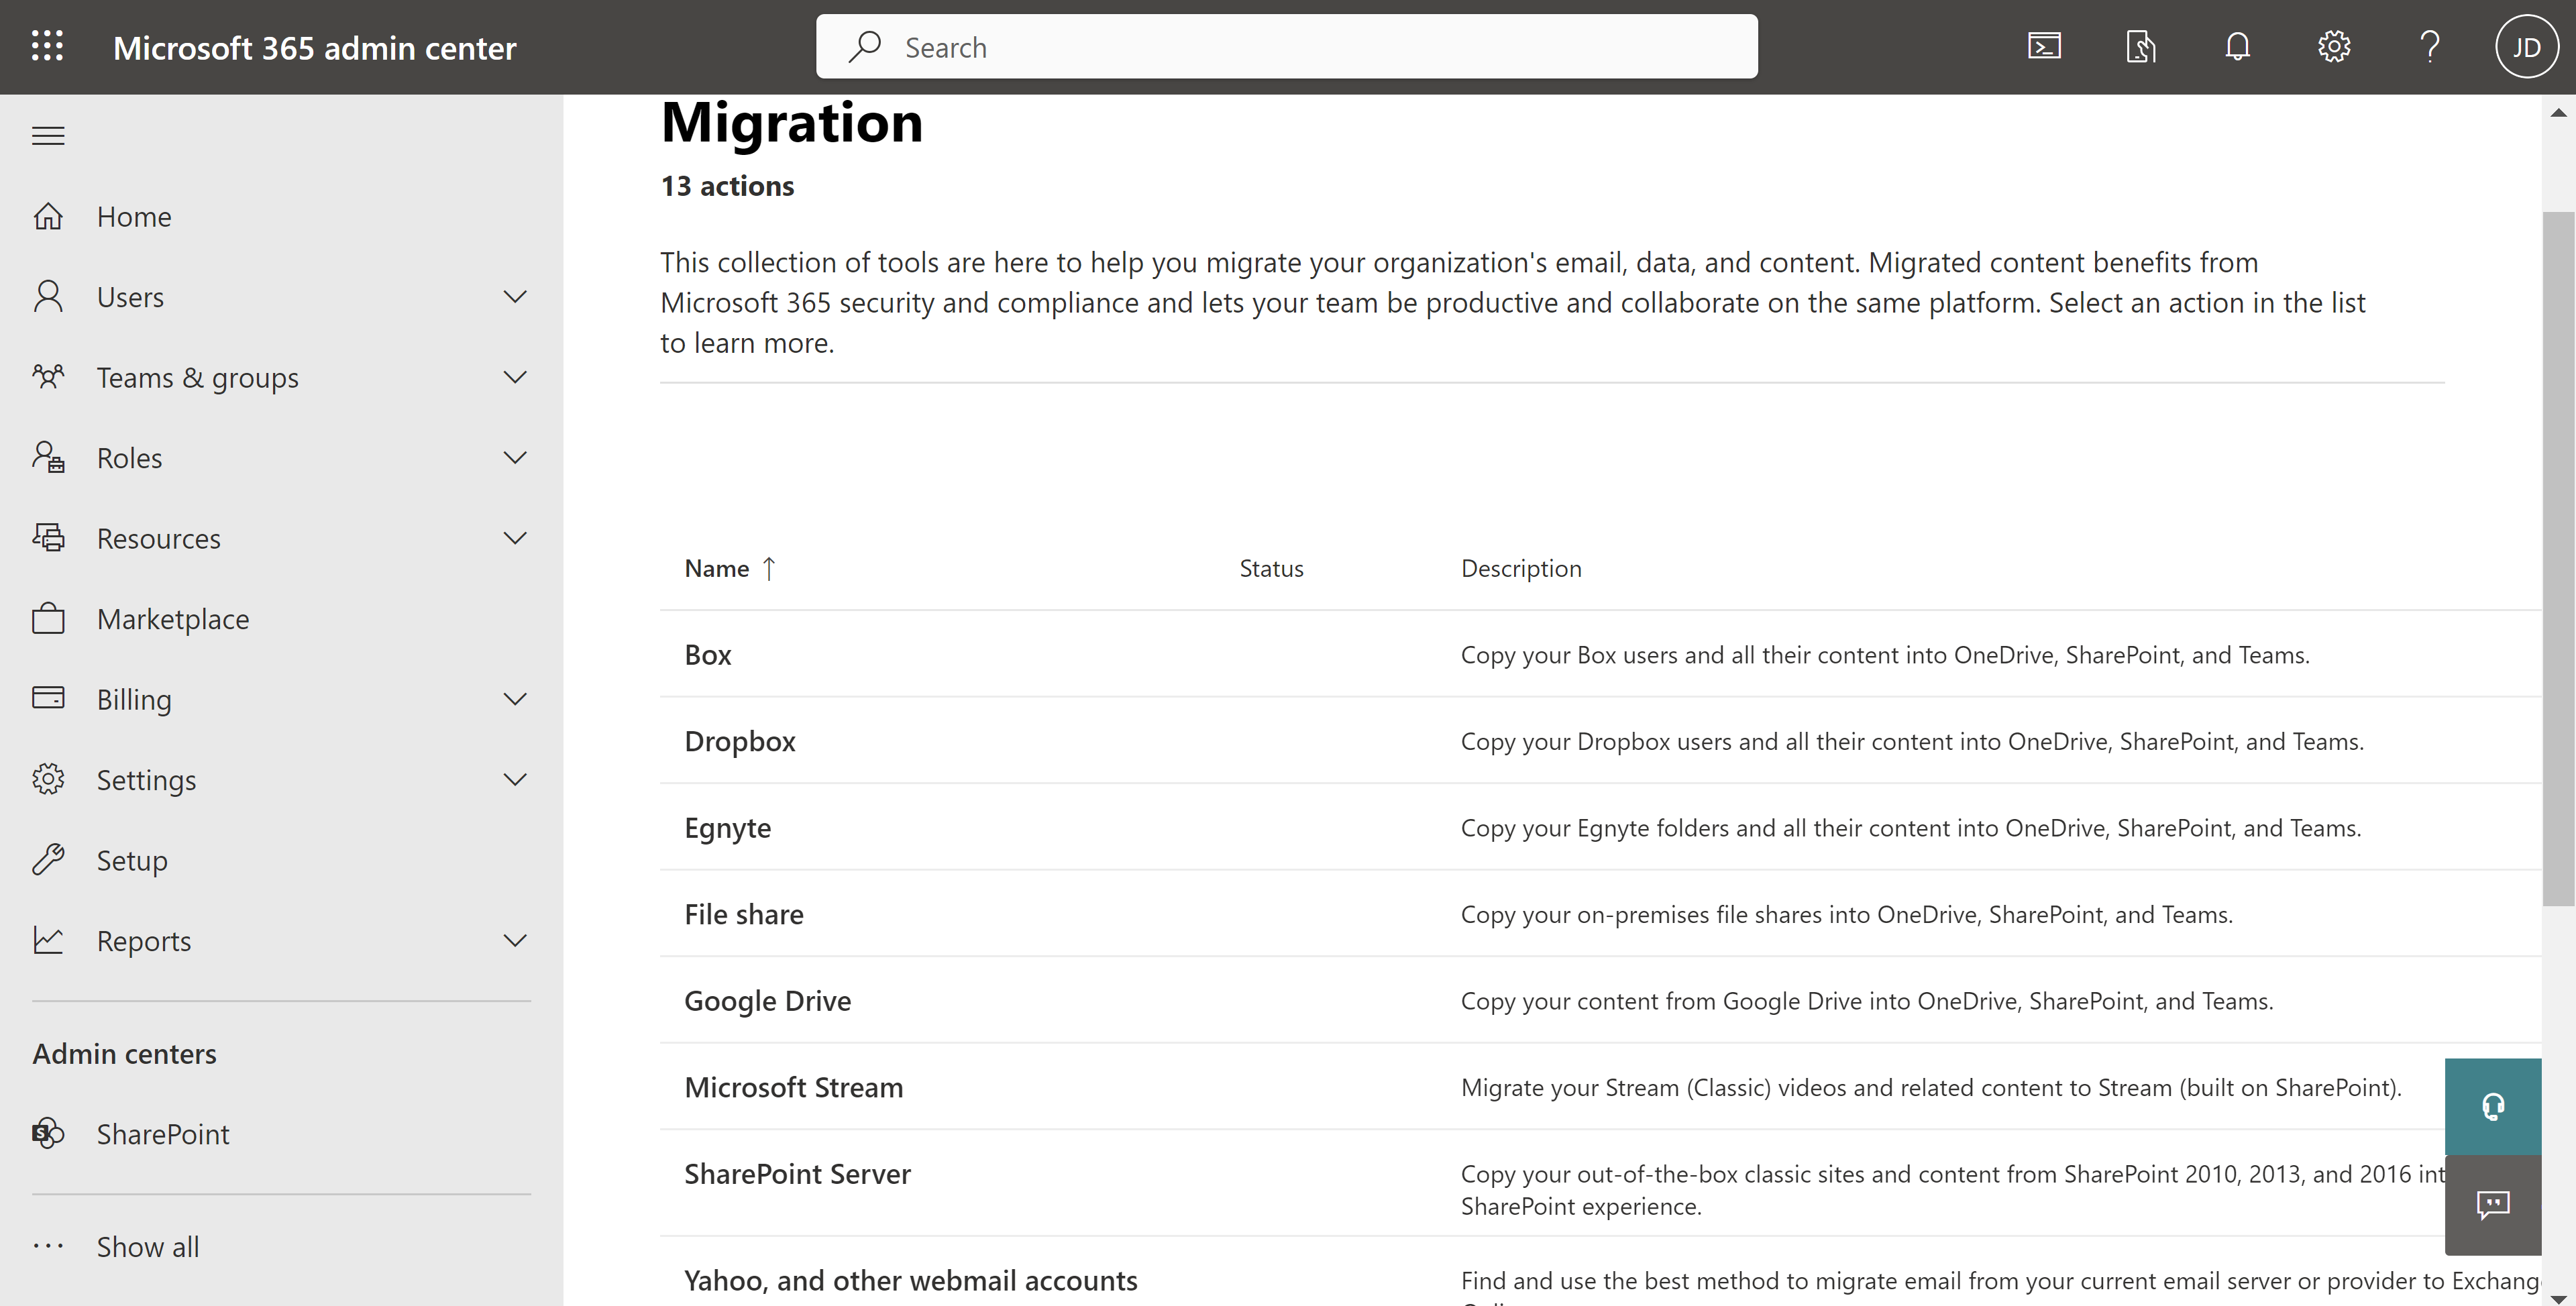
- Microsoft admin center: Sign in to the Microsoft Admin Center. Navigate to Set up -> Migration -> Microsoft Stream.
Important
- You'll need Global or SharePoint admin credentials to access the migration tool from Microsoft Admin Center.
- The migration tool was previously also available on SharePoint admin center, but it is now deprecated.
Once you select Launch Migration tool button, you land on the Stream connector inside Migration Manager.
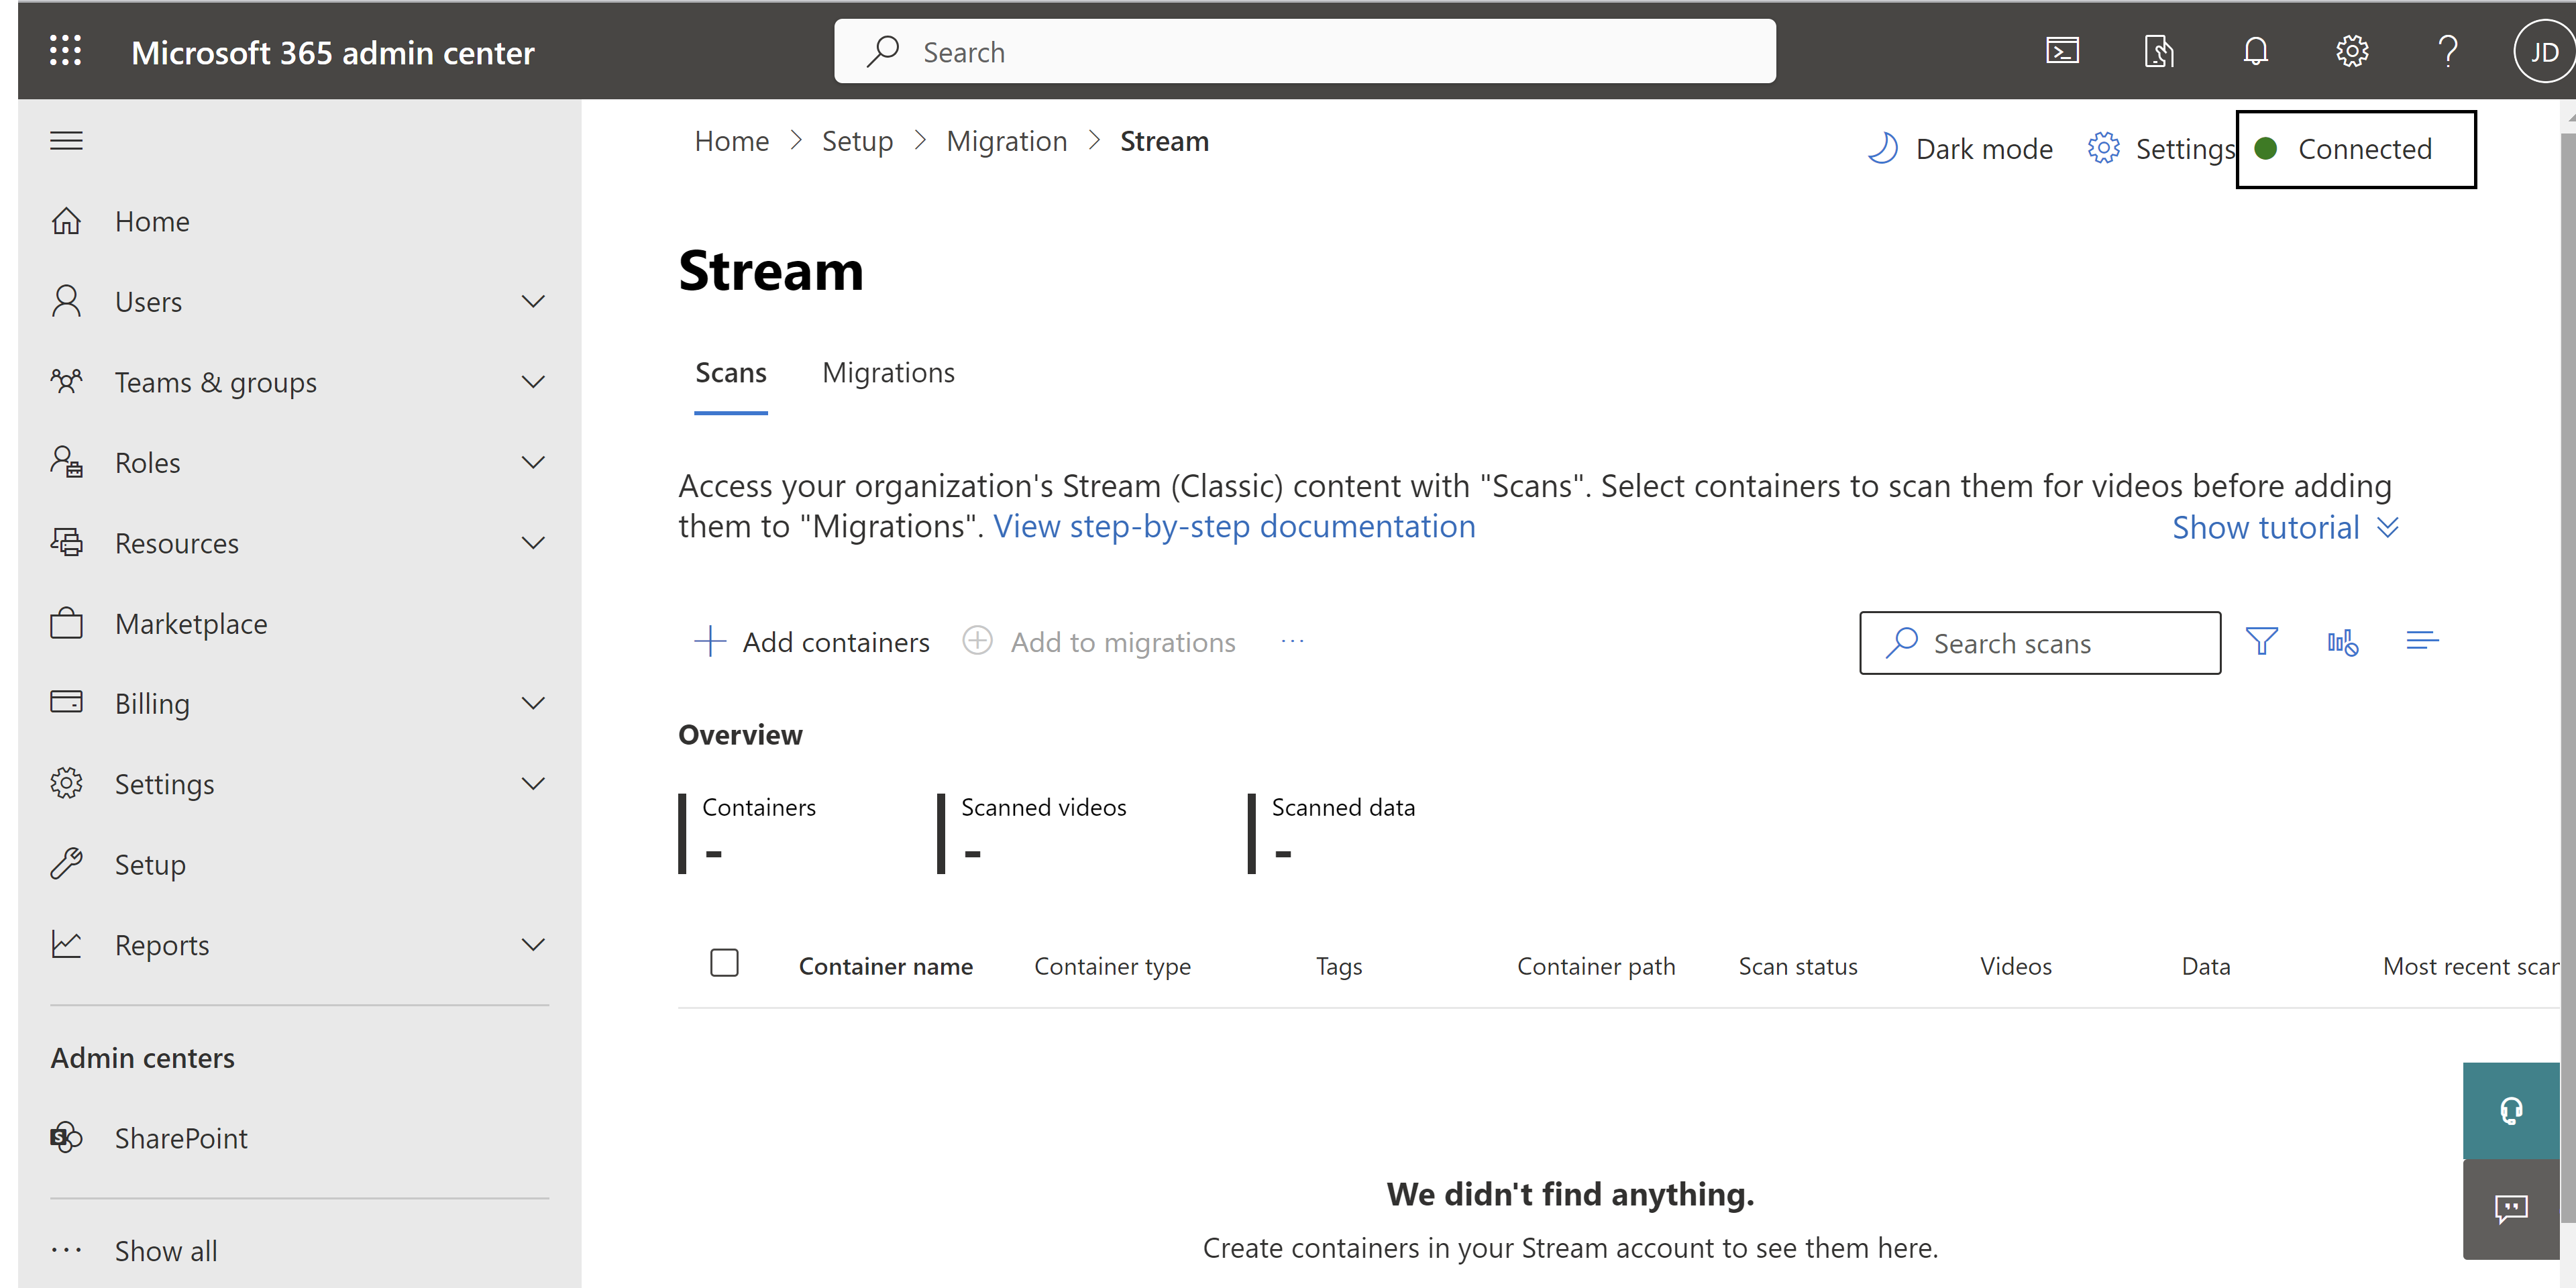
Note: Make sure that you check for the green dot on top right corner of your screen. This indicator confirms that Stream is successfully connected. If it isn't green, the tool isn't going to work properly and you need to add the following two URLs to your allowlist: https://api.mover.io and https://api.microsoftstream.com/. If you're a GCC tenant, in addition to these two URLs, you also need to add https://api.prod.migrations.microsoft.com.
Step 2: Discovering the containers
Once you're in the Stream connector, you notice two tabs: Scans and Migrations. The Scans tab is where you'll find all the Stream (Classic) content available in your tenant. Migrations is where you migrate videos. The migration tool groups all the videos available in your tenant into entities called containers.
Scans tab features include:
| Feature | Description |
|---|---|
| Summary header | Gives an overview of your container data including number of containers, videos inside them, and video sizes. |
| Add Containers | To manually discover containers |
| Look for new containers | Inside ‘Add containers’ pane. Surface any new containers added after the last scan. |
| Specify single container | Inside ‘Add containers’ pane. Add a single container path to discover it manually |
| Upload a CSV | Inside ‘Add containers’ pane. Add multiple container paths in a CSV to discover them manually |
| Download report | Download the Scan summary. |
| Scan and Stop buttons | Discover videos inside containers. These buttons are contextual and appear when individual containers are selected. |
| Scan log | Appears when a container is selected and shows the logs for videos inside that container. Refer to the Scan log and Summary section for details. |
| Filters | Filter containers by Container type, Contains meeting recording, and Scan status. |
| Search | Search by Container name and Container path. |
Note: It takes up to 15 minutes to load the containers for the first time when you use the tool.
Content keeps loading until 49,500 rows or containers are discovered. The Scans tab displays one line item for every container that exists in the tenant if the container has at least one published video. There are five types of containers:
| Container Name | Classic Content Mapping |
|---|---|
| Microsoft 365 Group | Videos in Microsoft 365 Groups and channels inside them |
| User | Videos in ‘My Content’ in Stream (Classic). Each user who has published at least a video and not associated that video with a group or channel will display as one container in the tool. (Recorded Teams meeting recording count as published videos.) |
| Stream group | Videos in Stream only groups. These containers only show up for customers that migrated from Office 365 Video to Stream (Classic). |
| Companywide Channel | Videos in companywide channel |
| Orphan Videos | Videos with no active owner, combined into one or multiple containers. Videos that belonged to uploader who left the organization and no other User, Microsoft 365 group or channel was assigned as owner are added to orphaned containers. |
Important
A note about orphaned containers: The number of orphaned containers would be much lesser than the number of users who have left the organization. This is because one orphaned container will have videos clubbed from as many inactive users as technically feasible.
We choose the default destination for Microsoft 365 Group and User containers, which admins can override. Destination needs to be defined manually for the remaining three container types. Destination assignment and updating options are available in subsequent steps.
The table shows ‘natural’ defaults. The third column contains information about the folder hierarchy that is created in OneDrive or SharePoint when the container is migrated.
| Container Types | Default Destination | Folder Hierarchy |
|---|---|---|
| Microsoft 365 Group^ | Already existing Microsoft 365 Group SharePoint team site | A folder ‘Stream migrated videos’ is created in root doc library. Each channel in the group becomes a folder under ‘Stream migrated videos’ folder. Teams meeting recording of the channel would be further under the ‘Recordings’ folder |
| User (My Content) | A user's OneDrive for Business (ODB) | A folder ‘Stream migrated videos’ is created in User’s OneDrive for business (ODB). Teams meeting recordings are placed further in a ‘Recording’ folder inside it |
| Stream-only group | None (Admins can choose an existing SharePoint site or create a new one) | Same as Microsoft 365 group. |
| Companywide-wide channel | None (Admins can choose an existing SharePoint site or create a new one) | Same as Microsoft 365 group. Each companywide channel appears as a folder inside ‘Stream migrated videos’ folder. We recommend Admins divide companywide channels across multiple new or existing sites to avoid reaching the SharePoint permissions quota limit. |
| Orphan Videos | None (Admins can choose an existing SharePoint site or create a new one) | Same as Microsoft 365 group. Organization can have one of multiple Orphan containers. |
^ destinations autoassignment for Microsoft 365 groups works perfectly if you have less than 100-K sites on SharePoint. If you have more than 100-K sites, some or all destinations can be missing.
If you have already run a scan in the past and want to add the new content created after that scan, you need to select on Add containers -> Look for new containers in Stream.
Migration nuance for large customers: Scans tab can load maximum of 50,000 rows. If your organization has more 49,500 container, you need to follow the following steps:
- You may choose to migrate from either the autodiscovered list of 49.5-K containers or add a container manually by clicking on Add Containers button and using Specify a single Container or Upload a csv file, if the desired containers aren't in the list of discovered ones. Refer to the add container documentation for more details. Total 50-K containers can be displayed on the screen, but tool autodiscovers 49.5 K to keep a buffer of 500 container to be discovered manually, if admin needs. The name of the container isn't visible in the tool and autodestination mapping doesn't work if it was manually added, but it doesn’t affect the migration in any way.
- Select on "Add containers":

- Specify a single container (or in bulk using csv file):
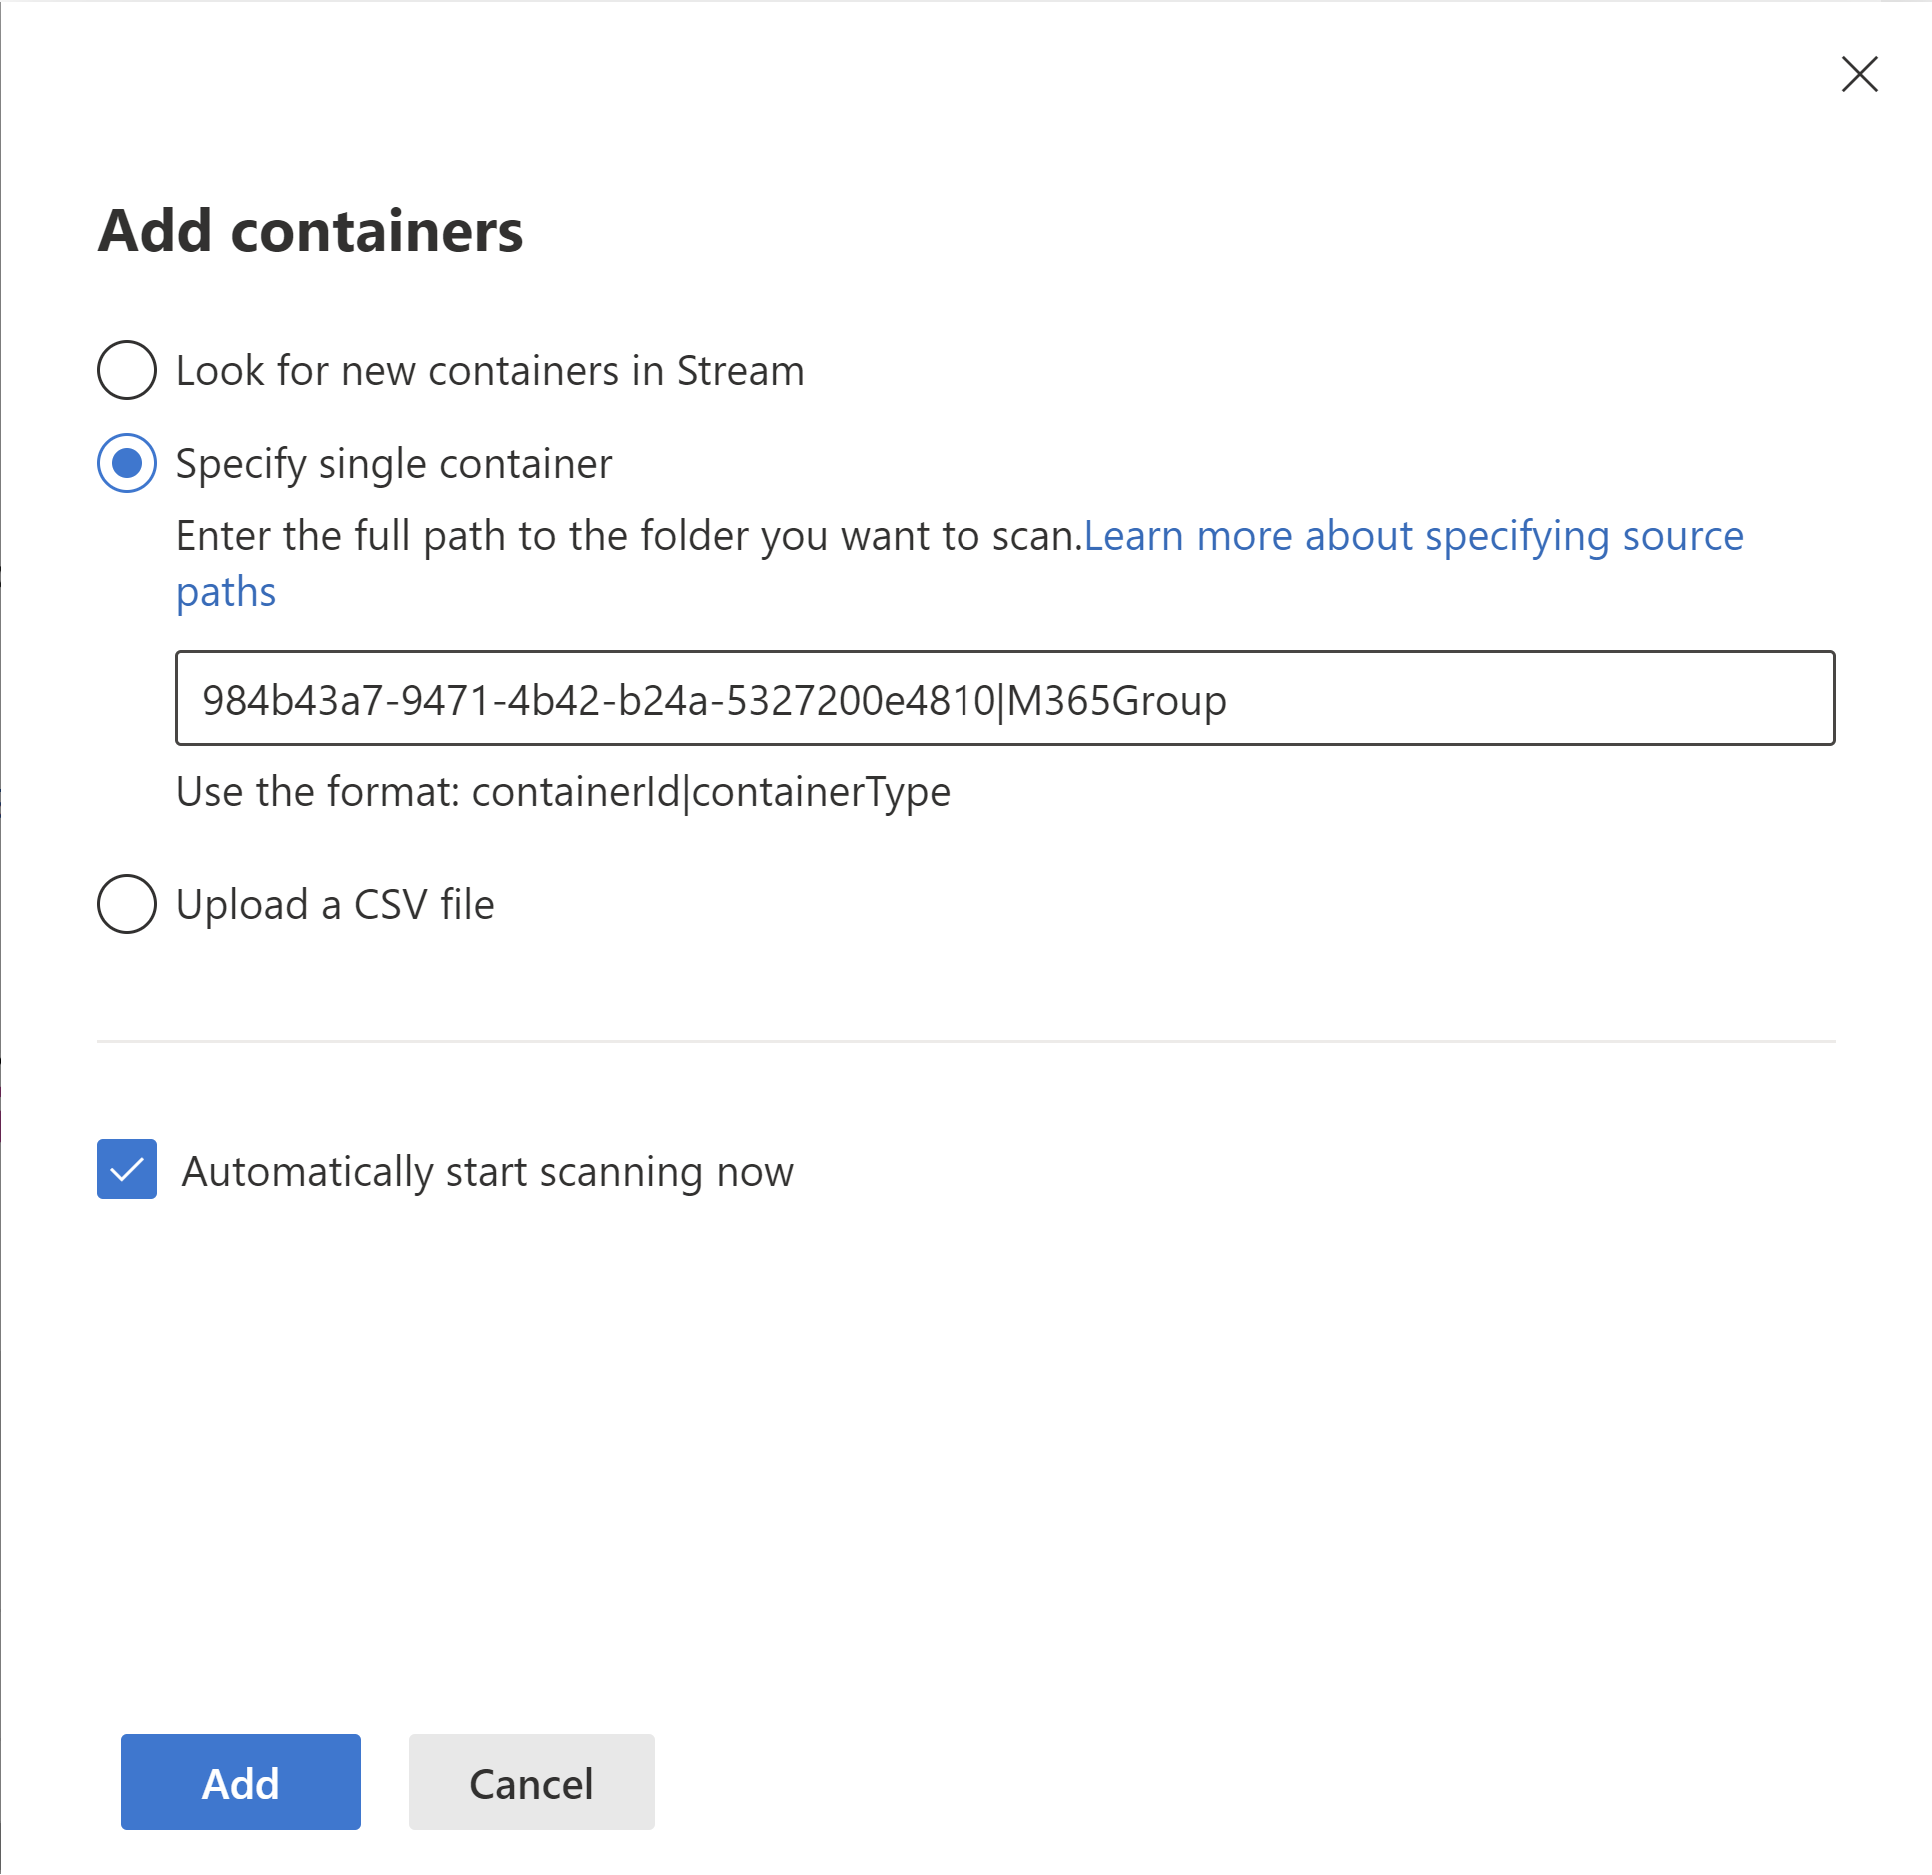
- The specified container(s) is(are) added:

Admins need to migrate a batch of containers and then delete them from Scans and Migrations. Once deleted, the migrated containers won't be discovered again by the tool. Wait for up to two days before deleting migrated containers from both tabs, this ensures that there's no status sync discrepancy between Stream and Migration manager platform.
Discover the next chunk of containers by clicking on Look for new Containers button in right pane, inside Add containers. The number of new containers discovered in the subsequent discovery depends on the quota freed from deleting the migrated containers.
Important
Containers should be added manually only if your tenant has more than 49.5K containers: Most of the Stream (Classic) tenants will have less than 49.5K containers and should use auto-discovery to identify their containers and NOT manually add them. Manually added containers have a drawback that their name and destination is not auto-populated.
Step 3: Understanding video assignment to containers
- The migration tool doesn’t move videos individually, as mentioned above, it moves them in logical groups called containers
- A video in Stream (classic) may appear in multiple places but in Stream (on SharePoint) it will be physically migrated at one single location. This is because unlike SharePoint, classic didn’t have a physical location construct
- In Classic, Videos were uploaded by users and associated with a Microsoft 365 group or company channel.
- If a video was associated only with users, it gets assigned to a single user container and moves by default to their OneDrive.
- However, if a video was associated with another entity such as Microsoft 365 group or company channel, it moves as part of that entity. If a video was associated with all such entities, it follows the following order.

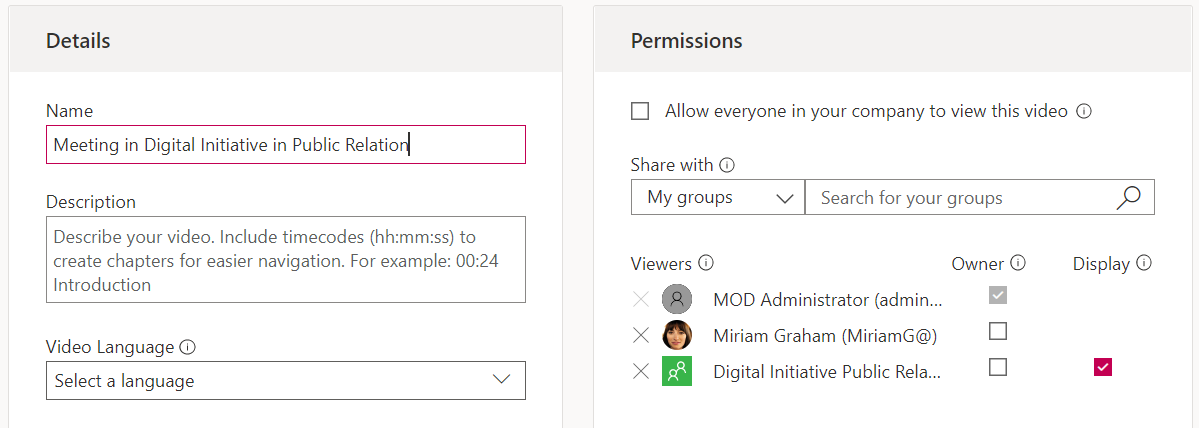
- Important: There's an exception to this rule. If a video in a Microsoft 365 group isn't assigned to the group as ‘Owner’ but only as 'Display', then the video moves with the User who is assigned as Owner. For example, in the case below, the video, which appears in ‘Digital Initiative Public Relations’ group in Stream (Classic) will move into the User container of ‘MOD Administrator’. We'll resolve this issue in the next step.
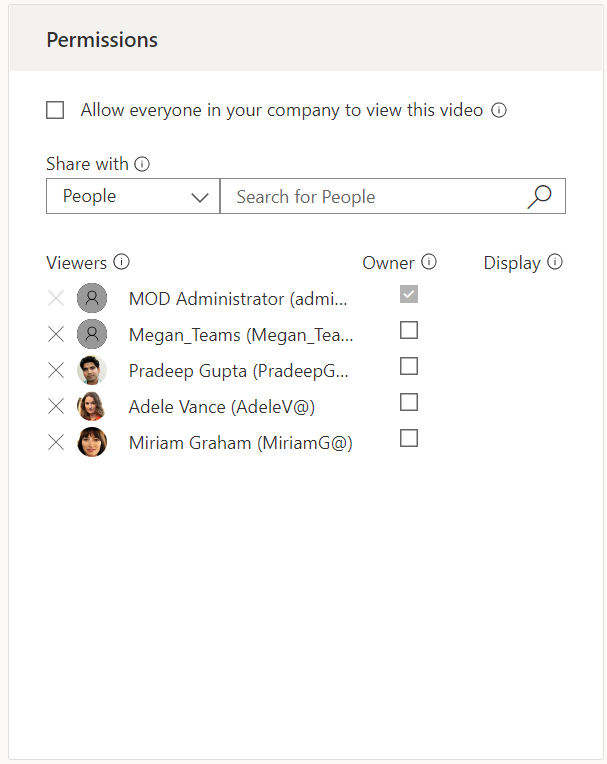
- For old meeting recording due to legacy Teams bug, if a meeting recording associated with a Group was uploaded, Teams flattened the group membership and assigned its members individual permissions. In these cases, the file is associated with its creator's User container and will go to their ODB. You see members individually added to the recordings in permissions UI rather than as a group. See the image below.
Step 4: Generating the video inventory report
Inventory report is a report of all the videos available in your tenant environment along with crucial information like container mapping and some important metadata. We strongly recommend you to generate your inventory report at this stage. It will not only be useful in the subsequent steps but should be preserved for future reference as well.
- Generate the video inventory report by following the steps mentioned here.
- Once the inventory report is generated, load it in the Power BI template provided here.
Depending on the size of data available in your tenant, it can take couple of hours for the report to generate. Once you have successfully loaded the report in Power BI, get a look and feel of the data. Using this report, you can decide which videos you want to migrate.