Attachments or links
If you have collaborated on a document with people, then you have likely sent copies of the document back and forth through email. However, depending on the situation, you might want to consider saving the document to a SharePoint library and then sending the link instead.
When to send information as an attachment or a link
If the user to whom the email notification is being sent through a flow is part of your company, then allowing an approved guest or external user to use links instead of attachments is a better option. Guests and external users are approved users in your tenant who have restricted access to locations that you have provided. This access level is configured in your Microsoft tenant's Microsoft Entra ID.
However, if emails are sent to people outside your company, then sending attachments is the only option because they won't have access to the link.
Send an email with attachments
In this example we'll create a flow that when an item is added to SharePoint, an email is sent with the attachments.
From the Power Automate home page, select Create Flow > Automated Cloud flow.
Name the flow Get SharePoint Attachments and Send Email and select the When an Item is created (SharePoint) trigger.
Select the Site Address and List for when an item gets added.
Select + New Step and search for Get Attachments SharePoint action.
Select the same Site Address and List as the trigger.
Select the ID field and from the Dynamic Content, select the ID property from the output of the trigger.
Select + New Step and search for and add an Initialize Variable action.
Name the variable varAttachmentArray.
Set the variable's Type to Array.
Select + New Step and search for the Get attachment content SharePoint action.
Select the same Site Address and List as the trigger.
In the ID property field, select the ID property output from the trigger.
For the File Identifier field, select the Id property from the Get Attachments action.
Note
When you add the properties to the Get attachment content action, Power Automate will automatically add an Apply to Each action.
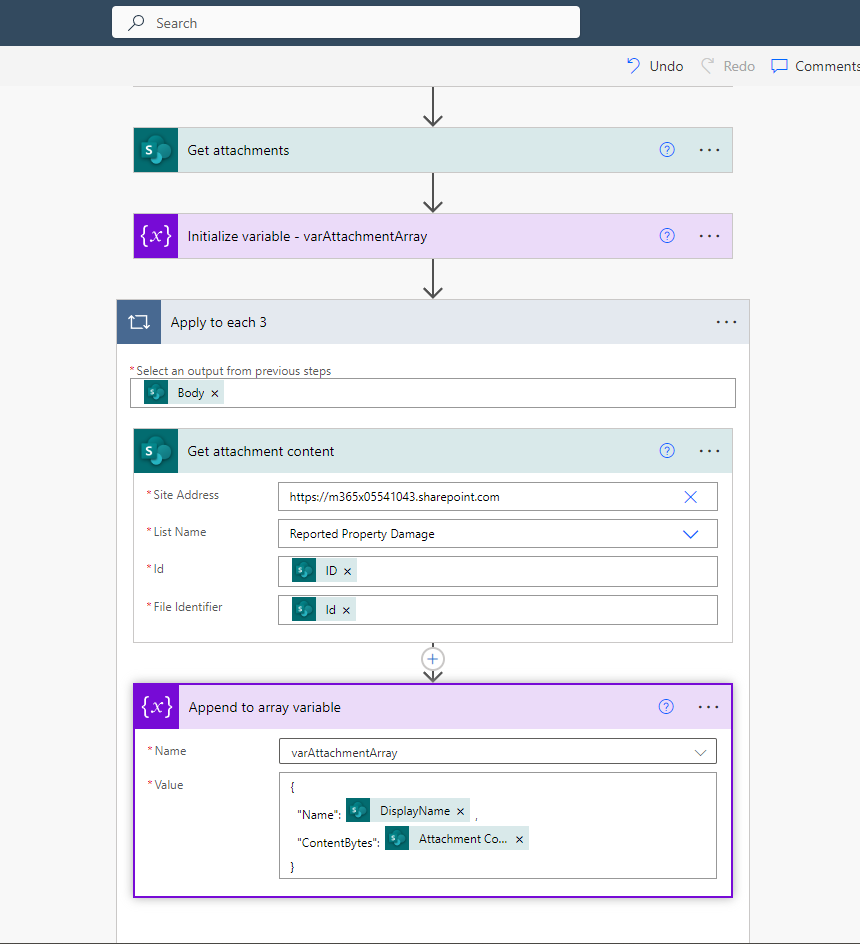
Here's what the Get Attachment content action should look like:
Inside of the Apply to Each action, select Add an Action. Search for Append to array variable.
In the Name field, select the variable varAttachmentArray.
For the Value, copy and paste the following:
  {
      "Name":
      "ContentBytes":
  }
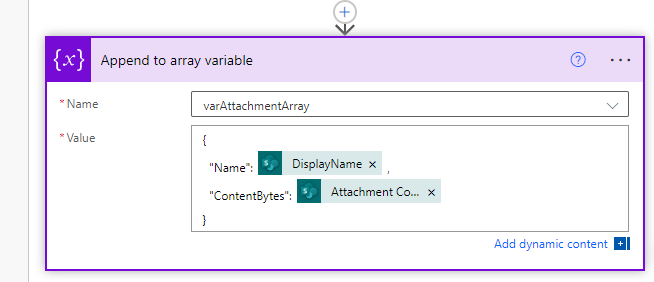
In the Value, place your cursor after the colon for Name and Dynamic Content should appear. Search for DisplayName and select it.
Add a comma after the DisplayName, and place your cursor next to the colon for ContentBytes. Dynamic Content appears. Search for Attachment Content and select it.
The Append to array variable action should look as follows:
Here's what our flow looks like at this point.
Outside of the Apply to Each loop, select + New Step. Search for and select the Send an Email (V2) action.
In the To field, add an email address. In the subject, enter the text SharePoint item added with attachments. In the body, enter "See attached files.".
Select Show Advanced Options and then select the icon in the top right hand corner of the Attachments fields.
In the Attachments field, select Add dynamic content and select the varAttachmentArray variable from Dynamic Content.
Save and test your flow! When an item is added to the SharePoint list, and email will be sent with all the attachments.
Send an email with links
Now consider the scenario where you want to send a link to the attachment rather than the actual attachments.
Links are part of the rich text option available in the body of the email. Selecting the link icon will allow you to add the title and the target, the target being the location of the content.
In this case, you would use the Get attachments action to get the file link and the file name and then add those items to the link of the email body. You can add multiple links.


