Branches in Git
You're a web developer trying to learn more about Git for your job. You've created a simple HTML and CSS website that features cat photos to practice your Git skills, and you've been working on it with your friends, Alice and Bob.
As your project progresses, you realize that you'd like everyone to be able to work on more than one task at a time without getting in the way of another person's work. You need a way to keep everyone's work separate, so new development doesn't get in the way of existing bug fixes. In Git, branches make this kind of collaboration easy.
The work done on a branch doesn't have to be shared, and it doesn't interfere with work done on other branches. Branches let you keep commits related to each topic together and isolated from other work, so changes made to a topic are easy to review and track.
Modern software development is done almost entirely in branches. The goal is to keep the main branch clean until the work is ready to check in. Then, you push your changes to the main branch, or better yet, submit a pull request to merge the changes.
An advantage Git has over earlier version control systems (VCSs) is that with Git, creating a branch is extremely fast; it amounts to writing a 40-character hash into a file under .git/heads. Switching branches is also fast, because Git stores whole files and unzips them instead of trying to reconstruct them from lists of changes. Merging in Git isn't quite as simple, but it's straightforward and often completely automatic.
Let's learn what branches are, how they're used, and how they work.
Branch structure and naming
A branch is simply a chain of commits that branch off from the main line of development, like a branch on a tree.
If you're switching to Git from another VCS, you might be accustomed to slightly different terminology. The VCS Subversion names its default branch trunk, while Git names it master. You can rename the default branch, just as you can rename any other branch. In this module, we name the default branch main.
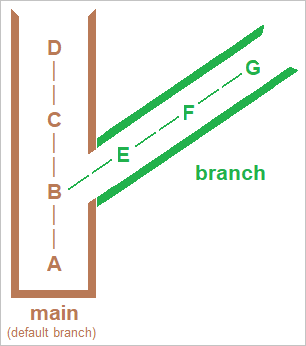
A branch usually starts with a commit on the default branch; in this case, on main. The branch grows a separate history chain as commits are added. Eventually, the changes in the branch are merged back into main. In this module, you'll learn to make commits in a branch, and merge them into the main branch.
Suppose you branch off the main branch. Here's how to visualize what happens:

Each capital letter in the diagram represents a commit. Branches have names like add-authentication and fix-css-bug, and branches can have branches of their own. The ultimate goal is to let developers do what they need to do without stepping on one another, and to end up with a main branch that represents the best efforts of everyone involved.
Create and switch branches (git branch and git checkout)
A common reason to create a new branch is to make changes to an existing feature. A branch for this purpose would commonly be called a topic branch or feature branch.
You can create a new branch by using the git branch command. Switch between branches by using the git checkout command.
You've already encountered checkout as a way of replacing files in the working tree by getting them from the index. With no paths in the argument list, checkout updates everything in the working tree and the index to match the specified commit—in this case, the head of the branch.
Merge branches (git merge)
When you've finalized some work in a branch, perhaps a feature or a bug fix, you'll want to merge that branch back into the main branch. You can use the git merge command to merge a specific branch into your current branch.
For example, if you were working in a branch named my-feature, the workflow would look like this example:
# Switch back to the main branch
git checkout main

# Merge my-feature branch into main
git merge my-feature
After using these commands and resolving any merge conflicts (we'll describe merge conflicts later in this module), all the changes from your my-feature branch would be in main.