Exercise - Publish the result to the pipeline
At this point, you can build the Space Game web project through the pipeline.
But where do the build results go? Right now, the build output remains on the temporary build server. Mara needs a way to hand off this build to Amita so she can begin testing.
You can store build artifacts in Azure Pipelines so that they're available to others on your team after the build completes, which is what you'll do here. As a bonus, you'll also refactor the build configuration to use variables to make the configuration easier to read and keep up to date.
Note
Azure Pipelines lets you automatically deploy the built app to a testing or production environment running in the cloud or in your datacenter. For now, Mara's goal is only to produce builds that she can hand off to QA by using their existing processes.
Publish the build to the pipeline
In .NET, you can package your app as a .zip file. You can then use the built-in PublishBuildArtifacts@1 task to publish the .zip file to Azure Pipelines.
In Visual Studio Code, change azure-pipelines.yml as you see here:
trigger:
- '*'

pool:
  name: 'Default' #replace if needed with name of your agent pool

steps:
- task: UseDotNet@2
  displayName: 'Use .NET SDK 6.x'
  inputs:
    version: '6.x'

- task: Npm@1
  displayName: 'Run npm install'
  inputs:
    verbose: false

- script: './node_modules/.bin/node-sass Tailspin.SpaceGame.Web/wwwroot --output Tailspin.SpaceGame.Web/wwwroot'
  displayName: 'Compile Sass assets'

- task: gulp@1
  displayName: 'Run gulp tasks'

- script: 'echo "$(Build.DefinitionName), $(Build.BuildId), $(Build.BuildNumber)" > buildinfo.txt'
  displayName: 'Write build info'
  workingDirectory: Tailspin.SpaceGame.Web/wwwroot

- task: DotNetCoreCLI@2
  displayName: 'Restore project dependencies'
  inputs:
    command: 'restore'
    projects: '**/*.csproj'

- task: DotNetCoreCLI@2
  displayName: 'Build the project - Release'
  inputs:
    command: 'build'
    arguments: '--no-restore --configuration Release'
    projects: '**/*.csproj'

- task: DotNetCoreCLI@2
  displayName: 'Publish the project - Release'
  inputs:
    command: 'publish'
    projects: '**/*.csproj'
    publishWebProjects: false
    arguments: '--no-build --configuration Release --output $(Build.ArtifactStagingDirectory)/Release'
    zipAfterPublish: true

- task: PublishBuildArtifacts@1
  displayName: 'Publish Artifact: drop'
  condition: succeeded()
trigger: - '*' pool: vmImage: ubuntu-latest steps: - task: UseDotNet@2 displayName: 'Use .NET SDK 6.x' inputs: version: '6.x' - task: Npm@1 displayName: 'Run npm install' inputs: verbose: false - script: './node_modules/.bin/node-sass Tailspin.SpaceGame.Web/wwwroot --output Tailspin.SpaceGame.Web/wwwroot' displayName: 'Compile Sass assets' - task: gulp@1 displayName: 'Run gulp tasks' - script: 'echo "$(Build.DefinitionName), $(Build.BuildId), $(Build.BuildNumber)" > buildinfo.txt' displayName: 'Write build info' workingDirectory: Tailspin.SpaceGame.Web/wwwroot - task: DotNetCoreCLI@2 displayName: 'Restore project dependencies' inputs: command: 'restore' projects: '**/*.csproj' - task: DotNetCoreCLI@2 displayName: 'Build the project - Release' inputs: command: 'build' arguments: '--no-restore --configuration Release' projects: '**/*.csproj' - task: DotNetCoreCLI@2 displayName: 'Publish the project - Release' inputs: command: 'publish' projects: '**/*.csproj' publishWebProjects: false arguments: '--no-build --configuration Release --output $(Build.ArtifactStagingDirectory)/Release' zipAfterPublish: true - task: PublishBuildArtifacts@1 displayName: 'Publish Artifact: drop' condition: succeeded()This version of azure-pipelines.yml looks like the previous version, but it adds two additional tasks.
The first task uses the
DotNetCoreCLI@2task to publish or package the app's build results (including its dependencies) into a folder. ThezipAfterPublishargument specifies to add the built results to a .zip file.The second task uses the
PublishBuildArtifacts@1task to publish the .zip file to Azure Pipelines. Theconditionargument specifies to run the task only when the previous task succeeds.succeeded()is the default condition, so you don't need to specify it, but we show it here to show its use.From the integrated terminal, add azure-pipelines.yml to the index, commit the change, and push the change to GitHub.
Tip
Before you run these Git commands, remember to save azure-pipelines.yml.
git add azure-pipelines.yml
git commit -m "Add publish tasks"
git push origin build-pipeline
As you did earlier, from Azure Pipelines, trace the build through each of the steps.
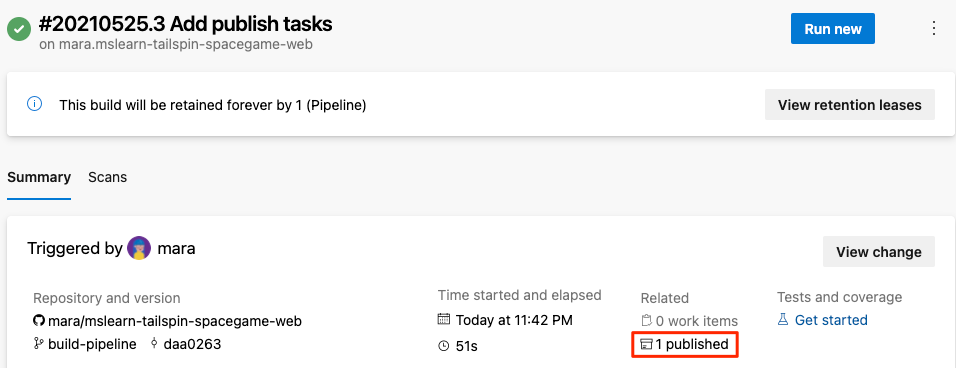
When the pipeline completes, go back to the build summary.
Under Related, there's 1 published.

Select the artifact.
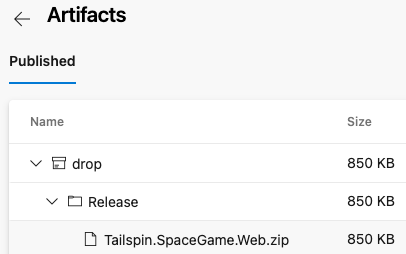
Expand the drop folder.
You'll see a .zip file that contains your built app and its dependencies:

If you want to try an optional exercise, you can download this .zip file to your computer and explore its contents.
Define variables to enhance readability
Mara steps back to examine her work. The build configuration does what she needs, but she wants to ensure Andy and others can easily help keep it up to date and extend it.
Variables allow you to define values once and refer to those values throughout your pipeline. Azure Pipelines replaces each variable with its current value when the pipeline runs.
Just like in other programming languages, variables let you do things like:
- Define values that might change between runs of your pipeline.
- Store information that's repeated throughout your pipeline, like a version number or a file path, in one place. That way, you don't need to update all occurrences when yours need to change.
Azure Pipelines provides many built-in variables. These variables describe aspects of the build process, like the build identifier and the directory names where your software is built and staged.
You can also define your own variables. Here's an example that shows a variable named buildConfiguration that defines the Release build configuration:
variables:
  buildConfiguration: 'Release'
Use variables when you repeat the same value multiple times or when a value, like a dependency version, might change.
You don't need to create a variable for every piece of your build configuration. In fact, too many variables can make your pipeline code harder for others to read and understand.
Take a moment to examine azure-pipelines.yml. Notice that these values are repeated:
- Build configuration:
Release. - Location of the wwwroot directory:
Tailspin.SpaceGame.Web/wwwroot. - .NET SDK version:
6.x.
You now use variables to define these values one time. You then reference the variables throughout the pipeline.
In Visual Studio Code, change azure-pipelines.yml as you see here:
trigger:
- '*'

pool:
  name: 'Default' #replace if needed with name of your agent pool

variables:
  buildConfiguration: 'Release'
  wwwrootDir: 'Tailspin.SpaceGame.Web/wwwroot'
  dotnetSdkVersion: '6.x'

steps:
- task: UseDotNet@2
  displayName: 'Use .NET SDK $(dotnetSdkVersion)'
  inputs:
    version: '$(dotnetSdkVersion)'

- task: Npm@1
  displayName: 'Run npm install'
  inputs:
    verbose: false

- script: './node_modules/.bin/node-sass $(wwwrootDir) --output $(wwwrootDir)'
  displayName: 'Compile Sass assets'

- task: gulp@1
  displayName: 'Run gulp tasks'

- script: 'echo "$(Build.DefinitionName), $(Build.BuildId), $(Build.BuildNumber)" > buildinfo.txt'
  displayName: 'Write build info'
  workingDirectory: $(wwwrootDir)

- task: DotNetCoreCLI@2
  displayName: 'Restore project dependencies'
  inputs:
    command: 'restore'
    projects: '**/*.csproj'

- task: DotNetCoreCLI@2
  displayName: 'Build the project - $(buildConfiguration)'
  inputs:
    command: 'build'
    arguments: '--no-restore --configuration $(buildConfiguration)'
    projects: '**/*.csproj'

- task: DotNetCoreCLI@2
  displayName: 'Publish the project - $(buildConfiguration)'
  inputs:
    command: 'publish'
    projects: '**/*.csproj'
    publishWebProjects: false
    arguments: '--no-build --configuration $(buildConfiguration) --output $(Build.ArtifactStagingDirectory)/$(buildConfiguration)'
    zipAfterPublish: true

- task: PublishBuildArtifacts@1
  displayName: 'Publish Artifact: drop'
  condition: succeeded()
trigger: - '*' pool: vmImage: ubuntu-latest variables: buildConfiguration: 'Release' wwwrootDir: 'Tailspin.SpaceGame.Web/wwwroot' dotnetSdkVersion: '6.x' steps: - task: UseDotNet@2 displayName: 'Use .NET SDK $(dotnetSdkVersion)' inputs: version: '$(dotnetSdkVersion)' - task: Npm@1 displayName: 'Run npm install' inputs: verbose: false - script: './node_modules/.bin/node-sass $(wwwrootDir) --output $(wwwrootDir)' displayName: 'Compile Sass assets' - task: gulp@1 displayName: 'Run gulp tasks' - script: 'echo "$(Build.DefinitionName), $(Build.BuildId), $(Build.BuildNumber)" > buildinfo.txt' displayName: 'Write build info' workingDirectory: $(wwwrootDir) - task: DotNetCoreCLI@2 displayName: 'Restore project dependencies' inputs: command: 'restore' projects: '**/*.csproj' - task: DotNetCoreCLI@2 displayName: 'Build the project - $(buildConfiguration)' inputs: command: 'build' arguments: '--no-restore --configuration $(buildConfiguration)' projects: '**/*.csproj' - task: DotNetCoreCLI@2 displayName: 'Publish the project - $(buildConfiguration)' inputs: command: 'publish' projects: '**/*.csproj' publishWebProjects: false arguments: '--no-build --configuration $(buildConfiguration) --output $(Build.ArtifactStagingDirectory)/$(buildConfiguration)' zipAfterPublish: true - task: PublishBuildArtifacts@1 displayName: 'Publish Artifact: drop' condition: succeeded()Notice the
variablessection, which defines these variables:buildConfiguration: Specifies the build configuration.wwwrootDir: Specifies the path to the wwwroot directory.dotnetSdkVersion: Specifies the .NET SDK version to use.
To reference these variables, use the
$()syntax just as you do for built-in variables. Here's the step that runs node-Sass to convert Sass files to CSS. To get the path to the wwwroot directory, it references thewwwrootDirvariable.- script: './node_modules/.bin/node-sass $(wwwrootDir) --output $(wwwrootDir)' displayName: 'Compile Sass assets'The script command uses the variable to define both the source directory for Sass files and the directory in which to write CSS files. It also uses the variable to define the task name that's shown in the user interface.
From the integrated terminal, add azure-pipelines.yml to the index, commit the change, and push the change to GitHub.
git add azure-pipelines.yml
git commit -m "Refactor common variables"
git push origin build-pipeline
From Azure Pipelines, trace the build through each of the steps.
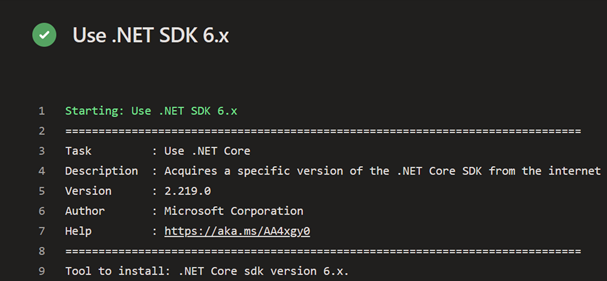
You'll see that the variables are replaced with their values when the build runs. For example, here's the
UseDotNet@2task that sets the .NET SDK version to use.
As before, to see the artifact when the build completes, you can navigate to the build summary.
Congratulations! You've successfully used Azure Pipelines and created your first build artifact.