Custom text classification skill
Custom text classification allows you to map a passage of text to different user defined classes. For example, you could train a model on the synopsis on the back cover of books to automatically identify a books genre. You then use that identified genre to enrich your online shop search engine with a genre facet.

Here, you'll see what you need to consider to enrich a search index using a custom text classification model:
- Store your documents so they can be accessed by Language Studio and Azure AI Search indexers.
- Create a custom text classification project.
- Train and test your model.
- Create a search index based on your stored documents.
- Create a function app that uses your deployed trained model.
- Update your search solution, your index, indexer, and custom skillset.
Store your data
Azure Blob storage can be accessed from both Language Studio and Azure AI Services. The container needs to be accessible, so the simplest option is to choose Container, but it's also possible to use private containers with some additional configuration.
Along with your data, you also need a way to assign classifications for each document. Language Studio provides a graphical tool that you can use to classify each document one at a time manually.
You can choose between two different types of project. If a document maps to a single class use a single label classification project. If you want to map a document to more than one class, use the multi label classification project.
If you don't want to manually classify each document, you can label all your documents before you create your Azure AI Language project. This process involves creating a labels JSON document in this format:
{
    "projectFileVersion": "2022-05-01",
    "stringIndexType": "Utf16CodeUnit",
    "metadata": {
      "projectKind": "CustomMultiLabelClassification",
      "storageInputContainerName": "{CONTAINER-NAME}",
      "projectName": "{PROJECT-NAME}",
      "multilingual": false,
      "description": "Project-description",
      "language": "en-us"
    },
    "assets": {
      "projectKind": "CustomMultiLabelClassification",
      "classes": [
        {
          "category": "Class1"
        },
        {
          "category": "Class2"
        }
      ],
      "documents": [
          {
              "location": "{DOCUMENT-NAME}",
              "language": "{LANGUAGE-CODE}",
              "dataset": "{DATASET}",
              "classes": [
                  {
                      "category": "Class1"
                  },
                  {
                      "category": "Class2"
                  }
              ]
          }
      ]
  }
You add as many classes as you have to the classes array. You add an entry for each document in the documents array including which classes the document matches.
Create your Azure AI Language project
There are two ways to create your Azure AI Language project. If you start using Language Studio without first creating a language service in the Azure portal, Language Studio will offer to create one for you.
The most flexible way to create an Azure AI Language project is to first create your language service using the Azure portal. If you choose this option, you get the option to add custom features.

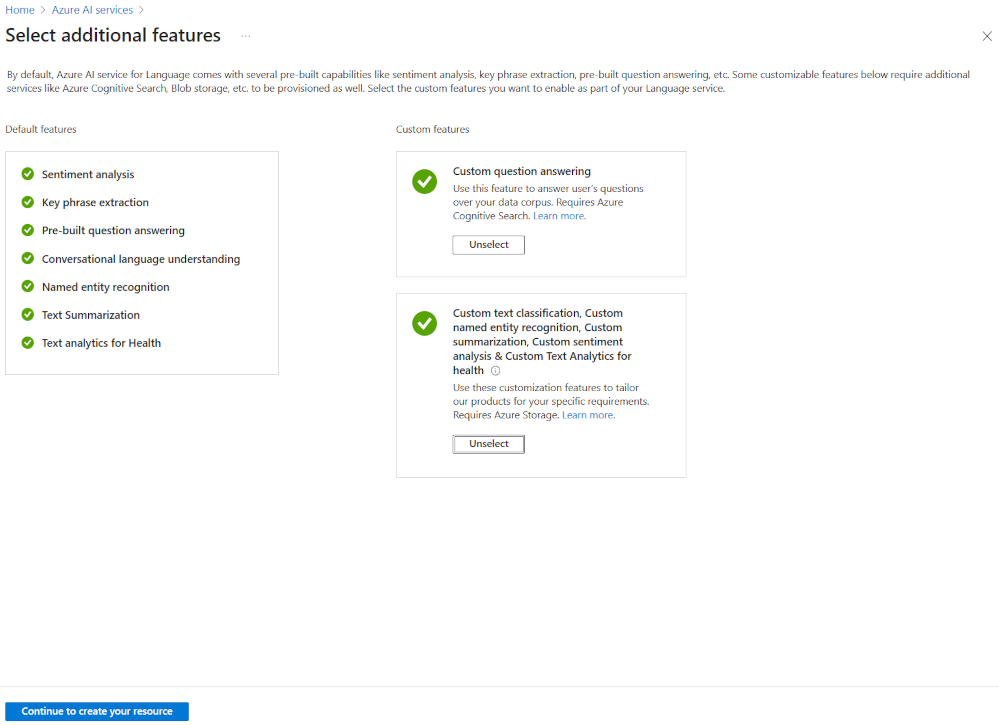
As you are going to create a custom text classification, select that custom feature when creating your language service. You'll also link the language service to a storage account using this method.
Once the resource has been deployed, you can navigate directly to the Language Studio from the overview pane of the language service. You can then create a new custom text classification project.
Note
If you have created your language service from Language Studio you might need to follow these steps. Set roles for your Azure Language resource and storage account to connect your storage container to your custom text classification project.
Train your classification model
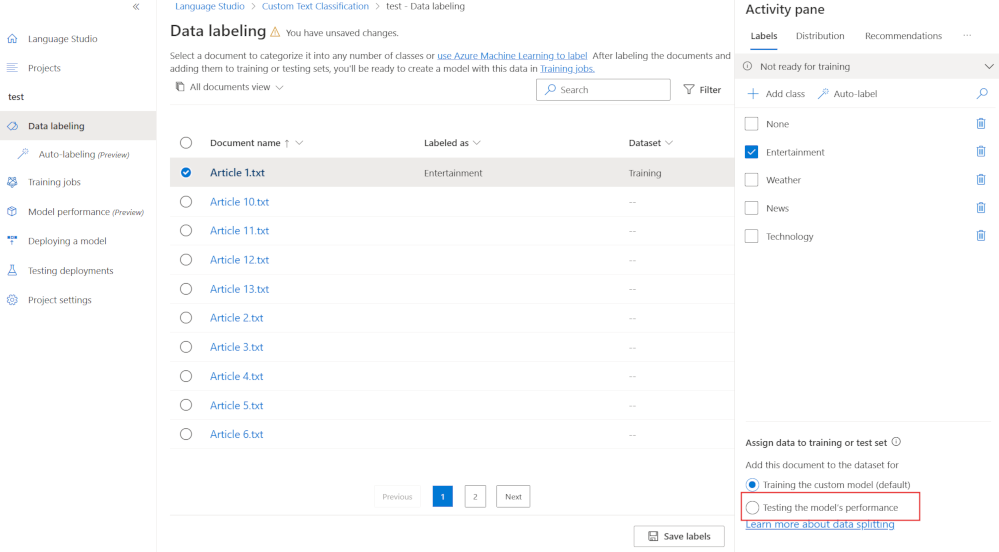
As with all AI models, you need to have identified data that you can use to train it. The model needs to see examples of how to map data to a class and have some examples it can use to test the model. You can choose to let the model automatically split your training data, by default it will use 80% of the documents to train the model and 20% to blind test it. If you have some specific documents that you want to test your model with, you can label documents for testing.
In Language Studio, in your project, select Data labeling. You'll see all your documents. Select each document you'd like to add to the testing set, then select Testing the model's performance. Save your updated labels and then create a new training job.
Create search index
There isn't anything specific you need to do to create a search index that will be enriched by a custom text classification model. Follow the steps in Create an Azure AI Search solution. You'll be updating the index, indexer, and custom skill after you've created a function app.
Create an Azure function app
You can choose the language and technologies you want for your function app. The app needs to be able to pass JSON to the custom text classification endpoint, for example:
{
    "displayName": "Extracting custom text classification",
    "analysisInput": {
        "documents": [
            {
                "id": "1",
                "language": "en-us",
                "text": "This film takes place during the events of Get Smart. Bruce and Lloyd have been testing out an invisibility cloak, but during a party, Maraguayan agent Isabelle steals it for El Presidente. Now, Bruce and Lloyd must find the cloak on their own because the only non-compromised agents, Agent 99 and Agent 86  are in Russia"
            }
        ]
      },
    "tasks": [
        {
        "kind": "CustomMultiLabelClassification",
        "taskName": "Multi Label Classification",
        "parameters": {
            "project-name": "movie-classifier",
            "deployment-name": "test-release"}
        }
    ]
}
Then process the JSON response from the model, for example:
{
  "jobId": "be1419f3-61f8-481d-8235-36b7a9335bb7",
  "lastUpdatedDateTime": "2022-06-13T16:24:27Z",
  "createdDateTime": "2022-06-13T16:24:26Z",
  "expirationDateTime": "2022-06-14T16:24:26Z",
  "status": "succeeded",
  "errors": [],
  "displayName": "Extracting custom text classification",
  "tasks": {
    "completed": 1,
    "failed": 0,
    "inProgress": 0,
    "total": 1,
    "items": [
      {
        "kind": "CustomMultiLabelClassificationLROResults",
        "taskName": "Multi Label Classification",
        "lastUpdateDateTime": "2022-06-13T16:24:27.7912131Z",
        "status": "succeeded",
        "results": {
          "documents": [
            {
              "id": "1",
              "class": [
                {
                  "category": "Action",
                  "confidenceScore": 0.99
                },
                {
                  "category": "Comedy",
                  "confidenceScore": 0.96
                }
              ],
              "warnings": []
            }
          ],
          "errors": [],
          "projectName": "movie-classifier",
          "deploymentName": "test-release"
        }
      }
    ]
  }
}
The function then returns a structured JSON message back to a custom skillset in AI Search, for example:
[{"category": "Action", "confidenceScore": 0.99}, {"category": "Comedy", "confidenceScore": 0.96}]
There are five things the function app needs to know:
- The text to be classified.
- The endpoint for your trained custom text classification deployed model.
- The primary key for the custom text classification project.
- The project name.
- The deployment name.
The text to be classified is passed from your custom skillset in AI Search to the function as input. The remaining four items can be found in Language Studio.
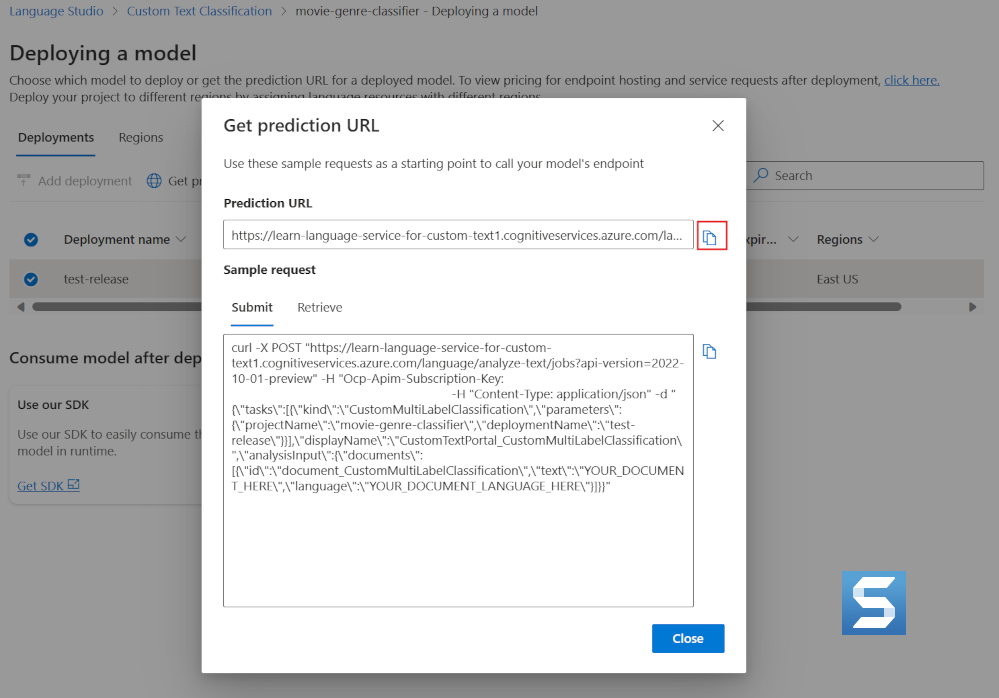
The endpoint and deployment name is on the deploying a model pane.
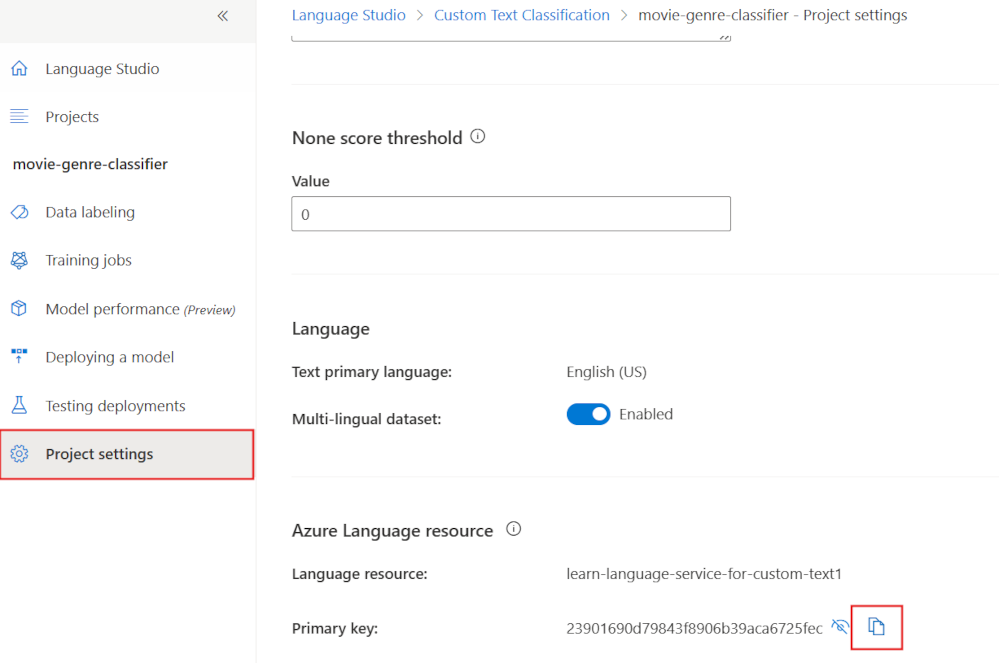
The project name and primary key are on the project settings pane.
Update your Azure AI Search solution
There are three changes in the Azure portal you need to make to enrich your search index:
- You need to add a field to your index to store the custom text classification enrichment.
- You need to add a custom skillset to call your function app with the text to classify.
- You need to map the response from the skillset into the index.
Add a field to an existing index
In the Azure portal, go to your AI Search resource, select the index and you'll add JSON in this format:
{
  "name": "classifiedtext",
  "type": "Collection(Edm.ComplexType)",
  "analyzer": null,
  "synonymMaps": [],
  "fields": [
    {
      "name": "category",
      "type": "Edm.String",
      "facetable": true,
      "filterable": true,
      "key": false,
      "retrievable": true,
      "searchable": true,
      "sortable": false,
      "analyzer": "standard.lucene",
      "indexAnalyzer": null,
      "searchAnalyzer": null,
      "synonymMaps": [],
      "fields": []
    },
    {
      "name": "confidenceScore",
      "type": "Edm.Double",
      "facetable": true,
      "filterable": true,
      "retrievable": true,
      "sortable": false,
      "analyzer": null,
      "indexAnalyzer": null,
      "searchAnalyzer": null,
      "synonymMaps": [],
      "fields": []
    }
  ]
}
This JSON adds a compound field to the index to store the class in a category field that is searchable. The second confidenceScore field stores the confidence percentage in a double field.
Edit the custom skillset
In the Azure portal, select the skillset and add JSON in this format:
{
  "@odata.type": "#Microsoft.Skills.Custom.WebApiSkill",
  "name": "Genre Classification",
  "description": "Identify the genre of your movie from its summary",
  "context": "/document",
  "uri": "https://learn-acs-lang-serives.cognitiveservices.azure.com/language/analyze-text/jobs?api-version=2022-05-01",
  "httpMethod": "POST",
  "timeout": "PT30S",
  "batchSize": 1,
  "degreeOfParallelism": 1,
  "inputs": [
    {
      "name": "lang",
      "source": "/document/language"
    },
    {
      "name": "text",
      "source": "/document/content"
    }
  ],
  "outputs": [
    {
      "name": "text",
      "targetName": "class"
    }
  ],
  "httpHeaders": {}
}
This WebApiSill skill definition specifies that the language and the contents of a document are passed as inputs to the function app. The app will return JSON text named class.
Map the output from the function app into the index
The last change is to map the output into the index. In the Azure portal, select the indexer and edit the JSON to have a new output mapping:
{
  "sourceFieldName": "/document/class",
  "targetFieldName": "classifiedtext"
}
The indexer now knows that the output from the function app document/class should be stored in the classifiedtext field. As this has been defined as a compound field, the function app has to return a JSON array containing a category and confidenceScore field.
You can now search an enriched search index for your custom classified text.


