Exercise - Deploy an Azure Functions app to Azure
Your project came with a pipeline that builds the projects in the solution and deploys the web app to Azure App Service. Now it's time to extend that pipeline to also deploy the new Azure Functions project.
In this part, you'll:
- Review the Build stage.
- Add a task to deploy your function app.
- Add a task configure the published App Service to use the published function.
- Save the pipeline to trigger a CI/CD workflow.
Review the Build stage
Here, you'll review the existing CI/CD pipeline defined in azure-pipelines.yml.
From Azure DevOps, navigate to Pipelines.
Select the pipeline.
Select Edit. Ensure that the branch is set to main by selecting it from the dropdown menu. This brings up the azure-pipelines.yml file that defines the existing CI/CD pipeline.
Because of the use of wildcards to the project paths, the highlighted tasks below will automatically restore, build, and publish the new Azure Functions project.
stages:
- stage: 'Build'
  displayName: 'Build the web application'
  jobs:
  - job: 'Build'
    displayName: 'Build job'
    pool:
      vmImage: 'ubuntu-20.04'
      demands:
      - npm

    variables:
      wwwrootDir: 'Tailspin.SpaceGame.Web/wwwroot'
      dotnetSdkVersion: '6.0.x'

    steps:
    - task: UseDotNet@2
      displayName: 'Use .NET SDK $(dotnetSdkVersion)'
      inputs:
        version: '$(dotnetSdkVersion)'

    - task: Npm@1
      displayName: 'Run npm install'
      inputs:
        verbose: false

    - script: './node_modules/.bin/node-sass $(wwwrootDir) --output $(wwwrootDir)'
      displayName: 'Compile Sass assets'

    - task: gulp@1
      displayName: 'Run gulp tasks'

    - script: 'echo "$(Build.DefinitionName), $(Build.BuildId), $(Build.BuildNumber)" > buildinfo.txt'
      displayName: 'Write build info'
      workingDirectory: $(wwwrootDir)

    - task: DotNetCoreCLI@2
      displayName: 'Restore project dependencies'
      inputs:
        command: 'restore'
        projects: '**/*.csproj'

    - task: DotNetCoreCLI@2
      displayName: 'Build the project - $(buildConfiguration)'
      inputs:
        command: 'build'
        arguments: '--no-restore --configuration $(buildConfiguration)'
        projects: '**/*.csproj'

    - task: DotNetCoreCLI@2
      displayName: 'Publish the project - $(buildConfiguration)'
      inputs:
        command: 'publish'
        projects: '**/*.csproj'
        publishWebProjects: false
        arguments: '--no-build --configuration $(buildConfiguration) --output $(Build.ArtifactStagingDirectory)/$(buildConfiguration)'
        zipAfterPublish: true

    - publish: '$(Build.ArtifactStagingDirectory)'
      artifact: drop
Andy: This was our previous build stage. I didn't change it from the original project because the tasks were already configured to run against all projects based on the wildcard matching pattern.
Mara: Yes, this should work as-is. I don't think we need to make any changes here. After this build task runs, the zip file artifacts for both the web and leaderboard projects will be published for the Deploy stage to use.
Add a task to deploy the Azure Function
Andy: I think we can also reuse the App Service deployment task as-is. Hopefully there's something similar we can use for deploying a function app.
Mara: I have good news. After a little research, it looks like there's a task that's conceptually similar to the App Service deployment task, but for Azure Functions deployments. Let's review it now.
Azure Function App Task
The AzureFunctionApp@1 task is designed to deploy function apps. It's conceptually similar to the AzureWebApp@1 task and includes everything needed for this function-app scenario:
azureSubscriptionrefers to the name of your Azure service connection pipeline variable.appTypeindicates whether the app is being deployed for Linux (functionAppLinux) or Windows (functionApp).appNamespecifies the name of the Azure Functions app instance in your Azure account.packagespecifies the path to the package to be deployed.runtimeStackindicates which image the function should be run on, which is required for Linux deployments.startUpCommandspecifies the startup command to run after the function has been deployed, which is required for Linux deployments.
You can learn more about the flexibility of this task in the documentation for the Azure Function App task.
Add the following highlighted code to the end of your pipeline.
- stage: 'Deploy'
  displayName: 'Deploy the web application'
  dependsOn: Build
  jobs:
  - deployment: Deploy
    pool:
      vmImage: 'ubuntu-20.04'
    environment: spike
    variables:
    - group: Release
    strategy:
      runOnce:
        deploy:
          steps:
          - download: current
            artifact: drop
          - task: AzureWebApp@1
            displayName: 'Azure App Service Deploy: website'
            inputs:
              azureSubscription: 'Resource Manager - Tailspin - Space Game'
              appName: '$(WebAppName)'
              appType: webAppLinux
              package: '$(Pipeline.Workspace)/drop/$(buildConfiguration)/Tailspin.SpaceGame.Web.zip'

          - task: AzureFunctionApp@1
            displayName: 'Azure Function Deploy: leaderboard'
            inputs:
              azureSubscription: 'Resource Manager - Tailspin - Space Game'
              appType: functionAppLinux
              appName: '$(LeaderboardAppName)'
              package: '$(Pipeline.Workspace)/drop/$(buildConfiguration)/Tailspin.SpaceGame.LeaderboardFunction.zip'
              runtimeStack: DOCKER|microsoft/azure-functions-dotnet:4
              startUpCommand: 'func azure functionapp publish $(functionAppName) --no-bundler'
Tip
In a YAML file, whitespace is important. Ensure that the task you add here uses the same indentation as the previous task.
Add a task to update the App Service's app settings
Andy: Now all we need to do is to configure the web app to use the published leaderboard API. We usually configure variables in the portal, but it would be better if we could do it here. It expects an AppSettings parameter named LeaderboardFunctionUrl.
Mara: I agree. Adding a task for that to our pipeline will help us avoid accidental oversights down the road if we change either service. We can put it right at the end.
Add the following highlighted code to the end of your pipeline. Be sure to match the indentation of the task above it. If you'd like to learn more about this task, you can review the docs for Azure App Service Settings task.
- task: AzureFunctionApp@1
  displayName: 'Azure Function Deploy: leaderboard'
  inputs:
    azureSubscription: 'Resource Manager - Tailspin - Space Game'
    appType: functionAppLinux
    appName: '$(LeaderboardAppName)'
    package: '$(Pipeline.Workspace)/drop/$(buildConfiguration)/Tailspin.SpaceGame.LeaderboardFunction.zip'
    runtimeStack: DOCKER|microsoft/azure-functions-dotnet:4
    startUpCommand: 'func azure functionapp publish $(functionAppName) --no-bundler'

- task: AzureAppServiceSettings@1
  displayName: 'Update web app settings'
  inputs:
    azureSubscription: 'Resource Manager - Tailspin - Space Game'
    appName: $(WebAppName)
    resourceGroupName: $(ResourceGroupName)
    appSettings: |
      [
        {
          "name": "AppSettings__LeaderboardFunctionUrl",
          "value": "http://$(LeaderboardAppName).azurewebsites.net/api/LeaderboardFunction",
          "slotSetting": false
        }
      ]
Save the pipeline to trigger a build and release
Select Save from the top right corner of the page. Confirm the Save to trigger a run.
In Azure Pipelines, go to the build. Trace the build as it runs.
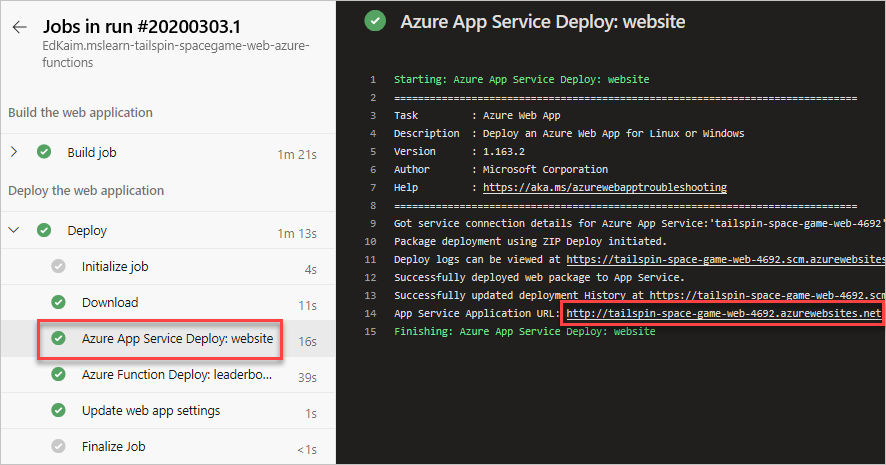
After the build succeeds, select the web site's deploy task and select the URL to view the deployed site.

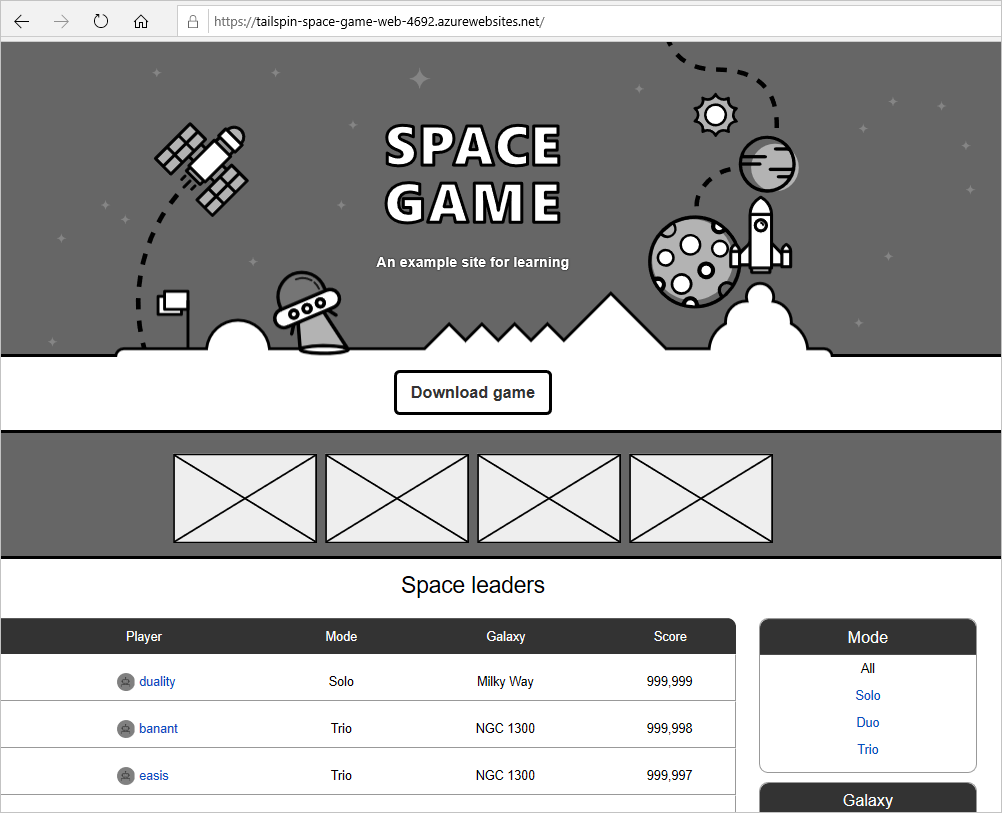
You'll get a page with the site running on App Service. Scroll down to confirm that the leaderboard has real data in it. This is powered by the function app.

Note
If there's an error loading the leaderboard, double-check the steps you followed in this module. If you see the exception message "An attempt was made to access a socket in a way forbidden by its access permissions", make sure that the app service's AppSettings__LeaderboardFunctionUrl setting is being set correctly.
You can also test out the function app directly. Just navigate to your URL using the following format. The response is JSON, which should just render as text in your browser.
http://<leaderboard function name>.azurewebsites.net/api/LeaderboardFunction?pageSize=10such as
http://tailspin-space-game-leaderboard-4692.azurewebsites.net/api/LeaderboardFunction?pageSize=10
Andy: This turned out great! Everyone should be pretty impressed with the potential we've shown here.