Apply an automated workflow
In this unit, you'll learn about automated workflow tools and how they integrate with Terraform and Azure.
About GitHub Actions
As an infrastructure manager, you need your build and deployment workflows to use the same version control as your project.
By using GitHub Actions, you can run a continuous integration and continuous delivery (CI/CD) process that's linked to your GitHub repositories.
With GitHub Actions, you can build, test, and deploy your code right from GitHub. You can also assign code reviews, manage branches, and triage issues.
GitHub Actions components
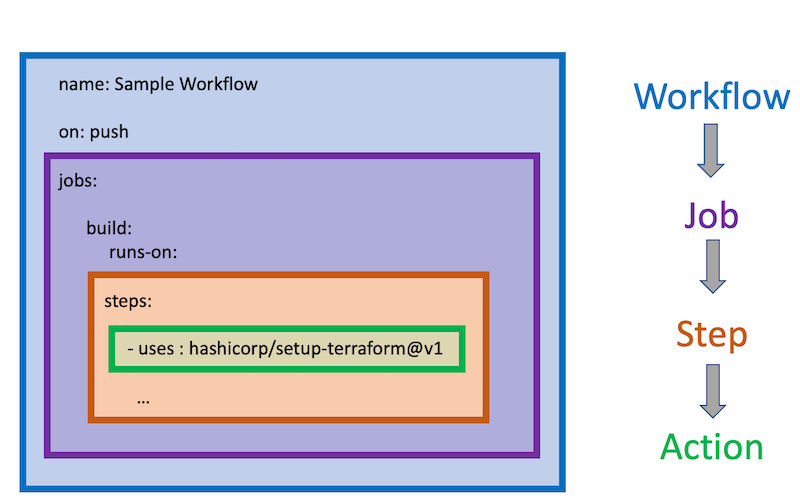
Let's describe the various GitHub Actions components, as shown in the following diagram:

- Workflow: Triggered by certain events or activities, a workflow is a collection of jobs and steps that automate software development lifecycle tasks.
- Job: A set of steps that execute on a runner.
- Step: A task that can run one or more commands or actions. Each step is made up of individual actions that run after a specific event occurs, such as a pull request.
- Action: Standalone commands that can be combined into steps. Multiple steps can be combined to create a job. Individual actions are packaged scripts that automate software development tasks. To create a workflow, you add actions to a YAML file in the .github/workflows directory in your GitHub repository.
A Terraform GitHub action
The hashicorp/setup-terraform action sets up the Terraform CLI in your GitHub Actions workflow by:
- Downloading a specific version of the Terraform CLI and adding it to the
PATH. - Configuring the Terraform CLI configuration file with a Terraform Cloud or Enterprise host name and API token.
- Installing a wrapper script to wrap later calls of the
terraformbinary and expose its STDOUT, STDERR, and exit code as outputs namedstdout,stderr, andexitcode, respectively.
Authenticate GitHub Actions with Azure
Terraform supports several options for authenticating with Azure:
- When you use Terraform interactively, we recommend that you authenticate via a Microsoft account.
- When you use Terraform from code or by automation, we recommend that you authenticate via an Azure Service Principal.
A Service principal is an identity for use with applications, hosted services, and automated tools to access Azure resources.
Next steps
In the next unit, we'll set up a sample project and use GitHub Actions with Terraform to deploy it to Azure.
Key concepts for new Azure Pipelines
Let's learn about the components that make up an Azure Pipeline.
- A trigger tells a Pipeline to run.
- A pipeline is made up of one or more stages. A pipeline can deploy to one or more environments.
- A stage is a way of organizing job in a pipeline and each stage can have one or more jobs.
- Each job runs on one agent. A job can also be agentless.
- Each agent runs a job that contains one or more steps.
- A step can be a task or script, and is the smallest building block of a pipeline.
- A task is a prepackaged script that does an action, such as invoking a REST API or publishing a build artifact.
- An artifact is a collection of files or packages published by a run.
Tip
For more in-depth information about the different Pipeline components and how to use them, see the Links provided in the Summary section.
Terraform Tasks for Azure Pipelines
When executing commands that interact with Azure such as plan, apply, and destroy, the task will use an Azure Service Connection to authorize operations against the target subscription.
The recommended way to connect to Azure is binding the Service Connection to an Azure Service Principal. An Azure Service Principal is an identity that you create for uses automated tools to access Azure resources.
The following YAML snippet uses the Azure Pipeline Terraform provider azurerm. A Service Connection is specified via the environmentServiceNameAzureRM input:
- task: TerraformTaskV1@0
  inputs:
    provider: 'azurerm'
    command: 'apply'
    workingDirectory: $(Build.Repository.LocalPath)/terraform
    backendAzureRmContainerName: 'tfstate'
    backendAzureRmKey: 'tf/terraform.tfstate'
    environmentServiceNameAzureRM: $(serviceConnection)
Tip
If you use azurerm as the Azure Pipeline Terraform provider, you also need to supply a Service Connection and Storage Container to use with the Terraform backend state.
Passing Parameters
There are multiple methods to pass parameters to terraform commands. Variables give you a convenient way to get key bits of data into various parts of the pipeline.
You can set a variable for a build pipeline by following these steps:
- Go to the Pipelines page, select the appropriate pipeline, and select Edit.
- Locate the Variables for this pipeline.
- Add or update the variable.
- To mark the variable as secret, select Keep this value secret.
- Save the pipeline.
Terraform Output to Pipeline Variables
The TerraformCLI task supports running the Terraform output command. When the CLI runs, pipeline variables will be created from each output variable emitted from the terraform output command.
Next steps
In the next unit, we'll set up a sample project and use Azure Pipelines with Terraform to deploy it to Azure.