Send emails by using Microsoft 365 Outlook
Microsoft 365 Outlook (previously known as Office 365 Outlook) has a standard connector that allows you to send, delete, and reply to email messages, among other tasks.
Basic concept of Microsoft 365 Outlook connector
Microsoft 365 Outlook can be used as actions and triggers in a Power Automate flow.
Actions and triggers
The following table describes the actions and triggers in Outlook.
| Action | Trigger |
|---|---|
| Create contact (V2) | When a new email arrives (V3) |
| Create event (V4) | When an email is flagged (V3) |
| Send an email (V2) | When a new email arrives in a shared mailbox (V2) |
| Delete contact (V2) | When a new email mentioning me arrives (V3) |
| Delete email (V2) | When a new event is created (V3) |
| Delete event (V2) | When an event is added, updated, or deleted (V3) |
| Export email (V2) | When an event is modified (V3) |
| Find meeting times (V2) | When an upcoming event is starting soon (V3) |
| Flag email (V2) | This operation updates an email flag. |
| Forward an email (V2) | Forward an email. |
| Get attachment (V2) | This operation gets an email attachment by ID. |
| Get calendar view of events (V3) | This operation gets all events (including instances of recurrences) in a calendar using Graph API. Recurrence property is null in this case. |
| Get calendars (V2) | This operation lists available calendars. |
| Get contact (V2) | This operation gets a specific contact from a contacts folder. |
| Get contact folders (V2) | This operation lists available contacts folders using Graph API |
| Get contacts (V2) | This operation gets contacts from a contacts folder. |
| Get email (V2) | This operation gets an email by ID. |
| Get emails (V3) | This operation gets emails from a folder via graph APIs. Filtering related to these fields: To, Cc, To Or Cc, From, Importance, Fetch Only With Attachments, Subject Filter, is performed using first 250 items in a given mail folder. To avoid that limitation, you can use 'Search Query' field. |
| Get event (V3) | This operation gets a specific event from a calendar using Graph API. (V3) |
| Get events (V4) | This operation gets events from a calendar using Graph API. (V4) |
| Get mail tips from a mailbox (V2) | Get mail tips for a mailbox such as automatic replies / OOF message or if the mailbox is full. This isn't available in GccHigh and Mooncake. |
| Get room lists (V2) | Get all the room lists defined in the user's tenant |
| Get rooms (V2) | Get all the meeting rooms defined in the user's tenant |
| Get rooms in room list (V2) | Get the meeting rooms in a specific room list |
| Mark as read or unread (V3) | This operation marks an email as read/unread. |
| Move email (V2) | This operation moves an email to the specified folder within the same mailbox. |
| Reply to email (V3) | This operation replies to an email. |
| Respond to an event invite (V2) | Respond to an event invite. |
| Send an email from a shared mailbox (V2) | This operation sends an email from a shared mailbox. Your account should have permission to access the mailbox for this operation to succeed. |
| Send email with options | This operation sends an email with multiple options and waits for the recipient to respond back with one of the options. Refer to the following link regarding the support of actionable messages in different mail clients: Outlook version requirements for actionable messages. |
| Set up automatic replies (V2) | Set the automatic replies setting for your mailbox. |
| Update contact (V2) | This operation updates a contact in a contacts folder. |
| Update event (V4) | This operation updates an event in a calendar using Graph API. |
| Update my contact's photo | Updates the photo of the specified contact of the current user. The size of the photo must be less than 4 MB. |
For full descriptions of actions and triggers, see this link to the Office 365 Outlook Connector documentation.
Send an email action with dynamic content from SharePoint
Creating a Power Automate flow to request approval when a new item is added in SharePoint is a smart move for simplifying your work processes. It means that when someone adds something new in SharePoint, the system can automatically ask for approval from the right people. This is great because it saves time, keeps everything organized, and ensures that important decisions are made without any delays.
The SharePoint connector has a trigger for new items in Power Automate flows. The example for this module starts a workflow process when a new item for a travel reimbursement request is submitted. Email notifications are sent by using Microsoft Outlook.
Set up Microsoft/SharePoint List
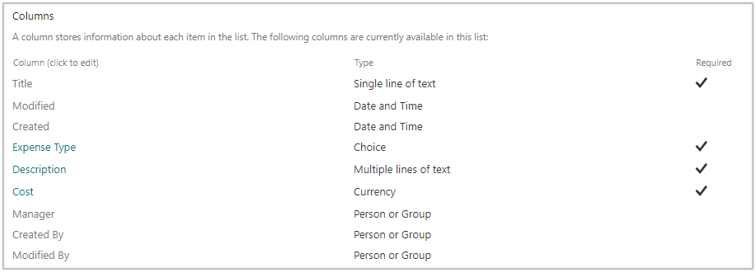
Create a SharePoint (or Microsoft Lists) list named Travel Reimbursement. The following screenshot shows the columns and column types for the Travel Reimbursement list. SharePoint automatically adds the Created, Created By, Modified, and Modified By columns.
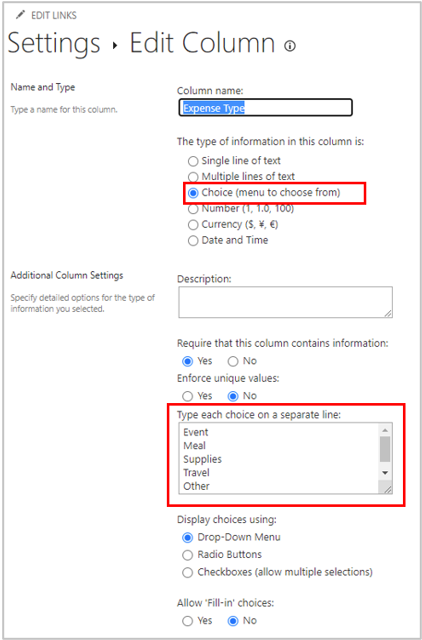
The following screenshot shows the Choice (menu to choose from) column.
Create Flow from List
Return to the Travel Reimbursement list and, from the ribbon, select Integrate > Power Automate > Create a flow.
On the right, in Create a flow, select the See more templates option.
Search for Start approval when a new item is added and select it.
Confirm the connections and then select Continue. If you need to sign in to any of the connections, do so by selecting Sign In next to the connection.
Update the flow title to Travel Reimbursement.
Select the SharePoint list (or Microsoft List) Site Address and then select the Travel Reimbursement list.
Now, we modify the template to get the manager information.
Drag the Get my profile (V2) action and then drop it below the trigger.
The following screenshot shows what the template looked like before you modified it.
The following screenshot shows what the template looks like after moving the Get my profile action.
Underneath the Get My Profile action, select the plus sign (+) and then select Add an action.
Search for get manager and then select the Get manager (V2) action.
In Get manager (V2) action, select the User(UPN) field and then the lightning bolt to open the Dynamic Content and then search for User Principal Name and select User Principal Name.
In the Start an approval action, for Assigned To, select Add dynamic content and then select Mail in Get manager (V2).
Select Flow checker to confirm that no errors occurred and then select Save.
You successfully created an email action by using Microsoft Outlook with dynamic content from SharePoint.

