Exercise - Build root FHIR resource tables using Marker portal
In the previous exercise, you applied the conventions to build a FHIR based relational data model in Dataverse and created a proposed entity relationship diagram for the root level table. In this exercise, you use the proposed design and build the Dataverse table that represents the ServiceRequest FHIR resource in the Power Apps maker portal.
First you set up a solution in your environment and include the relevant components from the Healthcare data mode for Dataverse and then you construct our new Service Request table. The new solution is used through the remainder of the exercises as you continue to build the Service Request tables.
These exercises don't result in a full representation of each Service Request data element, but it covers the fundamental steps required to extend the Healthcare data model for Dataverse.
Prerequisites
To complete the steps in this exercise, you need to meet the following prerequisites:
Ensure Microsoft Cloud for Healthcare trial with the Data integration toolkit is installed. For more information, see Microsoft Cloud for Healthcare training environment preparation.
Ensure System administrator rights are granted for the user on a Microsoft Dataverse instance
Proposed design
The previous exercise concluded with a proposed design for the root Dataverse table for Service Request. You take the proposed design and implement the table, columns, and relationships.
Entity relationship diagram
The following simplified entity relationship diagram represents the root Service Request table and includes references to existing tables via Lookup fields.

This diagram isn't inclusive of all related elements, but it displays the relationship between all tables so far and provides enough information to begin building in the maker portal.
Set up the working solution
Power Platform solutions provide a common workspace for building model driven apps in Dataverse. In the following section, you set up the solution that is used throughout the rest of the exercises.
Create the publisher
In this task, you create your own publisher, which helps you uniquely identify your application and new components that you create.
Sign in to the Power Apps maker portal.
Select the environment.

Select Solutions on the left navigation pane and then select + New solution.

Select New publisher and enter the publisher details as follows:
Display name - Service Request Publisher
Name - ServiceRequestPub
Description - Adding Service Request to the data model
Prefix - fhir

Select Save.


Note
The publisher prefix typically aligns with your organization customizations, and fhir was chosen for the prefix to distinguish the new tables from the existing tables. The Dataverse Healthcare APIs has one exception for publisher prefix with the Azure FHIR Id column - a prefix of msemr is required for message processing. You can set the publisher prefix to msemr at this point in the exercise or change it temporarily when creating the Azure FHIR Id field.
Create the solution
The solution provides you with a collection of the components that you use when creating your new model-driven application. The solution also provides a method for versioning and deployment between environments.
In the New solution panel, select the New solution and then enter details as follows:
Display name - Service Request
Name - ServiceRequest
Publisher - Service Request Publisher (ServiceRequestPub)
Version - 1.0.0.0

Select Create.

Add tables to the solution
In this task, you add tables to the solution that you can use and update as part of the application. These tables are referenced in the list of Lookup columns.
From the upper toolbar, select Add existing and then select Table.

In the Add existing tables panel, search for the schema name Contact and select the Contact table. This table represents the Patient FHIR resource. Select Next.

In the Selected tables panel, select Include all objects. This step selects Include table metadata automatically.

Select Add.
Repeat the previous steps to add the following tables using the schema name beginning with the msemr prefix:
- CodeableConcept - msemr_codeableconcept
- Encounter - msemr_encounter
- Device - msemr_device
- Group - msemr_group
- Location - msemr_location


The solution now contains references that are needed for the new Service Request table.
Add extra components to the solution
The following items are required when creating the tables and setting up the maps for the ingestion APIs.
From the upper toolbar, select Add existing and then select More, then select Choice.
Search for Codeable Concept.
Select Codeable Concept Type from the list.
Select Add.
Create the ServiceRequest table
In this section, you create the new Service Request table and provide the column details. You create a Standard table, a Dataverse table where you can store data and add to the navigation in model-driven apps.
Sign in to the Power Apps maker portal.
Open the ServiceRequest solution.
In the left navigation pane, select Tables, select the New table dropdown, and then select Table.
In the new Table panel to the right, expand the Advanced options section. Provide the following details for the table in the fields provided.
Property Value Display name Service Request Plural name Service Requests Description A record of a request for service such as diagnostic investigations, treatments, or operations to be performed. Schema name fhir_servicerequest Type Standard Record ownership User or Team Appear in search results checked 
Select Save.

Create the table columns
Now that the base table details are created, begin adding the columns that represent the ServiceRequest FHIR resource elements. This section provides details on how to create columns for the primitive and complex types.
Column definitions
The following table collects the proposed fields required for the Service Request table, expanding on the details of the diagram at the beginning of the exercise.
| Schema Name | Display Name | Data Type | Description |
|---|---|---|---|
| AzureFHIRID | Azure FHIR ID | String 64 characters |
Attribute used to store the GUID of the object in Azure FHIR. |
| AzureFHIRLastUpdatedOn | Azure FHIR Last Updated On | Date and Time | Attribute used to store the date and time that the object was last synced with Azure FHIR. |
| AzureFHIRVersion | Azure FHIR Version | String 50 characters |
Attribute used to store the version of the object in Azure FHIR. |
| status (required) | Status | Choice values: draft, active, on-hold, revoked, completed, entered-in-error, unknown |
Status code for the Service Request |
| intent (required) | Intent | Choice values: proposal, plan, directive, order, original-order, reflex-order, filler-order, instance-order, option |
Intent code for the Service Request |
| priority | Priority | Choice values: routine, urgent, asap, stat |
Priority code for the Service Request |
| doNotPerform | Do Not Perform | Yes/No | True if service/procedure shouldn't be performed |
| authoredOn | Authored On | Date and Time | Date request signed |
| patientInstruction | Patient Instruction | String multi-line, 2,000 characters |
Patient or consumer-oriented instructions |
| quantity[x]: Service amount. One of these | |||
| quantityQuantity | Quantity - expand into the following fields | ||
| quantityQuantityValue | Quantity Value | Decimal | Numerical value (with implicit precision) |
| quantityQuantityComparator | Quantity Comparator | Choice values: <, <=, >=, > |
How the actual value compares to the given value |
| quantityQuantityUnit | Quantity Unit | String 50 characters |
Unit representation |
| quantityQuantityUri | Quantity Uri | String 500 characters |
System that defines coded unit form |
| quantityQuantityCode | Quantity Code | String 50 characters |
Coded form of the unit |
| quantityRatio | Ratio - expand into the following fields | ||
| quantityRatioNumeratorValue | Quantity Ratio Numerator Value | Decimal | Numerical value (with implicit precision) |
| quantityRatioNumeratorComparator | Quantity Ratio Numerator Comparator | Choice values: <, <=, >=, > |
How the actual value compares to the given value |
| quantityRatioNumeratorUnit | Quantity Ratio Numerator Unit | String 50 characters |
Unit representation |
| quantityRatioNumeratorUri | Quantity Ratio Numerator Uri | String 500 characters |
System that defines coded unit form |
| quantityRatioNumeratorCode | Quantity Ratio Numerator Code | String 50 characters |
Coded form of the unit |
| quantityRatioDenominatorValue | Quantity Ratio Denominator Value | Decimal | Numerical value (with implicit precision) |
| quantityRatioDenominatorComparator | Quantity Ratio Denominator Comparator | Choice values: <, <=, >=, > |
Comparator symbol |
| quantityRatioDenominatorUnit | Quantity Ratio Denominator Unit | String 50 characters |
Unit representation |
| quantityRatioDenominatorUri | Quantity Ratio Denominator Uri | String 500 characters |
System that defines coded unit form |
| quantityRatioDenominatorCode | Quantity Ratio Denominator Code | String 50 characters |
Coded form of the unit |
| quantityRange | Range - expand into the following fields | ||
| quantityRangeHighValue | Quantity Range High Value | Decimal | Numerical value (with implicit precision) |
| quantityRangeHighUnit | Quantity Range High Unit | String 50 characters |
Unit representation |
| quantityRangeHighUri | Quantity Range High Uri | String 500 characters |
System that defines coded unit form |
| quantityRangeHighCode | Quantity Range High Code | String 50 characters |
Coded form of the unit |
| quantityRangeLowValue | Quantity Range Low Value | Decimal | Numerical value (with implicit precision) |
| quantityRangeLowUnit | Quantity Range Low Unit | String 50 characters |
Unit representation |
| quantityRangeLowUri | Quantity Range Low Uri | String 500 characters |
System that defines coded unit form |
| quantityRangeLowCode | Quantity Range Low Code | String 50 characters |
Coded form of the unit |
| asNeeded[x]: Preconditions for service. One of these | |||
| asNeededBoolean | As Needed Boolean | Yes/No | |
| asNeededCodeableConcept | As Needed Codeable Concept | Lookup, single CodeableConcept |
As needed SNOMED code |
| code | Code | Lookup, single CodeableConcept |
What is being requested/ordered Procedure Codes (SNOMED CT) |
| encounter | Encounter | Lookup, single Encounter |
Encounter in which the request was created |
| performerType | Performer Type | Lookup, single CodeableConcept |
Performer role |
| subject | Subject | Lookup, multi-table Device, Group, Location, Patient |
Individual or Entity the service is ordered for |
This list is used in this section when creating the table.
Sign in to the Power Apps maker portal.
In the left navigation, select Solutions, and open the ServiceRequest solution.
In the left navigation, select Tables and then select the Service Request table from the list.

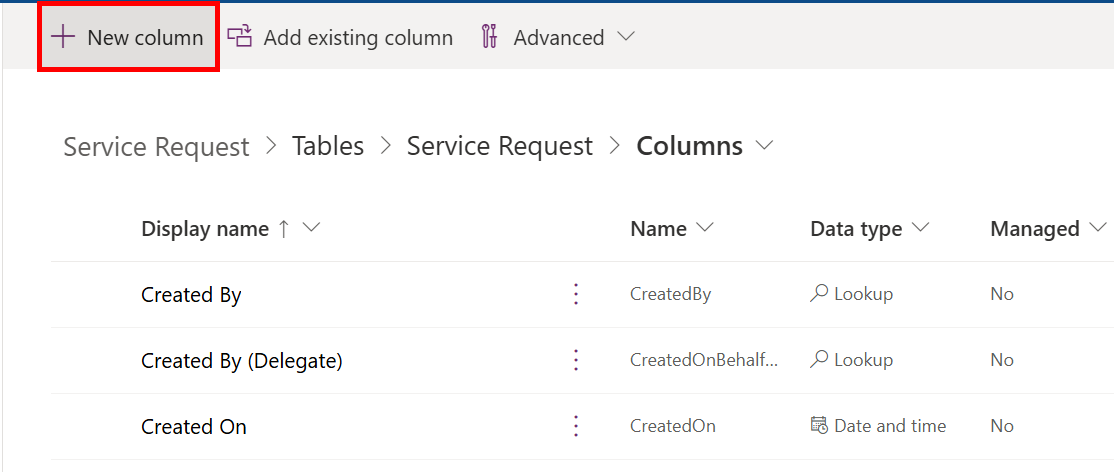
Once the table is saved, you're taken to the main details pane for the new Service Request table. Under the Schema group, select Columns.

In the columns view, select New Column.
In the new column pane, expand the Advanced options section. This field is an example of a standard Text column.
If your publisher prefix isn't set to msemr, be sure to update it before creating this column. You can revert the prefix change after creating this column.
Enter the following properties for the column:
Property Value Display name Azure FHIR ID Description Attribute used to store the GUID of the object in Azure FHIR. Data type Single line of text Format text Behavior Simple Required Optional Searchable checked Schema name msemr_AzureFHIRID Maximum character count 64 
Select Save.
In the left navigation under the Service Request table, select Keys.
Select New Key. Enter Azure FHIR Key as the name and select Azure FHIR ID from the list of Columns.

Select Save.
Select Columns again from the left navigation pane and select New Column.
In the new column pane, expand the Advanced options section. This field is an example of a standard Date and Time field. Enter the following properties for the column:
Property Value Display name Azure FHIR Last Updated On Description Attribute used to store the date and time that the object was last synced with Azure FHIR. Data type Date and Time Format Date and Time Behavior Simple Required Optional Searchable checked Schema name fhir_AzureFHIRLastUpdatedOn Time zone adjustment User Local Select Save.
In the columns view, select New Column.
In the new column pane, expand the Advanced options section. This field is an example of a standard Choice field.
Next to the Sync this choice with field, select New choice.

You can select an existing global choice that includes the values required for this column. For example, Value Quality Comparator is an existing global choice that can be selected for the comparator columns. If no choice is available, you can create a new one from this dialog.
In the New choice panel, you add new Choice options for each available Status value defined in the FHIR specification. Provide the following values for the new global Choice.
Property Value Display name Service Request Status Choice Label Draft Choice Label Active Choice Label On hold Choice Label Revoked Choice Label Completed Choice Label Entered in error Choice Label Unknown Select Save.
Note
These status value Labels are reformatted to a more user-friendly display and the value is dependent on the seed value specified in your Publisher. You might change the Labels later with little impact, but the numeric Values may have an impact on code or business rules. Mapping the FHIR string values to the Choice values will be covered in a later exercise.
Enter the following properties for the column.
Property Value Display name Status Description Status code for the Service Request Data type Choice Sync with global choice? Yes Sync this choice with Service Request Status Default choice Draft Behavior Simple Required Business Required Searchable Checked Schema name fhir_Status 
Select Save.
In the columns view, select New Column.
In the new column pane, expand the Advanced options section. This field is an example of a standard Multiple lines of text field. Enter the following properties for the column:
Property Value Display name Patient Instruction Description Patient or consumer-oriented instructions Data type Multiple lines of text Format Text Behavior Simple Required Optional Searchable Checked Schema name fhir_PatientInstruction 
Select Save.
In the columns view, select New Column.
In the new column pane, expand the Advanced options section. This field is an example of a standard Yes/No field.
Property Value Display name Do Not Perform Description Patient or consumer-oriented instructions Data type Yes/No Choices Yes/No default values Default choice No Behavior Simple Required Optional Searchable Checked Schema name fhir_DoNotPerform 
Select Save.
In the columns view, select New Column.
In the new column pane, expand the Advanced options section. This field is an example of a standard Numeric Decimal field.
Property Value Display name Quantity Value Description Numerical value (with implicit precision) Data type Decimal Minimum value -100,000,000,000 Maximum value 100,000,000,000 Decimal places 2 Behavior Simple Required Optional Searchable Checked Schema name fhir_quantityQuantityValue 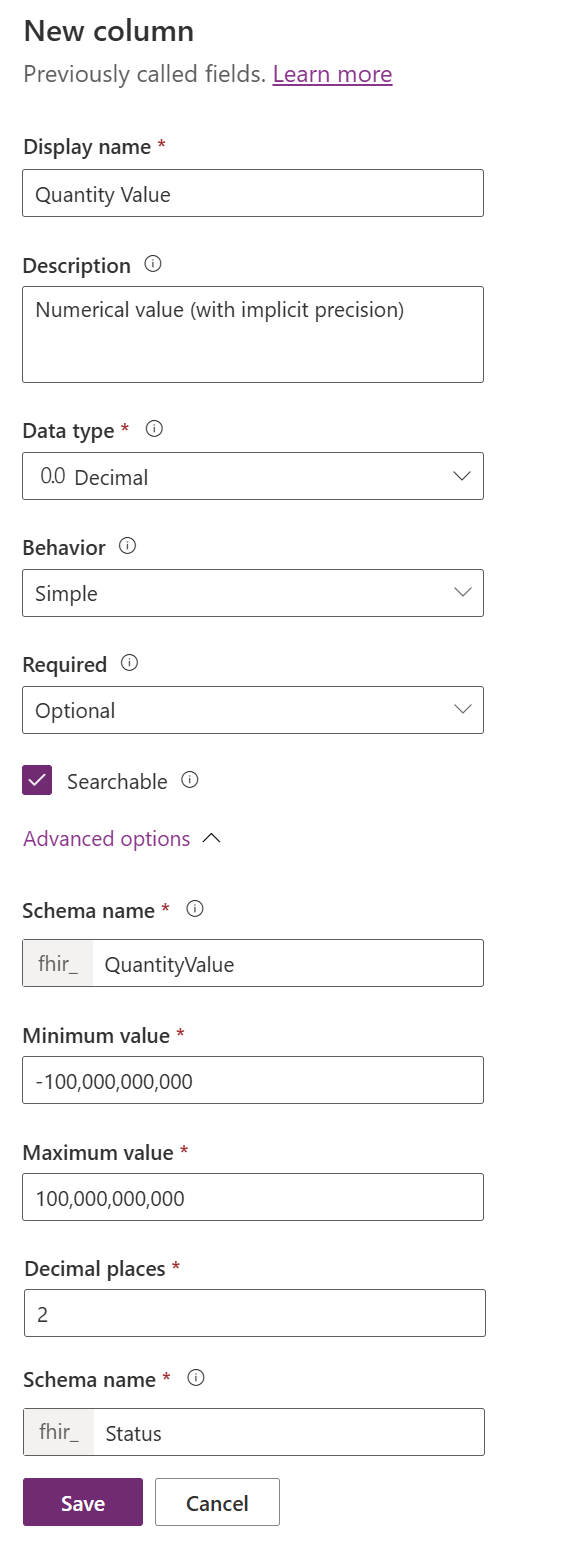
Select Save.
Repeat these steps in the Create the table columns task for the remainder of the primitive and complex types.


Create the Lookup column relationships
The design includes fields on the Service Request table that relate to existing Healthcare data model for Dataverse tables. These fields are implemented as Lookups, or relationship types of Many-to-one.
In the main navigation, select Relationships under the Service Request table.
In the relationships view, select New Relationship, Many-to-one.
In the new Many-to-one relationship pane, from the selector under Related (One), enter Encounter.
Note
You may see two entries for Encounter, one being a Standard table and the other a Virtual table. Verify that you are selecting the Standard table by ensuring that the Lookup column name reads msemr_encounter.
Expand the General and Advanced options sections.
Enter in the following properties for the new Lookup field.
Property Value Lookup column display name Encounter Lookup column name fhir_msemr_encounter Lookup column requirement Optional Searchable checked Relationship name fhir_servicerequest_encounter_encounter Lookup column description Encounter in which the request was created Related table display settings Display option Use plural name Display area Details Display order 10000 Type of behavior Referential Delete Remove link 
Select Done.
Repeat the steps in the Create the Lookup column relationships section for the remainder of the Lookup, single types:
asNeededCodeableConcept,code,performerType.Navigate to the main overview of the Service Request Solution.

Note
The multi-table Lookup for subject will be covered in a later exercise.


Next
The Service Request table should now include the core fields. In the next exercise, you'll extend the design to include expansion tables that represent the child array elements found in the FHIR specification.