Get started with API Center
In this exercise, you will:
Create an API Center service.
Define metadata properties.
Add APIs to your API Center.
Add deployments and environments.
Prerequisites
To start managing your APIs through API Center, you need:
- An Azure subscription.
- The Microsoft.ApiCenter resource provider registered in your subscription.
- At least a Contributor role assignment or equivalent permissions in the Azure subscription.
Note
If you haven't already, you need to register the Microsoft.ApiCenter resource provider in your subscription.
- Sign in to the Azure portal.
- Enter Subscriptions in the search bar.
- Select subscription where you want to create the API Center.
- In the left menu, under Resources, select Resource providers.
- Search for Microsoft.ApiCenter in the list of resource providers. If it's not registered, select Register.
Step 1: Create an API Center service
Sign in to the Azure portal.
Enter API Centers in the search bar.
Select + Create.
On the Basics tab, select or enter the following settings:
a. Select your Azure subscription.
b. Select an existing resource group or select New to create a new one.
c. Enter a Name for your API center. It must be unique in the region where you're creating your API center.
d. In Region, select one of the available regions for API Center.
e. For the pricing plan, select Free trial ($0 for 90 days).
f. Select Review + create.
h. After validation completes, select Create.
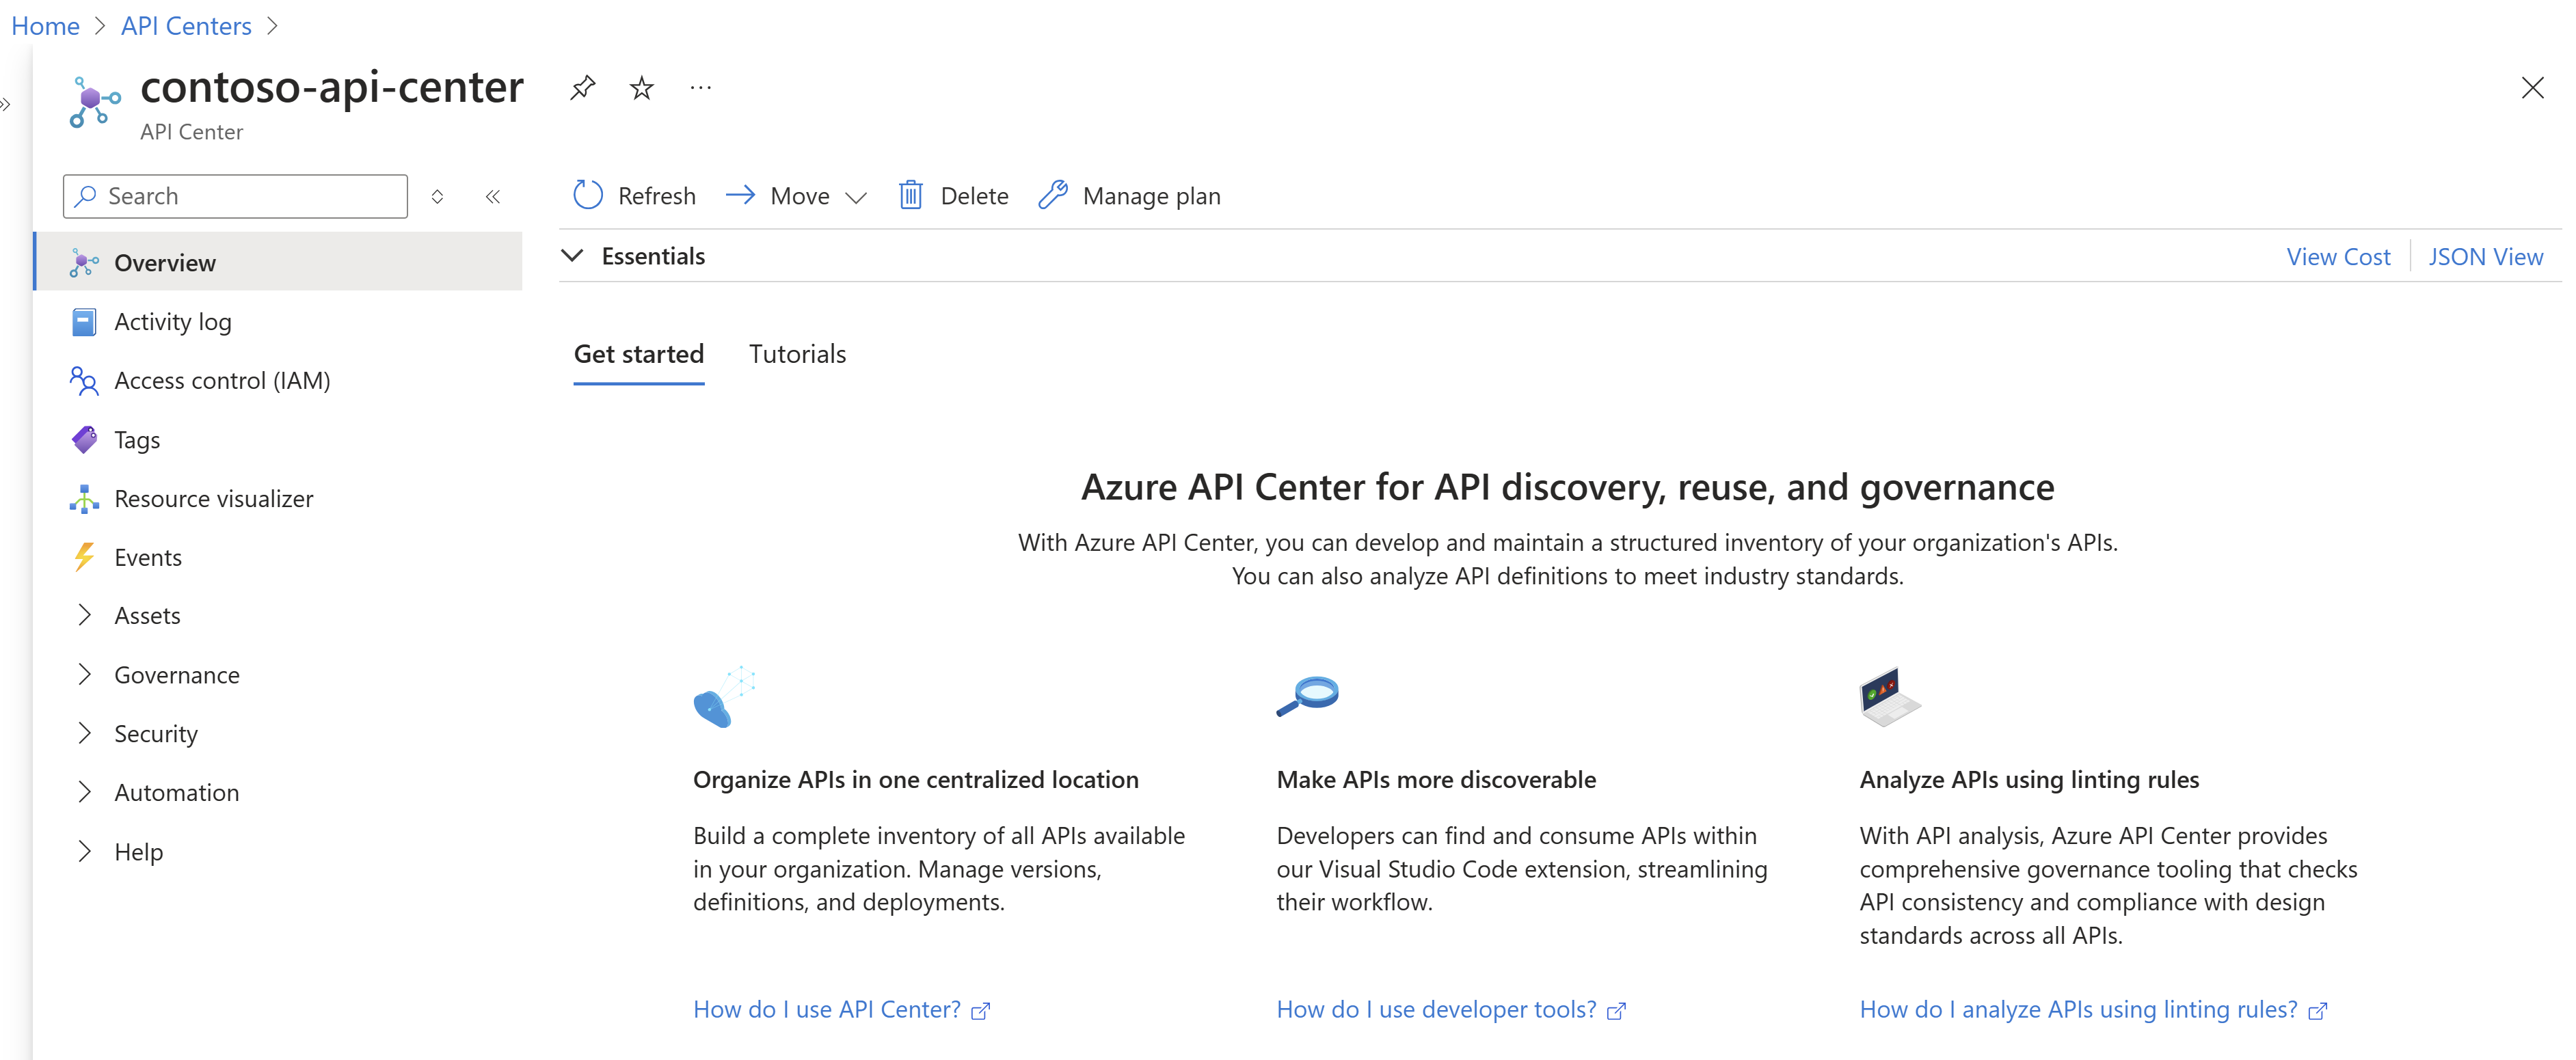
After deployment, your API center is ready to use!
To run CLI reference commands locally, install the Azure CLI, and log in using the following command.
az login
Note
If you haven't already, you need to register the Microsoft.ApiCenter resource provider in your subscription.
Run the following command to register the resource provider
az provider register –namespace Microsoft.ApiCenter
Step 1: Create an API Center service
Create a resource group by running the following command passing the:
- resource group name --name Example. Contoso
- location --location Example. Eastus
az group create –-name contoso –-location eastus

Note
az apic commands require the apic-extension Azure CLI extension. If you haven't used az apic commands, the extension will be installed dynamically when you run your first az apic command, or you can install the extension manually. Learn more about Azure CLI extensions.
Create an API Center by running the following command, passing the:
- API center service name -n Example. contoso-apis
- Resource group -g Example. Contoso
- location --l Example. Eastus
az apic create -n contoso-apis -g contoso -l eastus
Note
By default, the API Center will be created under the Free pricing tier.
Note
Creating an API Center service is currently not supported on VS Code. Create one using Azure CLI or the Azure portal.
Step 2: Define metadata properties
API Center uses metadata properties to organize the APIs in your inventory and enable operations such as filtering, search etc.
Note
Do not include any sensitive, confidential, or personal information in the metadata properties titles/ names.
Contoso, like many other organizations would like to have all their APIs pass through an approver before they become available for use and ensure that a compliance review is conducted for all APIs. The organization also has APIs that are public facing and those built exclusively for internal use only. To enforce this at scale across all APIs, we add three custom metadata properties:
- API Approver of type String
- Compliance review of type Predefined choices
- Public facing of type Boolean
On the left menu, select Assets > Metadata > + New metadata.
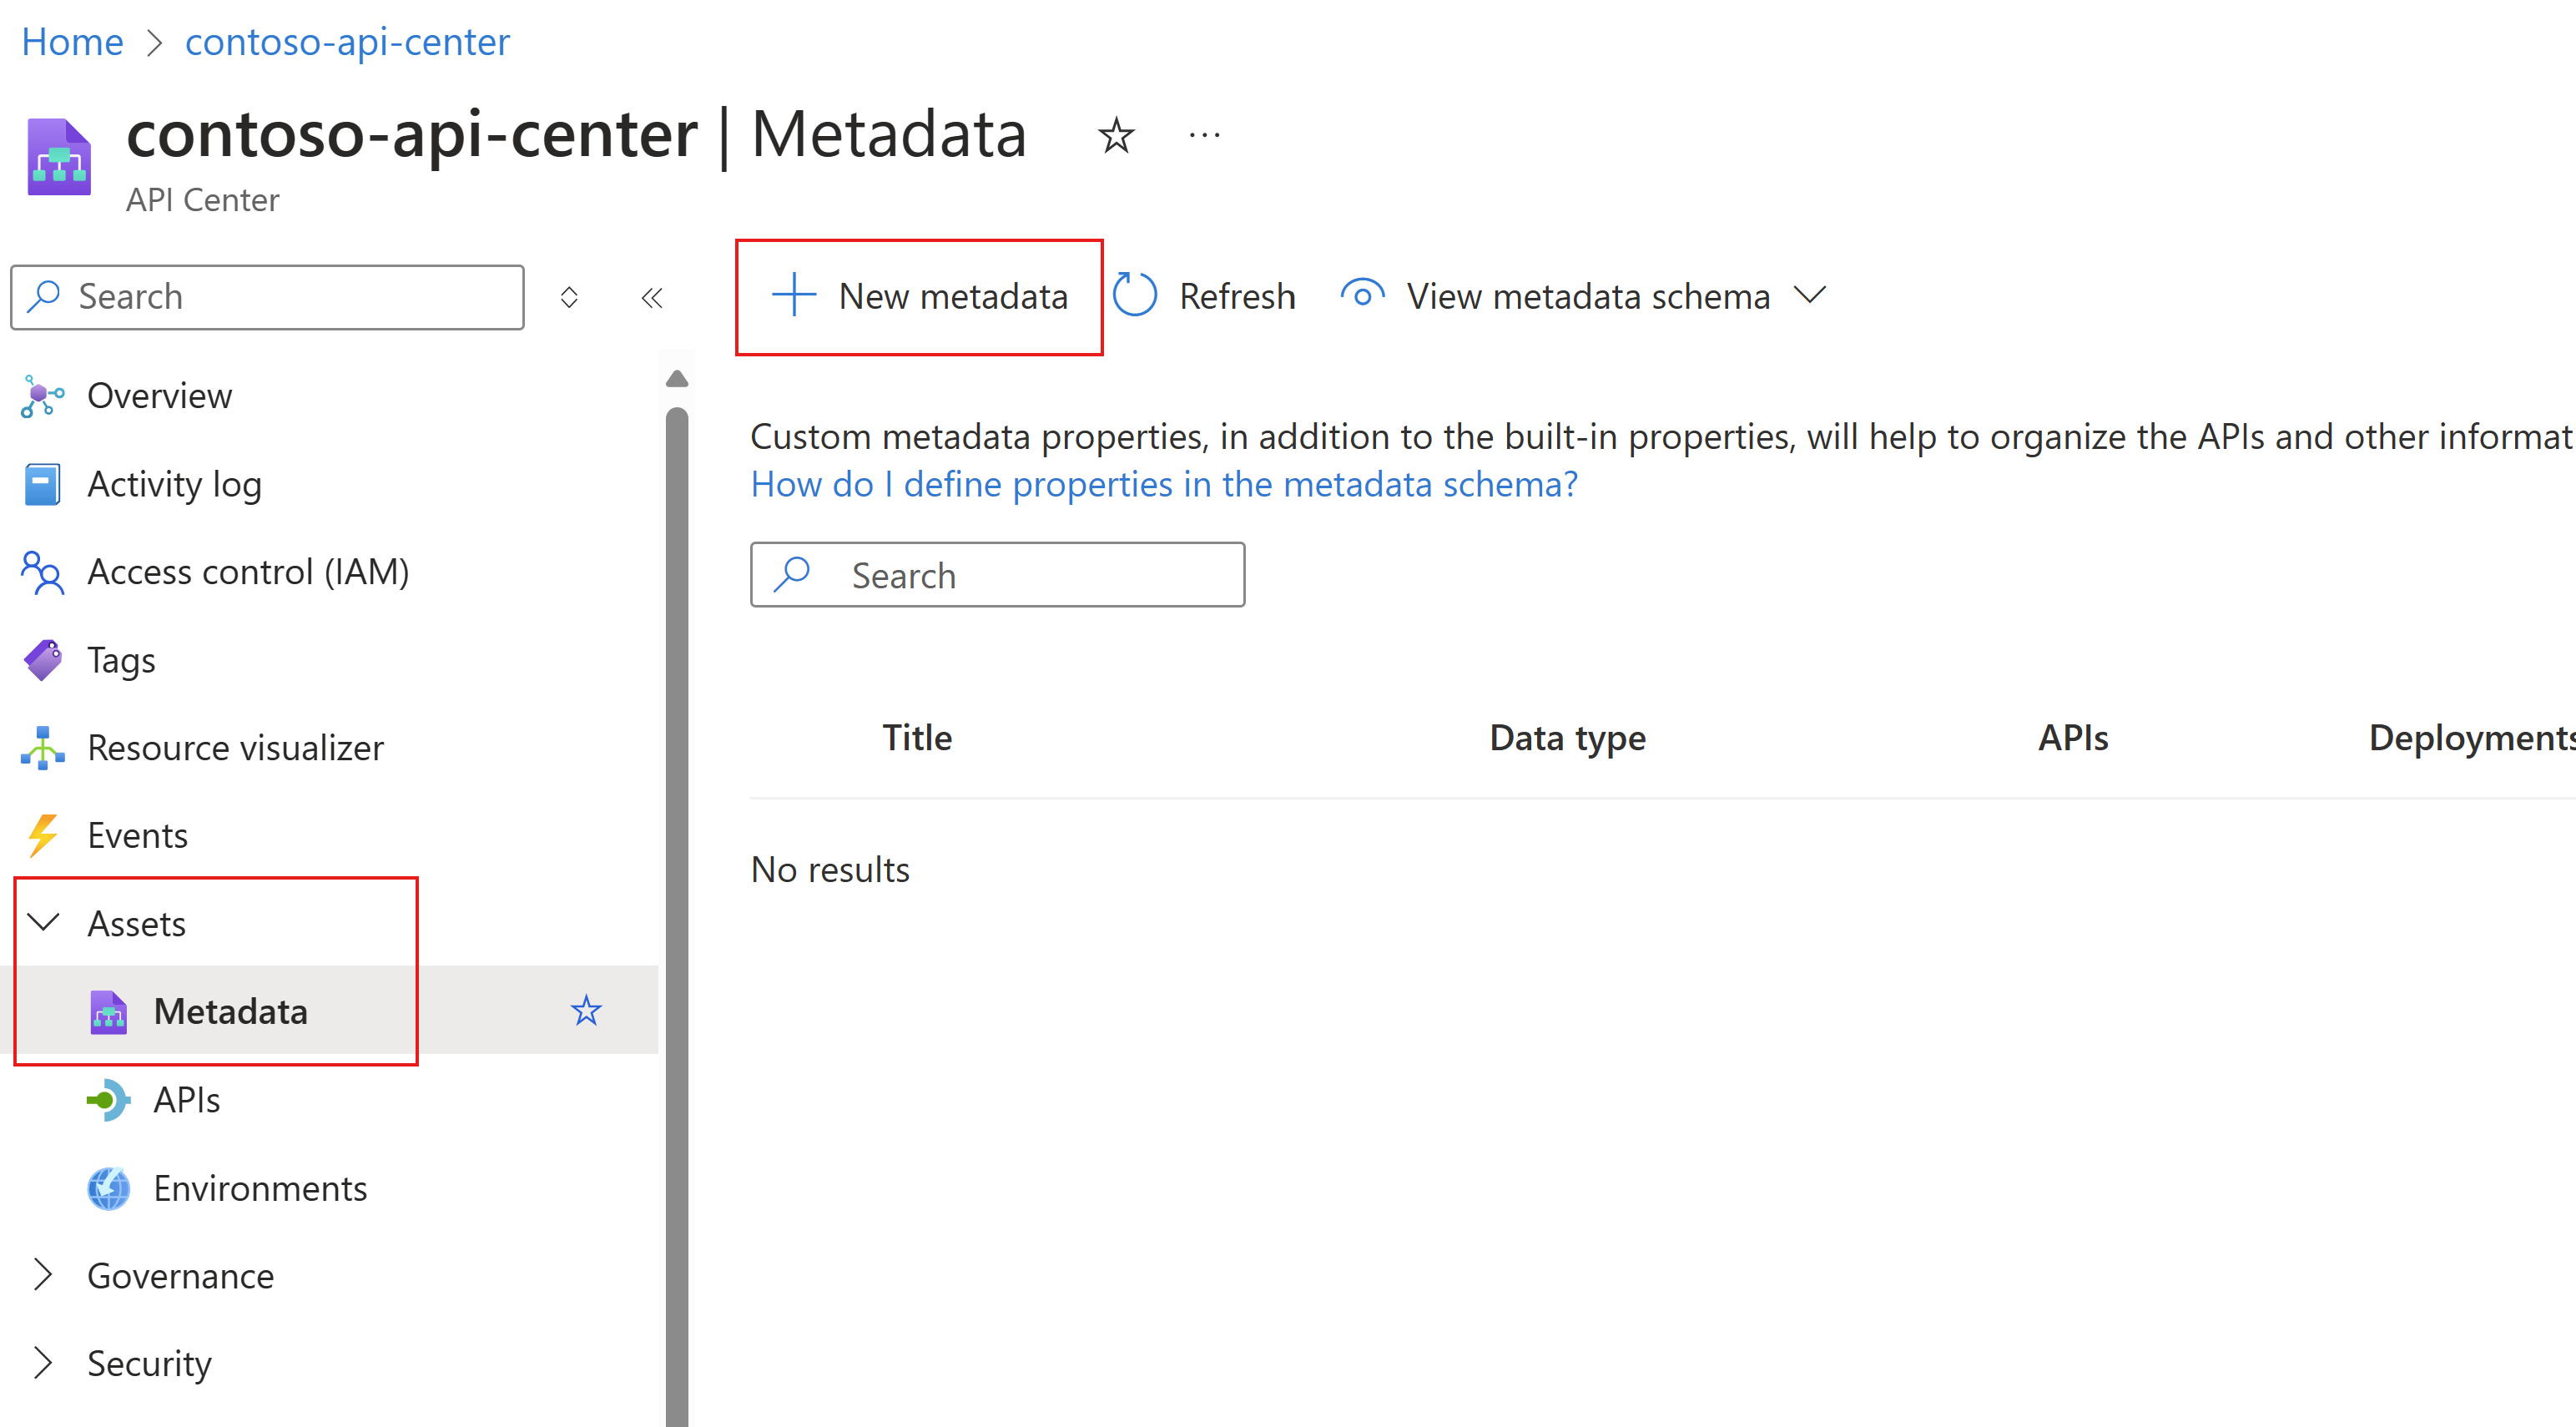
On the Details tab, enter information about the property.
a. In Title, enter API Approver
b. In Description, enter Default API Approver
c. Select type String and select Next
On the Assignments tab, select Required for APIs. Select Optional for Deployments and Environments. Select Next
Select Create
Repeat the same steps for the Public-facing property as shown in the image below. For type, select Boolean
On the Assignments tab, select Required for APIs. Select Not applicable for Deployments and Environments. Select Next
Select Create
Repeat the same steps for the Compliance-review property as shown in the image below. For the type, select Predefined choices and add 3 choices, Not Started, In Progress and Completed
On the Assignments tab, select Required for APIs. Select Not applicable for Deployments and Environments
Select Next
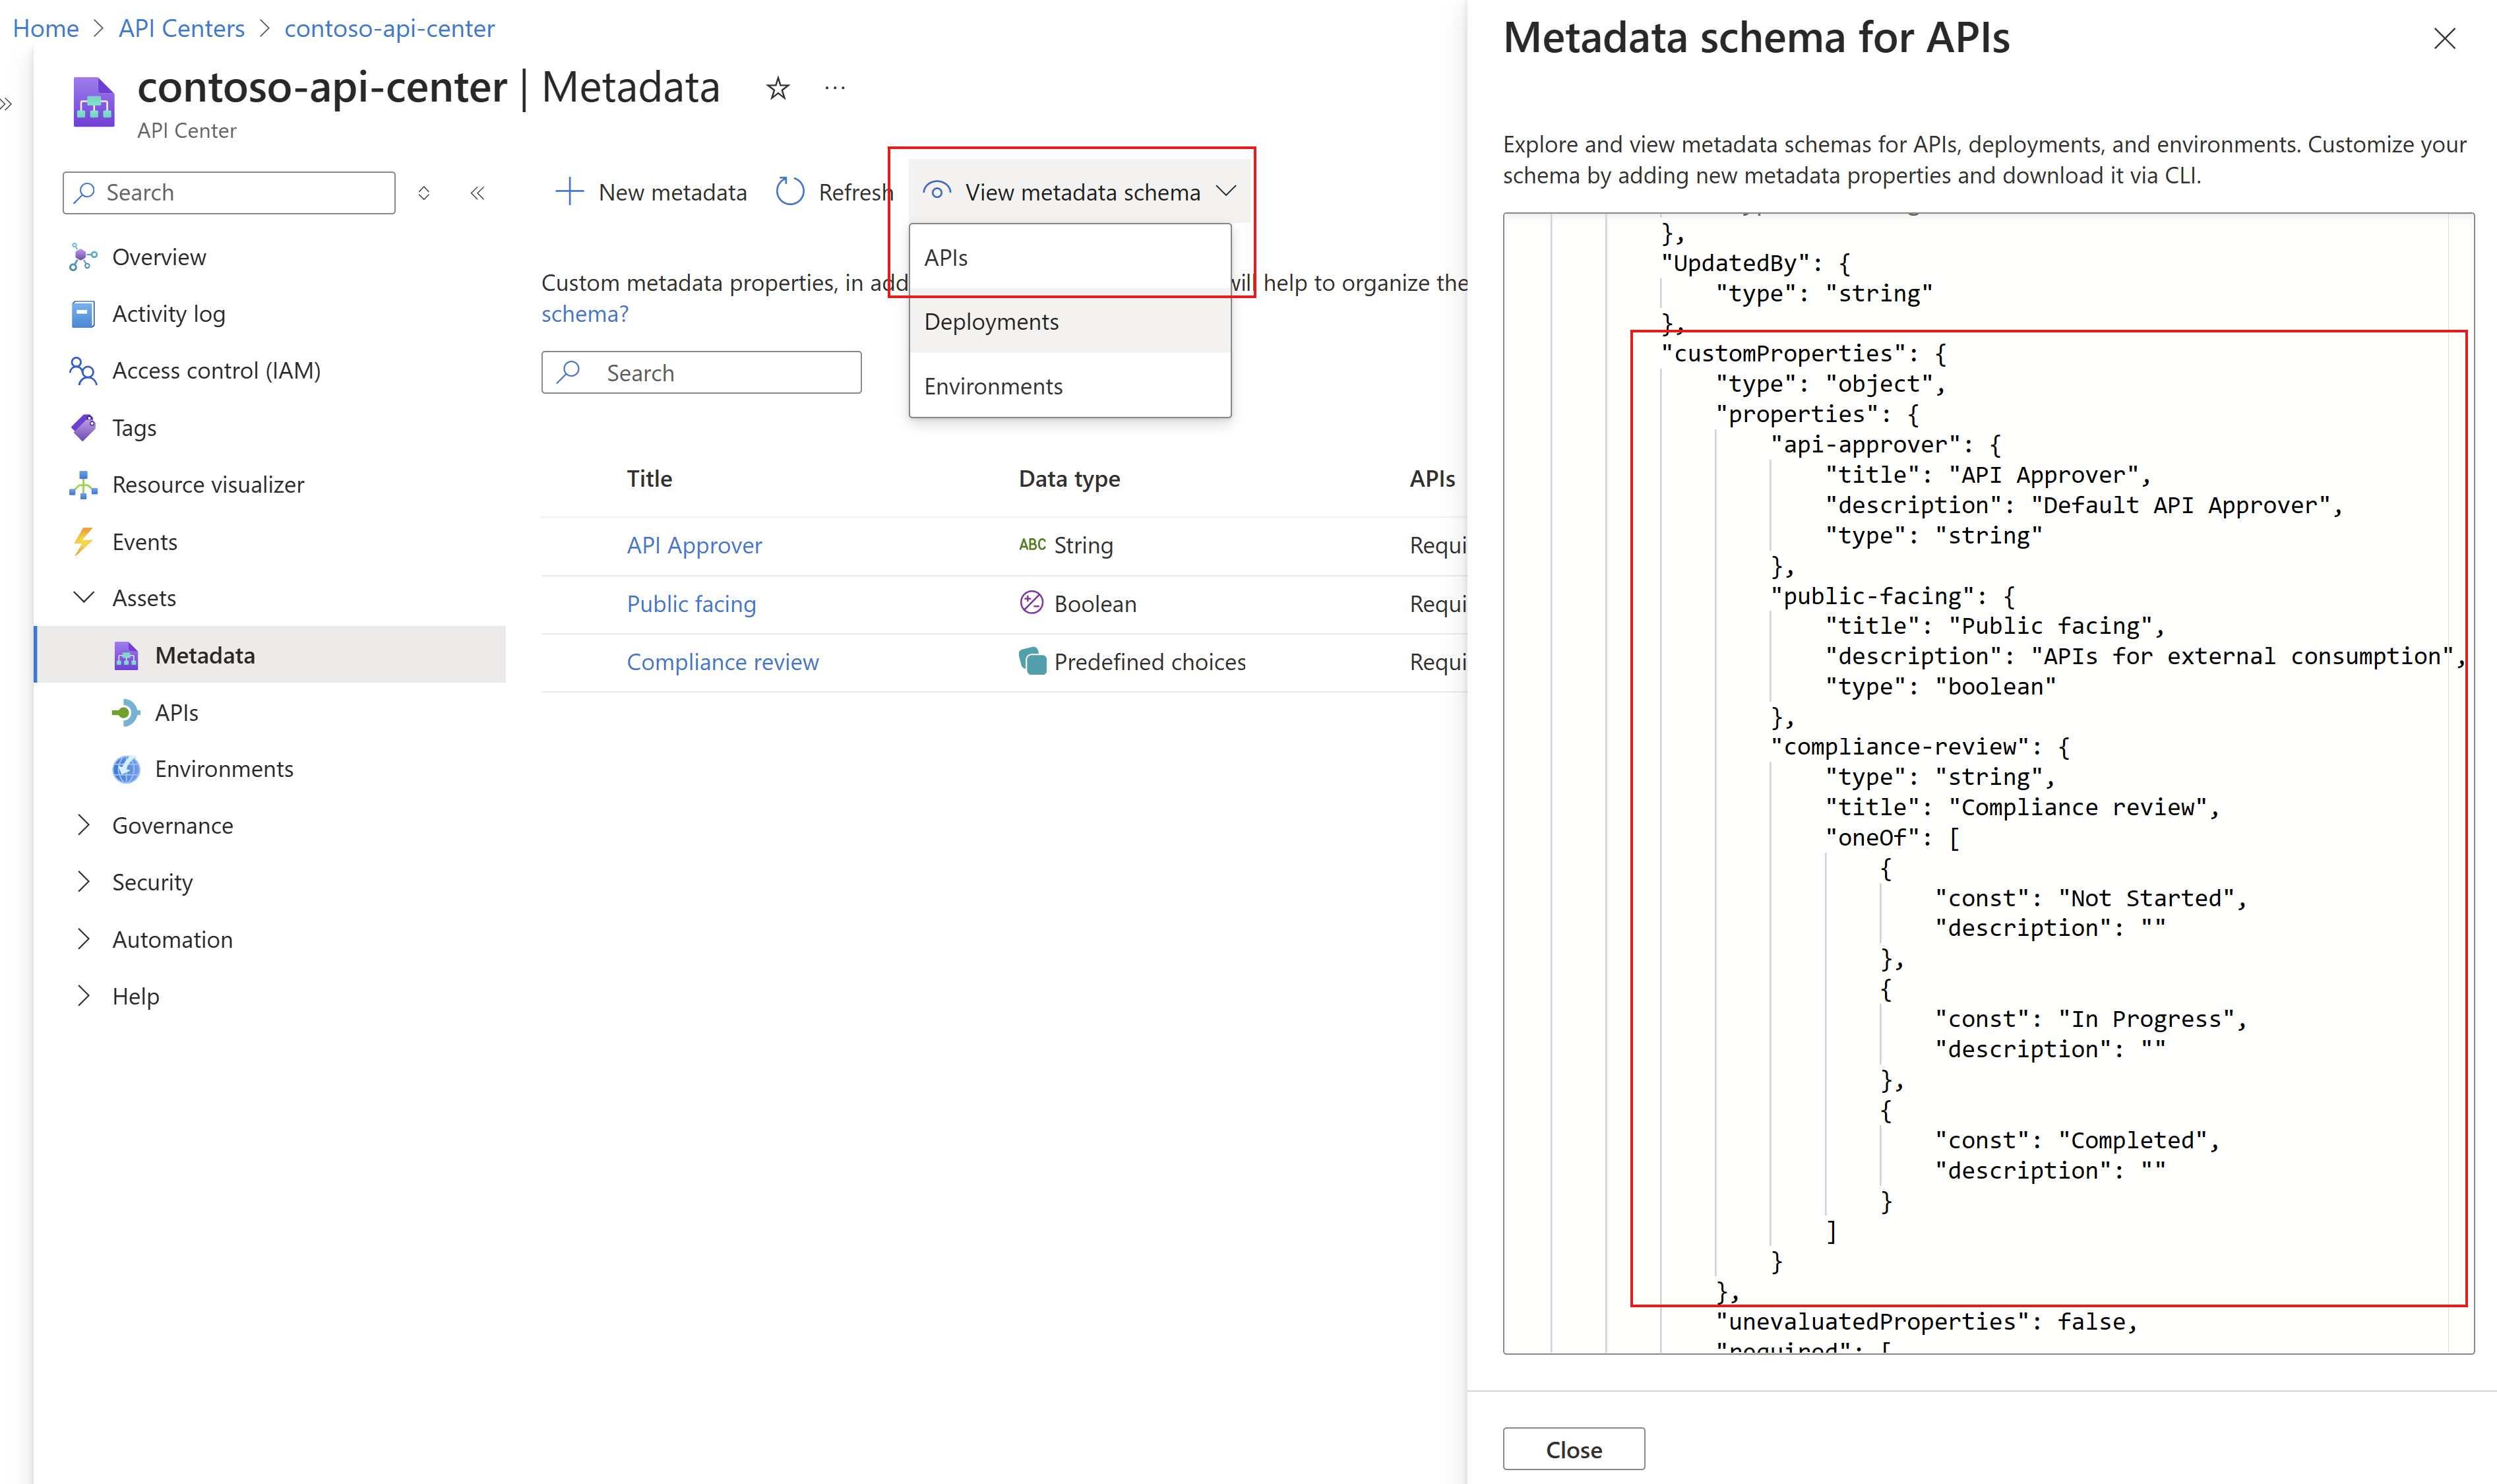
A JSON metadata schema for your APIs is now available for you to view, edit, and download. To view, select View metadata schema and select APIs from the dropdown.
This opens a modal on the right with metadata details, which include built-in properties from API Center such as LifecycleStage, Name, Description, TermsOfService among others. If you scroll to the bottom of the file, you'll see the custom metadata you’ve added in the previous steps as shown below.
Note
You can add and edit properties in the schema at any time and instantly apply them to all APIs in your API Center
Create a new metadata schema by running the following command, to set the:
- Metadata name as api-approver
- Schema with property type as String and title as API Approver
- Assignments as required for APIs while optional for Environment and Deployment
az apic metadata create -g contoso -n contoso-apis --metadata-name "api-approver" --schema '{"type":"string","title":"API Approver"}' --assignments '[{entity:api,required:true,deprecated:false},{entity:environment,required:true,deprecated:false}]'
Repeat the same steps for:
- Metadata name as public-facing
- Schema with property type as Boolean and title as Public Facing
- Assignments as required for APIs while optional for Environment and Deployment
By running the following command:
az apic metadata create -g contoso -n contoso-apis --metadata-name "public-facing" --schema '{"type":"boolean", "title":"Public Facing"}' --assignments '[{entity:api,required:true,deprecated:false},{entity:environment,required:true,deprecated:false}]'
Finally, repeat the same steps for:
- Metadata name as compliance-review
- Schema with property type as String and title as Compliance Review
- Assignments as required for APIs while optional for Environment and Deployment
By running the following command:
az apic metadata create -g contoso -n contoso-apis --metadata-name "compliance-review" --schema '{"type":"string","title":"Compliance Review", "oneOf":[{"const":"Not Started","description":""},{"const":"In Progress","description":""},{"const":"Completed","description":""}]}' --assignments '[{entity:api,required:true,deprecated:false},{entity:environment,required:true,deprecated:false}]'
You can run the following command to view a list of all the defined metadata in your API Center.
az apic metadata list -g <resource-group-name> -n <api-center-name>
Note
You can add and edit properties in the schema at any time and instantly apply them to all APIs in your API Center
Note
This action is currently not supported on VS Code. Create one using Azure CLI or the Azure portal.
Step 3: Add APIs to the inventory
The Contoso organization would like to recommend technical conferences for their engineering teams as part of their internal skilling drive. We'll add a Conference API with speakers, sessions, and topics.
Conference API URL: https://bigconference.azurewebsites.net/
For the following steps, you can copy the OpenAPI definition from the website above and save it as a JSON file on your local machine. Or, substitute a different API definition when adding an API to the inventory.
In the portal, navigate to your API center.
In the left menu, select Assets > APIs > + Register API.
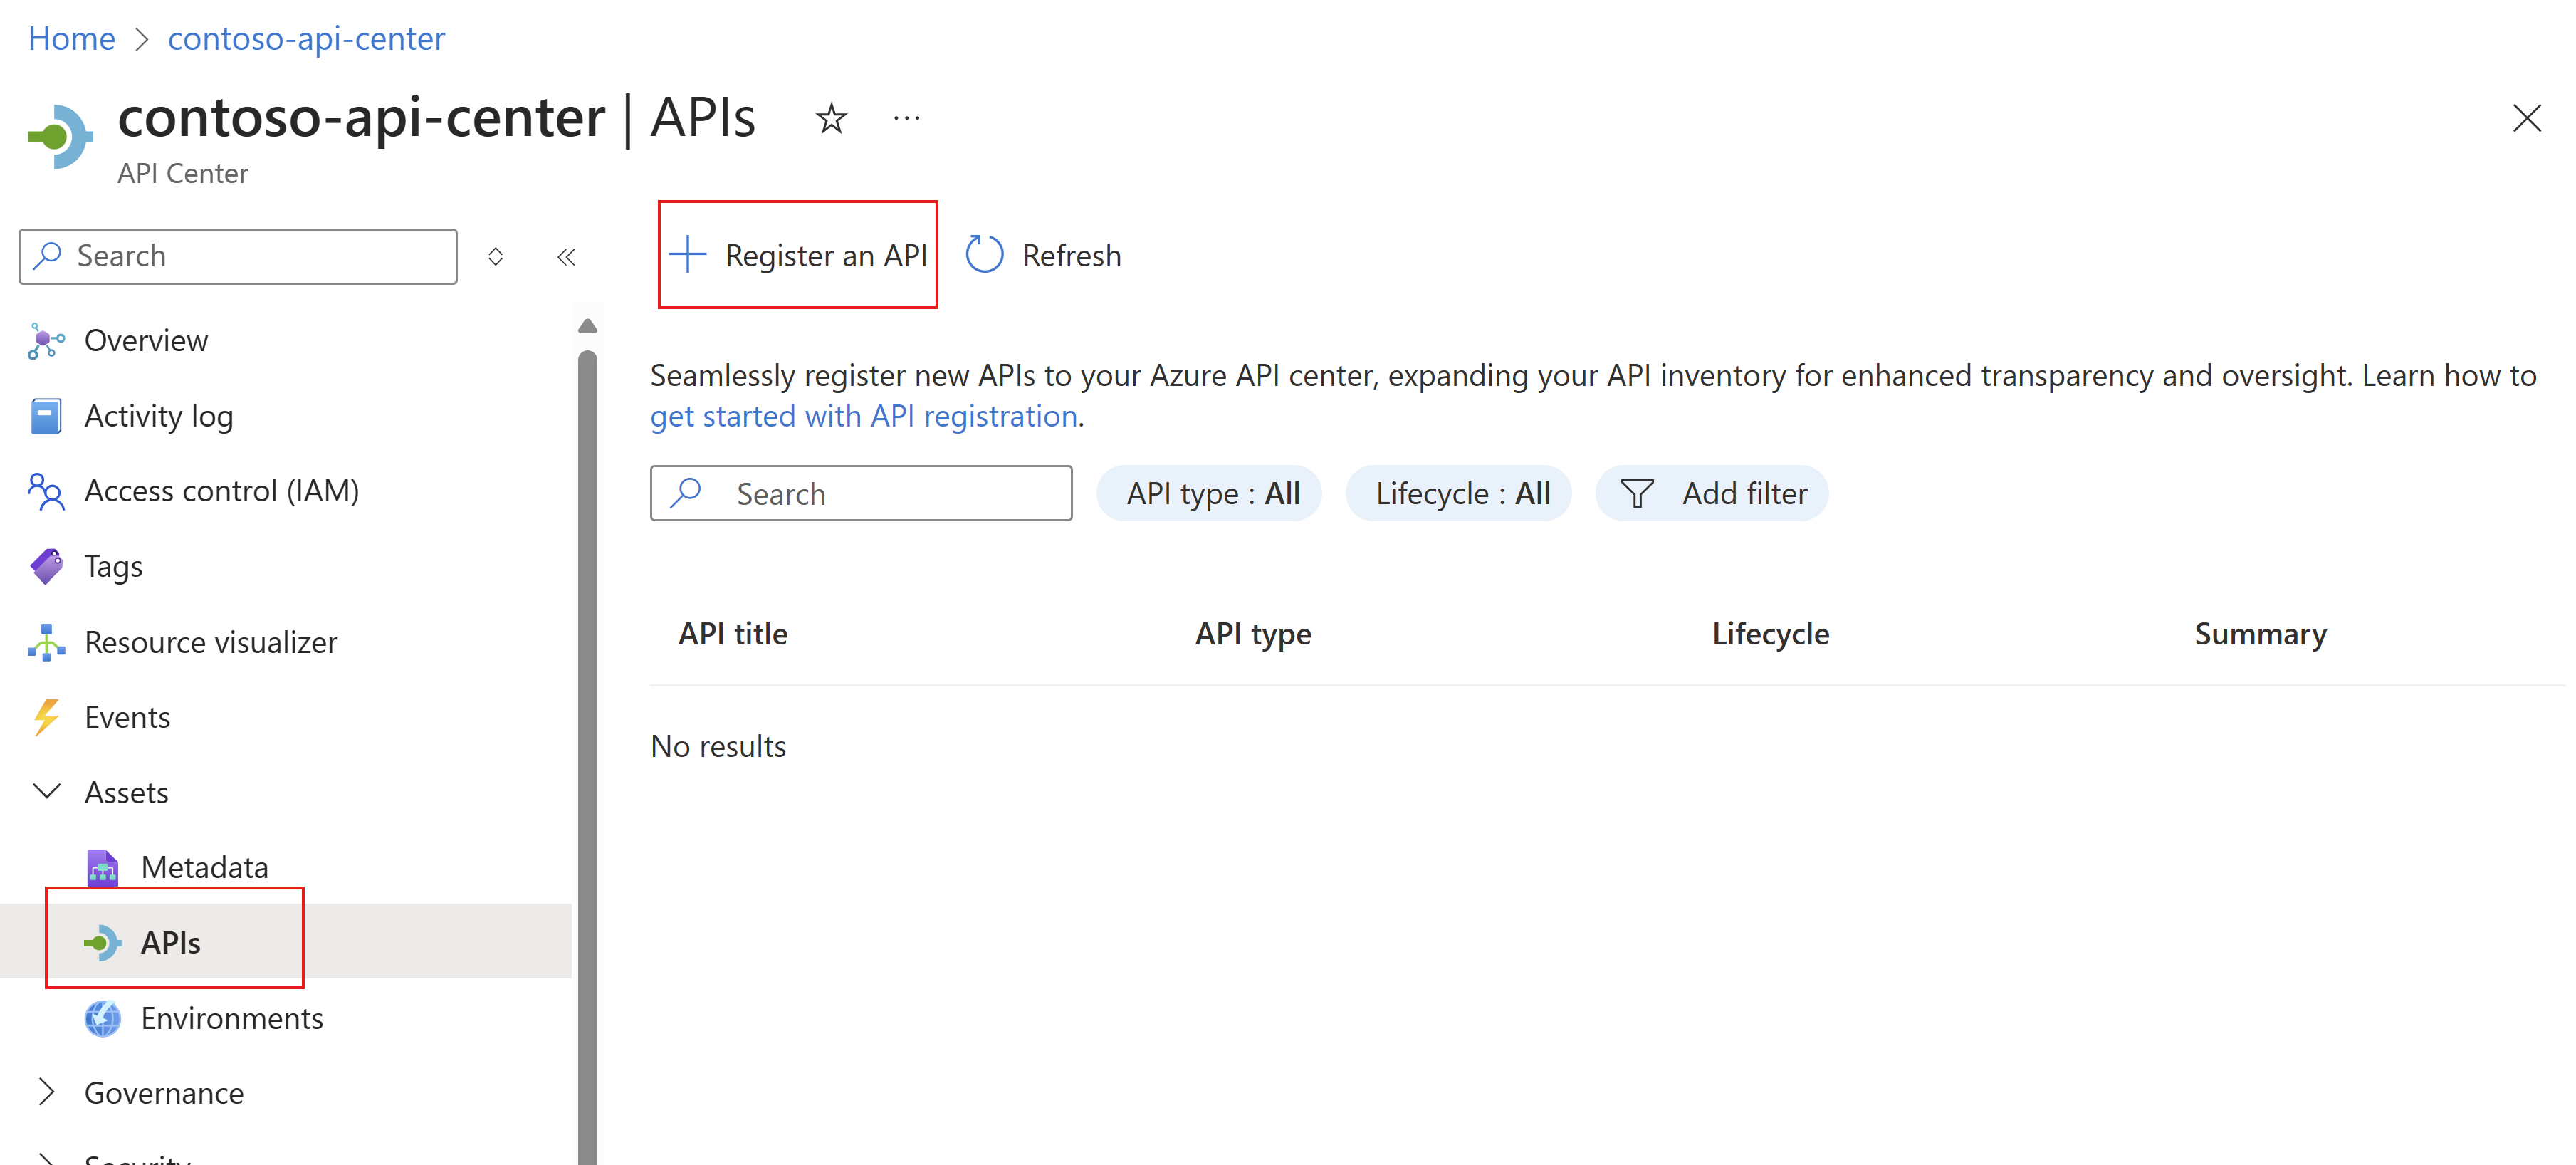
In the Register API page, add the following required information for the API. You'll see the custom API Approver, *Public-facing, and compliance-review metadata properties that you defined in the previous steps at the bottom of the page.
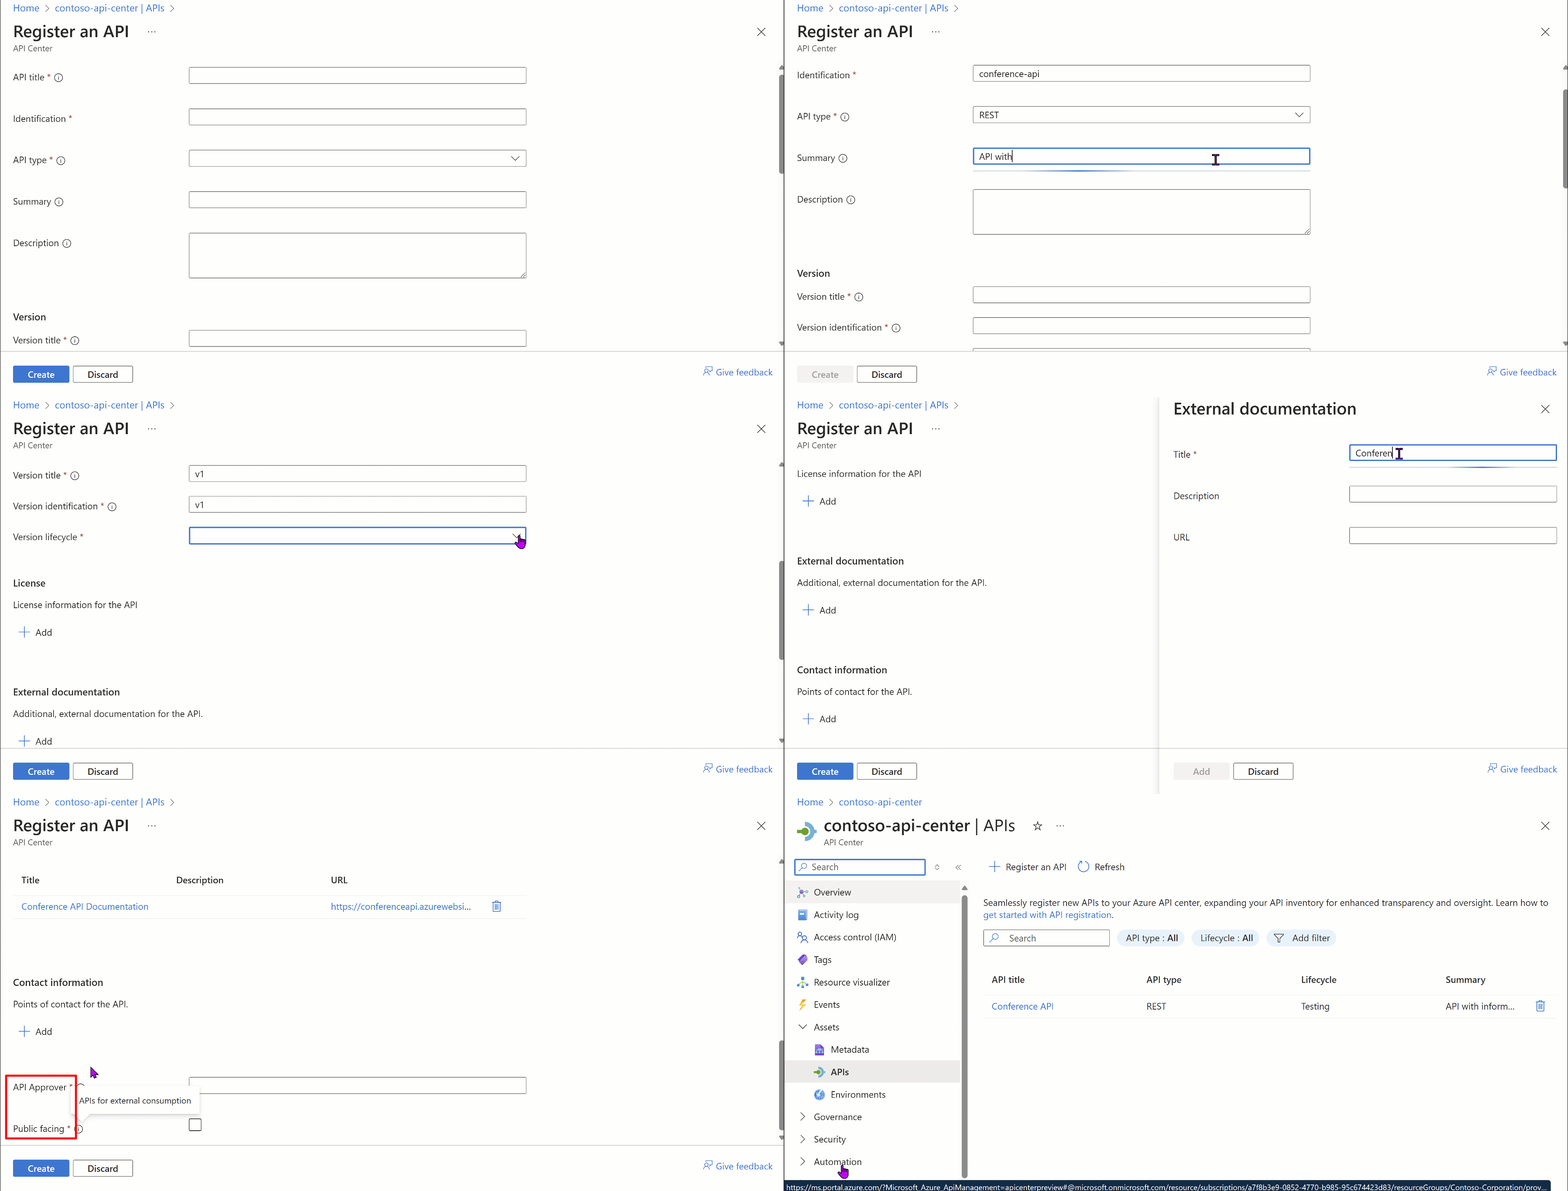
To view your created API, on the left menu, select Assets > APIs > Conference API.
The Overview tab gives a view of the API configuration. Expand Details to see and edit additional information such as API version and deployments (we have no deployments at this point).
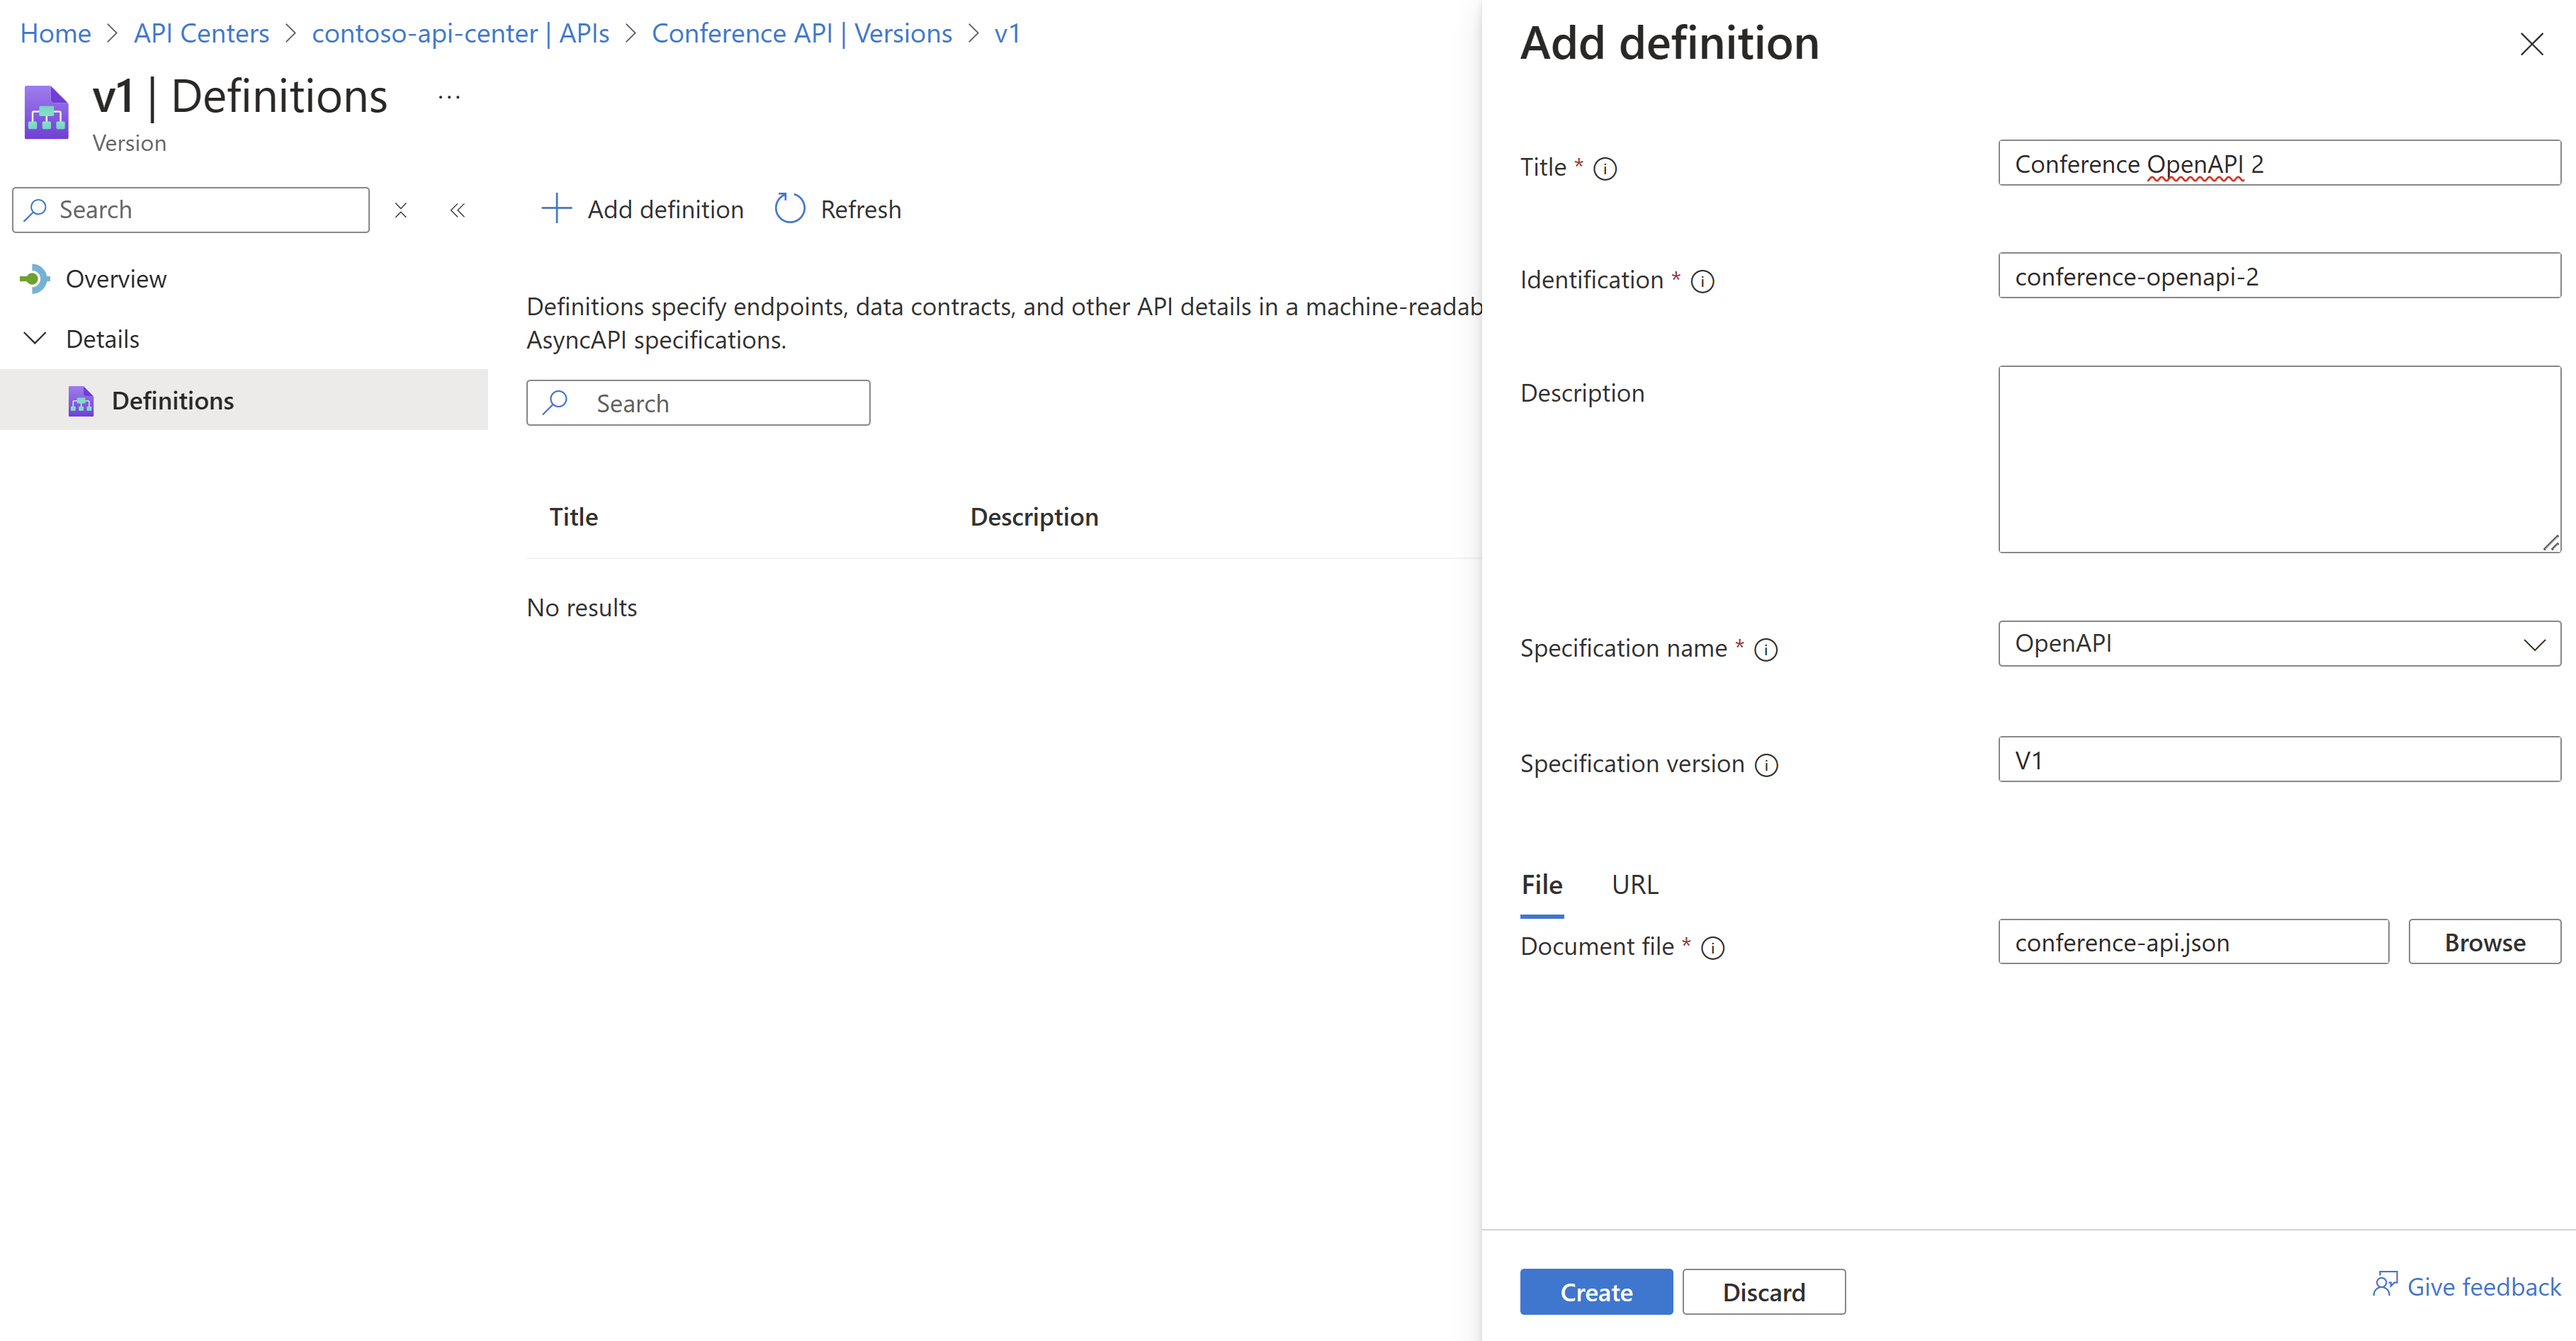
You would normally want to add an API definition for your API version and API Center supports text specification formats including OpenAPI 2, OpenAPI 3 for REST.
To add a Definition,
- In the left menu, select Assets > APIs > Select your API (Conference API).
- Expand Details and select Versions.
- Select your version (v1), and expand Details.
- Under details, select Definitions > Add definition.
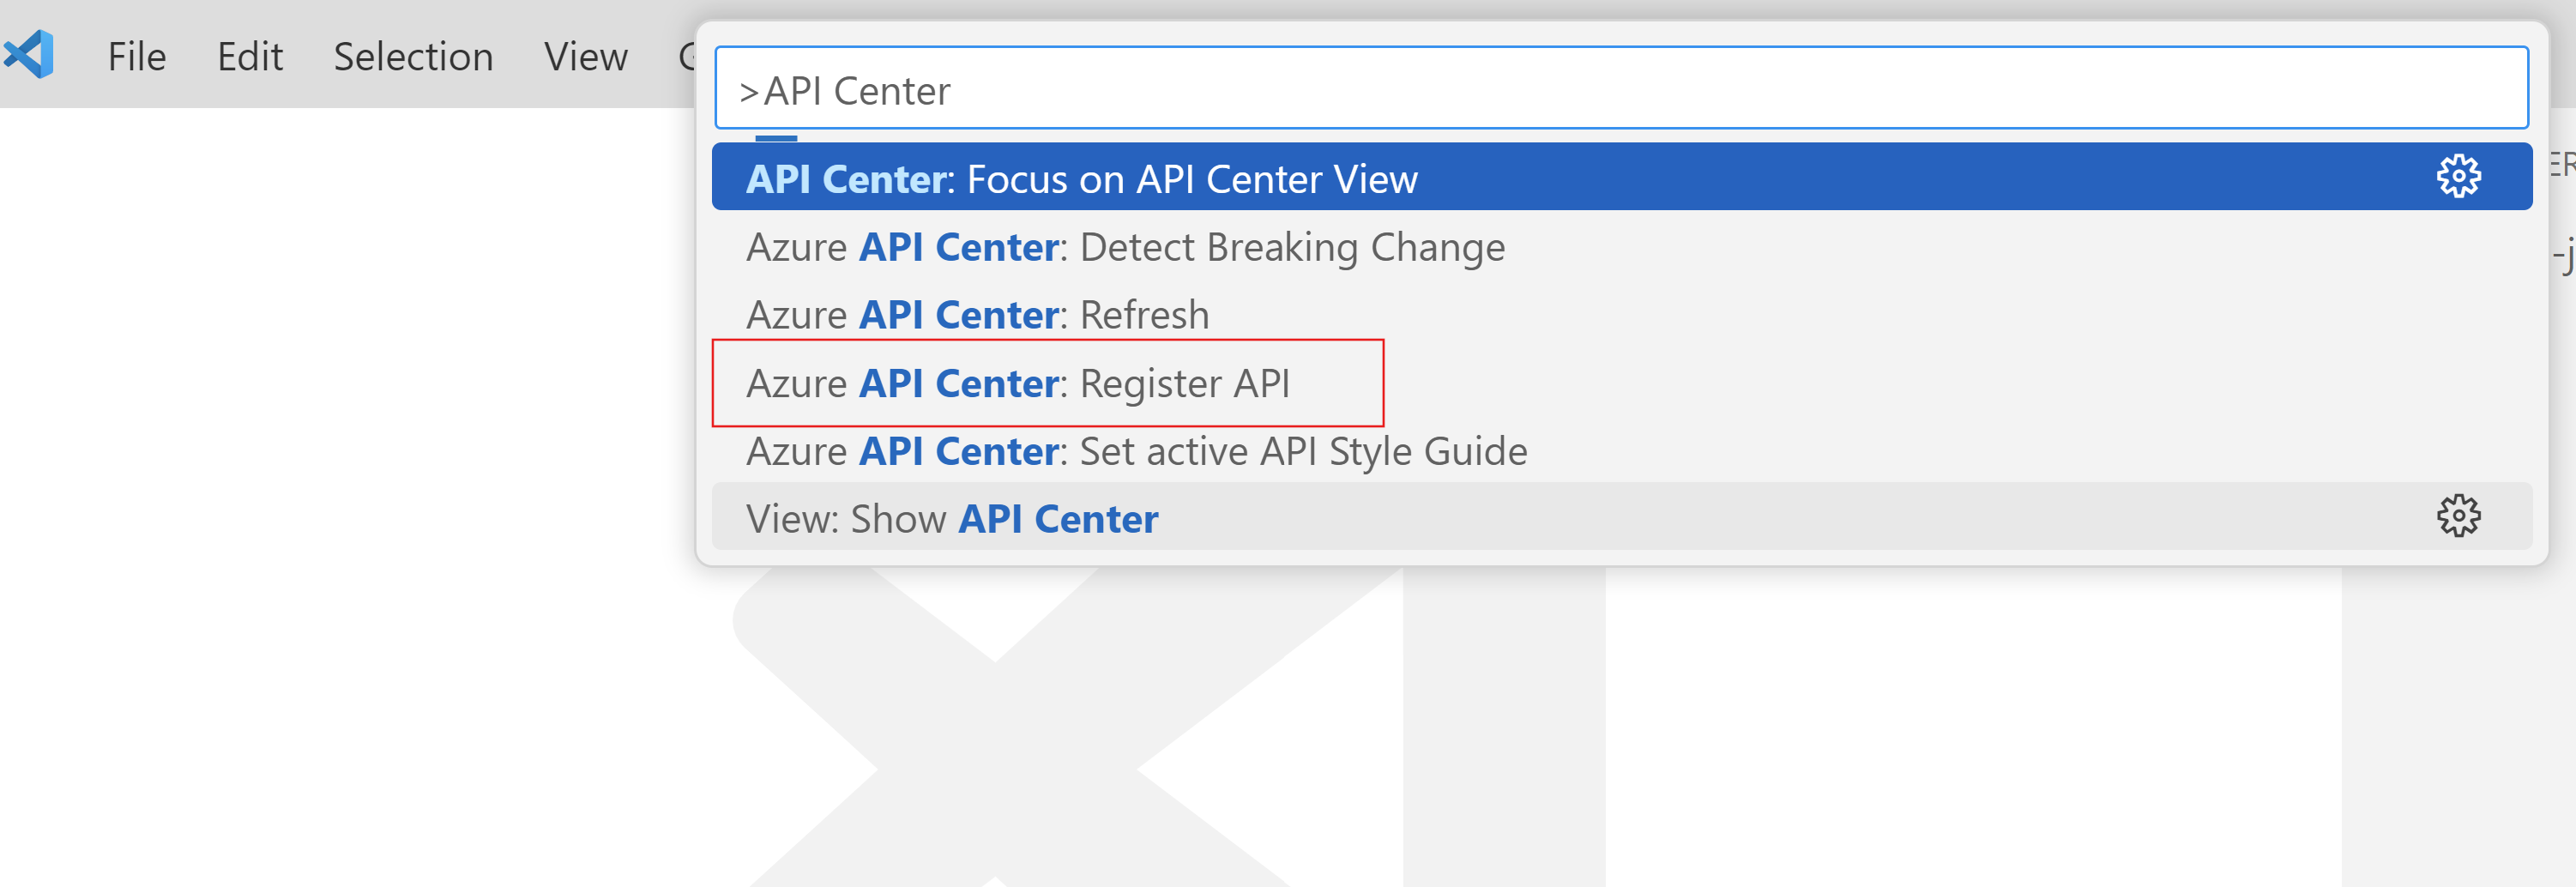
You can use the Azure API Center extension for Visual Studio Code to register an API into your API instance.
Step 1: Install the extension
Step 2: Open the command pallet, ‘Ctrl + Shift + P’ and type API Center: Register API
Follow the prompts to provide the following information for your API:
| Register API | Step by step |
|---|---|
| Select API Center Service | Select your API Center instance |
| API Title | Enter the name of your API (Conference API) |
| API Type | REST |
| API Version Title | Enter a version name for your API (v1) |
| API Version Lifecycle | Select a lifecycle from the dropdown (Development) |
| API Definition Title | Enter a name for your definition (Conference API Definition) |
| API Specification Name | Select a specification from the dropdown (OpenAPI 2) |
| Select API Definition File to Import | Browse and select the definition file from your storage |
Refresh the API Center extension tab and your newly created API appears in the respective APIC instance/ resource.
Use the following command to create a new API, passing in the:
- Resource group -g Example. Contoso
- API center service name -n Example. contoso-api-center
- Title --title Example. Conference API
- API ID --api-id Example. conference-api
- Type --type Example. REST
az apic api create -g contoso -n contoso-apis --title "Conference API" --api-id conference-api --type REST
Create an API version using the following command, passing in the:
- Resource group -g Example. contoso
- API center service name -n Example. contoso-apis
- API ID --api-id Example. conference-api
- Title --title Example. v1.2.2
- Version ID --version-id Example. 2024-07-03
- Lifecycle stage --lifecycle-stage Example. design
az apic api version create -g contoso -n contoso-apis --api-id conference-api --title v1.2.2 --version-id 2024-07-03 --lifecycle-stage design
You can also add an API definition for your API version and API Center supports text specification formats including OpenAPI 2, OpenAPI 3 for REST.
To add a Definition, use the following command, passing in:
- Resource group -g Example. contoso
- API center service name -n Example. contoso-apis
- API ID --api-id Example. conference-api
- Version ID --version-id Example. 2024-07-03
- Title --title Example. OpenAPI
- Definition ID --definition-id Example. openapi
az apic api definition create -g contoso -n contoso-apis --api-id conference-api --version-id 2024-07-03 --title OpenAPI --definition-id openapi
To import an OpenAPI definition file from a url, use the az apic api definition import-specification command to import . Example: https://conferenceapi.azurewebsites.net/?format=json
az apic api definition import-specification -g contoso -n contoso-apis --api-id conference-api --version-id 2024-07-03 --definition-id openapi --format "link" --value 'https://petstore3.swagger.io/api/v3/openapi.json' --specification '{"name":"openapi","version":"3.0.2"}'
Step 4: Add deployments and environments
Environments
An environment (Development, Testing, Staging, or Production), represents a location where an API runtime is deployed. API Platform engineers at Contoso define two environments – Testing and production, in their API Center instance to manage and track different API runtimes in their organization.
To create an environment,
On the left menu, select Assets > Environments > + New environment.
Add the following information.
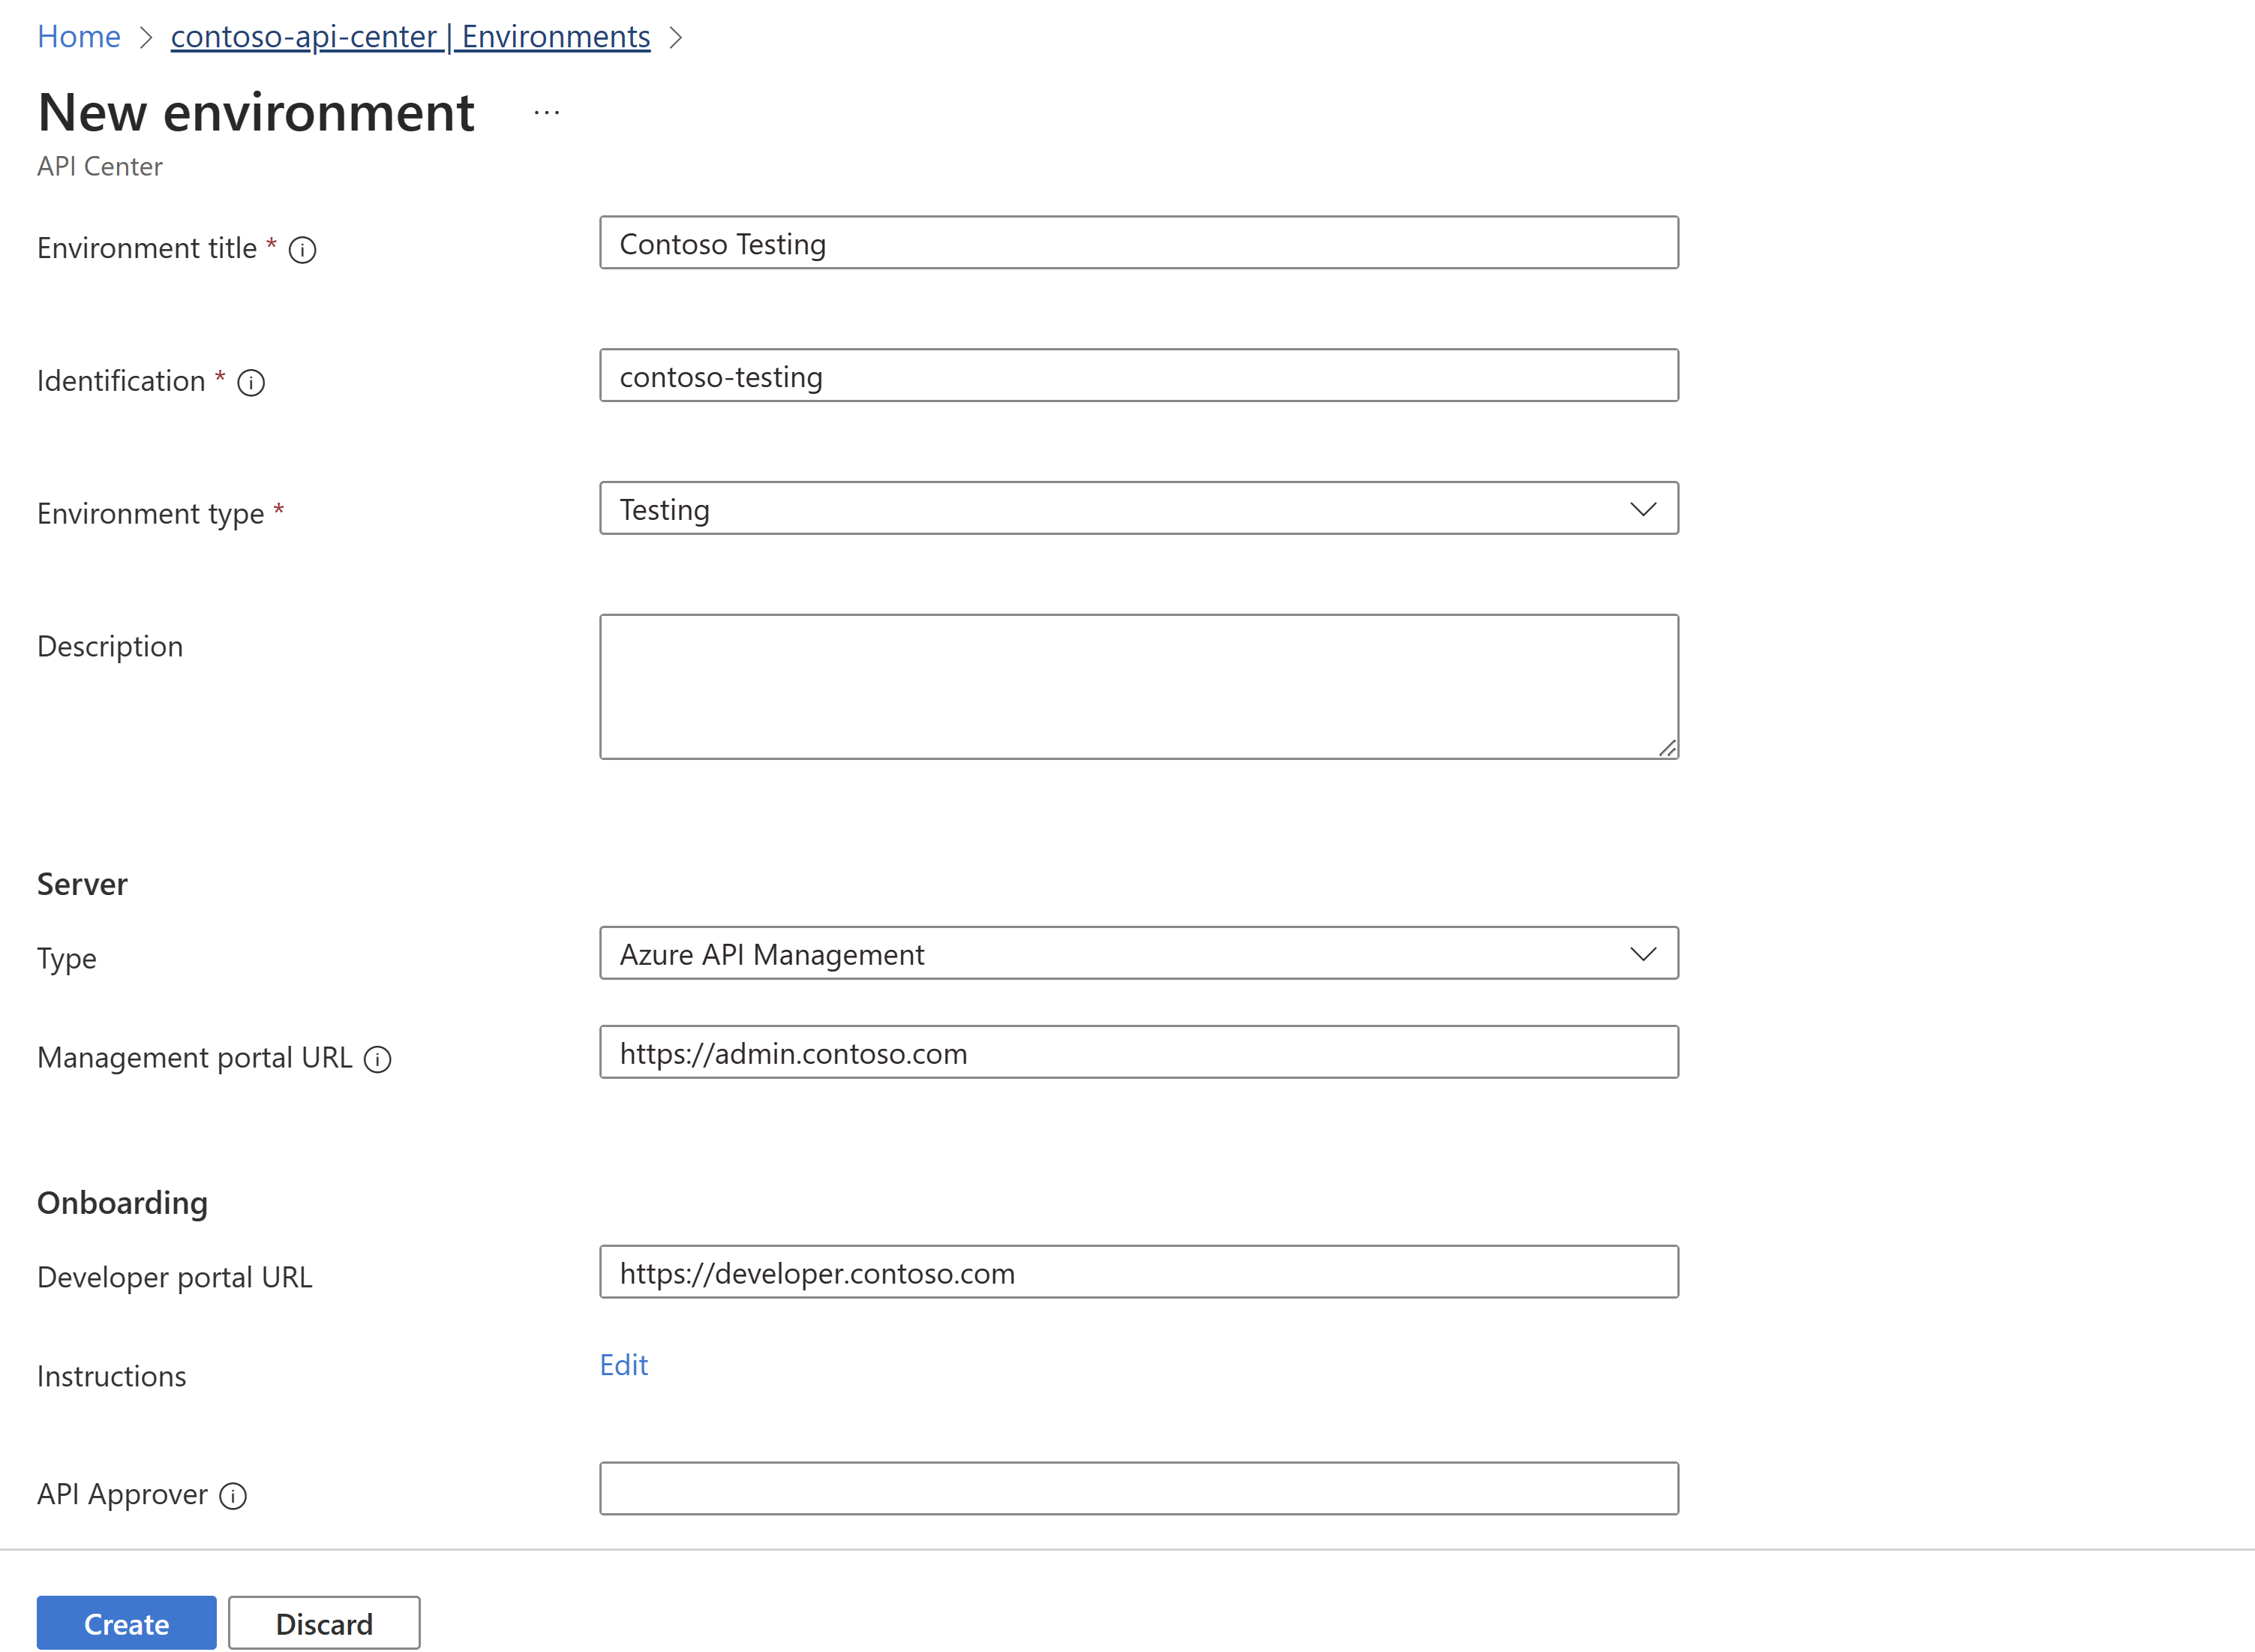
Select Create.
Repeat the same steps for the Production environment.
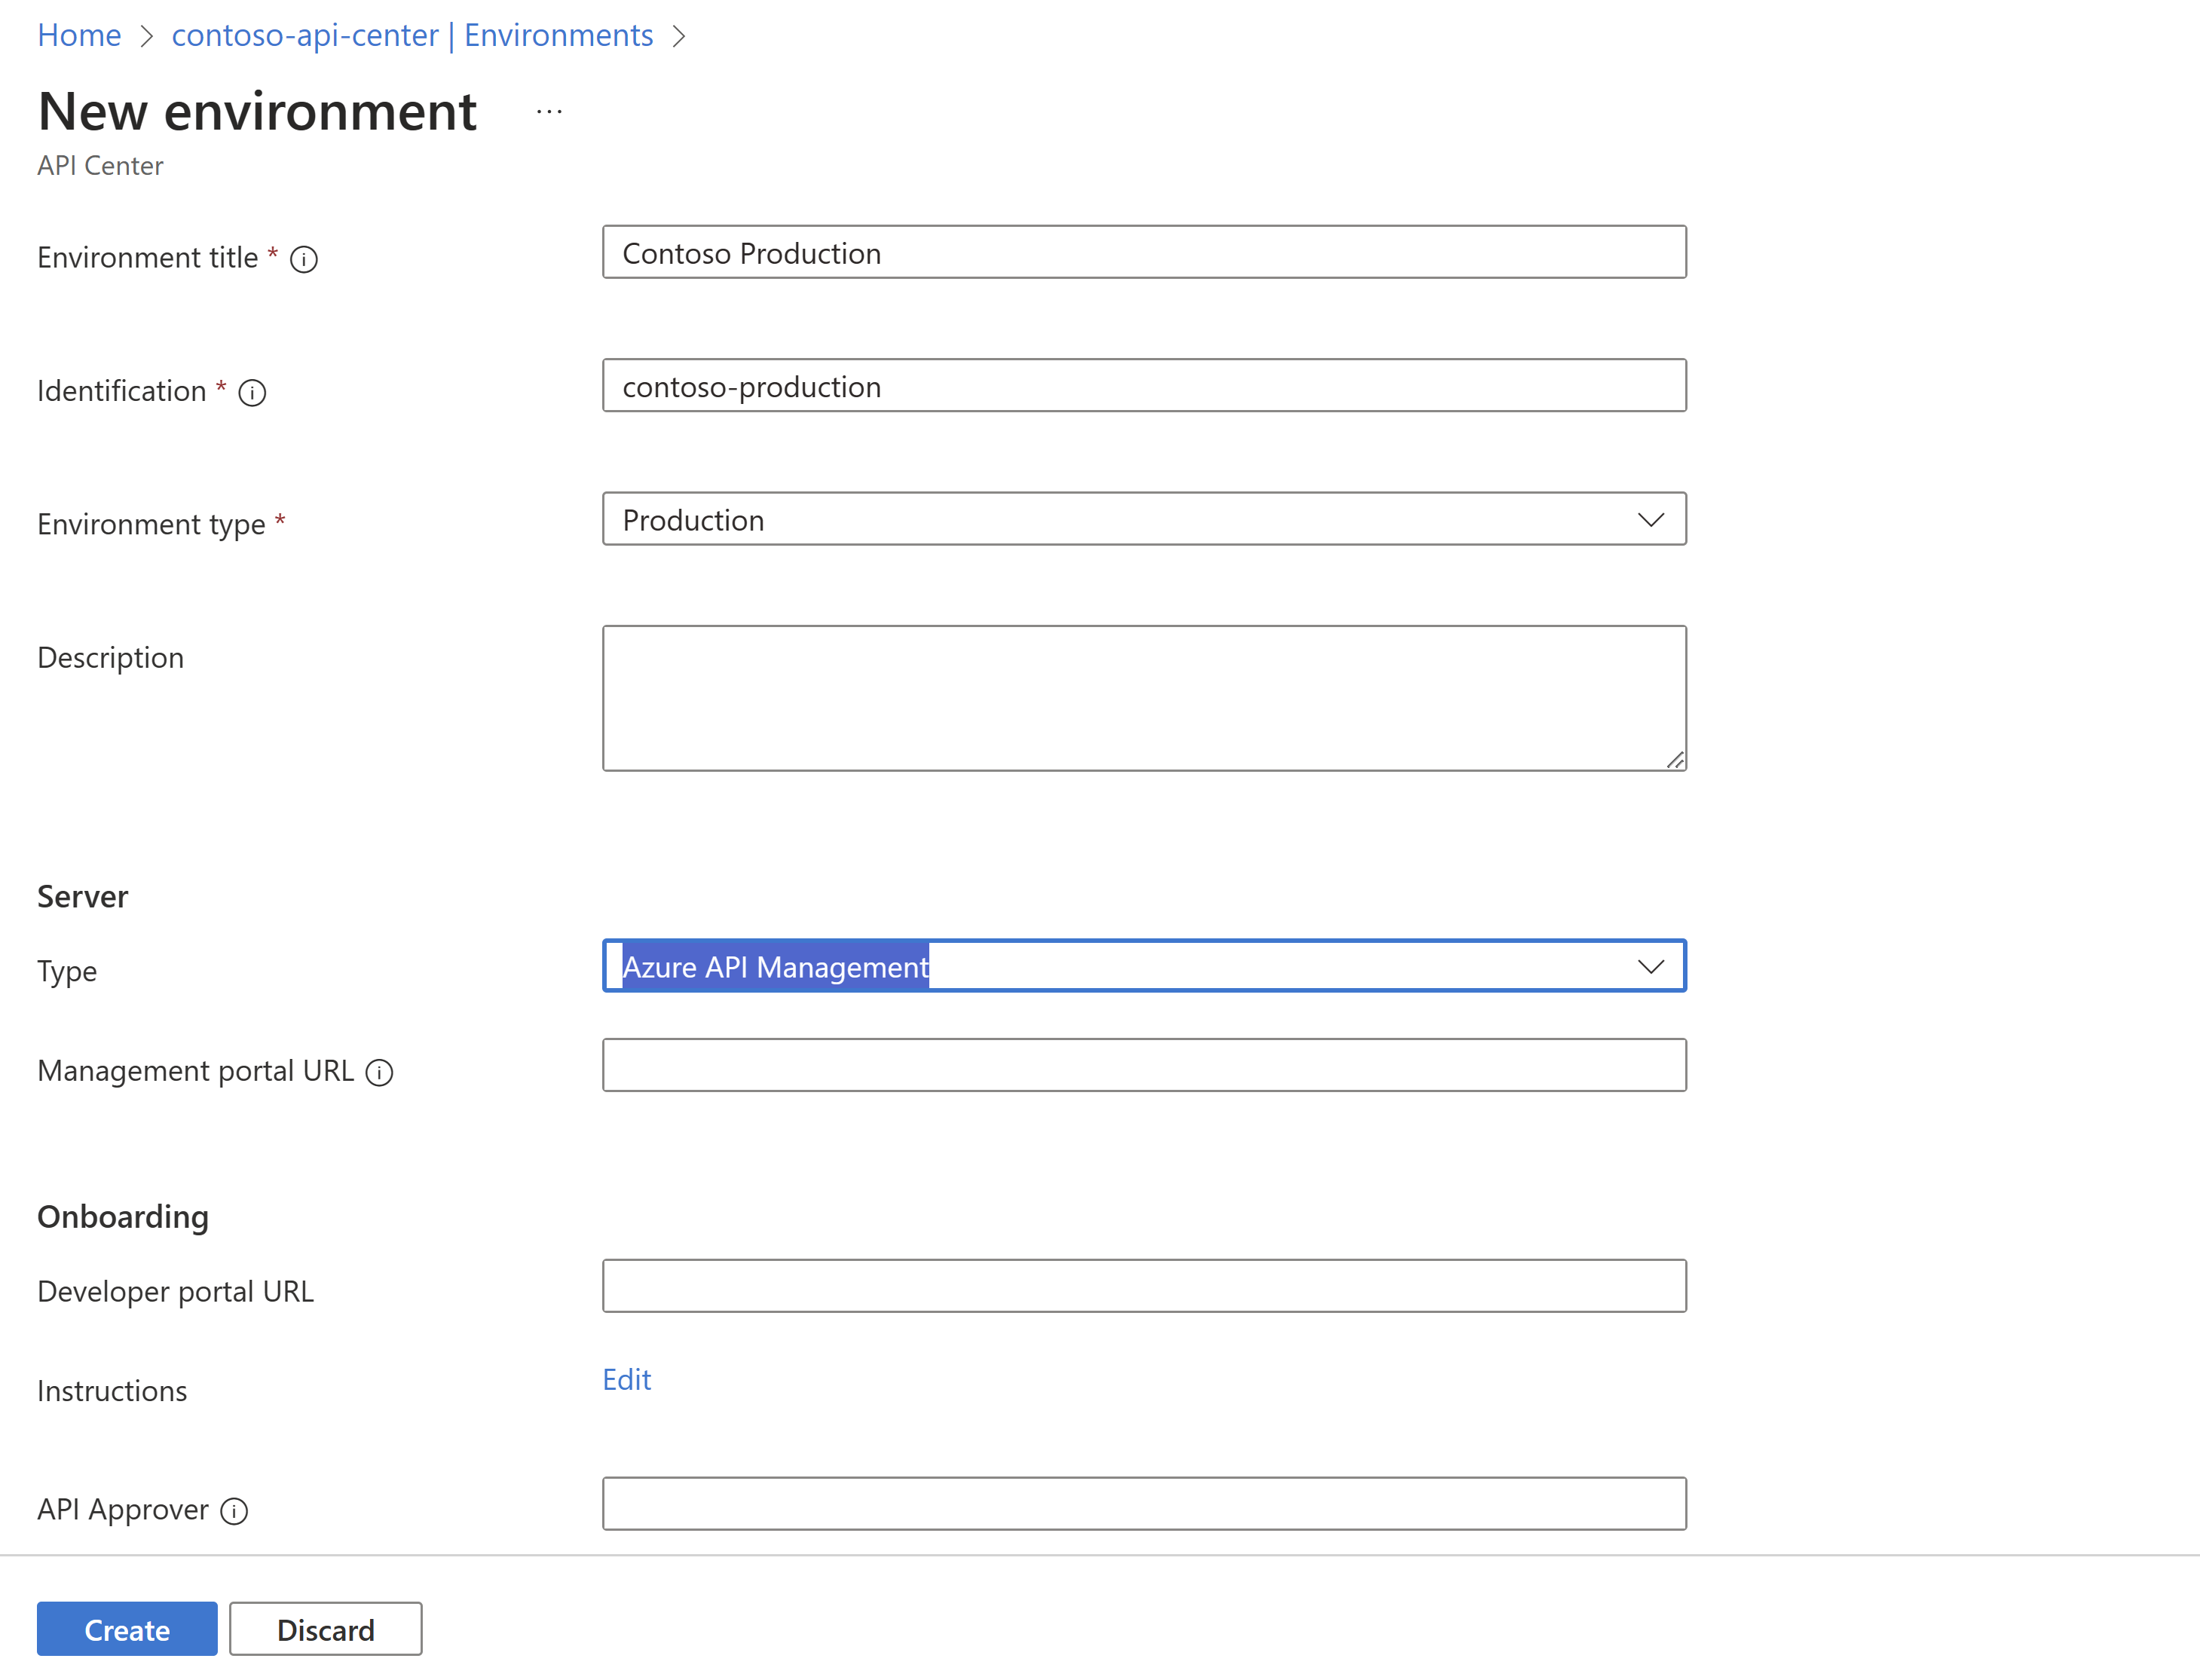
To create an environment, run the following CLI command
az apic environment create -g contoso -n contoso-apis --title ContosoTesting --environment-id contosotesting --type testing
Repeat the same for the production environment
az apic environment create -g contoso -n contoso-apis-new --title ContosoProduction --environment-id contosoproduction --type production
Note
Creating environments is currently not supported on VS Code. Please use the Azure CLI or the Azure portal option for this step.
Deployments
A unique location (address) for users to interact with your API is provided for each API runtime in a given environment. This location is called a deployment, and a single API version could have two deployments - a staging and a production deployment.
Contoso has one API, the Conference API, which we associate with the environments we created.
In the portal, navigate to your API center.
In the left menu, select APIs and then select an API, for example, the Conference API.
On the Conference API page, expand Details > Deployments > + Add deployment.
Add the following information:
a. Select Contoso Testing from the dropdown for the Environment field.
b. For the definition, click Select, choose the API version v1 from the dropdown and select the definition you added earlier. Click Select.
c. After successfully adding the definition, add a base runtime URL that will be specific for the API in the selected environment.
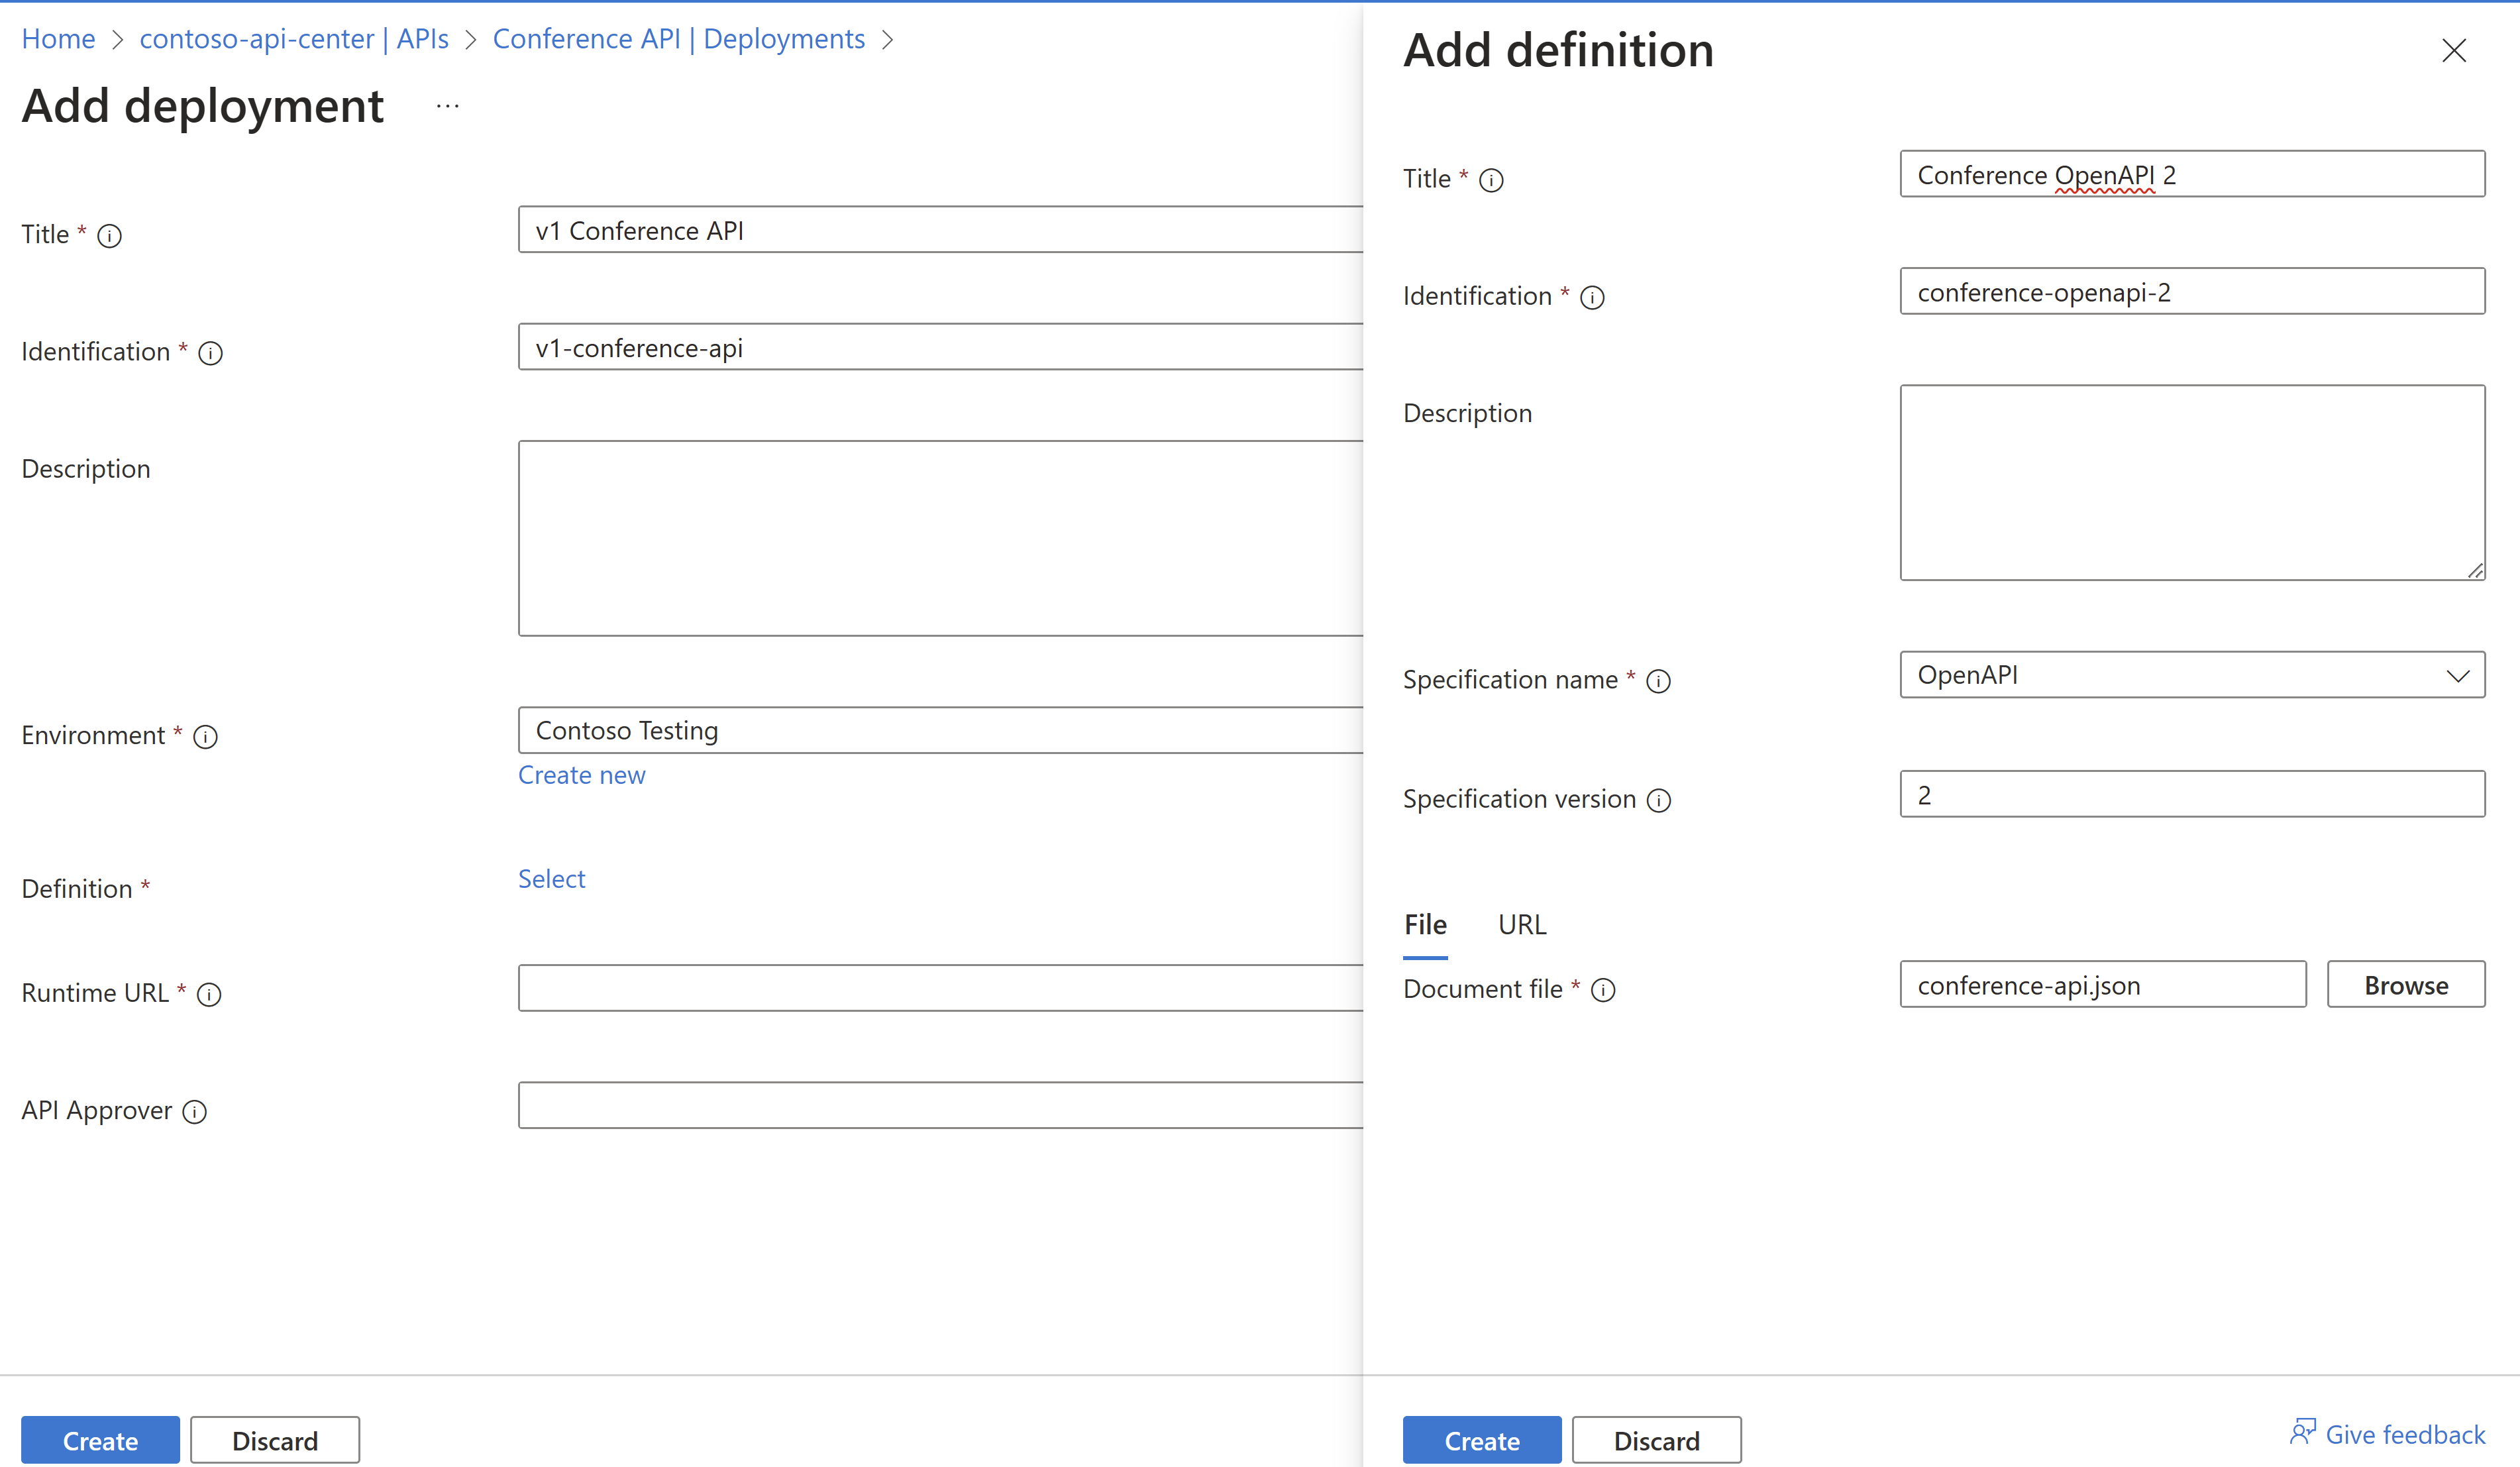
To create a deployment and associate it with the environment we created in the step above, run the following CLI command
az apic api deployment create -g contoso-corporation -s contoso-api-center --deployment-id "v1-conference-api" --title "Conference OpenAPI 2" --description "Conference Demo API deployment." --api-id conference-api --environment-id "/workspaces/default/environments/contoso-testing" --definition-id "/workspaces/default/apis/conference-api/versions/v1/definitions/conference-openapi-2" --server '{"runtimeUri":["https://conferenceapi.azurewebsites.net/"]}'

Note
Creating deployments is currently not supported on VS Code. Please use the Azure CLI or the Azure portal option for this step.