Exercise - Use Azure Resource Manager functions to create expressions
Note
The first time you activate a sandbox and accept the terms, your Microsoft account is associated with a new Azure directory named Microsoft Learn Sandbox. You're added to a special subscription named Concierge Subscription.
In this exercise, you create an expression by using Azure Resource Manager (ARM) template functions. The expression creates a unique name for each resource group by combining a prefix input with a hash of the resource group ID. It results in Azure storage account names like dev2hu6sbtr5 and staging5his8hgr67.
In this exercise, you use the Azure Resource Manager Tools for Visual Studio Code. Be sure to install this extension in Visual Studio Code.
Create the ARM template file
In the previous module, you created an ARM template that deployed a storage account. You added parameters and an output to this file. Here, you start with that file, but the output is removed to reduce the overhead.
Open Visual Studio Code and create a file called azuredeploy.json. If you have this file from the previous module, you can use that file.
Replace the contents of the file with the following code:
{
    "$schema": "https://schema.management.azure.com/schemas/2019-04-01/deploymentTemplate.json#",
    "contentVersion": "1.0.0.0",
    "parameters": {
       "storageName": {
           "type": "string",
           "minLength": 3,
           "maxLength": 24
       },
        "storageSKU": {
            "type": "string",
            "defaultValue": "Standard_LRS",
            "allowedValues": [
                "Standard_LRS",
                "Standard_GRS",
                "Standard_RAGRS",
                "Standard_ZRS",
                "Premium_LRS",
                "Premium_ZRS",
                "Standard_GZRS",
                "Standard_RAGZRS"
            ]
        }
   },
    "functions": [],
    "variables": {},
    "resources": [{
        "name": "[parameters('storageName')]",
        "type": "Microsoft.Storage/storageAccounts",
        "apiVersion": "2019-06-01",
        "tags": {
            "displayName": "[parameters('storageName')]"
        },
        "location": "[resourceGroup().location]",
        "kind": "StorageV2",
        "sku": {
         "name": "[parameters('storageSKU')]"
       }
    }],
     "outputs": {}
}
If you didn't complete the previous module, take a moment to review this file. Note the
storageNameparameter. This parameter is used to pass in a unique name for the storage account.
Create an expression to set a unique storage account name
Instead of passing in the name of the storage account, change the parameter to take a prefix for the storage account name. This parameter is passed to the concat function in your expression.
In the
parameterssection, changestorageNameto storagePrefix.Change value of the
maxLength:attribute of thestoragePrefixparameter to 11. The maximum length for a storage account name is 24 characters, so you want to be sure the added hash from the function you create doesn't cause the name to be longer than 24.Create the expression to set the unique storage account name. In the
resourcessection, change the values of thename:anddisplayName:attributes from"[parameters('storageName')]"to "[toLower(concat(parameters('storagePrefix'),uniqueString(resourceGroup().id)))]". You learned about this expression in the previous unit. The file should now look like this file:{ "$schema": "https://schema.management.azure.com/schemas/2019-04-01/deploymentTemplate.json#", "contentVersion": "1.0.0.0", "parameters": { "storagePrefix": { "type": "string", "minLength": 3, "maxLength": 11 }, "storageSKU": { "type": "string", "defaultValue": "Standard_LRS", "allowedValues": [ "Standard_LRS", "Standard_GRS", "Standard_RAGRS", "Standard_ZRS", "Premium_LRS", "Premium_ZRS", "Standard_GZRS", "Standard_RAGZRS" ] } }, "functions": [], "variables": {}, "resources": [{ "name": "[toLower(concat(parameters('storagePrefix'),uniqueString(resourceGroup().id)))]", "type": "Microsoft.Storage/storageAccounts", "apiVersion": "2019-06-01", "tags": { "displayName": "[toLower(concat(parameters('storagePrefix'),uniqueString(resourceGroup().id)))]" }, "location": "[resourceGroup().location]", "kind": "StorageV2", "sku": { "name": "[parameters('storageSKU')]" } }], "outputs": {} }
Deploy the ARM template to Azure
To deploy this template to Azure, you need to sign in to your Azure account from the Visual Studio Code terminal. Be sure you have the Azure CLI tools installed. Also, be sure you're signing in to the same account that activated the sandbox.
Open a terminal window by using the Terminal menu.
If the drop-down menu on the right side of the terminal window says bash, you have the right shell to work from. You can skip to the next section.

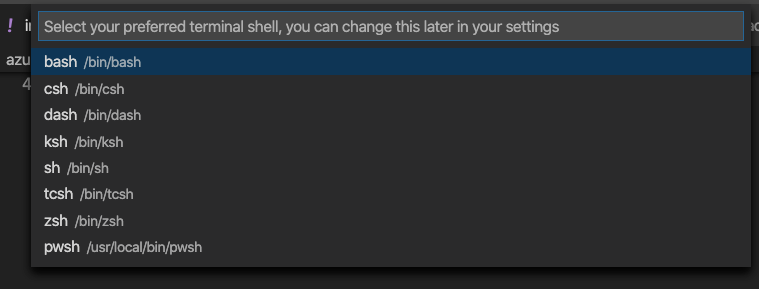
If you don't have the right shell, select Select Default Shell in the drop-down menu.
Select bash:

Select + in the terminal to create a new terminal with bash as the shell.
Sign in to Azure
From the terminal in Visual Studio Code, run the following command to sign in to Azure. Running this command opens a browser that allows you to sign in to your account:
az loginAfter you're signed in, you see a list of the subscriptions associated with the account in the terminal. If you activated the sandbox, you see one called Concierge Subscription. Use this one for the rest of the exercise.
Set the default subscription for all the Azure CLI commands you run in this session:
az account set --subscription "Concierge Subscription"Note
If you've used more than one sandbox recently, there might be more than one Concierge Subscription listed. In that case, use the next two steps to set the default subscription. If the above command was successful, skip the next two steps.
Get the Concierge Subscription IDs:
 az account list \
   --refresh \
   --query "[?contains(name, 'Concierge Subscription')].id" \
   --output table
Set the default subscription by using the subscription ID. Replace
{your subscription ID}with the most recent Concierge Subscription ID.az account set --subscription {your subscription ID}
Set the default resource group
Set the default resource group to the resource group created for you in the sandbox environment. Doing so allows you to omit that parameter from the rest of the Azure CLI commands in this exercise.
az configure --defaults group=<rgn>[sandbox resource group name]</rgn>
Deploy the template to Azure
You learned about the deployment commands in the previous module. Here, we're using the Azure CLI az deployment group create command.
Deploy the template by using Azure CLI commands in the Visual Studio Code terminal. Remember to replace
{your-prefix}with a different string. For example, you could use storage.templateFile="azuredeploy.json" today=$(date +"%d-%b-%Y") DeploymentName="addfunction-"$today az deployment group create \ --name $DeploymentName \ --template-file $templateFile \ --parameters storagePrefix={your-prefix}In the first section of this code, you set Azure CLI variables for the path to the template file that you want to deploy and the name of the deployment. You then used the
az deployment group createcommand to deploy the template to Azure.You should see the message
Running...in the terminal.
To deploy this template to Azure, you need to sign in to your Azure account from the Visual Studio Code terminal. Be sure you have the Azure PowerShell tools installed and that you're signing in to the same account that activated the sandbox.
Open a terminal window by using the Terminal menu.
If the drop-down menu on the right side of the terminal window says pwsh, you have the right shell to work from. You can skip to the next section.

If you don't have the right shell, select Select Default Shell in the drop-down menu.
Select pwsh.

Select + in the terminal to create a new terminal with pwsh as the shell.
Sign in to Azure by using Azure PowerShell
From the terminal in Visual Studio Code, run the following command to sign in to Azure. When you run this command, you're prompted to open a browser to a URL that allows you to sign in to your account. Use the code that's in the prompt. Make sure to sign in with the same account that you used to activate the sandbox.
Connect-AzAccountAfter you're signed in, you see a list of the subscriptions associated with the account in the terminal. If you activated the sandbox, you see one called Concierge Subscription. Use this one for the rest of the exercise.
Set the default subscription for all the Azure CLI commands you run in this session.
Get the subscription ID. The command lists your subscriptions and their IDs. The subscription ID is the second column. Look for
Concierge Subscriptionand copy the second column. It looks something like this:aaaa0a0a-bb1b-cc2c-dd3d-eeeeee4e4e4e.Get-AzSubscriptionChange your active subscription to the Concierge Subscription. Be sure to replace
{Your subscription ID}with the ID you copied.$context = Get-AzSubscription -SubscriptionId {Your subscription ID} Set-AzContext $contextSet the default resource group to the resource group created for you in the sandbox environment. Doing so allows you to omit that parameter from the rest of the Azure PowerShell commands in this exercise.
Set-AzDefault -ResourceGroupName <rgn>[sandbox resource group name]</rgn>
Deploy the template to Azure
You learned about the deployment commands in the previous module. Here, we're using the Azure PowerShell New-AzResourceGroupDeployment command.
Deploy the template by using Azure PowerShell commands in the Visual Studio Code terminal. Remember to replace
{your-prefix}with a different string. For example, you could use storage.$templateFile = "azuredeploy.json" $today=Get-Date -Format "MM-dd-yyyy" $deploymentName="addfunction-"+"$today" New-AzResourceGroupDeployment ` -Name $deploymentName ` -TemplateFile $templateFile ` -storagePrefix {your-prefix}
In the first section of this code, you set Azure PowerShell variables for the path to the template file that you want to deploy and the name of the deployment. You then used the New-AzResourceGroupDeployment command to deploy the template to Azure.
Check your deployment
When the deployment finishes, go to the Azure portal and make sure you're in the sandbox subscription. To check the subscription, select your avatar in the upper-right corner of the page. Select Switch directory. In the list, select the Microsoft Learn Sandbox directory.
In the left pane, select Resource groups.
Select
[sandbox resource group name] .In the Overview section, you see that one deployment succeeded:

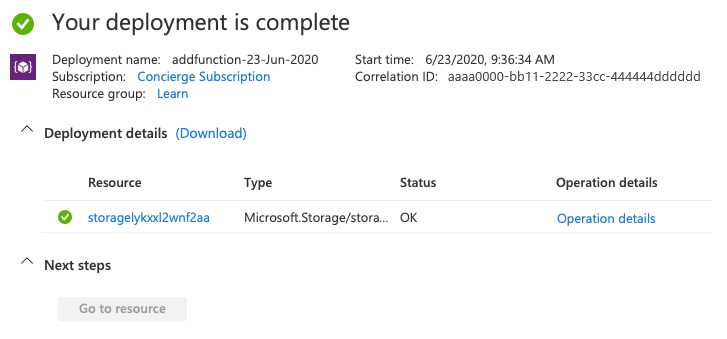
Select 1 Succeeded to see the details of the deployment:

Select addfunction to see what resources were deployed:

Leave the page open in your browser so you can check on deployments again later in the module.