Exercise - Optimize Microsoft Graph queries with the mgt-get component
In this exercise, you'll learn how to use the Get component of the Microsoft Graph Toolkit. This enables you to show notebooks from OneNote for the signed-in user.
Before you start
As a prerequisite for this exercise, make sure that you completed the previous exercise in this module: "Unit 3: Exercise - Cache data loaded by components."
Consume the Get component
Follow these steps to consume the Get component, to display a user's notebooks in your app.
Open the index.html file. Add the Get component inside the
<body>tag, right after the Login component<mgt-login></mgt-login>.<!DOCTYPE html> <html> <head> <script src="https://unpkg.com/@microsoft/mgt@3/dist/bundle/mgt-loader.js"></script> </head> <body> <mgt-msal2-provider client-id="YOUR-CLIENT-ID-HERE"></mgt-msal2-provider> <mgt-login></mgt-login> <mgt-get></mgt-get> </body> </html>Add the
resourceandscopesattributes to the Get component, as follows:<mgt-get resource="me/onenote/notebooks" scopes="Notes.Read, Notes.Read.All"> </mgt-get>To get a list of OneNote notebooks and display them in the app, perform the following tasks:
- Add
<template></template>between the<mgt-get></mgt-get>tags. - Add
<div></div>between the<template></template>tags. - Add a
data-forattribute on the<div>to loop through each notebook in the list of notebooks. Set thedata-forattribute tonote in value.
<mgt-get resource="me/onenote/notebooks" scopes="Notes.Read, Notes.Read.All"> <template> <div class="note" data-for="note in value"> </div> </template> </mgt-get>- Add
You'll now have a list of notebooks’ data in your app. To display the list of notebook names with their associated URLs, add the following line inside of the
<div></div>tags:<a href="{{ note.links.oneNoteWebUrl.href}}"> {{ note.displayName }} </a>To display the person’s profile who last modified the notebook, and the notebook’s last modified date and time, add the following code snippet inside of the
<div></div>tags. Add it after the<a></a>tag.<h4> Last modified by: <mgt-person person-query="{{note.lastModifiedBy.user.displayName}}" view="oneline" person-card="hover"></mgt-person> </h4> <h5>Last modified date: {{note.lastModifiedDateTime}}</h5>To make your Get component look more professional, create an index.css file in the performance-mgt folder.
Add the following CSS snippet into index.css:
.note {
  box-shadow: 0 3px 7px rgba(0, 0, 0, 0.3);
  padding: 10px;
  margin: 8px 4px;
  font-family: Segoe UI, Frutiger, Frutiger Linotype, Dejavu Sans, Helvetica Neue, Arial, sans-serif;
}

.note a {
  font-size: 14px;
  margin-top: 8px;
}

.note h4 {
  font-size: 9px;
  font-family: 'Segoe UI', Tahoma, Geneva, Verdana, sans-serif;
  color: gray;
  margin-top: 4px;
  margin-bottom: 0px;
}
.note h5 {
  font-size: 7px;
  font-family: 'Segoe UI', Tahoma, Geneva, Verdana, sans-serif;
  color: royalblue;
  margin-top: 4px;
  margin-bottom: 0px;
}

.note mgt-person {
  --person-line1-font-size: 10px;
  --avatar-size-s: 12px;
  display: inline-block;
  vertical-align: middle;
}
Add the following line in your index.html file, between the
<head></head>tags:<link rel='stylesheet' href='index.css'>The index.html file should look like the following when you're done:
<!DOCTYPE html>
<html>
<head>
  <script src="https://unpkg.com/@microsoft/mgt@3/dist/bundle/mgt-loader.js"></script>
  <link rel='stylesheet' href='index.css'>
</head>

<body>
  <mgt-msal2-provider client-id="YOUR-CLIENT-ID-HERE"></mgt-msal2-provider>
  <mgt-login></mgt-login>
  <mgt-get resource="/me/onenote/notebooks" scopes="Notes.Read, Notes.Read.All">
    <template>
      <div class="note" data-for="note in value">
        <a href="{{note.links.oneNoteWebUrl.href}}">{{ note.displayName }} </a>
        <h4> Last modified by:
          <mgt-person person-query="{{note.lastModifiedBy.user.displayName}}" view="oneline" person-card="hover">
          </mgt-person>
        </h4>
        <h5>Last modified date: {{note.lastModifiedDateTime}}</h5>
      </div>
    </template>
  </mgt-get>
</body>
</html>
Test your app in the browser
If this is the first time you've used your Microsoft 365 developer tenant, you might not have any notebooks in your Microsoft 365 developer tenant account's OneNote. Before you start testing your app, visit
https://www.office.com/launch/onenote, and sign in with your Microsoft 365 developer tenant account. Create new notebooks in OneNote.In Visual Studio Code, select the following key combination in Visual Studio Code and search for Live Server:
- Windows: CTRL+SHIFT+P
- macOS: COMMAND+SHIFT+P
Run Live Server to test your app.
Open your browser, and go to
http://localhost:3000.Sign in with your Microsoft 365 developer account. Consent to the required permissions, and select Accept.
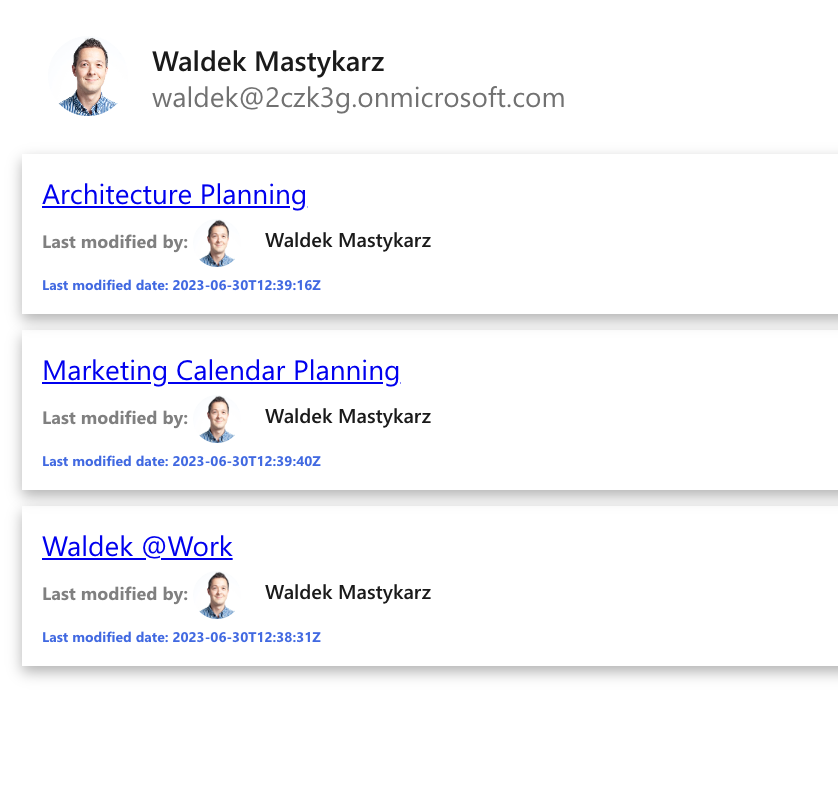
A list of files will appear in your app, with information about the person who shared the file with you and the last modified time.