Exercise - App navigation practice
You're nearing the end of this module, so let's put everything together in an exercise.
In the following example, you're continuing to add screen transition functionality to the Contoso Coffee Machines app, but you can use any multiple-screen app. The following steps match the app that you've been working on in this learning path.
Note
When you're entering formulas, it's better to type them into the formula (fx) versus using the copy/paste technique. Single and double quotation marks don't translate the same way in Power Apps.
Sign in to the Power Apps home page, and then open the Contoso Coffee Machines app in edit mode.
On the home screen, select the View Catalog button. In the
OnSelectformula, changeNavigate('Catalog Screen')to:Navigate('Catalog Screen',ScreenTransition.Cover)Still on the home screen, select the Admin Screen button. In the
OnSelectformula, changeNavigate('Admin Screen')to:Navigate('Admin Screen',ScreenTransition.Fade)Place the app in preview mode. Test how the transitions look and feel by selecting the buttons on the home screen to go to the respective screens, and then use your Back buttons to go back to the home screen.
Add a transition to a Back button. Place the app back in edit mode and go to the admin screen.
Select the arrow icon (or whatever icon you're using as a Back button) and change the formula for
OnSelectfromBack()to:Back(ScreenTransition.UnCoverRight)Go back to the home screen and put your app in preview mode. Select the Admin Screen button, and then select the Back button. Did you notice the difference in the transition?
Return to edit mode. Add a Success screen by selecting New screen > Templates > Success.
Rename the screen Success Screen.
Go to the catalog screen and select your
Formcontrol. You can select it on your Tree view panel.In the
OnSuccessproperty for the form, enter the following code:Navigate(‘Success Screen’,ScreenTransition.Fade)Now that you've added
OnSuccessto your form, move to your success screen by selecting Success Screen on the Tree view panel.On the success screen, insert a
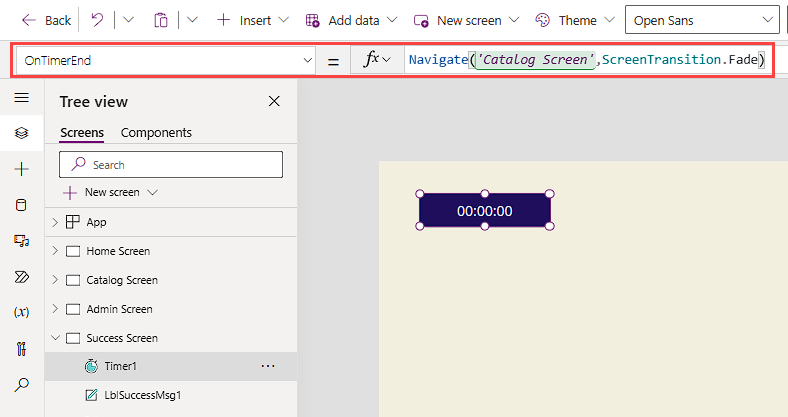
Timercontrol.Adjust the following properties for your
Timercontrol:AutoStart:trueDuration:4000OnTimerEnd:Navigate(‘Catalog Screen’,ScreenTransition.Fade)Visible:false
To test the functionality of your success screen timer, return to the catalog screen and place your app in preview mode. Select any item and make a change to the item on the form.
Select the Save changes button at the bottom of the form. If you do it correctly, the app shows the success screen for four seconds and then returns to the catalog screen, where you can continue to make changes.
Close preview mode and return to the home screen from the Tree view panel. Now you'll make a dropdown navigation menu.
Insert a
Dropdowncontrol onto the home screen and position it under the upper-left corner of the header rectangle.Insert a
Text labelcontrol and update theTextproperty toScreen Navigation. Place it just above theDropdowncontrol.Select your
Dropdowncontrol. Update theDefaultproperty to:""Still on your
Dropdowncontrol, update theItemsproperty to:["", "Catalog", "Admin"]Enter the following formula for the
OnChangeproperty of theDropdowncontrol:Switch( Self.SelectedText.Value, "Catalog", Navigate( 'Catalog Screen', ScreenTransition.Cover ), "Admin", Navigate( 'Admin Screen', ScreenTransition.Cover ) ); Reset(Self)Place the app back in preview/play mode and test the
OnChangefunctionality of yourDropDowncontrol to go to the other screens.Add a Home icon to your catalog screen. Put the app back in edit mode and select Catalog Screen.
Select the Back icon control on the upper right of the catalog screen, and then copy it by using Ctrl+C or by right-clicking and then selecting Copy.
Paste the copy of your Back icon (Ctrl+V) and reposition it to the upper left of your header rectangle.
With the pasted Back icon selected, use the Icon button on the command bar and change the icon to the Home icon.
Change the
OnSelectproperty to:Navigate('Home Screen', ScreenTransition.CoverRight)Now you have a way to return to the home after you successfully save changes to your data.
On the catalog screen, place your app in preview mode. Ensure that selecting the home icon control takes you to the home screen.
You successfully added some navigation functionality to an app:
- Screen transitions for the
NavigateandBackfunctions. - A Success screen that you go to by using a form's
OnSuccessproperty. - A
Timercontrol that goes back to the catalog screen by using theOnTimerEndproperty. - A
Dropdowncontrol that goes to other screens by using theOnChangeproperty. - A Home icon to enable users to return to the home screen.
Next, you'll complete a knowledge check.
