Bring your own database (BYOD)
The BYOD feature lets administrators configure their own database, and then export one or more data entities, that are available in finance and operations apps, into it. Specifically, this feature lets you complete the following tasks:
- Define one or more Microsoft Azure SQL databases that you can export entity data from finance and operations apps into.
- Export either all the records (full push) or only the records that have changed or been deleted (incremental push).
- Use the rich scheduling capabilities of the batch framework to enable periodic exports.
- Access the entity database by using Transact-SQL (T-SQL), and even extend the database by adding more tables.
- Export entities into multiple databases.
The BYOD feature is recommended for when you do the following:
- Export data from finance and operations apps into your own data warehouse.
- Use analytical tools other than Power BI, and those tools require T-SQL access to data.
- Perform batch integration with other systems.
If you have integration solutions that require direct T-SQL access to the database, BYOD is the recommended upgrade path.
Before you can configure the export option and use the BYOD feature, you must create an SQL database for production environments by using Azure portal.
You should also create a SQL user account for sign-in to the database. Make sure to record and save the server name, database name, and the SQL user ID and password. You will use these values when you configure the entity export option.
If you're using the BYOD feature for integration with a business intelligence (BI) tool, consider creating an SQL premium database. Premium databases support clustered columnstore indexes (CCIs). CCIs are in-memory indexes that improve the performance of read queries that are typical in analytical and reporting workloads.
If you're using the BYOD feature to export data into a staging database or for general integration purposes, you can use a standard database.
To configure the entity export, follow this procedure.
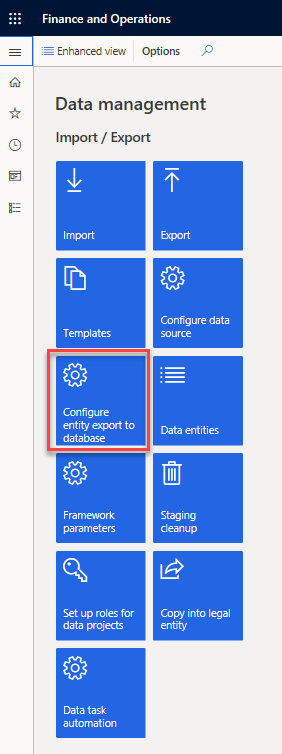
Go to the Data management workspace and select the Configure entity export to database tile.
If you've already configured any databases, a list is shown, and you will need to select a database. Then, skip step 3.
To configure a new database, select New, and then enter a unique name and a description for the new database.
Enter the connection string in the following format: Data Source=<logical server name>, 1433; Initial Catalog =<your DB name>; Integrated Security=False; User ID = <SQL user ID>; Password = <password>
Select Validate, and make sure that the connection is successful.
When the validation is passed, the database that you configured for entity export appears in lists of databases.
By default, the Create clustered column store indexes option is enabled. This option optimizes the destination database for selected queries by defining CCIs for entities that are copied from finance and operations.
By default, the Enable triggers in target database option is disabled. This option sets export jobs to enable SQL triggers in the target database, and lets you hook downstream processes into the trigger to orchestrate actions that must be started after records have been inserted.
You can now publish one or more entities to the new database by selecting the Publish option on the menu.
After entities are published to the destination database, you can use the Export function in the Data management workspace to move data. The Export function lets you define a Data movement job that contains one or more entities.
You can use the Export page to export data from finance and operations apps into many target data formats, such as a comma-separated values (CSV) file. This page also supports SQL databases as another destination.
The value of the <logical server name> has a format like <yourSqlAzureServername> .database.windows.net, which can be found in Azure portal by selecting the SQL databases menu.
For scenarios in which reporting systems read data from BYOD, there is always the challenge of ensuring that the reporting systems get consistent data from BYOD while the sync from finance and operations apps is in progress.
One trigger is supported per bulk insert operation. The size of the bulk insert is determined by the Maximum insert commit size parameter in the Data management framework.
You can achieve this result by not having the reporting systems read directly from the staging tables that were created by the BYOD process. The staging tables hold the data while data is being synced from the finance and operations apps instance and hence will be constantly changing.
Use the SQL trigger feature to determine when the data sync from finance and operations apps has been completed, and then hydrate the downstream reporting systems.

