Exercise - Set up the host pool and register virtual machine host
In the accounting-firm scenario, your organization is using Azure Virtual Desktop to provide your workforce access to virtualized desktops and apps.
In this unit, you'll create a host pool and add a virtual machine that will act as a session host. To avoid having to join the virtual machine to a domain, you'll manually install the Azure Virtual Desktop agent and boot loader to register the virtual machine to the host pool. You'll then have an Azure Virtual Desktop deployment that you can use in the rest of the module exercises.
You need an Azure subscription to complete the exercises. If you don't have an Azure subscription, create a free account and add a subscription before you begin. If you're a student, you can take advantage of the Azure for students offer.
Create a host pool for Azure Virtual Desktop
Let's create a host pool to contain the virtual machine you'll create later in this exercise.
Sign in to the Azure portal.
Search for and select Azure Virtual Desktop.
Select Create a host pool.
Enter the following information into the Basics tab:
Field Value Subscription Your subscription Resource group Create a new resource group named learn-firewall-rg Host pool name learn-host-pool Location Region near you Validation environment No Preferred app group type Desktop Host pool type Pooled Load balancing algorithm Breadth-first Max session limit 2 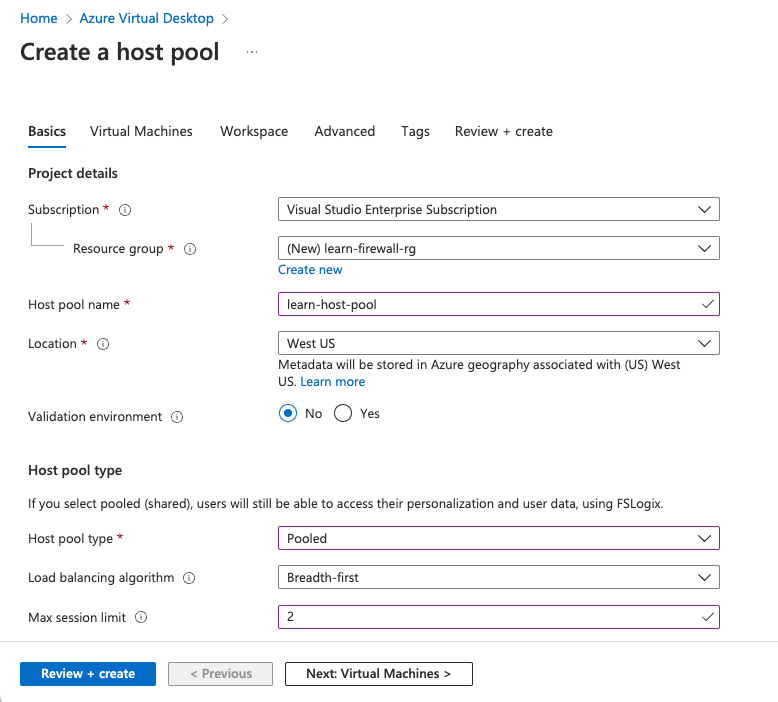
Select Review + create and wait for validation to pass.
Select Create.
Create a registration token for the host pool
Next, you'll create a registration token to authorize a session host to join the host pool.
Select the Cloud Shell icon at the top of the screen, then choose PowerShell in the Cloud Shell drop-down.
In Cloud Shell, run the following command to create a registration token that will expire in 4 hours:
 $resourceGroup = 'learn-firewall-rg'
 $hostPoolName = 'learn-host-pool'
 $regToken = New-AzWvdRegistrationInfo `
 -ResourceGroupName $resourceGroup `
 -HostPoolName $hostPoolName `
 -ExpirationTime $((get-date).ToUniversalTime().AddHours(4).ToString('yyyy-MM-ddTHH:mm:ss.fffffffZ'))
Run the following command to get the registration token:
$regToken.TokenCopy the token to a note app like Notepad.
Create a subnet and virtual network for the host pool
In Cloud Shell, run the following command to create a subnet and virtual network in the same location as the resource group:
$subnetConfig = New-AzVirtualNetworkSubnetConfig `
-Name hostSubnet `
-AddressPrefix 10.0.0.0/24

$location = Get-AzResourceGroup -Name learn-firewall-rg

$virtualNetwork = New-AzVirtualNetwork `
-Name hostVNet `
-AddressPrefix 10.0.0.0/16 `
-Location $location.Location `
-ResourceGroupName $resourceGroup `
-Subnet $subnetConfig
This list shows some location values you can use:
- westus2
- southcentralus
- centralus
- eastus
- westeurope
- southeastasia
- japaneast
- brazilsouth
- australiasoutheast
- centralindia
Ignore the warning message about upcoming breaking changes. It doesn't apply to the command you're running.
Create a session host for the host pool
Here, you'll create an Azure virtual machine to act as a session host for the host pool.
In Cloud Shell, run the following command to set the user name and password for the administrator account on the virtual machine. The password needs to be at least eight characters long and include a digit, an uppercase letter, a lowercase letter, and a special character. Write down the password, because you'll need it later.
$cred = Get-CredentialRun the following command to create a public IP address to use to connect to the virtual machine:
New-AzPublicIpAddress `
  -Name 'myPublicIP' `
  -ResourceGroupName $resourceGroup `
  -Location 'eastus' `
  -AllocationMethod Static `
  -Sku Standard
Run the following command to create the virtual machine by using a Windows 11 Enterprise multiple session image:
New-Azvm `
 -Name 'learn-host-vm' `
 -Credential $cred `
 -ResourceGroupName $resourceGroup `
 -Size 'Standard_DS1_v2' `
 -VirtualNetworkName hostVNet `
 -SubnetName hostSubnet `
 -Image 'MicrosoftWindowsDesktop:windows-11:win11-22h2-pro:latest' `
 -PublicIpAddressName 'myPublicIP'
Wait a couple of minutes for the virtual machine to be created.
Connect to the virtual machine by using a remote desktop session
Use a remote desktop session to sign into the virtual machine you created in the previous section.
- In the Azure portal, search for and select Virtual machines.
- Select learn-host-vm.
- Select Connect > Connect.
- Select Download RDP File > Open file > Connect.
- In the Windows Security window, select More choices > Use a different account.
- Enter the user name and the password you used when you created the virtual machine, and then select OK.
- If you're asked to connect despite certificate errors, select Yes.
Register the virtual machine with host pool
Here, you'll install the Azure Virtual Desktop agent and boot loader on the virtual machine to register the virtual machine to the host pool.
Install the agent
In your remote desktop session on the virtual machine, install the Azure Virtual Desktop agent. You'll need the registration token for the host pool to complete the installation.
Copy the following link to the Azure Virtual Desktop agent:
https://query.prod.cms.rt.microsoft.com/cms/api/am/binary/RWrmXvOn the virtual machine, open Microsoft Edge to start a web browser session.
Paste the link into a web browser.
Once the file downloads, select Open file to install the Azure Virtual Desktop agent.
When the installer asks you for the registration token, paste in the value you got after you created the token.
If you no longer have the token value, go back to your Cloud Shell session and run the following command:
 (Get-AzWvdRegistrationInfo `
 -ResourceGroupName $resourceGroup `
 -HostPoolName $hostPoolName).Token
Complete the installation.
Install the boot loader
In your remote desktop session on the virtual machine, install the Azure Virtual Desktop boot loader.
- Copy the following link to the Azure Virtual Desktop boot loader:
https://query.prod.cms.rt.microsoft.com/cms/api/am/binary/RWrxrH - Paste the link into a web browser session in the virtual machine.
- When the download finishes, select Open file to install the Azure Virtual Desktop boot loader.
- Complete the installation.
- Close the remote desktop session.
Check your work
At this point, the virtual machine should be registered as a session host for the host pool. To verify that it's registered, let's sign into the portal and check the virtual machine in the host pool.
- In the Azure portal, search for or select Azure Virtual Desktop.
- Select Host pools > learn-host-pool.
- In the center pane, under Virtual machines, select Total machines.
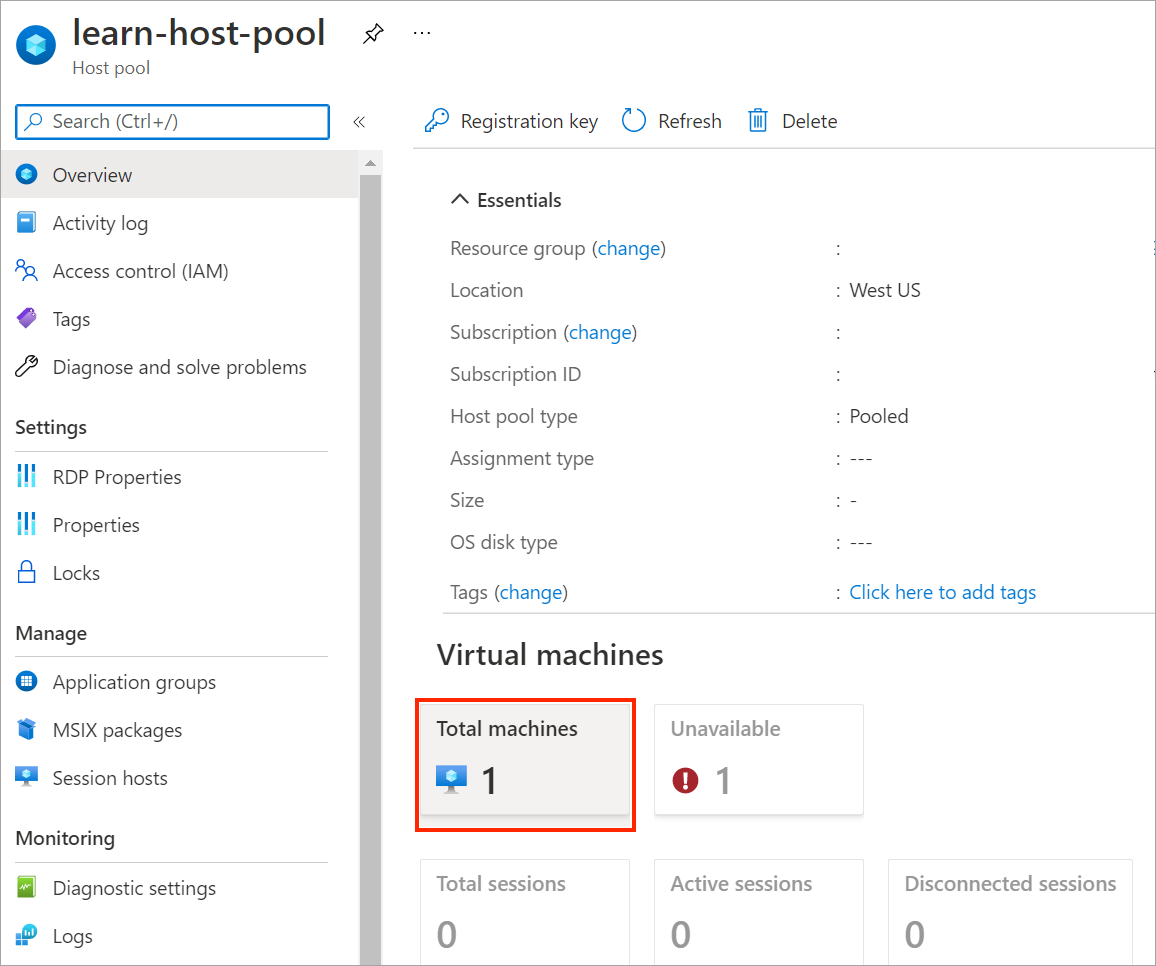
- You see that learn-host-vm is registered with the host pool.
- Select learn-host-vm.
- If you get a Not found error, wait a few minutes and try again.
- Examine the status under VM status.
 The
The DomainJoinedCheckandDomainTrustCheckhealth checks failed because you didn't join the virtual machine to a domain, but the rest of the health checks succeeded.
