Exercise - Add lint and validate jobs to your workflow
You spoke to your team and decided to further automate your deployments by using a workflow. You want to build more confidence in what you deploy.
In this exercise, you'll add validation jobs to your workflow. You'll then run the linter and preflight validation before each deployment.
During the process, you do the following tasks:
- Update your existing workflow to add two new jobs to lint and validate your Bicep code.
- Run your workflow.
- Fix any issues that your workflow detects.
Add lint and validation jobs to your workflow
In Visual Studio Code, open the workflow.yml file in the .github/workflows folder.
In the
env:section, change theAZURE_RESOURCEGROUP_NAMEvariable's value toToyWebsiteTest:env: AZURE_RESOURCEGROUP_NAME: ToyWebsiteTest ENVIRONMENT_TYPE: TestBelow the
jobs:line, above thedeployjob, add a new lint job:jobs: lint: runs-on: ubuntu-latest steps: - uses: actions/checkout@v3 - name: Run Bicep linter run: az bicep build --file deploy/main.bicepThis job defines a step to check out the code and a step that runs the
az bicep buildcommand to lint the Bicep file.Tip
YAML files are sensitive to indentation. Whether you type or paste this code, make sure your indentation is correct. Later in this exercise, you'll see the complete YAML workflow definition so that you can verify that your file matches.
Below the lines that you just added, and above the deploy job, add a validation job:
validate:
  runs-on: ubuntu-latest
  steps:
  - uses: actions/checkout@v3
  - uses: azure/login@v1
    name: Sign in to Azure
    with:
      client-id: ${{ secrets.AZURE_CLIENT_ID }}
      tenant-id: ${{ secrets.AZURE_TENANT_ID }}
      subscription-id: ${{ secrets.AZURE_SUBSCRIPTION_ID }}
  - uses: azure/arm-deploy@v1
    name: Run preflight validation
    with:
      deploymentName: ${{ github.run_number }}
      resourceGroupName: ${{ env.AZURE_RESOURCEGROUP_NAME }}
      template: ./deploy/main.bicep
      parameters: environmentType=${{ env.ENVIRONMENT_TYPE }}
      deploymentMode: Validate
This job defines steps to check out the code, sign in to your Azure environment, and use the
azure/arm-deployaction with theValidatedeployment mode.Your workflow definition now has three jobs. The first lints your Bicep file, the second performs a preflight validation, and the third performs the deployment to Azure.
Below the
runs-online in thedeployjob, add aneedsstatement:deploy: runs-on: ubuntu-latest needs: [lint, validate] steps: - uses: actions/checkout@v3 - uses: azure/login@v1 name: Sign in to AzureThe
needsstatement indicates that the deploy job depends on the lint and validate jobs completing successfully before it can run.Also notice that both the validate and deploy jobs sign into Azure, and all of the jobs check out the code from the repository. Those steps are necessary because each job uses a new GitHub runner.
Save the file.
Configure the linter
By default, the Bicep linter provides a warning when it detects a problem with your file. GitHub Actions doesn't treat linter warnings as problems that should stop your workflow. To customize this behavior, you create a bicepconfig.json file that reconfigures the linter.
Add a new file in the deploy folder and name it bicepconfig.json.
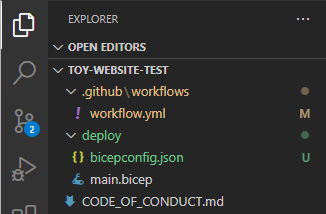
Copy and paste the following code into the file:
{
  "analyzers": {
    "core": {
      "enabled": true,
      "verbose": true,
      "rules": {
        "adminusername-should-not-be-literal": {
          "level": "error"
        },
        "max-outputs": {
          "level": "error"
        },
        "max-params": {
          "level": "error"
        },
        "max-resources": {
          "level": "error"
        },
        "max-variables": {
          "level": "error"
        },
        "no-hardcoded-env-urls": {
          "level": "error"
        },
        "no-unnecessary-dependson": {
          "level": "error"
        },
        "no-unused-params": {
          "level": "error"
        },
        "no-unused-vars": {
          "level": "error"
        },
        "outputs-should-not-contain-secrets": {
          "level": "error"
        },
        "prefer-interpolation": {
          "level": "error"
        },
        "secure-parameter-default": {
          "level": "error"
        },
        "simplify-interpolation": {
          "level": "error"
        },
        "protect-commandtoexecute-secrets": {
          "level": "error"
        },
        "use-stable-vm-image": {
          "level": "error"
        }
      }
    }
  }
}
Save the file.
Configure the deploy job to work with the linter
When you use a custom linter configuration, Bicep writes log data that GitHub Actions interprets as an error. To disable this behavior, you configure the arm-deploy task to ignore the standard error (stderr) log stream.
Open the workflow.yml file.
In the
deployjob's Deploy website test step, set thefailOnStdErrproperty tofalse:deploy: runs-on: ubuntu-latest needs: [lint, validate] steps: - uses: actions/checkout@v3 - uses: azure/login@v1 name: Sign in to Azure with: client-id: ${{ secrets.AZURE_CLIENT_ID }} tenant-id: ${{ secrets.AZURE_TENANT_ID }} subscription-id: ${{ secrets.AZURE_SUBSCRIPTION_ID }} - uses: azure/arm-deploy@v1 name: Deploy website with: failOnStdErr: false deploymentName: ${{ github.run_number }} resourceGroupName: ${{ env.AZURE_RESOURCEGROUP_NAME }} template: ./deploy/main.bicep parameters: environmentType=${{ env.ENVIRONMENT_TYPE }}Save the file.
Verify and commit your workflow definition
Verify that your workflow.yml file looks like the following code:
name: deploy-toy-website-test
concurrency: toy-company

on:
  push:
    branches:
      - main

permissions:
  id-token: write
  contents: read

env:
  AZURE_RESOURCEGROUP_NAME: ToyWebsiteTest
  ENVIRONMENT_TYPE: Test

jobs:
  lint:
    runs-on: ubuntu-latest
    steps:
    - uses: actions/checkout@v3
    - name: Run Bicep linter
      run: az bicep build --file deploy/main.bicep

  validate:
    runs-on: ubuntu-latest
    steps:
    - uses: actions/checkout@v3
    - uses: azure/login@v1
      name: Sign in to Azure
      with:
        client-id: ${{ secrets.AZURE_CLIENT_ID }}
        tenant-id: ${{ secrets.AZURE_TENANT_ID }}
        subscription-id: ${{ secrets.AZURE_SUBSCRIPTION_ID }}
    - uses: azure/arm-deploy@v1
      name: Run preflight validation
      with:
        deploymentName: ${{ github.run_number }}
        resourceGroupName: ${{ env.AZURE_RESOURCEGROUP_NAME }}
        template: ./deploy/main.bicep
        parameters: environmentType=${{ env.ENVIRONMENT_TYPE }}
        deploymentMode: Validate

  deploy:
    runs-on: ubuntu-latest
    needs: [lint, validate]
    steps:
    - uses: actions/checkout@v3
    - uses: azure/login@v1
      name: Sign in to Azure
      with:
        client-id: ${{ secrets.AZURE_CLIENT_ID }}
        tenant-id: ${{ secrets.AZURE_TENANT_ID }}
        subscription-id: ${{ secrets.AZURE_SUBSCRIPTION_ID }}
    - uses: azure/arm-deploy@v1
      name: Deploy website
      with:
        failOnStdErr: false
        deploymentName: ${{ github.run_number }}
        resourceGroupName: ${{ env.AZURE_RESOURCEGROUP_NAME }}
        template: ./deploy/main.bicep
        parameters: environmentType=${{ env.ENVIRONMENT_TYPE }}
If your file looks different, update it to match this example, and then save it.
Commit and push your changes to your Git repository by running the following commands in the Visual Studio Code terminal:
git add .
git commit -m "Add lint and validation jobs"
git push
This commit is the first time you pushed to this repository, so you might be prompted to sign in.
On Windows, type 1 to authenticate using a web browser, and select Enter.
On macOS, select Authorize.
A browser window appears. You might need to sign in to GitHub again. Select Authorize.
Immediately after you push, GitHub Actions starts a new workflow run.
View the workflow run
In your browser, go to Actions.
The first run of your workflow, labeled Initial commit, is shown as a failure. GitHub automatically ran the workflow when you created the repository. It failed because the secrets weren't ready at that time. You can ignore this failure.
Select the most recent run of your workflow.
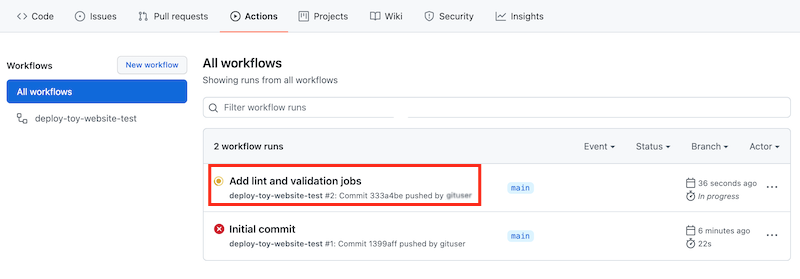
Notice that the workflow run now shows the three jobs that you defined in the YAML file. The lint and validate jobs run in parallel before the deploy job starts.
If the workflow is still running, wait until it finishes. Although workflows automatically update the page with the latest status, it's a good idea to refresh your page occasionally.
Notice that the lint and validate jobs failed.
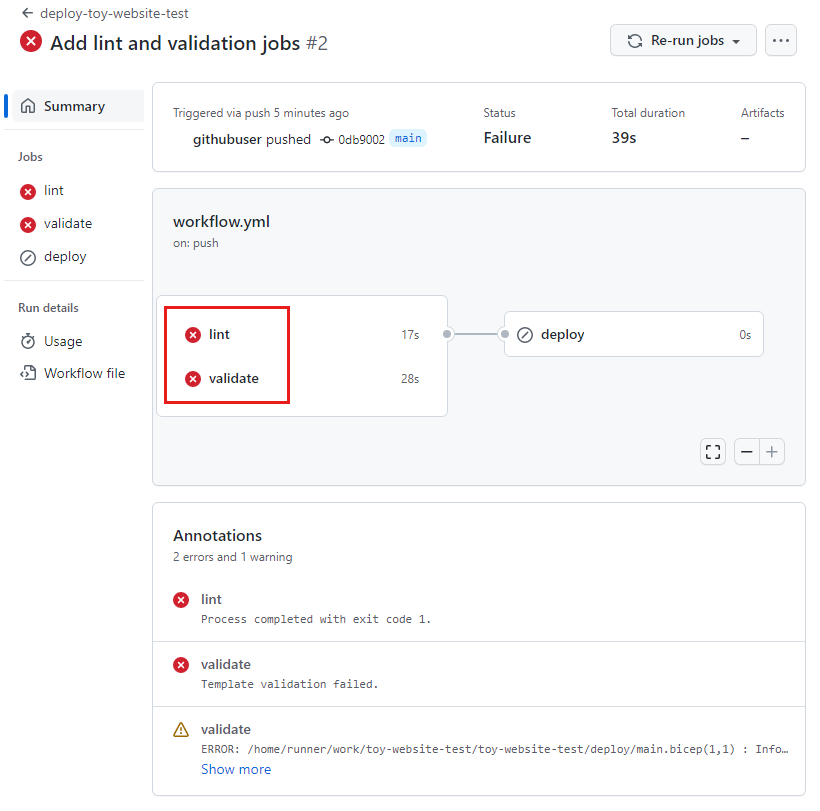
Select the lint job to see its details.
Select the Run Bicep linter step to view the workflow log.
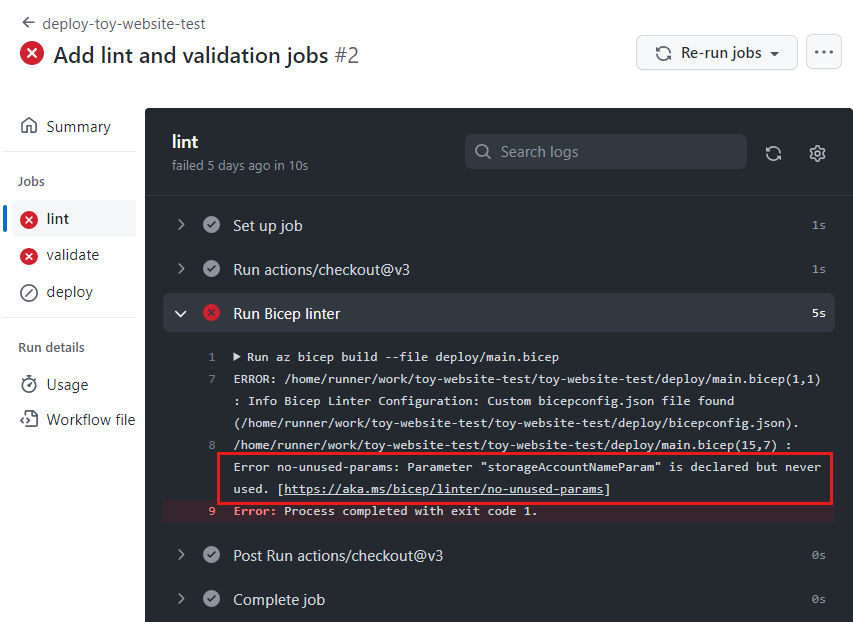
The error in the workflow log includes a linter error message:
Error no-unused-params: Parameter "storageAccountNameParam" is declared but never used.This error message indicates that the linter found a rule violation in your Bicep file.
Fix the linter error
Now that you identified the problem, you can fix it in your Bicep file.
In Visual Studio Code, open the main.bicep file in the deploy folder.
Notice that the Bicep linter also detected that the
storageAccountNameParamparameter isn't used. In Visual Studio Code, a squiggly line is displayed under the parameter. Normally, the line would be yellow to indicate a warning. But because you customized the bicepconfig.json file, the linter treats the code as an error and displays the line in red.param storageAccountNameParam string = uniqueString(resourceGroup().id)Delete the
storageAccountNameParamparameter.Save the file.
Commit and push your changes to your Git repository by running the following commands in the Visual Studio Code terminal:
git add .
git commit -m "Remove unused parameter"
git push
Once again, GitHub Actions automatically triggers a new run of your workflow.
View the workflow run again
In your browser, go to your workflow.
Select the most recent run.
Wait until the workflow run finishes. Although GitHub Actions automatically updates the page with the latest status, it's a good idea to refresh your page occasionally.
Notice that the lint job finished successfully, but the validate job is still failing.
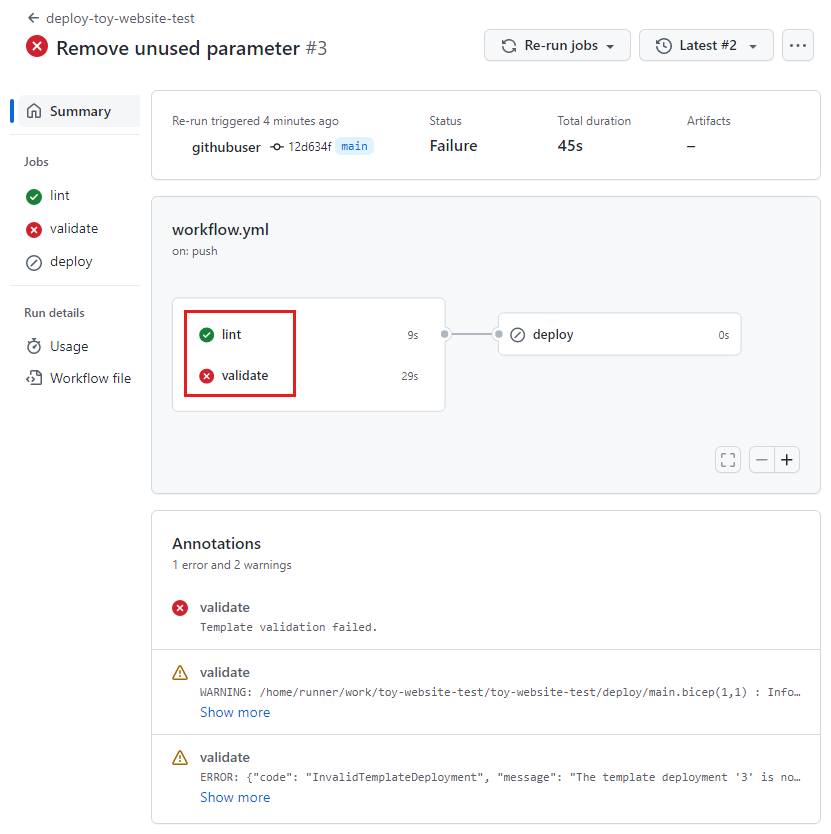
Select the validate job to see its details.
Select the Run preflight validation step to view the workflow log.
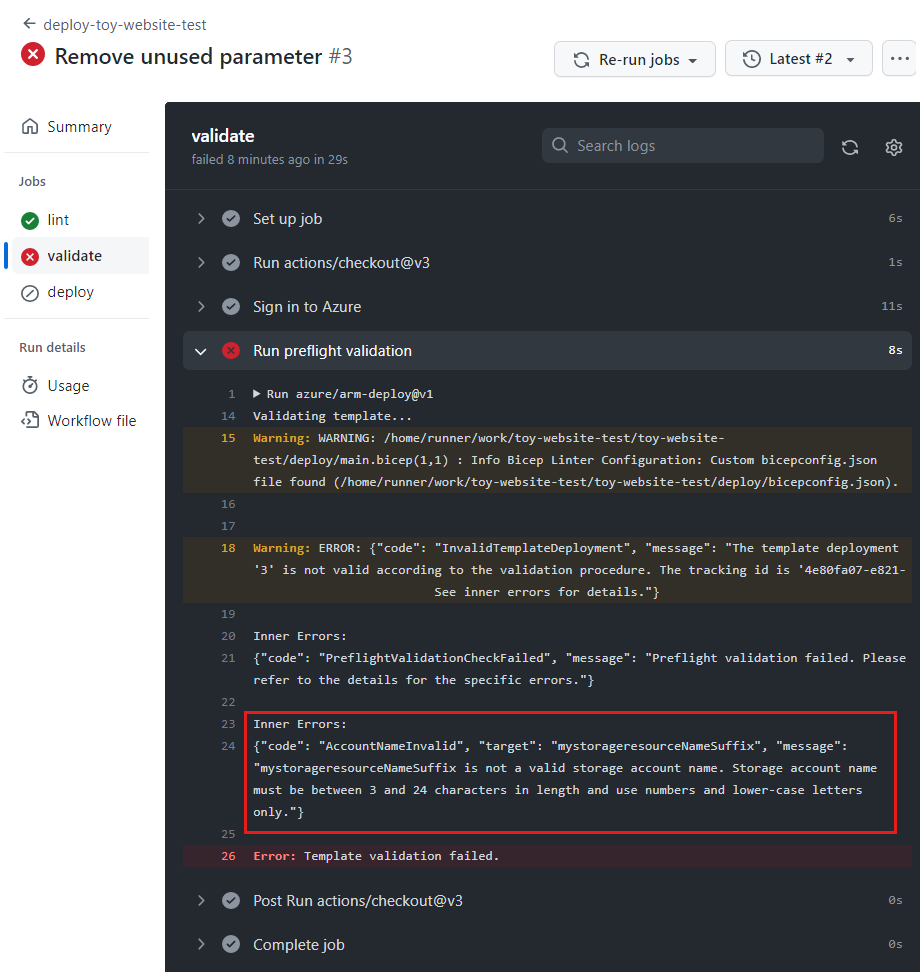
The error displayed in the workflow log includes the following message:
mystorageresourceNameSuffix is not a valid storage account name. Storage account name must be between 3 and 24 characters in length and use numbers and lower-case letters only.This error indicates that the storage account name isn't valid.
Fix the validation error
You found another problem in the Bicep file. Here, you fix the problem.
In Visual Studio Code, open the main.bicep file in the deploy folder.
Look at the definition of the
storageAccountNamevariable:var appServiceAppName = 'toy-website-${resourceNameSuffix}' var appServicePlanName = 'toy-website' var logAnalyticsWorkspaceName = 'workspace-${resourceNameSuffix}' var applicationInsightsName = 'toywebsite' var storageAccountName = 'mystorageresourceNameSuffix'There seems to be a typo, and the string interpolation isn't configured correctly.
Update the
storageAccountNamevariable to use string interpolation correctly:var storageAccountName = 'mystorage${resourceNameSuffix}'Save the file.
Commit and push your changes to your Git repository by running the following commands in the Visual Studio Code terminal:
git add .
git commit -m "Fix string interpolation"
git push
View the successful workflow run
In your browser, go to your workflow.
Select the most recent run.
Wait until the workflow run finishes. Although GitHub Actions automatically updates the page with the latest status, it's a good idea to refresh your page occasionally.
Notice that all three jobs in the workflow finished successfully:
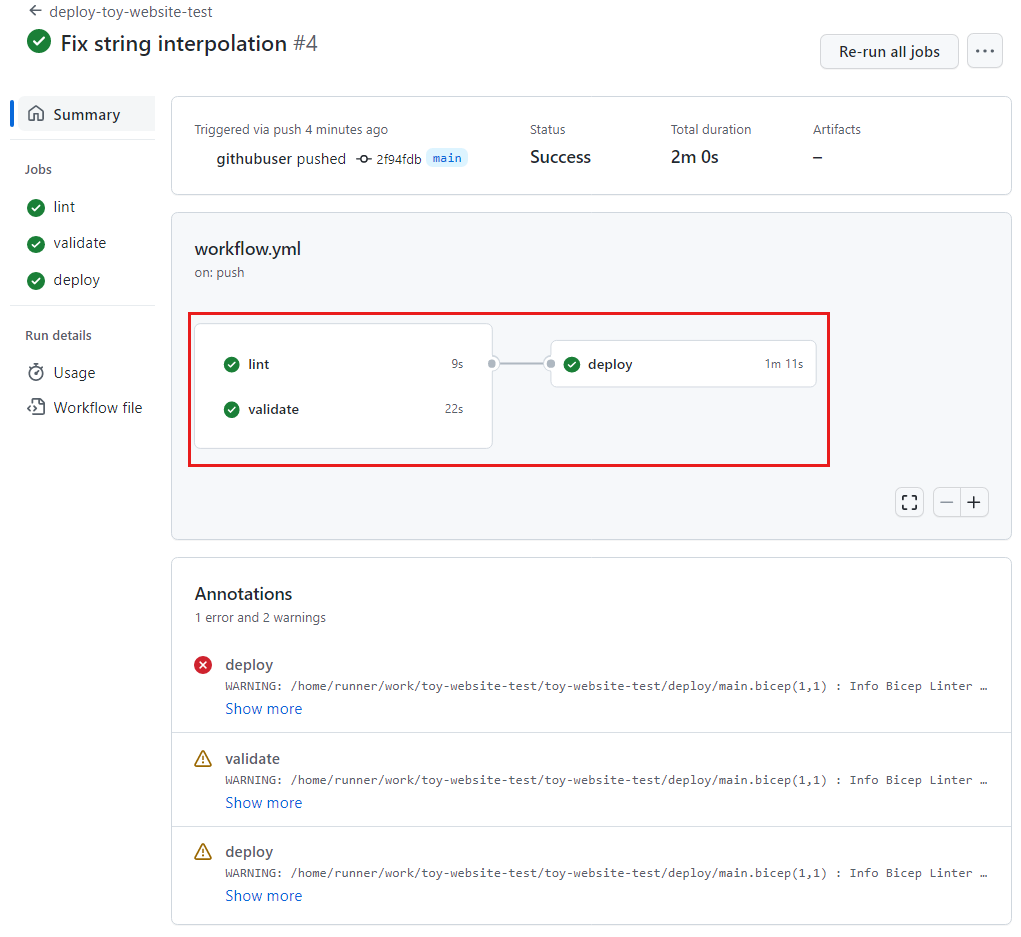
Some warnings are listed in the Annotations panel. These warnings appear because of the way Bicep writes informational messages to the workflow log. You can ignore these warnings.
You now have a workflow that successfully detects errors in your Bicep code early in your deployment process, and then deploys to Azure if there are no errors.