Exercise - Add a preview job to your workflow
You want to add an extra job to your workflow so you can check what changes will be made to your Azure environment.
During the process, you'll do the following tasks:
- Update the workflow definition YAML file to add a new preview job.
- Add an environment to your GitHub repository.
- Configure the environment to require a review.
- Update the workflow YAML file to use the environment for the deployment job.
- View the what-if results and approve a workflow run.
Update the workflow definition to add a preview job
Here, you add a new job to your workflow that runs the what-if operation.
In Visual Studio Code, open the workflow.yml file in the .github/workflows folder.
Between the validate and deploy jobs, add the following definition for the preview job:
preview:
  runs-on: ubuntu-latest
  needs: [lint, validate]
  steps:
  - uses: actions/checkout@v3
  - uses: azure/login@v1
    name: Sign in to Azure
    with:
      client-id: ${{ secrets.AZURE_CLIENT_ID }}
      tenant-id: ${{ secrets.AZURE_TENANT_ID }}
      subscription-id: ${{ secrets.AZURE_SUBSCRIPTION_ID }}
  - uses: azure/arm-deploy@v1
    name: Run what-if
    with:
      failOnStdErr: false
      resourceGroupName: ${{ env.AZURE_RESOURCEGROUP_NAME }}
      template: deploy/main.bicep
      parameters: >
        environmentType=${{ env.ENVIRONMENT_TYPE }}
      additionalArguments: --what-if
Notice that the preview job depends on the successful completion of the lint and validate jobs.
Update the deploy job to make it depend on the preview job:
deploy:
  runs-on: ubuntu-latest
  needs: preview
  steps:
  - uses: actions/checkout@v3
  - uses: azure/login@v1
    name: Sign in to Azure
    with:
      client-id: ${{ secrets.AZURE_CLIENT_ID }}
      tenant-id: ${{ secrets.AZURE_TENANT_ID }}
      subscription-id: ${{ secrets.AZURE_SUBSCRIPTION_ID }}
  - uses: azure/arm-deploy@v1
    name: Deploy website
    with:
      failOnStdErr: false
      deploymentName: ${{ github.run_number }}
      resourceGroupName: ${{ env.AZURE_RESOURCEGROUP_NAME }}
      template: ./deploy/main.bicep
      parameters: environmentType=${{ env.ENVIRONMENT_TYPE }}
Save your changes to the file.
Add an environment
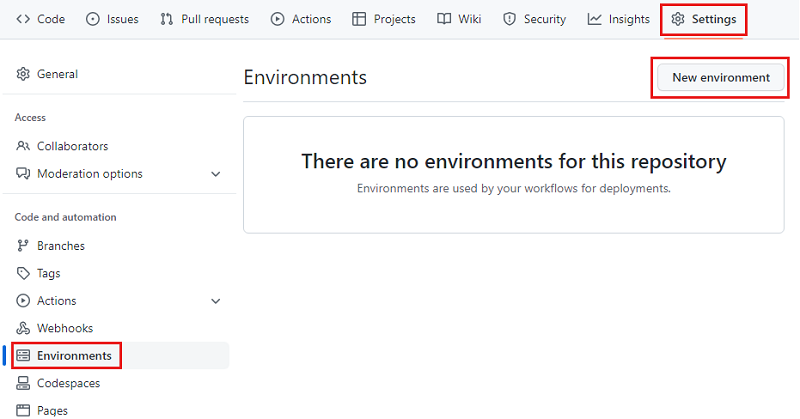
In your browser, go to Settings > Environments.
Select New environment.
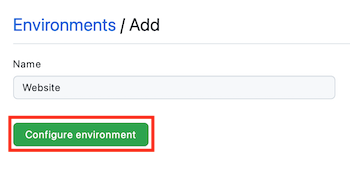
Enter Website as the environment name.
Select Configure environment.
In the setup steps for this module, you already created a federated credential for your workflow to use when it deploys to the environment.
Add required reviewer protection rule to the environment
Select the Required reviewers box.
Add your own GitHub username to the reviewer list.
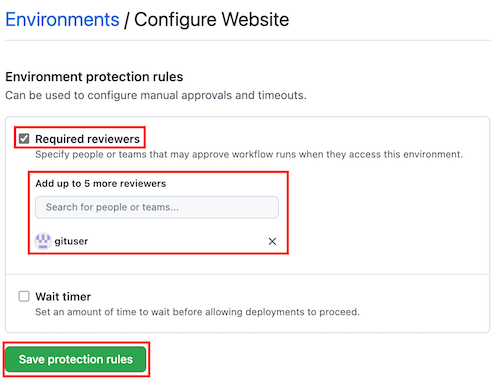
Select Save protection rules.
Select Environments to exit the configuration.
Update the workflow definition to require an environment and reviewer
Here, you configure the deploy job to run against the Website environment that you created previously.
Open the workflow.yml file in Visual Studio Code.
Add the
environmentparameter to the deploy job. Set the value toWebsite, to match the name of the environment you created:deploy: runs-on: ubuntu-latest environment: Website needs: preview steps: - uses: actions/checkout@v3 - uses: azure/login@v1 name: Sign in to Azure with: client-id: ${{ secrets.AZURE_CLIENT_ID }} tenant-id: ${{ secrets.AZURE_TENANT_ID }} subscription-id: ${{ secrets.AZURE_SUBSCRIPTION_ID }} - uses: azure/arm-deploy@v1 name: Deploy website with: failOnStdErr: false deploymentName: ${{ github.run_number }} resourceGroupName: ${{ env.AZURE_RESOURCEGROUP_NAME }} template: ./deploy/main.bicep parameters: environmentType=${{ env.ENVIRONMENT_TYPE }}Save the file.
Verify and commit your workflow definition
Verify that your workflow.yml file looks like the following code:
name: deploy-toy-website-test
concurrency: toy-company

on:
  push:
    branches:
      - main

permissions:
  id-token: write
  contents: read

env:
  AZURE_RESOURCEGROUP_NAME: ToyWebsiteTest
  ENVIRONMENT_TYPE: Test

jobs:
  lint:
    runs-on: ubuntu-latest
    steps:
    - uses: actions/checkout@v3
    - name: Run Bicep linter
      run: az bicep build --file deploy/main.bicep

  validate:
    runs-on: ubuntu-latest
    steps:
    - uses: actions/checkout@v3
    - uses: azure/login@v1
      name: Sign in to Azure
      with:
        client-id: ${{ secrets.AZURE_CLIENT_ID }}
        tenant-id: ${{ secrets.AZURE_TENANT_ID }}
        subscription-id: ${{ secrets.AZURE_SUBSCRIPTION_ID }}
    - uses: azure/arm-deploy@v1
      name: Run preflight validation
      with:
        deploymentName: ${{ github.run_number }}
        resourceGroupName: ${{ env.AZURE_RESOURCEGROUP_NAME }}
        template: ./deploy/main.bicep
        parameters: environmentType=${{ env.ENVIRONMENT_TYPE }}
        deploymentMode: Validate

  preview:
    runs-on: ubuntu-latest
    needs: [lint, validate]
    steps:
    - uses: actions/checkout@v3
    - uses: azure/login@v1
      name: Sign in to Azure
      with:
        client-id: ${{ secrets.AZURE_CLIENT_ID }}
        tenant-id: ${{ secrets.AZURE_TENANT_ID }}
        subscription-id: ${{ secrets.AZURE_SUBSCRIPTION_ID }}
    - uses: azure/arm-deploy@v1
      name: Run what-if
      with:
        failOnStdErr: false
        resourceGroupName: ${{ env.AZURE_RESOURCEGROUP_NAME }}
        template: deploy/main.bicep
        parameters: >
          environmentType=${{ env.ENVIRONMENT_TYPE }}
        additionalArguments: --what-if

  deploy:
    runs-on: ubuntu-latest
    environment: Website
    needs: preview
    steps:
    - uses: actions/checkout@v3
    - uses: azure/login@v1
      name: Sign in to Azure
      with:
        client-id: ${{ secrets.AZURE_CLIENT_ID }}
        tenant-id: ${{ secrets.AZURE_TENANT_ID }}
        subscription-id: ${{ secrets.AZURE_SUBSCRIPTION_ID }}
    - uses: azure/arm-deploy@v1
      name: Deploy website
      with:
        failOnStdErr: false
        deploymentName: ${{ github.run_number }}
        resourceGroupName: ${{ env.AZURE_RESOURCEGROUP_NAME }}
        template: ./deploy/main.bicep
        parameters: environmentType=${{ env.ENVIRONMENT_TYPE }}
If your file looks different, update it to match this example, and then save it.
Commit and push your changes to your Git repository by running the following commands in the Visual Studio Code terminal:
git add .
git commit -m "Add preview job"
git push
Run the workflow and review the what-if outputs
In your browser, go to your workflow runs.
Select the most recent run of your workflow.
Wait until the workflow completes the lint, validate, and preview jobs. Although GitHub automatically updates the page with the latest status, it's a good idea to refresh your page occasionally.
Notice that the workflow prompts you for a review. Depending on how you set up your GitHub account, you'll receive an email or web notification with a request to review the workflow.
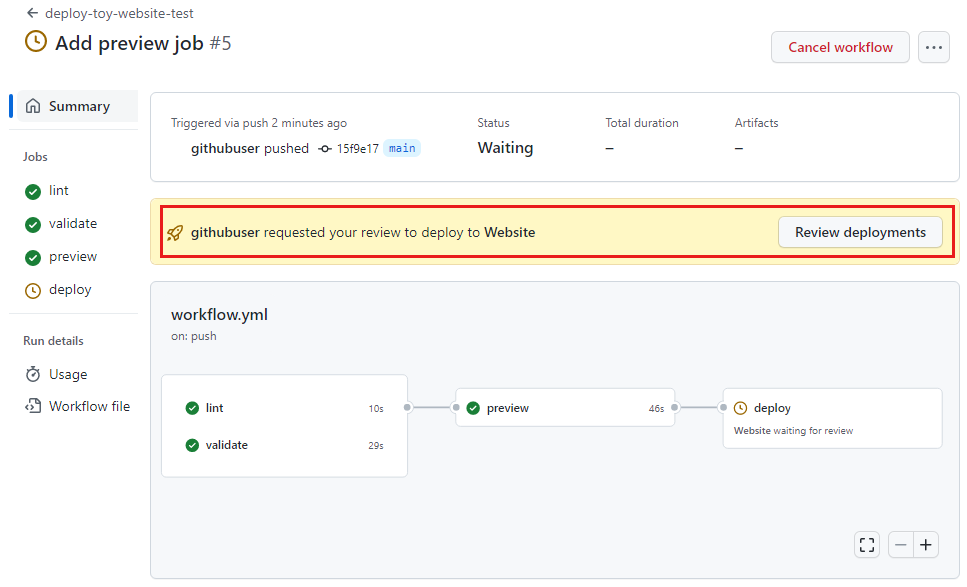
Before you approve the continuation of the workflow, you'll review the what-if results to ensure that they match your expectations.
Select the preview job.
Select the Run what-if step to inspect the changes that the what-if command reports on.
Notice that the workflow log provides what-if results similar to the following code:
Resource and property changes are indicated with these symbols:
  - Delete
  + Create
  ~ Modify
  = Nochange
  * Ignore

The deployment will update the following scope:

Scope: /subscriptions/***/resourceGroups/ToyWebsiteTest

  ~ Microsoft.OperationalInsights/workspaces/workspace-abcdefghijklm [2022-10-01]
    - properties.retentionInDays: 30
    - properties.sku:

        name: "pergb2018"

    - properties.workspaceCapping:

        dailyQuotaGb: -1.0

  ~ Microsoft.Web/sites/toy-website-abcdefghijklm [2022-03-01]
    + properties.siteConfig.localMySqlEnabled:   false
    + properties.siteConfig.netFrameworkVersion: "v4.6"

  = Microsoft.Insights/components/toywebsite [2020-02-02]
  = Microsoft.Storage/storageAccounts/mystorageabcdefghijklm [2022-09-01]
  = Microsoft.Web/serverfarms/toy-website [2022-03-01]
  * microsoft.alertsmanagement/smartDetectorAlertRules/Failure Anomalies - toywebsite

Resource changes: 2 to modify, 3 no change, 1 to ignore.
The what-if operation detected a change to the log analytics workspace and website resources. However, the changes that it detected are noise. They don't represent real changes to your resource. Over time, the Azure team works to reduce noise. In the meantime, you can ignore the detected changes.
You might also see an item in the what-if output for the resource type
microsoft.alertsmanagement/smartDetectorAlertRules/Failure Anomalies - toywebsite. This is a resource that Application Insights creates automatically. The what-if command detects that no change will be made to the resource.
Approve the workflow run
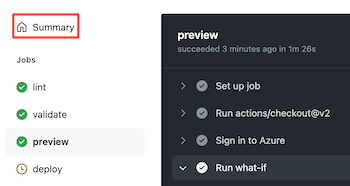
Select the Summary to return to the overview for the workflow run.
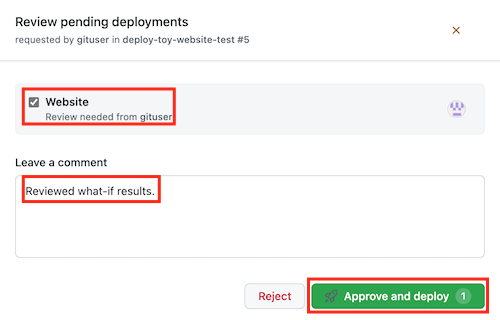
Select the Review deployments button on the review panel.
In the Review pending deployments pop-up, select the Website environment. In the Leave a comment box, enter Reviewed what-if results.
Select Approve and deploy.
Observe the successful deployment
After you approve the workflow run, notice that the deploy job starts running.
Wait for the job to finish.
Notice that the workflow run finishes successfully.