Load test cases and run automated tests
After completing the configuration of RSAT, test cases can be run. You can run only the test cases that automation files have been generated for. After the test suite has been created, it can be loaded into the RSAT tool, which is typically installed on an Azure server or a laptop.
In RSAT, select Load to download test cases and test case automation files from Azure DevOps. All test cases that belong to the test plan that is specified in the Settings dialog box are downloaded.

Test cases are organized by test suite under a common test plan. The test suites are the ones that you created in your Azure DevOps project. By using RSAT, you can work with one test suite at a time. If RSAT can't load a test case, verify that your test plan was correctly created in Azure DevOps and that it contains the required test suites and test cases.
To see how to create a test plan in Azure DevOps that you can use with RSAT, watch the following video.
If you’re loading the test plan for the first time, the Parameters File column in the grid is blank, and you must generate test automation parameter files for your test cases.
To run the tests, generate the following test automation files:
- Test parameter files (Excel files that contain test case parameters)
- XML files that are required to run the tests
When you select New, test automation files are generated in your working directory. The Excel test parameter files appear in the Parameters File column in the grid.

For the test recording files, the Generate Test Execution files only option is unavailable. Because Store Commerce for web uses the Selenium web directly to do the playback, no additional script file must be generated.
Modify test parameters
This section explains how to modify Excel files by specifying input and validation parameters for your test run.
In RSAT, select one or more test cases to modify, and then select Edit. An Excel window is opened for each test case that you have selected. Alternatively, you can open the Excel files directly from the working directory.
In addition to a Summary tab, the Excel file includes a Variables tab that has the details of all the variables that were generated. Store Commerce automatically generates variables for all the input values that are entered during a recording session. You don't have to generate the variables separately. Each variable has a unique variable ID that you can pass to different test cases in a single instance of a test run. All variables on the Variables tab appear in the order that they were entered in during the recording session.
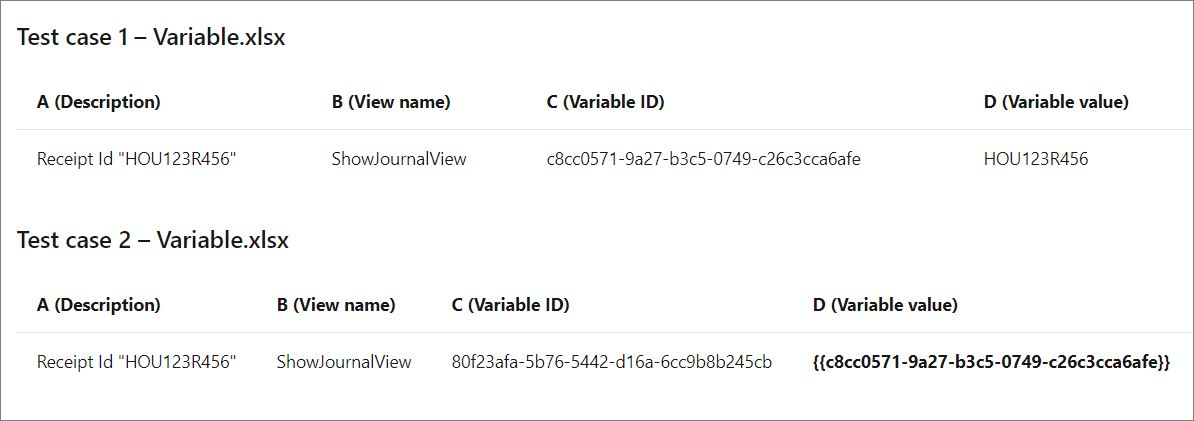
To pass variables or values between Store Commerce test cases, select the test cases in the RSAT tool and open the Variables.xlsx file by selecting the Excel icon in the tool. Copy the Variable ID (Column C) value and paste it in the Variable value field (Column D).
For example, to pass the Receipt ID from Test case 1 - variable.xlsx to Test case 2 - variable.xlsx, copy the variable ID value from column C: c8cc0571-9a27-b3c5-0749-c26c3cca6afe. Paste the value in the Variable value column D in to the test case 2 - variable.xlsx file, in braces: {{ c8cc0571-9a27-b3c5-0749-c26c3cca6afe}}
The following image shows an example for creating test cases.
Run the tests by using RSAT
In RSAT, select Run to run the selected test cases. You can run only test cases that automation files have been generated for. RSAT opens Store Commerce and runs the tests by using the data that is entered in Excel.
After the tests run, the results are updated in the Result column in RSAT and in Azure DevOps.
To change the sequence that test cases are run in, use the up arrow and down arrow buttons.
