Add props to a component
Let's continue building our application by creating a component to display the current list of bookings. You'll add in a form that the user can use to add bookings, so create a static array for now.
Create the component
Start by creating the component.
In Visual Studio Code, create a file named BookingList.vue in src/components.
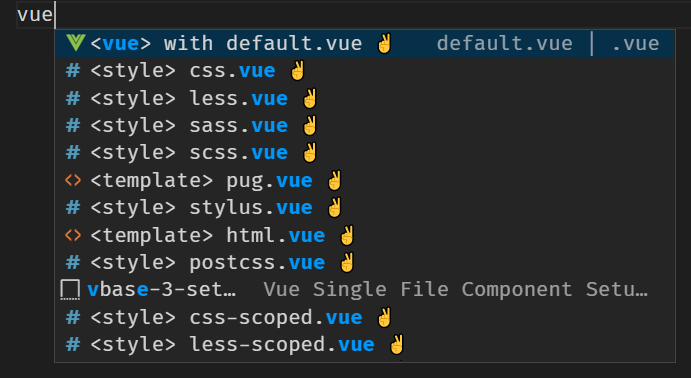
In BookingList.vue, type vue, and then select <vue> with default.vue from the snippets menu.

The snippet will create the default structure.
Register the props and computed value
We're expecting an array of information about bookings, so we'll declare our prop as type Array. Because you're creating a component, you can also take advantage of computed properties to automatically calculate values for you. You'll add a computed property to add the total price and return a display value that you can use.
Open src/components/BookingList.vue if it's not already open.
Inside the curly braces (
{ }) forexport default, add the following code to create a prop namedbookingsand thecomputedproperty:props: { bookings: Array }, computed: { totalDisplay() { let totalCost = 0; if (this.bookings && this.bookings.length > 0) { totalCost = this.bookings.map(b => b.price) .reduce((a, b) => a + b); } return '$ ' + totalCost.toLocaleString('en-US'); } }Notice how
totalDisplaycan access thebookingsprop by usingthis, which is how we would be able to access data or other properties declared as part of our component. We create the code to calculate the total of all prices listed inbookings, and to create a string display.
Add the template for display
Let's add the template to display the information for our bookings. You'll use v-for to loop through all bookings and the totalDisplay computed property that we created earlier.
Open src/components/BookingList.vue if it's not already open.
Inside the
<template>element, add the following HTML:<section> <h2> Here's your current bookings: </h2> <div class="row" v-for="(booking, index) in bookings" :key="index"> <div>{{ booking.name }} </div> </div> <h3 class="row"> Total: {{ totalDisplay }} </h3> </section>Our code iterates through all bookings with
v-forand displayscabin. We then calltotalDisplayto display the total cost of all bookings.
Add the component to the main page
Let's use the component that we created and pass in a list of bookings.
Open src/components/Host.vue.
Add a new line below the opening
<script>tag and beforeexport default.Add the following code (including the comment) to import the
BookingListcomponent:import BookingList from './BookingList.vue'; // TODO: Register next componentRegister the component by adding the following code (including the comment) below the
TODO: Add componentscomment:components: { BookingList, // TODO: Add next component },Important
The two commas are required because we'll add more values in the future.
Use the component
With the component registered, let's call it in our page. We'll use the bookings array that we created earlier to seed the list of bookings on the page.
Open src/components/Host.vue if it's not already open.
Below the
TODO: Add booking-listcomment, add the following code to use thebooking-listcomponent:<booking-list :bookings="bookings"></booking-list>
Test the page
With the component registered and configured, let's test the page!
Save all files by selecting File > Save all.
Return to your browser window with
http://localhost:8080and refresh the page.The page now displays the sample booking.

Congratulations! You've created a component with props.